Wake On Lan after a power failure (or from G3 state)
Wake-on-LAN (WOL; translated from English - “waking up [a signal from] a local network”) is a technology that allows you to remotely turn on a computer by sending a special sequence of bytes through a local area network. wiki
And everything would be fine if it weren’t for one thing. After a power failure, your computer will not turn on.
Agree, this will be a "pleasant" surprise, especially if you are a couple of thousand kilometers from it.
One of the solutions is written here , but it is hardware and software, and you can do without additional hardware.
About WOL on Habré you can already find two pages . Therefore, the inclusion of wol on the card will not be considered in this article.
Introduction
First, let's see why the computer does not turn on. To understand this, you should turn to ACPI.
ACPI - English Advanced Configuration and Power Interface). ACPI describes the state - both global and specific devices in particular. ( wiki )

We are interested in two global states:
- G2 (S5) (soft-off) - soft (software) shutdown; the system is completely stopped, but energized, ready to turn on at any time. The system context is lost.
- G3 (mechanical off) - mechanical shutdown of the system; ATX power supply is disabled.
Unfortunately, when the power is connected, the system itself does not go from G3 to G2.
Therefore, to ensure the ability to boot after a power failure, you need to learn how to transfer a computer from G3 to G2.
Most [new] bios have the option “After Power Failure”. It can take one of three values:
- “Stay Off” - in case of loss of power in the network and its restoration, the power button must be pressed to turn on the PC.
- “Turn On” - power recovery causes the system to turn on automatically.
- "Last State" - Restoring the system to the state in which it was at the time of power failure. If it was turned off, it remains off, otherwise it turns on.
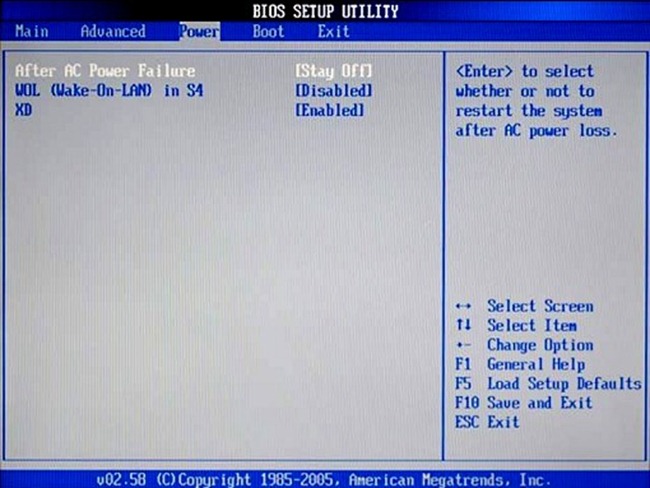
Choosing “Turn On”, the only question that remains is how to turn off the computer when it turned on after a power failure, and not from a network request or regular start by a button on the case. We will do these checks in initrd.
Initrd (short for English. Initial RAM Disk, a disk in random access memory for initial initialization) is a temporary file system used by the Linux kernel at boot. ( wiki_en ) ( wiki_en )
The location of the files for initrd in Ubuntu / Debian can be found in man on initramfs-tools ( online from the Ubuntu website ).
For Centos, everything is a little different - there is a dracut.
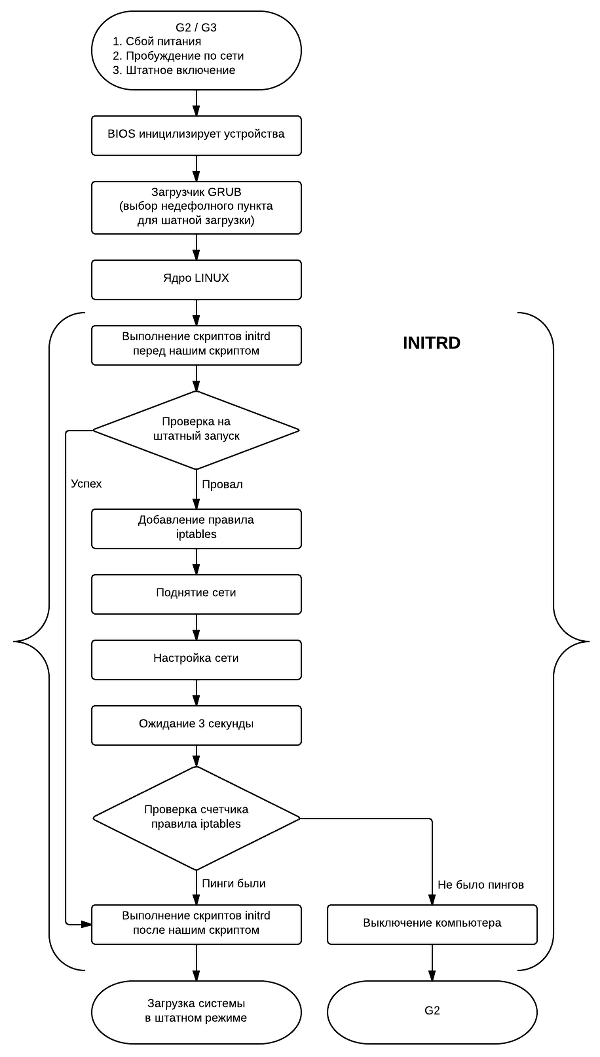
To ensure that the computer was turned on, after sending the wol packet, we will ping it. But since the WOL package is “magic”, let the pings be “magic” too. Let our pings be 48 bytes in size, and not 84. In
total, the whole idea is in the form of a block diagram:
Implementation
Modules
In / etc / initramfs-tools / modules add the necessary modules for iptables and the network.
Module for your network card
r8169 (у вас может быть другая)
Iptables modules
xt_length
iptable_filter
ip_tables
x_tables
Script
In / etc / initramfs-tools / scripts / local-top / add a checkboot file with the contents:
#!/bin/sh
PREREQ=""
prereqs()
{
echo "$PREREQ"
}
case $1 in
prereqs)
prereqs
exit 0
;;
esac
[ `cat /proc/cmdline | grep nocheckboot | wc -l` -eq 1 ] && exit 0
iptables -A INPUT -p icmp --icmp-type echo-request -m length --length 48 -j ACCEPT
modprobe r8169
ifconfig eth0 192.168.0.2 up
sleep 3
C=`iptables -L INPUT -v | grep 'icmp echo-request length 48' | cut -f5 -d' '`
[ $C -gt 0 ] && exit 0
poweroff -f
exit 0
And make it executable:
chmod +x /etc/initramfs-tools/scripts/local-top/checkboot
The script implements the flowchart above.
Hook
In / etc / initramfs-tools / hooks / add a checkboot file with the contents:
#!/bin/sh
PREREQ=""
prereqs()
{
echo "$PREREQ"
}
case $1 in
prereqs)
prereqs
exit 0
;;
esac
cp /sbin/ifconfig "${DESTDIR}/sbin"
cp /sbin/iptables "${DESTDIR}/sbin"
cp /lib/libip4tc.so.0 "${DESTDIR}/lib"
cp /lib/libip6tc.so.0 "${DESTDIR}/lib"
cp /lib/libxtables.so.7 "${DESTDIR}/lib"
cp /lib/i386-linux-gnu/i686/cmov/libm.so.6 "${DESTDIR}/lib"
mkdir "${DESTDIR}/lib/xtables"
cp "/lib/xtables/libipt_icmp.so" "${DESTDIR}/lib/xtables"
cp "/lib/xtables/libxt_length.so" "${DESTDIR}/lib/xtables"
cp "/lib/xtables/libxt_standard.so" "${DESTDIR}/lib/xtables"
exit 0
And make it executable:
chmod +x /etc/initramfs-tools/hooks/checkboot
This file indicates what needs to be added to initrd for our script to work correctly.
In it, after copying the iptables and ifconfig utilities, you must also copy the libraries for iptables.
Link libraries can be obtained by running ldd / sbin / iptables .
But in the process, dynamically loaded modules will also be used. You can see their list by running the command:
# strace iptables -A INPUT -p icmp --icmp-type echo-request -m length --length 48 -j ACCEPT 2>&1 | grep ^open | grep '.so' | grep -v ENOENT | grep -o '"[^"]*"'
What will allow to receive other loaded libraries:
"/lib/xtables/libipt_icmp.so"
"/lib/xtables/libxt_length.so"
"/lib/xtables/libxt_standard.so"
Update initrd
Before upgrading initrd, it is a good idea to copy the stable version to / boot with a different name, so that in case of any errors in the script / hook, loading the system is not difficult.
We update initrd with the command:
# update-initramfs -u
Grub
Add new lines to grub with nocheckboot.
We do this either by directly editing /boot/grub/grub.cfg with the creation of a new item with the addition of nocheckboot in the parameters line to the kernel, or by changing /etc/grub.d/10_linux, which is better, since after update-grub2 our changes will not disappear as will happen if we edit grub.cfg.
To do this, add /etc/grub.d/10_linux:
    linux_entry "${OS} nockeckboot" "${version}" simple \
    "${GRUB_CMDLINE_LINUX} ${GRUB_CMDLINE_EXTRA} ${GRUB_CMDLINE_LINUX_DEFAULT} nocheckboot"
After:
    linux_entry "${OS}" "${version}" simple \
    "${GRUB_CMDLINE_LINUX} ${GRUB_CMDLINE_EXTRA} ${GRUB_CMDLINE_LINUX_DEFAULT}"
And then we do:
# update-grub2
Launch
It remains only to write a startup script.
And here he is:
!#/bin/sh
wol -i 192.168.0.255 {MAC}
ping -s 20 -c 50 -W 1 192.168.0.2
Here "-c 50" is 50 packets, 1 packet per second, which means 50 seconds is the time for all the steps to go to "Checking the iptables rule counter". And "-s 20" makes the packet size equal to 48 bytes. 48 - 20 = 28 bytes - IP and ETHERNET headers.
Instead of a conclusion
That's all, now you will not lose access to cars due to a power failure.
Of course, here you can still talk about UPS, but the task was to find a solution without using UPS.
Such a scheme is useful if you need access to your computers (access to data, performing calculations), which most of the time arrive in the off state and wait for you.