Creating an Android application for the detection of persons in real time using the Firebase ML Kit
- Transfer
- Tutorial

Earlier this year, Google introduced a new product: Firebase Machine Learning Kit . ML Kit allows you to effectively use machine learning in Android and iOS applications. In this post I will talk about how to use it to create Android application for the detection of persons in real time.
Face detection is only one of the computer vision features offered by the Firebase ML Kit (or rather, facilitates its use). This is a function that can be useful in many applications: signing people in photos, working with selfies, adding emoji and other effects while shooting, taking photos only when everyone is smiling with open eyes, etc. The possibilities are endless.
We have already published articles about other features of the Firebase ML Kit:
However, implementing a face detector in a proprietary application is still not easy. You need to understand how the API works, what information it provides, how to process and use it, taking into account the orientation of the device, the source of the camera and the selected camera (front or rear).
Ideally, we should get a code like this:
camera.addFrameProcessor { frame ->
    faceDetector.detectFaces(frame)
}
The main components here are camera , frame , faceDetector . Before dealing with each of them, suppose that our layout contains the camera component itself and a certain overlay on which we will draw squares around the detected faces.
<FrameLayout...>
    // Any other views
    <CameraView... /><husaynhakeem.io.facedetector.FaceBoundsOverlay... />
    // Any other views
</FrameLayout>
Camera
Regardless of which API of the camera we use, the most important thing is that it provides a way to handle individual frames. Thus, we will be able to process each incoming frame, identify faces in it and display it to the user.
Frame
A frame is information provided by the camera for detecting faces. It must contain all that is required by the face detector for their detection. This required information is defined below:
dataclassFrame(
    valdata: ByteArray?,
    val rotation: Int,
    val size: Size,
    val format: Int,
    val isCameraFacingBack: Boolean)
dataclassSize(val width: Int, val height: Int)- data - an array of bytes containing information about what the camera displays;
- rotation - device orientation;
- size - the width and height of the camera preview;
- format - frame coding format;
- isCameraFacingBack - indicates whether the front camera or the rear camera is being used.
Face Detector
A face detector is the most important component — it takes a frame, processes it, and then displays the results to the user. Thus, the face detector uses an instance FirebaseVisionFaceDetectorto process incoming frames from the camera. He should also know the orientation of the camera and its direction (front or rear). Finally, he needs to know on which overlay the results will be displayed. The skeleton class FaceDetectorlooks like this:
classFaceDetector(privateval faceBoundsOverlay: FaceBoundsOverlay) {
    privateval faceBoundsOverlayHandler = FaceBoundsOverlayHandler()
    privateval firebaseFaceDetectorWrapper = FirebaseFaceDetectorWrapper()
    funprocess(frame: Frame) {
        updateOverlayAttributes(frame)
        detectFacesIn(frame)
    }
    privatefunupdateOverlayAttributes(frame: Frame) {
        faceBoundsOverlayHandler.updateOverlayAttributes(...)
    }
    privatefundetectFacesIn(frame: Frame) {
        firebaseFaceDetectorWrapper.process(
                image = convertFrameToImage(frame),
                onSuccess = {
                    faceBoundsOverlay.updateFaces( /* Faces */)
                },
                onError = { /* Display error message */ })
    }
}
Overlay
An overlay is a view component that sits on top of a camera. It displays frames (or borders) around detected faces. He must know the orientation of the device, the direction of the camera (front or rear) and the dimensions of the camera (width and height). This information helps determine how to draw borders around a detected face, how to scale the borders, and whether they should be reflected .
classFaceBoundsOverlay@JvmOverloadsconstructor(
        ctx: Context,
        attrs: AttributeSet? = null,
        defStyleAttr: Int = 0) : View(ctx, attrs, defStyleAttr) {
    privateval facesBounds: MutableList<FaceBounds> = mutableListOf()
    funupdateFaces(bounds: List<FaceBounds>) {
        facesBounds.clear()
        facesBounds.addAll(bounds)
        invalidate()
    }
    overridefunonDraw(canvas: Canvas) {
        super.onDraw(canvas)
        facesBounds.forEach {
            val centerX = /* Compute the center's x coordinate */val centerY = /* Compute the center's ycoordinate */
            drawBounds(it.box, canvas, centerX, centerY)
        }
    }
    privatefundrawBounds(box: Rect, canvas: Canvas, centerX: Float, centerY: Float) {
        /* Compute the positions left, right, top and bottom */
        canvas.drawRect(
                left,
                top,
                right,
                bottom,
                boundsPaint)
    }
}
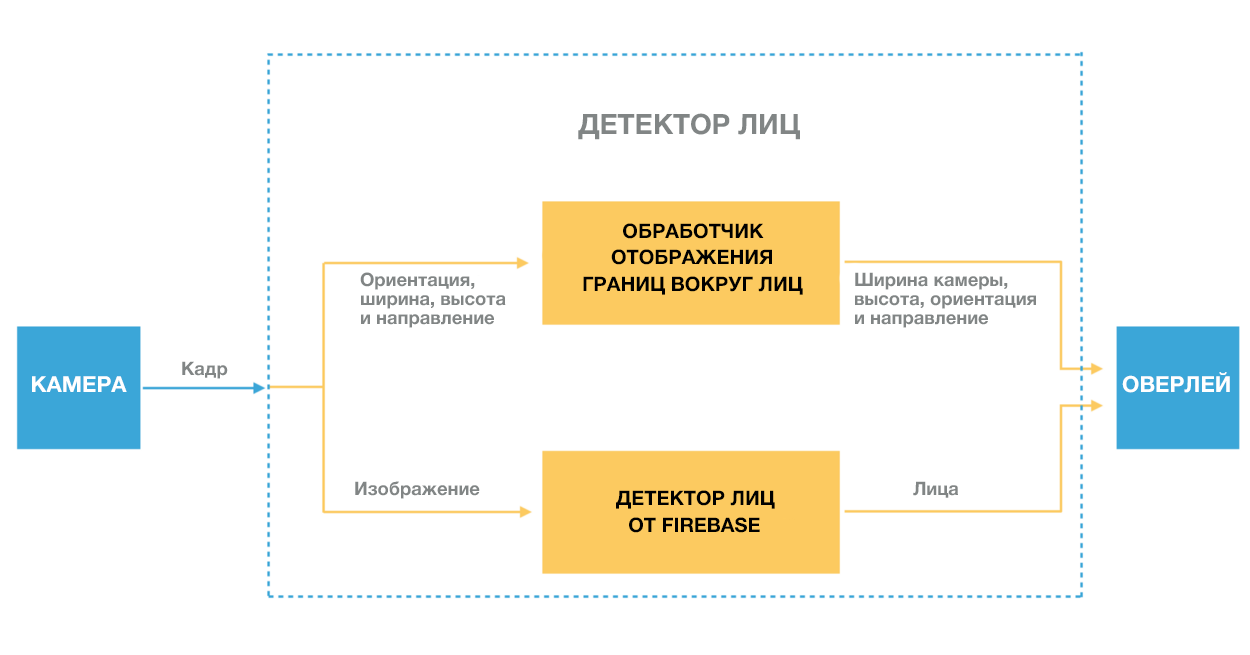
The diagram below shows the components described above and how they interact with each other from the moment when the camera feeds a frame to the moment when the results are displayed to the user.

Creating a real-time face detection application in 3 steps
Using the face detection library (which contains the code described above), creating an application becomes quite simple.
In this example, I selected the following camera library .
Step 1. Add FaceBoundsOverlayon top of the camera.
<FrameLayout...>
    // Any other views
    <CameraView... /><husaynhakeem.io.facedetector.FaceBoundsOverlay... />
    // Any other views
</FrameLayout>
Step 2. Identify the instance FaceDetectionand connect it to the camera.
private val faceDetector: FaceDetector by lazy {
    FaceDetector(facesBoundsOverlay)
}
cameraView.addFrameProcessor {
    faceDetector.process(Frame(
            data = it.data,
            rotation = it.rotation,
            size = Size(it.size.width, it.size.height),
            format = it.format))
}
Step 3. Configure Firebase in the project.
Conclusion
Face detection is powerful functionality, and the ML Kit makes it available and allows developers to perform more complex functions with it, such as face recognition, which goes beyond simple detection: it is important not only to detect the face, but also to determine whose it is.
Soon in the Ml Kit they plan to add a new feature - face recognition. With its help, it will be possible to detect more than 100 points around the face and quickly process them. This can potentially be useful in applications using augmented reality objects or virtual stickers (such as Snapchat). Together with the face detection functionality, you can create many interesting applications.
