Cobbler + puppet or network installation of Ubuntu 12.04
Introduction
Sooner or later, every serious company has to think about the legalization of its IT infrastructure. Take the medium-sized company N. Central office, 30 small branches. Everywhere there are workstations under Windows, mainly XP. On more recent machines, laptops, there are windows 7 and 8, on 2k3, 2k8, ubuntu-server servers.
The company is expanding at a slow pace, and the small IT department manages to roll new machines from pre-created Acronis images. But in order to reduce costs / legalize infrastructure / clean up conscience, a decision is made to switch to opensource. There is already another scale of the tragedy, reinstalling many workstations with your hands is a long and ungrateful process. Under the cut - one of the solutions to this problem.
1. Tools and installation of required packages.
It was decided to install Ubuntu 12.04.3 LTS using PXE. As implementation tools, cobbler and puppet were chosen.
Cobbler is a network installation server for Linux, which provides quick construction of the necessary deployment environment and management of the OS installation process on new computers or virtual machines (Xen, qemu, KVM or VMware Server), and subsequent reinstallation of systems.
It is written by Cobbler in Python and is a bunch for some standard components for such cases PXE, TFTP, DHCP and others.
Install the packages we need:
sudo apt-get install cobbler cobbler-common cobbler-web dhcp3-server xinetd tftpd tftp debmirrorBy default, we get cobbler version 2.2.3, which is not entirely good. Why - find out further.
Then we’ll check to see if our cobbler is happy with everything:
sudo cobbler checkWhat they should see in response:
No configuration problems found. All systems go.We synchronize the configuration:
sudo cobbler syncCobbler is now ready for further customization.
2. Cobbler setup
Change the cobbler configuration by specifying the network settings of the server on which it is installed:
sudo dpkg-reconfigure cobblerSpecify the server address on the network, the password for the cobbler web interface.
Configure cobbler to use DHCP:
sudo nano /etc/cobbler/settingswill change
manage_dhcp: 0manage_dhcp: 1Reboot and sync the cobbler configuration:
sudo service cobbler restart
sudo cobbler sync
Change the DHCP pattern that cobbler will pass to isc-dhcp-server:
sudo nano /etc/cobbler/dhcp.templateWe bring to the form:
subnet 192.168.1.0 netmask 255.255.255.0 { #подсеть
 option routers 192.168.1.254; #адрес шлюза
 option domain-name-servers 192.168.1.254; #адрес DNS сервера
 option subnet-mask 255.255.255.0; #маска
 range dynamic-bootp 192.168.1.10 192.168.1.20; #диапазон раздаваемых IP
And reboot cobbler again:
sudo service cobbler restart
sudo cobbler sync
Now cobbler is ready to import your ISO file, but here, as promised, I will explain the situation with some nuances of cobbler 2.2.3.
Actually, the nuances.
The first rake my bike rode into was the fact that I could not import the image of the desktop version. After importing into cobbler, it was not visible in the list of distributions available for installation. After googling the forums of our overseas friends - it turned out that you need to use alternate, server, mini versions of Ubuntu distributors, the desktop cobbler simply does not see (although there are some workaround, it was easier for me to download alternate). Also, a feature of version 2.2.3 is that it does not create a local distribution from your image, only the kernel loads during installation, it downloads all other packages from repositories on the Internet. At least that was the case with the image lubuntu-12.04-alternate-i386. In version 2.4, a local distrib is created, and packages are delivered directly from your ISO image.
Continue
Mount our image and import it into the list of cobbler distributions:
sudo mount -o loop lubuntu1203.iso /mnt
sudo cobbler import --name=lubuntu-12-4 --path=/mnt --breed=ubuntu
We did not install the cobbler-web package for nothing. We can refer to its web-interface at the address: 192.168.1.2/cobbler_web.
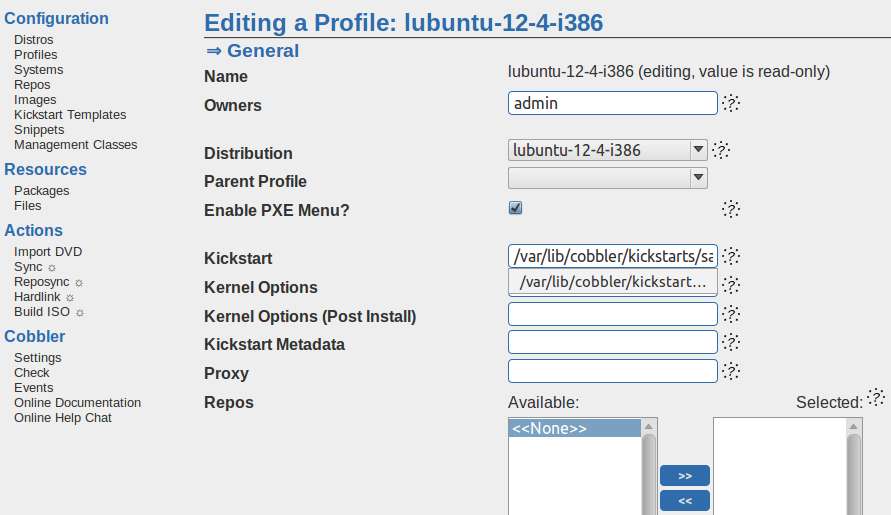
Here you can configure many useful things, add your distributions, packages, repositories, profiles, and more. Our task is to configure the profile we imported. Go to Profiles, where we see lubuntu-12-4, click Edit. Here our task is to add kickstart.
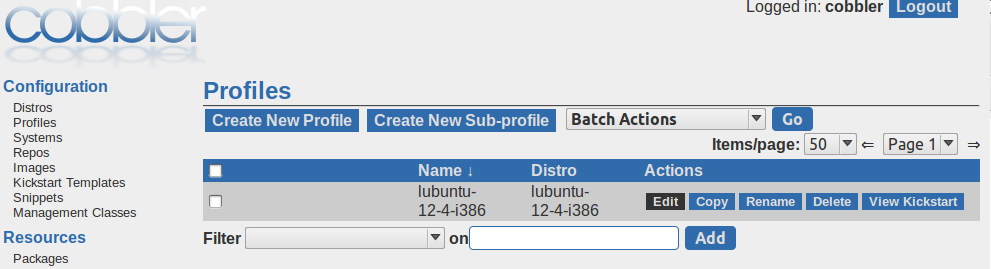
Already at the last stage, when installing Ubuntu on the client machine, I came across the error “Bad Archive Mirror An error has been detected while trying to use the specified archive mirror”.
Solved by copying and renaming kickstart file
/var/lib/cobbler/kickstarts/ubuntu-server.preseed/etc/cobbler/precise.ubuntu.alternate.lan.preseedIn our profile, we will write the path to kickstart in the appropriate place:
3. Puppet
Puppet was assigned the function of fine tuning the machines. In the example I examined, we will check for the presence of some packages on the client machine, and install them, if not.
Install puppet on the server:
sudo apt-get install puppetmasterAnd on the client:
sudo apt-get install puppetFor convenience, by the way, in / etc / cobbler / settings there is a puppet_auto_setup parameter that sets puppet automatically, but requires a local copy of EPEL on its server. Either I did not fully understand, or the idea is really stupid, but everything can be implemented through the post-install script in cobbler itself is much simpler.
It is understood that the machines get their names from DNS, otherwise, you will have to configure the hosts files on the client and puppet server, respectively.
192.168.0.1 puppetmaster.example.com puppetmaster puppet
192.168.0.10 puppetclient.example puppetclient
Let's create the manifest /etc/puppet/manifests/site.pp with the following contents (packages are selected as an example, for detailed configuration of puppet, refer to its documentation):
$base_packages = [
	“gnome”,
	“mc”,
	“openssh-server”,
	“vim”
]
package { $base_packages:
	ensure => installed
	}
The final step for this simple Puppet server is to restart the service:
sudo /etc/init.d/puppetmaster restartNow we can request a certificate from the client:
puppet agent --server puppetmaster --waitforcert 60 --test
info: Creating a new SSL certificate request for puppetclient
Let’s review the certificate signing request on the server:
puppet cert --listNow we should see a request from the client, we will sign:
puppet cert --sign puppetclientOn the first attempt to connect to the server, puppet returned an error that the server name in the certificate does not match the name to which the request was made, it is necessary to edit
/etc/puppet/puppet.conf[master]
certname=puppetmasterThat's all, the client machine will put the packages specified in the manifest.
Conclusion
This process may vary slightly between distributions. You may need to create the missing folder, which will be explicitly written in the console. Also, it was not possible to overcome the hang at the beginning of the installation, for about 15 minutes, it might seem that the machine just hung. As far as I have found out, deduplicate is running. Also a common bug described in bug trackers. Why, why - maybe someone will tell you here. Criticism, advice, corrections are welcome.