FB2D - 2D framework for Linux Frame Buffer (Rust)
So I decided to tell about the library that I wrote recently. Maybe someone will come in handy.
This is a Rust 2D framework for rendering directly to the Linux Frame Buffer / dev / fb0.
The task was to display simple 2D scenes on a Raspberry Pi. Raspberry Pi runs under the control of YoctoProject custom headless Linux. Window Managers are missing, just like OpenGL. Only the Frame Buffer remains.
In the case of Frame Buffer, each pixel has to be processed. Since I write mostly for GoLang for Raspberry Pi, I decided to write a library on Go. I quickly realized that Go is not suitable for me in performance. He could not perform massive memory operations in a reasonable time.
Then I noticed Rust, who performed similar tests much faster.
So, the library is developed on Rust. Since this is my first project on Rust, do not kick much, but comments are welcome.
As in any 2D library, there are three main entities: scenes, nodes and sprites.
A scene is a container for visual objects. A node is a virtual object endowed with certain properties, such as location, size, etc. Nodes can be nested.
Each node contains a visual object, the so-called sprite. Sprites come in several forms. Now supported sprites like RectSprite, TextureSprite, TextSprite.
RectSprite is a rectangle of a specific color. RectSprite without color is typically used to group other child nodes. RectSprite matches the XML < box > tag
TextureSprite - object to render the image. Currently only PNG (RGBA) is supported. TextureSprite corresponds to the XML tag < image >
TechSprite is an object for rendering a single line of text with a selected font and size. There is automatic support for RTL. TechSprite matches the XML tag < text >
In addition to the location and size attributes, each node has gravity and anchor attributes. This helps to precisely position the object inside another object. All attributes associated with the size and location are set as a percentage relative to the parent node. This approach allows to achieve the best scaling on screens of different sizes and proportions.
It is possible to create a scene, either programmatically, or to create an xml file describing the scene.
Programmatic way to create and run the scene.
letmut fb = fb2d::screen_writer_for_framebuffer("/dev/fb0")?; fb2d::set_graphics_mode(); letmut scene = fb2d::scene::Scene::new(); let background_sprite = RectSprite::new(); let background_node = Node::new_rect_node(FLOAT_RECT_FULL, background_sprite); let sprite1 = RectSprite::new(); letmut node1 = Node::new_rect_node( FloatRect { pos: FLOAT_POS_ZERO, size: FLOAT_SIZE_HALF, }, sprite1, ); node1.anchor_point = ANCHOR_POINT_TOP_LEFT; let sprite2 = TextureSprite::new_for_texture("image.png"); letmut node2 = Node::new_texture_node( FloatRect { pos: FLOAT_POS_ZERO, size: FloatSize { width: 0.7, height: 0.7, }, }, sprite2, ); node2.anchor_point = ANCHOR_POINT_CENTER; letmut sprite3 = TextSprite::new(); sprite3.text = String::from("Hello, World !!!"); sprite3.gravity = GRAVITY_CENTER; sprite3.height = 0.2; let node3 = Node::new_text_node( FloatRect { pos: FLOAT_POS_ZERO, size: FLOAT_SIZE_FULL, }, sprite3, ); scene.add_node(node2, node1.key); scene.add_node(node1, background_node.key); scene.add_node(node3, background_node.key); scene.set_root_node(background_node); scene.writer = Some(Box::new(fb)); scene.run();- Creating a scene using an XML file.
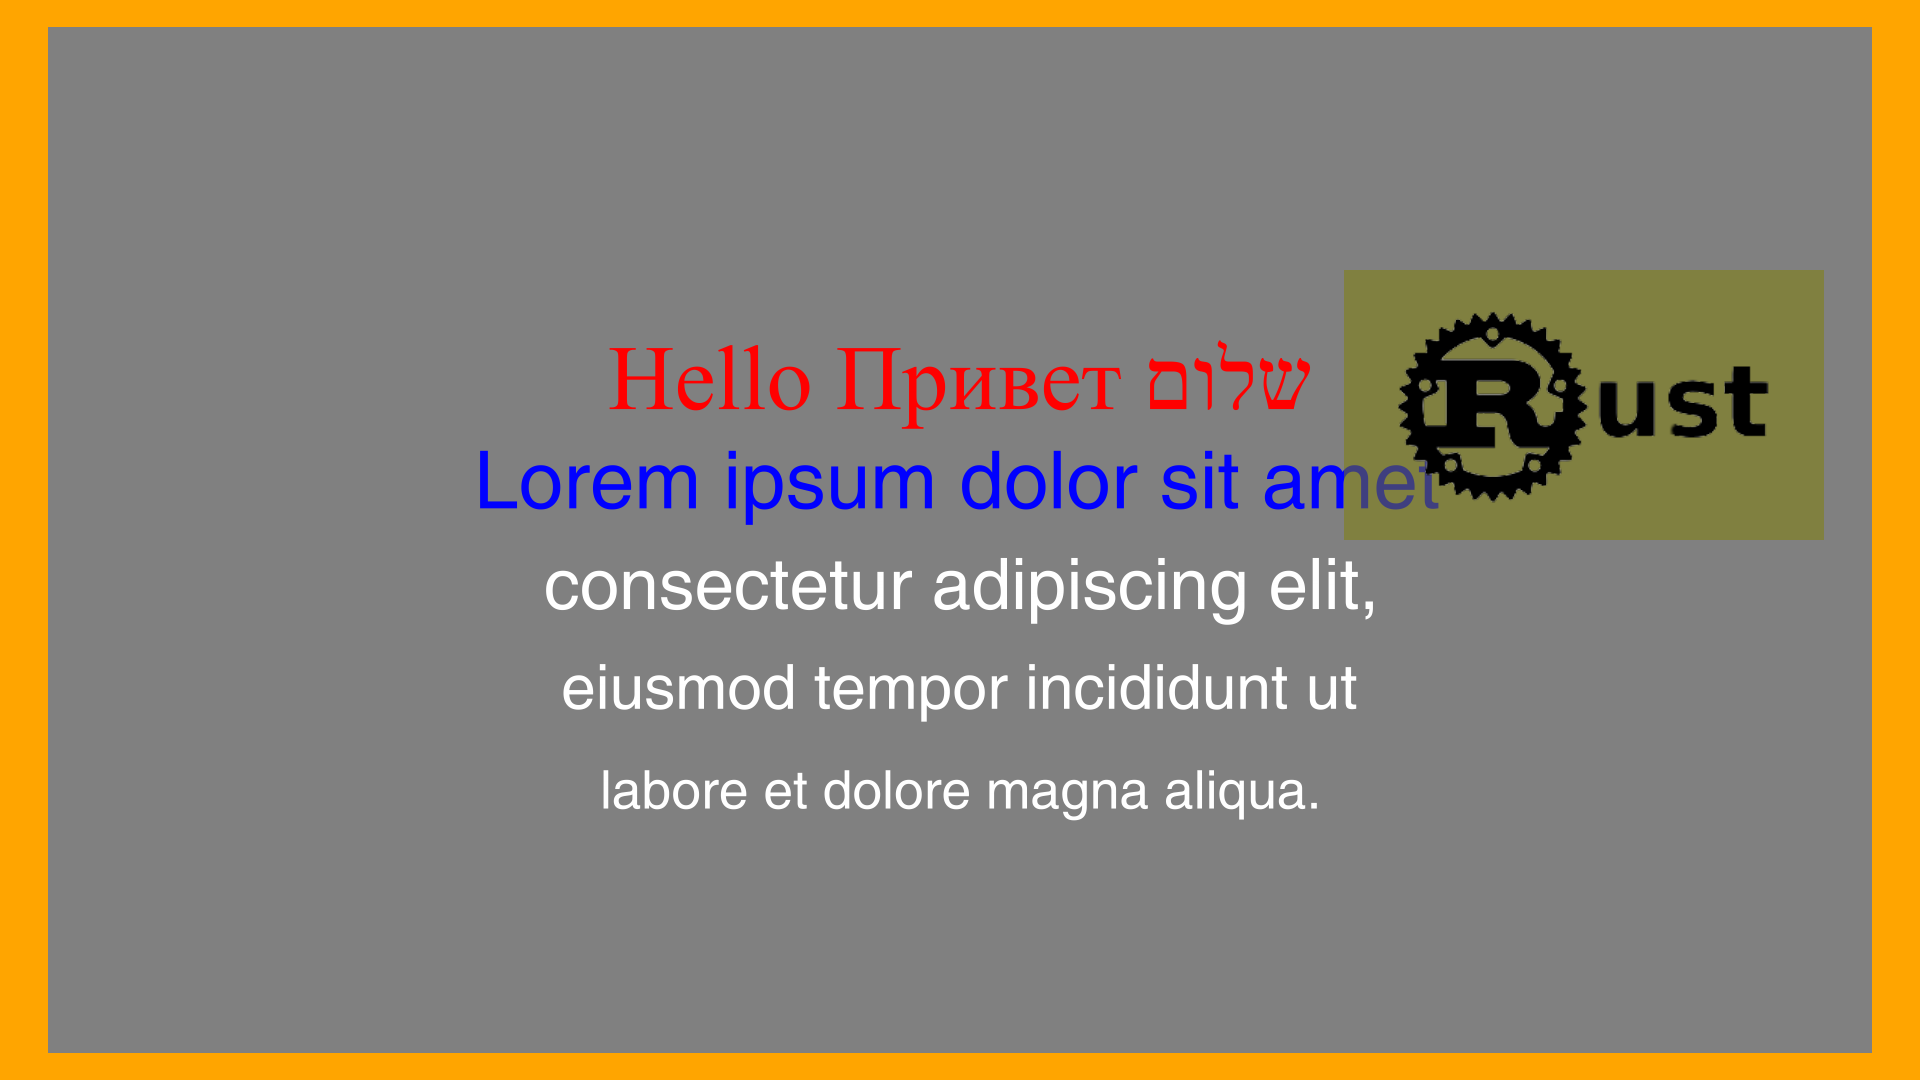
<scenecolor="#ffa500"><boxpos="0"size="95% 95%"anchor-point="0.5 0"color="#F0C0C0C0"><textpos="0 -40%"size="100% 10%"anchor-point="0.5 0"height="100%"text="שלום Hello Привет"font="Times New Roman.ttf"color="red"/></box><boxpos="0%"size="25% 25%"anchor-point="0 1"color="olive"alpha="0.5"><imagepos="0"size="100% 100%"anchor-point="0 1"image="image1.png" /></box></scene>The scene is created by pointing to a directory or zip file containing the scene.xml. Dependent files of images and fonts must be located in this directory or zip file.
match fb2d::scene::Scene::new_from_bundle("assets/scene1") {
        Ok(mut scene) => {
            letmut fb = fb2d::screen_writer_for_framebuffer("/dev/fb0")?;
            fb2d::set_graphics_mode();
            scene.writer = Some(Box::new(fb));
            scene.run();
        }
        Err(e) => eprintln!("Error: {:?}", e),
    }
An example of the resulting image.
It is possible to render a frame in a PNG file for debugging.
Any help (Contribution) is welcome. There is a lot of work on optimizing rendering, and adding new features like animation.