November 21, 2013 at 12:46
Automate monitoring: low-level discovery for SNMP
We already wrote about what a wonderful tool like LLD is in Zabbix.
At the same time, we complained that composite indexes in SNMP tables are not supported in the system, which somewhat limits the possibilities for use. For example, if you need to make Discovery of two RAID controllers on one server and all physical and logical disks behind them, then, alas, we could not do this without crutches. Only worked for the first RAID controller on the list. But as they say, everything flows, everything changes! And the long-awaited release 2.2 removed this binding hand on hand.
I would like to tell about the innovation by the example of a template for HP servers. But first, a little bit about SNMP.
So what is LLD for SNMP?
This is adding row-based data items to an SNMP table. Each row is one new prototype-based data item. And what is an SNMP table in general, how can I find it among other SNMP objects in the MIB?
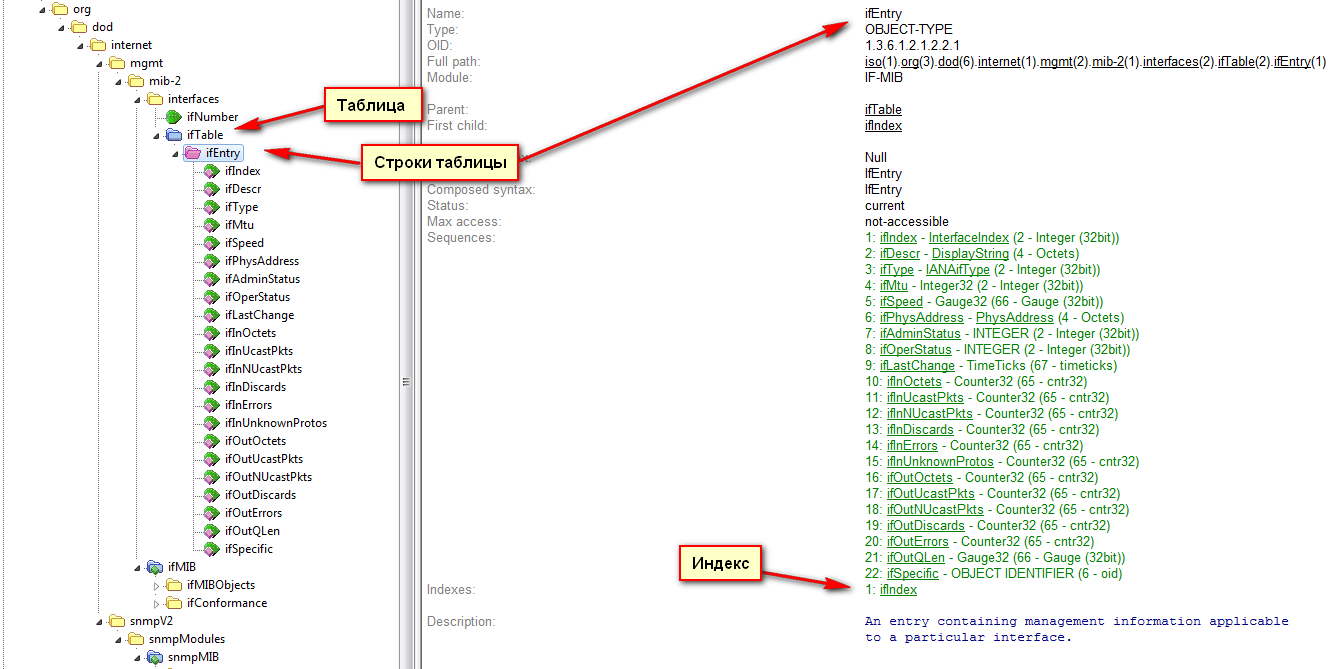
This is an object ( OBJECT-TYPE ) whose SYNTAX attribute is defined as SEQUENCE OF X, where X is the sequence of objects that describes the columns of the table. The table rows themselves are stored a floor below in another object, and differ from the table by the presence of the INDEX ATTRIBUTE , a unique key used to identify the rows. What did I say? Better example.
Take the well-known ifTable table with interfaces from IF-MIB, its MIB in the SNMP tree will look like this:
And the result of a query to such a table on some switch will look like this:
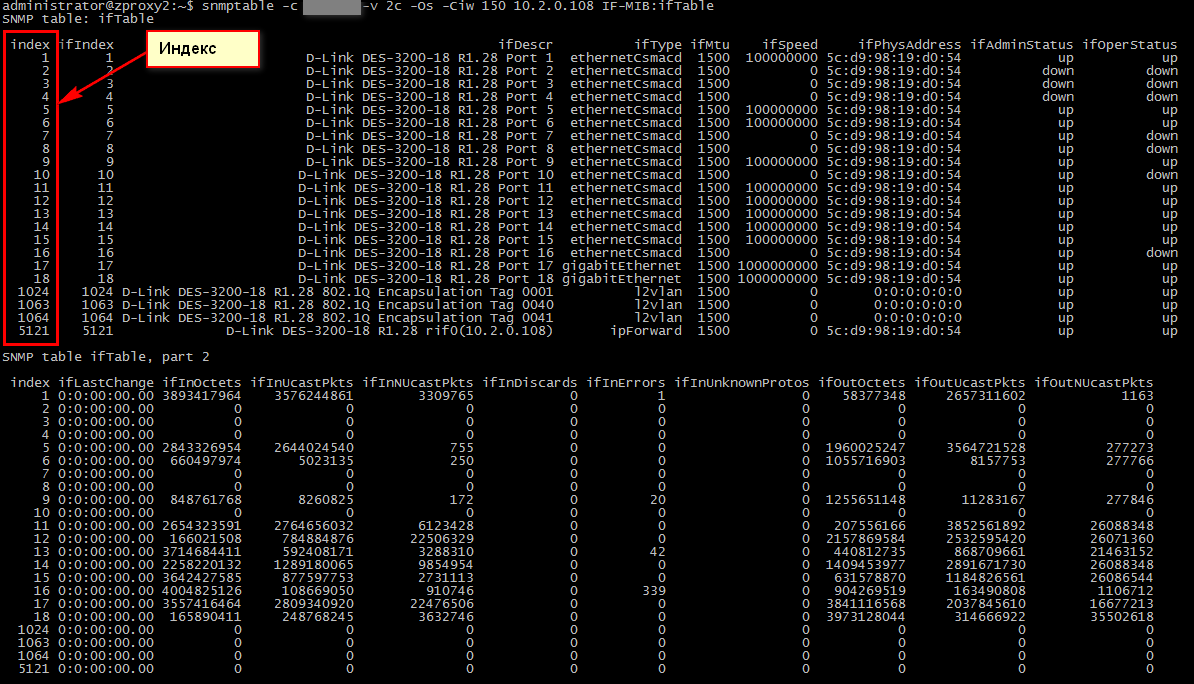
Moreover, index is an integral part of the OID, and just serves to distinguish the columns of one row of the table from another:
administrator @ zproxy2: ~ $ snmpwalk -c public -v 2c -On 10.2.0.108 IF-MIB: ifDescr
.1.3.6.1.2.1.2.2.1.2. 1 = STRING: D-Link DES-3200-18 R1.28 Port 1
.1.3.6.1.2.1.2.2.1.2. 2 = STRING: D-Link DES-3200-18 R1.28 Port 2
.1.3.6.1.2.1.2.2.1.2. 3 = STRING: D-Link DES-3200-18 R1.28 Port 3
.1.3.6.1.2.1.2.2.1.2. 4 = STRING: D-Link DES-3200-18 R1.28 Port 4
.1.3.6.1.2.1.2.2.1.2. 5= STRING: D-Link DES-3200-18 R1.28 Port 5
.1.3.6.1.2.1.2.2.1.2. 6 = STRING: D-Link DES-3200-18 R1.28 Port 6
.1.3.6.1.2.1.2.2.1.2. 7 = STRING: D-Link DES-3200-18 R1.28 Port 7
.1.3.6.1.2.1.2.2.1.2. 8 = STRING: D-Link DES-3200-18 R1.28 Port 8
.1.3.6.1.2.1.2.2.1.2. 9 = STRING: D-Link DES-3200-18 R1.28 Port 9
.1.3.6.1.2.1.2.2.1.2. 10 = STRING: D-Link DES-3200-18 R1.28 Port 10
.1.3.6.1.2.1.2.2.1.2. 11 = STRING: D-Link DES-3200-18 R1.28 Port 11
.1.3.6.1.2.1.2.2.1.2. 12 = STRING: D-Link DES-3200-18 R1.28 Port 12
.1.3.6.1.2.1.2.2.1.2. thirteen= STRING: D-Link DES-3200-18 R1.28 Port 13
.1.3.6.1.2.1.2.2.1.2. 14 = STRING: D-Link DES-3200-18 R1.28 Port 14
.1.3.6.1.2.1.2.2.1.2. 15 = STRING: D-Link DES-3200-18 R1.28 Port 15
.1.3.6.1.2.1.2.2.1.2. 16 = STRING: D-Link DES-3200-18 R1.28 Port 16
.1.3.6.1.2.1.2.2.1.2. 17 = STRING: D-Link DES-3200-18 R1.28 Port 17
.1.3.6.1.2.1.2.2.1.2. 18 = STRING: D-Link DES-3200-18 R1.28 Port 18
.1.3.6.1.2.1.2.2.1.2. 1024 = STRING: D-Link DES-3200-18 R1.28 802.1Q Encapsulation Tag 0001
.1.3.6.1.2.1.2.2.1.2. 1063 = STRING: D-Link DES-3200-18 R1.28 802.1Q Encapsulation Tag 0040
.1.3.6.1.2.1.2.2.1.2. 1064 = STRING: D-Link DES-3200-18 R1.28 802.1Q Encapsulation Tag 0041
.1.3.6.1.2.1.2.2.1.2. 5121 = STRING: D-Link DES-3200-18 R1.28 rif0 (10.2.0.108)
In IF-MIB: ifTable index is simple and equal to one column in the table: ifIndex . Zabbix could find data elements in such tables even at the time of the appearance of LLD, from version 2.0, and the detection of all available interfaces from the ifTable table is in the standard template . About the same how to configure LLD with simple indexes we just wrote on the hub last time .
But there are tables in SNMP where the index is compound and looks more complicated than just a single digit. Here is an example TCP-MIB table: tcpConnTable, which stores all current connections. In this table, the index is composite and consists of four objects:
Local IP Address. Local Port .Remote IP Address.Remote Port
Here they are in the MIB file:

These indices are when polling the equipment:
administrator @ zproxy2: ~ $ snmptable -c public -v 2c -Os -Ciw 150 10.2.0.108 TCP-MIB: tcpConnTable
SNMP table: tcpConnTable
index tcpConnState tcpConnLocalAddress tcpConnLocalPort tcpConnRemAddress tcpConnRemPort
0.0.0.0. 22 .0.0.0.0.0 listen 0.0.0.0 22 0.0.0.0 0
0.0.0.0. 80.0.0.0.0.0 listen 0.0.0.0 80 0.0.0.0 0
or if polling snmpwalk:
administrator @ zproxy2: ~ $ snmpwalk -c virton -v 2c -Os 10.2.0.108 TCP-MIB: tcpConnTable
tcpConnState.0.0.0.0. 22 .0.0.0.0.0 = INTEGER: listen (2)
tcpConnState.0.0.0.0. 80 .0.0.0.0.0 = INTEGER: listen (2)
tcpConnLocalAddress.0.0.0.0. 22 .0.0.0.0.0 = ipaddress: 0.0.0.0
tcpConnLocalAddress.0.0.0.0. 80 .0.0.0.0.0 = ipaddress: 0.0.0.0
tcpConnLocalPort.0.0.0.0. 22 .0.0.0.0.0 = INTEGER: 22
tcpConnLocalPort.0.0.0.0. 80 .0.0.0.0.0 = INTEGER: 80
tcpConnRemAddress.0.0.0.0. 22.0.0.0.0.0 = ipaddress: 0.0.0.0
tcpConnRemAddress.0.0.0.0. 80 .0.0.0.0.0 = ipaddress: 0.0.0.0
tcpConnRemPort.0.0.0.0. 22 .0.0.0.0.0 = INTEGER: 0
tcpConnRemPort.0.0.0.0. 80 .0.0.0.0.0 = INTEGER: 0
Previously, such indexes introduced Zabbix into a stupor. In 2.2, we can now monitor such tables. Let's look at a practical example.
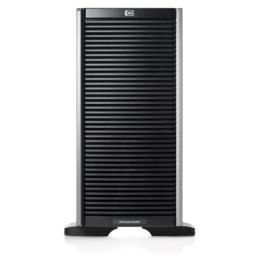
So, we have an HP Proliant server, and it has two RAID controllers. In addition to everything else about the system, we are interested in the status of all hard drives connected to the RAID controller.
To access this data, if we have Windows or Linux, we need to install the HP Insight Management Agent, which will post this information for access via snmp. It remains only to pick it up.
To understand what to take, we turn to the MIB file. For RAID, this is the CPQIDA-MIB, and for physical disks, this is the CPQIDA-MIB table: cpqDaPhyDrvTable. As we can see, the index here consists of two parts:
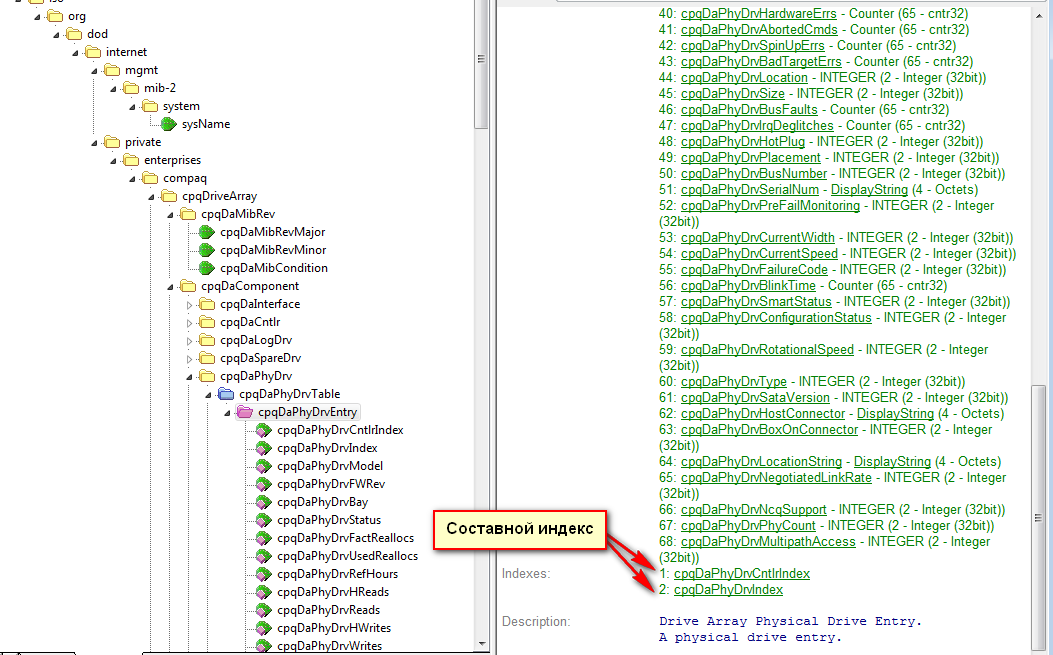
The first part of the index is the controller index.
The second part is the disk index.
Let's poll the table, its column with the disk status:
administrator @ zproxy2: ~ $ snmpwalk -c public -v 2c 192.168.0.22 1.3.6.1.4.1.232.3.2.5.1.1.5
iso.3.6.1.4.1.232.3.2.5.1.1.5. 1 . 0 = INTEGER: 1
iso.3.6.1.4.1.232.3.2.5.1.1.5. 1 . 1 = INTEGER: 2
iso.3.6.1.4.1.232.3.2.5.1.1.5. 1 . 2 = INTEGER: 3
iso.3.6.1.4.1.232.3.2.5.1.1.5. 1 . 3 = INTEGER: 4
iso.3.6.1.4.1.232.3.2.5.1.1.5. 4 . 1 = INTEGER: 5
iso.3.6.1.4.1.232.3.2.5.1.1.5. 4 . 2 = INTEGER: 6
iso.3.6.1.4.1.232.3.2.5.1.1.5. 4 .3 = INTEGER: 7
iso.3.6.1.4.1.232.3.2.5.1.1.5. 4 . 4 = INTEGER: 8
We see that we have eight disks (cpqDaPhyDrvIndex) located on the controllers under indices 1 and 4 (cpqDaPhyCntlrIndex). In 2.0, only the first four disks would be found through LLD.
How to configure detection? Yes, just like LLD with regular indexes:
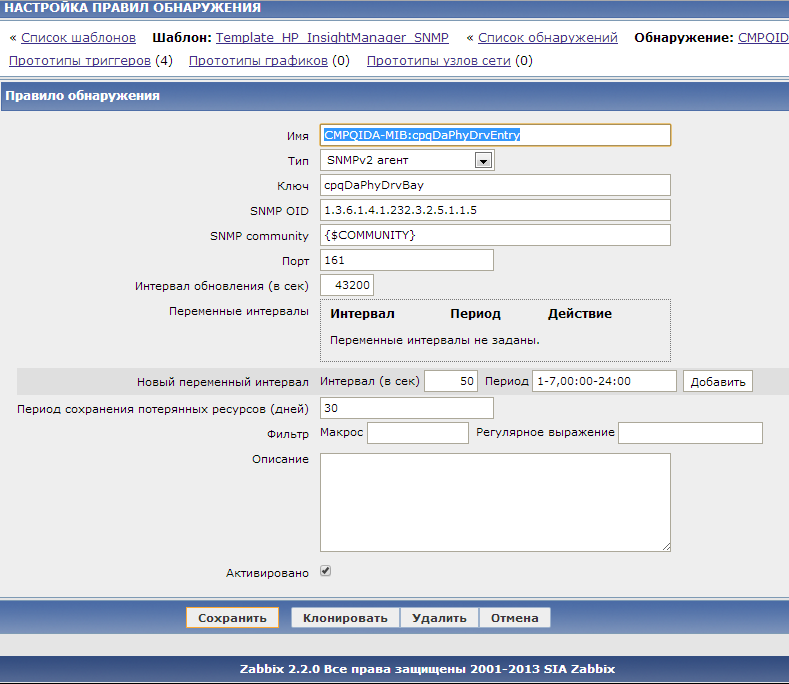
Step 1: First, create a discovery in the template for HP:
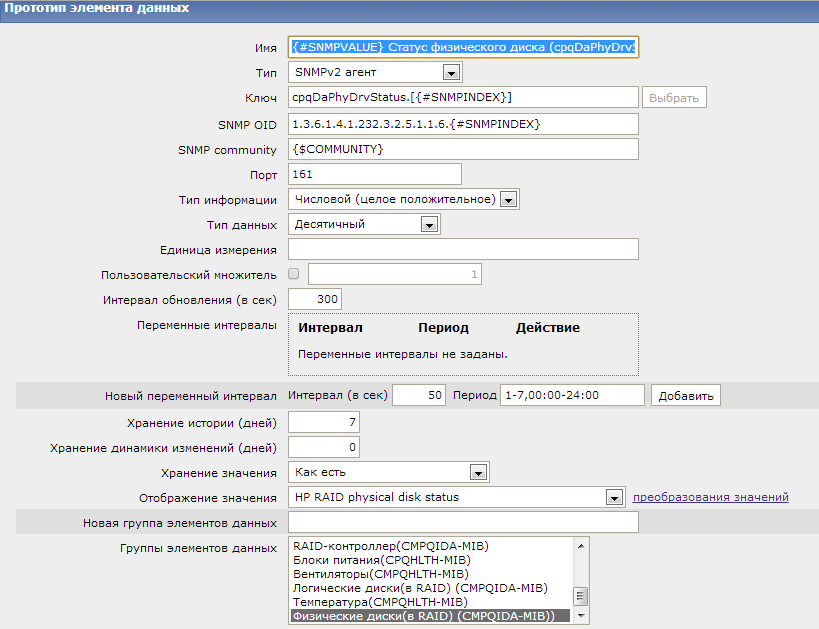
Step 2: Create a prototype data element
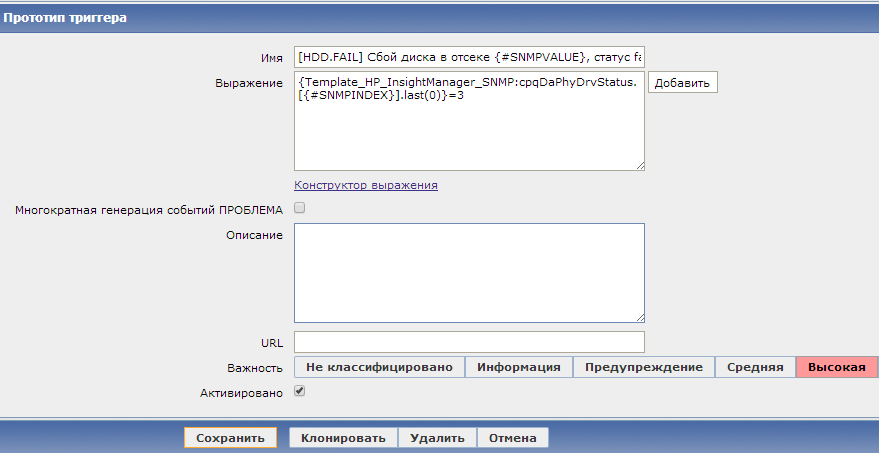
Step 3: Create a prototype trigger
Next
Repeat steps 2,3 for other interesting columns of the physical disk table.
Data Elements:
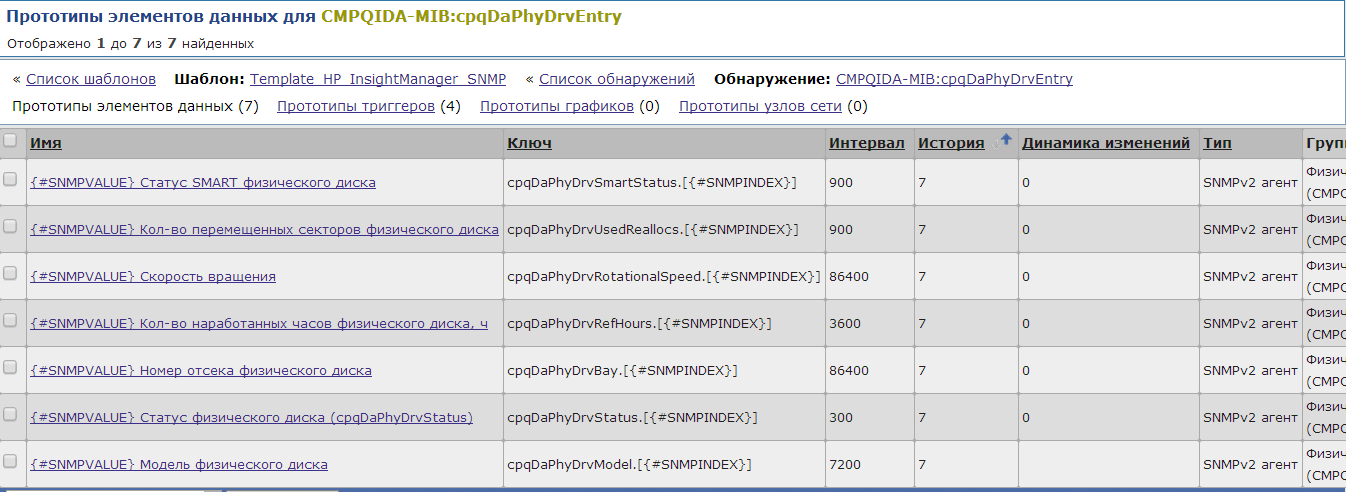
Triggers:

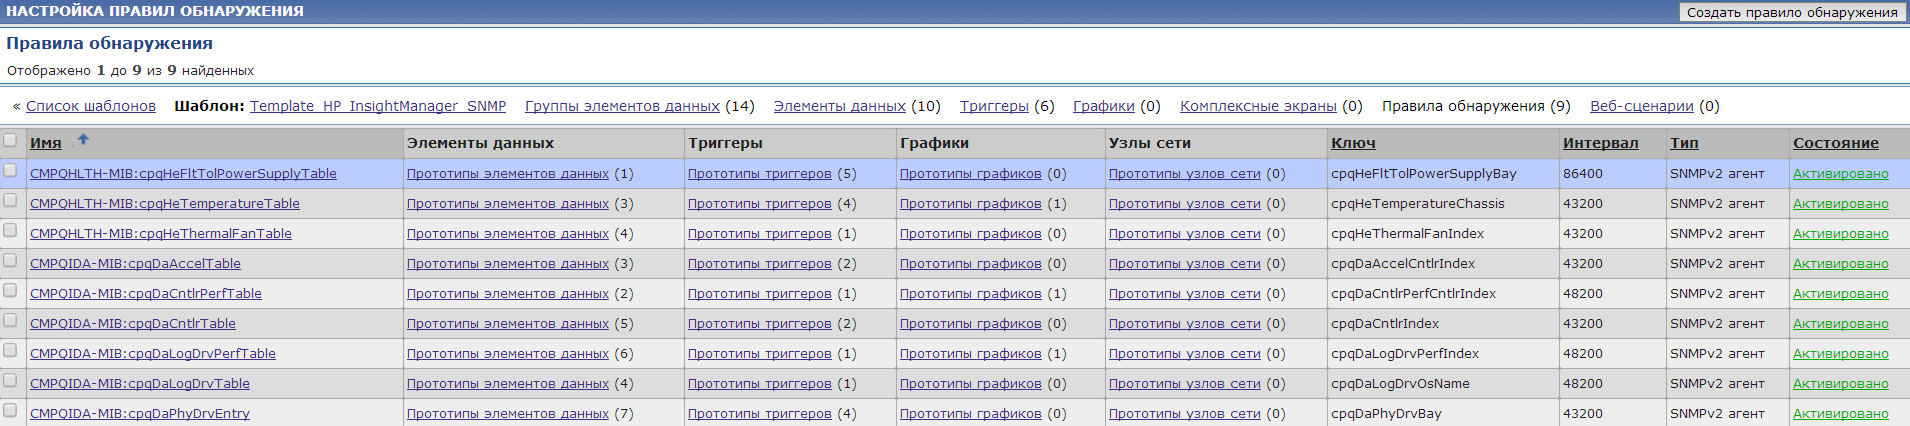
Repeat steps 1-3 for other interesting tables in MIBs from HP, we get:
What the system will look like this:
Step 4: Add our template to the HP network nodes.
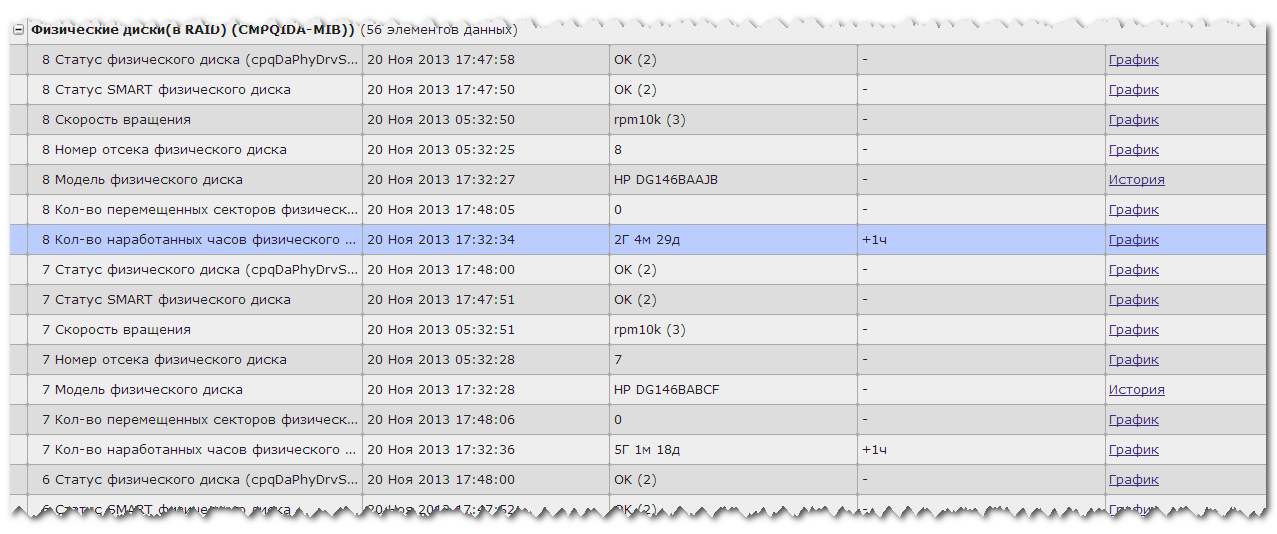
Specify the macro value {$ COMMUNITY} for them, if it is different from public, wait for LLD to finish working. We will see the result in the Recent Data section :
Now that Zabbix supports composite SNMP indexes, the list of tables to which the LLD arm can reach has expanded significantly. And the more you use Low-level Discovery - the less you configure in Zabbix with your hands. Manual work with LLD - setting up prototypes in a template. But this needs to be done only once.
Posted by wabbit .
At the same time, we complained that composite indexes in SNMP tables are not supported in the system, which somewhat limits the possibilities for use. For example, if you need to make Discovery of two RAID controllers on one server and all physical and logical disks behind them, then, alas, we could not do this without crutches. Only worked for the first RAID controller on the list. But as they say, everything flows, everything changes! And the long-awaited release 2.2 removed this binding hand on hand.
I would like to tell about the innovation by the example of a template for HP servers. But first, a little bit about SNMP.
SNMP
So what is LLD for SNMP?
This is adding row-based data items to an SNMP table. Each row is one new prototype-based data item. And what is an SNMP table in general, how can I find it among other SNMP objects in the MIB?
This is an object ( OBJECT-TYPE ) whose SYNTAX attribute is defined as SEQUENCE OF X, where X is the sequence of objects that describes the columns of the table. The table rows themselves are stored a floor below in another object, and differ from the table by the presence of the INDEX ATTRIBUTE , a unique key used to identify the rows. What did I say? Better example.
Take the well-known ifTable table with interfaces from IF-MIB, its MIB in the SNMP tree will look like this:
And the result of a query to such a table on some switch will look like this:
Moreover, index is an integral part of the OID, and just serves to distinguish the columns of one row of the table from another:
administrator @ zproxy2: ~ $ snmpwalk -c public -v 2c -On 10.2.0.108 IF-MIB: ifDescr
.1.3.6.1.2.1.2.2.1.2. 1 = STRING: D-Link DES-3200-18 R1.28 Port 1
.1.3.6.1.2.1.2.2.1.2. 2 = STRING: D-Link DES-3200-18 R1.28 Port 2
.1.3.6.1.2.1.2.2.1.2. 3 = STRING: D-Link DES-3200-18 R1.28 Port 3
.1.3.6.1.2.1.2.2.1.2. 4 = STRING: D-Link DES-3200-18 R1.28 Port 4
.1.3.6.1.2.1.2.2.1.2. 5= STRING: D-Link DES-3200-18 R1.28 Port 5
.1.3.6.1.2.1.2.2.1.2. 6 = STRING: D-Link DES-3200-18 R1.28 Port 6
.1.3.6.1.2.1.2.2.1.2. 7 = STRING: D-Link DES-3200-18 R1.28 Port 7
.1.3.6.1.2.1.2.2.1.2. 8 = STRING: D-Link DES-3200-18 R1.28 Port 8
.1.3.6.1.2.1.2.2.1.2. 9 = STRING: D-Link DES-3200-18 R1.28 Port 9
.1.3.6.1.2.1.2.2.1.2. 10 = STRING: D-Link DES-3200-18 R1.28 Port 10
.1.3.6.1.2.1.2.2.1.2. 11 = STRING: D-Link DES-3200-18 R1.28 Port 11
.1.3.6.1.2.1.2.2.1.2. 12 = STRING: D-Link DES-3200-18 R1.28 Port 12
.1.3.6.1.2.1.2.2.1.2. thirteen= STRING: D-Link DES-3200-18 R1.28 Port 13
.1.3.6.1.2.1.2.2.1.2. 14 = STRING: D-Link DES-3200-18 R1.28 Port 14
.1.3.6.1.2.1.2.2.1.2. 15 = STRING: D-Link DES-3200-18 R1.28 Port 15
.1.3.6.1.2.1.2.2.1.2. 16 = STRING: D-Link DES-3200-18 R1.28 Port 16
.1.3.6.1.2.1.2.2.1.2. 17 = STRING: D-Link DES-3200-18 R1.28 Port 17
.1.3.6.1.2.1.2.2.1.2. 18 = STRING: D-Link DES-3200-18 R1.28 Port 18
.1.3.6.1.2.1.2.2.1.2. 1024 = STRING: D-Link DES-3200-18 R1.28 802.1Q Encapsulation Tag 0001
.1.3.6.1.2.1.2.2.1.2. 1063 = STRING: D-Link DES-3200-18 R1.28 802.1Q Encapsulation Tag 0040
.1.3.6.1.2.1.2.2.1.2. 1064 = STRING: D-Link DES-3200-18 R1.28 802.1Q Encapsulation Tag 0041
.1.3.6.1.2.1.2.2.1.2. 5121 = STRING: D-Link DES-3200-18 R1.28 rif0 (10.2.0.108)
In IF-MIB: ifTable index is simple and equal to one column in the table: ifIndex . Zabbix could find data elements in such tables even at the time of the appearance of LLD, from version 2.0, and the detection of all available interfaces from the ifTable table is in the standard template . About the same how to configure LLD with simple indexes we just wrote on the hub last time .
But there are tables in SNMP where the index is compound and looks more complicated than just a single digit. Here is an example TCP-MIB table: tcpConnTable, which stores all current connections. In this table, the index is composite and consists of four objects:
Local IP Address. Local Port .Remote IP Address.Remote Port
Here they are in the MIB file:
These indices are when polling the equipment:
administrator @ zproxy2: ~ $ snmptable -c public -v 2c -Os -Ciw 150 10.2.0.108 TCP-MIB: tcpConnTable
SNMP table: tcpConnTable
index tcpConnState tcpConnLocalAddress tcpConnLocalPort tcpConnRemAddress tcpConnRemPort
0.0.0.0. 22 .0.0.0.0.0 listen 0.0.0.0 22 0.0.0.0 0
0.0.0.0. 80.0.0.0.0.0 listen 0.0.0.0 80 0.0.0.0 0
or if polling snmpwalk:
administrator @ zproxy2: ~ $ snmpwalk -c virton -v 2c -Os 10.2.0.108 TCP-MIB: tcpConnTable
tcpConnState.0.0.0.0. 22 .0.0.0.0.0 = INTEGER: listen (2)
tcpConnState.0.0.0.0. 80 .0.0.0.0.0 = INTEGER: listen (2)
tcpConnLocalAddress.0.0.0.0. 22 .0.0.0.0.0 = ipaddress: 0.0.0.0
tcpConnLocalAddress.0.0.0.0. 80 .0.0.0.0.0 = ipaddress: 0.0.0.0
tcpConnLocalPort.0.0.0.0. 22 .0.0.0.0.0 = INTEGER: 22
tcpConnLocalPort.0.0.0.0. 80 .0.0.0.0.0 = INTEGER: 80
tcpConnRemAddress.0.0.0.0. 22.0.0.0.0.0 = ipaddress: 0.0.0.0
tcpConnRemAddress.0.0.0.0. 80 .0.0.0.0.0 = ipaddress: 0.0.0.0
tcpConnRemPort.0.0.0.0. 22 .0.0.0.0.0 = INTEGER: 0
tcpConnRemPort.0.0.0.0. 80 .0.0.0.0.0 = INTEGER: 0
Previously, such indexes introduced Zabbix into a stupor. In 2.2, we can now monitor such tables. Let's look at a practical example.
HP Insight Manager
So, we have an HP Proliant server, and it has two RAID controllers. In addition to everything else about the system, we are interested in the status of all hard drives connected to the RAID controller.
To access this data, if we have Windows or Linux, we need to install the HP Insight Management Agent, which will post this information for access via snmp. It remains only to pick it up.
To understand what to take, we turn to the MIB file. For RAID, this is the CPQIDA-MIB, and for physical disks, this is the CPQIDA-MIB table: cpqDaPhyDrvTable. As we can see, the index here consists of two parts:
The first part of the index is the controller index.
The second part is the disk index.
Let's poll the table, its column with the disk status:
administrator @ zproxy2: ~ $ snmpwalk -c public -v 2c 192.168.0.22 1.3.6.1.4.1.232.3.2.5.1.1.5
iso.3.6.1.4.1.232.3.2.5.1.1.5. 1 . 0 = INTEGER: 1
iso.3.6.1.4.1.232.3.2.5.1.1.5. 1 . 1 = INTEGER: 2
iso.3.6.1.4.1.232.3.2.5.1.1.5. 1 . 2 = INTEGER: 3
iso.3.6.1.4.1.232.3.2.5.1.1.5. 1 . 3 = INTEGER: 4
iso.3.6.1.4.1.232.3.2.5.1.1.5. 4 . 1 = INTEGER: 5
iso.3.6.1.4.1.232.3.2.5.1.1.5. 4 . 2 = INTEGER: 6
iso.3.6.1.4.1.232.3.2.5.1.1.5. 4 .3 = INTEGER: 7
iso.3.6.1.4.1.232.3.2.5.1.1.5. 4 . 4 = INTEGER: 8
We see that we have eight disks (cpqDaPhyDrvIndex) located on the controllers under indices 1 and 4 (cpqDaPhyCntlrIndex). In 2.0, only the first four disks would be found through LLD.
How to configure detection? Yes, just like LLD with regular indexes:
Step 1: First, create a discovery in the template for HP:
| Key | cpqDaPhyDrvBay |
| SNMP OID | The OID of the column in the table that we will use to search for disks. We will use OID 1.3.6.1.4.1.232.3.2.5.1.1.5, this is the column that contains the drive bay number (cpqDaPhyDrvBay). The value of this column will be assigned to the special macro {#SNMPVALUE} , which we can use, for example, in data item names or in trigger names |
| SNMP community | in this example, the macro {$ COMMUNITY} is used . The same template has a default value, {$ COMMUNITY} = public. Further, for each specific network node to which we will attach this template, we can either rewrite the value of the macro if its SNMP community is different or do nothing, and then the public specified in the template will be used. This technique helps to avoid the need to change data elements at the host level. |
| Filter | We can filter the obtained value of the special macro {#SNMPVALUE} by regex, or leave this field empty if nothing needs to be cut off. Since we are talking about macros, I’ll remind you that there are two of them in LLD via SNMP: {#SNMPINDEX} , {#SNMPVALUE} . And for each line found in the table, they will take values:  |
| The period of conservation of lost resources | After how many days to delete the data item when it is no longer detected (the disk was pulled out and taken away). By default, leave 30 days. |
Step 2: Create a prototype data element
Step 3: Create a prototype trigger
Next
Repeat steps 2,3 for other interesting columns of the physical disk table.
Data Elements:
Triggers:
Repeat steps 1-3 for other interesting tables in MIBs from HP, we get:
| SNMP Table | What's interestnig | Table index |
|---|---|---|
| CMPQIDA-MIB: cpqDaCntlrTable | RAID Controller Status | Plain |
| CMPQIDA-MIB: cpqDaAccelTable | Array Accelerator Status, Battery Monitoring | Plain |
| CMPQIDA-MIB: cpqDaCntlrPerfTable | RAID performance, RAID processor load | Composite |
| CMPQIDA-MIB: cpqDaLogDrvTable | Logical drive status | Composite |
| CMPQIDA-MIB: cpqDaLogDrvPerfTable | Logical drive performance | Composite |
| CMPQHLTH-MIB: cpqHeTemperatureTable | Temperature of CPU, memory and other components | Composite |
| CMPQHLTH-MIB: cpqHeThermalFanTable | Fan Status | Plain |
| CMPQHLTH-MIB: cpqHeFltTolPowerSupplyTable | Power Supply Status | Composite |
Step 4: Add our template to the HP network nodes.
Specify the macro value {$ COMMUNITY} for them, if it is different from public, wait for LLD to finish working. We will see the result in the Recent Data section :
Total
Now that Zabbix supports composite SNMP indexes, the list of tables to which the LLD arm can reach has expanded significantly. And the more you use Low-level Discovery - the less you configure in Zabbix with your hands. Manual work with LLD - setting up prototypes in a template. But this needs to be done only once.
PS
Applying a template for HP, all of a sudden anyone is interested.
2.0 2013-11-20T14:22:01Z Templates Template_HP_InsightManager_SNMPTemplate_HP_InsightManager_SNMP Templates_Production CMPQHLTH-MIB CMPQIDA-MIB CPQSINFO-MIB HP Platform RAID-контроллер(Accelerator) (CMPQIDA-MIB) RAID-контроллер(CMPQIDA-MIB) Блоки питания(CPQHLTH-MIB) Вентиляторы(CMPQHLTH-MIB) Логические диски(в RAID) (CMPQIDA-MIB) Температура(CMPQHLTH-MIB) Физические диски(в RAID) (CMPQIDA-MIB)) HP Platform: Cтатус системы 4 {$COMMUNITY} 0 .1.3.6.1.4.1.232.2.1.3.0 cpqSiMibCondition.0 300 90 30 0 3 0 0 0 0 1 0 0 161 0 HP Platform HP RAID drive status HP Platform: MIB version (major) 4 {$COMMUNITY} 0 .1.3.6.1.4.1.232.2.1.1.0 cpqSiMibRev.cpqSiMibRevMajor.0 86400 30 0 1 3 localhost 0 0 0 0 0 0 0 161 0 CPQSINFO-MIB HP Platform: MIB version (minor) 4 {$COMMUNITY} 0 .1.3.6.1.4.1.232.2.1.2.0 cpqSiMibRev.cpqSiMibRevMinor.0 86400 30 0 1 3 localhost 0 0 0 0 0 0 0 161 0 CPQSINFO-MIB HP Platform: Общий статус охлаждения 4 {$COMMUNITY} 0 .1.3.6.1.4.1.232.6.2.6.1.0 cpqHeThermalCondition.0 300 2 0 0 3 0 0 0 0 1 0 0 161 0 HP Platform HP RAID drive status HP Platform: Показания Т сенсоров 4 {$COMMUNITY} 0 .1.3.6.1.4.1.232.6.2.6.3.0 cpqHeThermalTempStatus 240 2 0 0 3 0 0 0 0 1 0 0 161 0 HP Platform HP RAID drive status HP Platform: Статус БП 4 {$COMMUNITY} 0 .1.3.6.1.4.1.232.6.2.9.1.0 cpqHeFltTolPwrSupplyCondition 300 2 0 0 3 0 0 0 0 1 0 0 161 0 Блоки питания(CPQHLTH-MIB) HP RAID drive status HP Platform: Статус ОЗУ 4 {$COMMUNITY} 0 .1.3.6.1.4.1.232.6.2.14.4.0 cpqHeResilentMemStatus.0 300 2 0 0 3 0 0 0 0 1 0 0 161 0 HP Platform HP RAID drive status HP Platform: модель 4 {$COMMUNITY} 0 .1.3.6.1.4.1.232.2.2.4.2.0 cpqSiProductName.0 86400 30 365 0 4 0 0 0 0 1 0 0 161 1 HP Platform HP Platform: серийный номер сервера 4 {$COMMUNITY} 0 .1.3.6.1.4.1.232.2.2.2.1.0 cpqSiSysSerialNum.0 86400 30 365 0 4 0 0 0 0 1 0 0 161 8 HP Platform HP Platform: форм-фактор 4 {$COMMUNITY} 0 1.3.6.1.4.1.232.2.2.2.2.0 cpqSiFormFactor.0 60 7 0 0 3 0 0 0 0 1 0 0 161 Name: cpqSiFormFactor
Type: OBJECT-TYPE
OID: 1.3.6.1.4.1.232.2.2.2.2
Full path: iso(1).org(3).dod(6).internet(1).private(4).enterprises(1).compaq(232).cpqSystemInfo(2).cpqSiComponent(2).cpqSiAsset(2).cpqSiFormFactor(2)
Module: CPQSINFO-MIB
Parent: cpqSiAsset
Previous sibling: cpqSiSysSerialNum
Next sibling: cpqSiAssetTag
Numerical syntax: Integer (32bit)
Base syntax: INTEGER
Composed syntax: INTEGER
Status: mandatory
Max access: read-write
Value list: 1: unknown(1)
2: portable(2)
3: laptop(3)
4: desktop(4)
5: tower(5)
6: mini-tower(6)
7: rack-mount(7)
Description: The form factor of the system. Setting this variable tounknown will fail. 2 HP Platform HP form factor CMPQHLTH-MIB:cpqHeFltTolPowerSupplyTable 4 {$COMMUNITY} 1.3.6.1.4.1.232.6.2.9.3.1.2 cpqHeFltTolPowerSupplyBay 86400 0 0 0 0 0 161 : 14 {#SNMPVALUE} Статус блока питания 4 {$COMMUNITY} 0 1.3.6.1.4.1.232.6.2.9.3.1.5.{#SNMPINDEX} cpqHeFltTolPowerSupplyStatus.[{#SNMPINDEX}] 90 30 0 0 3 0 0 0 0 1 0 0 161 Name: cpqHeFltTolPowerSupplyStatus
Type: OBJECT-TYPE
OID: 1.3.6.1.4.1.232.6.2.9.3.1.5
Full path: iso(1).org(3).dod(6).internet(1).private(4).enterprises(1).compaq(232).cpqHealth(6).cpqHeComponent(2).cpqHeFltTolPwrSupply(9).cpqHeFltTolPowerSupplyTable(3).cpqHeFltTolPowerSupplyEntry(1).cpqHeFltTolPowerSupplyStatus(5)
Module: CPQHLTH-MIB
Parent: cpqHeFltTolPowerSupplyEntry
Previous sibling: cpqHeFltTolPowerSupplyCondition
Next sibling: cpqHeFltTolPowerSupplyMainVoltage
Numerical syntax: Integer (32bit)
Base syntax: INTEGER
Composed syntax: INTEGER
Status: mandatory
Max access: read-only
Value list: 1: noError(1)
2: generalFailure(2)
3: bistFailure(3)
4: fanFailure(4)
5: tempFailure(5)
6: interlockOpen(6)
7: epromFailed(7)
8: vrefFailed(8)
9: dacFailed(9)
10: ramTestFailed(10)
11: voltageChannelFailed(11)
12: orringdiodeFailed(12)
13: brownOut(13)
14: giveupOnStartup(14)
15: nvramInvalid(15)
16: calibrationTableInvalid(16)
Description: The status of the power supply. 0 Блоки питания(CPQHLTH-MIB) HP PSU Status {Template_HP_InsightManager_SNMP:cpqHeFltTolPowerSupplyStatus.[{#SNMPINDEX}].last(0)}=3 [PSU] bistFailure(3) блока питания в отсеке {#SNMPVALUE} 0 2 0 {Template_HP_InsightManager_SNMP:cpqHeFltTolPowerSupplyStatus.[{#SNMPINDEX}].last(0)}>5 [PSU] Другая ошибка блока питания в отсеке {#SNMPVALUE} 0 4 0 {Template_HP_InsightManager_SNMP:cpqHeFltTolPowerSupplyStatus.[{#SNMPINDEX}].last()}=4 [PSU] Не работает вентилятор на блоке питания в отсеке {#SNMPVALUE} 0 3 0 {Template_HP_InsightManager_SNMP:cpqHeFltTolPowerSupplyStatus.[{#SNMPINDEX}].last(0)}=2 [PSU] Общая ошибка блока питания в отсеке {#SNMPVALUE} 0 4 0 {Template_HP_InsightManager_SNMP:cpqHeFltTolPowerSupplyStatus.[{#SNMPINDEX}].last()}=5 [PSU] Перегрев блока питания в отсеке {#SNMPVALUE} 0 4 0 CMPQHLTH-MIB:cpqHeTemperatureTable 4 {$COMMUNITY} .1.3.6.1.4.1.232.6.2.6.8.1.1 cpqHeTemperatureChassis 43200 0 0 0 0 0 161 : 30 {#SNMPINDEX} Датчик температуры 4 {$COMMUNITY} 0 .1.3.6.1.4.1.232.6.2.6.8.1.4.{#SNMPINDEX} cpqHeTemperatureCelsius.[{#SNMPINDEX}] 300 7 30 0 3 C 0 0 0 0 1 0 0 161 0 Температура(CMPQHLTH-MIB) {#SNMPINDEX} Расположение датчика температуры 4 {$COMMUNITY} 0 .1.3.6.1.4.1.232.6.2.6.8.1.3.{#SNMPINDEX} cpqHeTemperatureLocale.[{#SNMPINDEX}] 7200 7 0 0 3 0 0 0 0 1 0 0 161 0 Температура(CMPQHLTH-MIB) HP T sensors locale {#SNMPINDEX} Статус датчика температуры 4 {$COMMUNITY} 0 .1.3.6.1.4.1.232.6.2.6.8.1.6.{#SNMPINDEX} cpqHeTemperatureCondition.[{#SNMPINDEX}] 120 7 0 0 3 0 0 0 0 1 0 0 161 0 Температура(CMPQHLTH-MIB) HP RAID drive status {Template_HP_InsightManager_SNMP:cpqHeTemperatureCondition.[{#SNMPINDEX}].last(0)}=3 [TEMP] Температура {#SNMPINDEX} высокая 0 3 Предупреждение 0 {Template_HP_InsightManager_SNMP:cpqHeTemperatureCelsius.[{#SNMPINDEX}].last(0)}>40 [TEMP] Температура {#SNMPINDEX} высокая {ITEM.LASTVALUE} 1 2 Предупреждение 0 {Template_HP_InsightManager_SNMP:cpqHeTemperatureCondition.[{#SNMPINDEX}].last(0)}=4 [TEMP] Температура {#SNMPINDEX} очень высокая 0 4 Предупреждение 0 {Template_HP_InsightManager_SNMP:cpqHeTemperatureCelsius.[{#SNMPINDEX}].last(0)}>60 [TEMP] Температура {#SNMPINDEX} слишком высокая! {ITEM.LASTVALUE} 1 4 Предупреждение 0 HP Температура[TESTING] 900 200 0.0000 100.0000 1 1 0 1 0 0.0000 0.0000 0 0 0 0 0 0 C80000 0 2 0 Template_HP_InsightManager_SNMP cpqHeTemperatureCelsius.[{#SNMPINDEX}] CMPQHLTH-MIB:cpqHeThermalFanTable 4 {$COMMUNITY} 1.3.6.1.4.1.232.6.2.6.6.1.1 cpqHeThermalFanIndex 43200 0 0 0 0 0 161 : 30 {#SNMPINDEX} Вентилятор установлен 4 {$COMMUNITY} 0 1.3.6.1.4.1.232.6.2.6.6.1.3.{#SNMPINDEX} cpqHeThermalFanPresent.[{#SNMPINDEX}] 86400 7 0 0 3 0 0 0 0 1 0 0 161 cpqHeThermalFanStatus
Type: OBJECT-TYPE
OID: 1.3.6.1.4.1.232.6.2.6.6.1.5
Full path: iso(1).org(3).dod(6).internet(1).private(4).enterprises(1).compaq(232).cpqHealth(6).cpqHeComponent(2).cpqHeThermal(6).cpqHeThermalFanTable(6).cpqHeThermalFanEntry(1).cpqHeThermalFanStatus(5)
Module: CPQHLTH-MIB
Parent: cpqHeThermalFanEntry
Prev sibling: cpqHeThermalFanCpuFan
Next sibling: cpqHeThermalFanHwLocation
Numerical syntax: Integer (32 bit)
Base syntax: INTEGER
Composed syntax: INTEGER
Status: mandatory
Max access: read-only
Value list: 1: other(1)
2: ok(2)
3: failed(4)
Description: This specifies if the fan described is operating properly.
This value will be one of the following:
other(1)
Fan status detection is not supported by this system or driver.
ok(2)
The fan is operating properly.
failed(4)
The fan is not operating properly. 0 Вентиляторы(CMPQHLTH-MIB) HP Fan Present {#SNMPINDEX} Скорость вращения вентилятора 4 {$COMMUNITY} 0 1.3.6.1.4.1.232.6.2.6.6.1.7.{#SNMPINDEX} cpqHeThermalFanCurrentSpeed.[{#SNMPINDEX}] 600 7 0 0 3 rpm 0 0 0 0 1 0 0 161 cpqHeThermalFanStatus
Type: OBJECT-TYPE
OID: 1.3.6.1.4.1.232.6.2.6.6.1.5
Full path: iso(1).org(3).dod(6).internet(1).private(4).enterprises(1).compaq(232).cpqHealth(6).cpqHeComponent(2).cpqHeThermal(6).cpqHeThermalFanTable(6).cpqHeThermalFanEntry(1).cpqHeThermalFanStatus(5)
Module: CPQHLTH-MIB
Parent: cpqHeThermalFanEntry
Prev sibling: cpqHeThermalFanCpuFan
Next sibling: cpqHeThermalFanHwLocation
Numerical syntax: Integer (32 bit)
Base syntax: INTEGER
Composed syntax: INTEGER
Status: mandatory
Max access: read-only
Value list: 1: other(1)
2: ok(2)
3: failed(4)
Description: This specifies if the fan described is operating properly.
This value will be one of the following:
other(1)
Fan status detection is not supported by this system or driver.
ok(2)
The fan is operating properly.
failed(4)
The fan is not operating properly. 0 Вентиляторы(CMPQHLTH-MIB) {#SNMPINDEX} Статус вентилятора 4 {$COMMUNITY} 0 1.3.6.1.4.1.232.6.2.6.6.1.5.{#SNMPINDEX} cpqHeThermalFanStatus.[{#SNMPINDEX}] 180 30 0 0 3 0 0 0 0 1 0 0 161 cpqHeThermalFanStatus
Type: OBJECT-TYPE
OID: 1.3.6.1.4.1.232.6.2.6.6.1.5
Full path: iso(1).org(3).dod(6).internet(1).private(4).enterprises(1).compaq(232).cpqHealth(6).cpqHeComponent(2).cpqHeThermal(6).cpqHeThermalFanTable(6).cpqHeThermalFanEntry(1).cpqHeThermalFanStatus(5)
Module: CPQHLTH-MIB
Parent: cpqHeThermalFanEntry
Prev sibling: cpqHeThermalFanCpuFan
Next sibling: cpqHeThermalFanHwLocation
Numerical syntax: Integer (32 bit)
Base syntax: INTEGER
Composed syntax: INTEGER
Status: mandatory
Max access: read-only
Value list: 1: other(1)
2: ok(2)
3: failed(4)
Description: This specifies if the fan described is operating properly.
This value will be one of the following:
other(1)
Fan status detection is not supported by this system or driver.
ok(2)
The fan is operating properly.
failed(4)
The fan is not operating properly. 0 Вентиляторы(CMPQHLTH-MIB) HP RAID SMART status {#SNMPINDEX} Тип вентилятора 4 {$COMMUNITY} 0 1.3.6.1.4.1.232.6.2.6.6.1.4.{#SNMPINDEX} cpqHeThermalFanCpuFan.[{#SNMPINDEX}] 86400 7 0 0 3 0 0 0 0 1 0 0 161 cpqHeThermalFanStatus
Type: OBJECT-TYPE
OID: 1.3.6.1.4.1.232.6.2.6.6.1.5
Full path: iso(1).org(3).dod(6).internet(1).private(4).enterprises(1).compaq(232).cpqHealth(6).cpqHeComponent(2).cpqHeThermal(6).cpqHeThermalFanTable(6).cpqHeThermalFanEntry(1).cpqHeThermalFanStatus(5)
Module: CPQHLTH-MIB
Parent: cpqHeThermalFanEntry
Prev sibling: cpqHeThermalFanCpuFan
Next sibling: cpqHeThermalFanHwLocation
Numerical syntax: Integer (32 bit)
Base syntax: INTEGER
Composed syntax: INTEGER
Status: mandatory
Max access: read-only
Value list: 1: other(1)
2: ok(2)
3: failed(4)
Description: This specifies if the fan described is operating properly.
This value will be one of the following:
other(1)
Fan status detection is not supported by this system or driver.
ok(2)
The fan is operating properly.
failed(4)
The fan is not operating properly. 0 Вентиляторы(CMPQHLTH-MIB) HP Fan Type {Template_HP_InsightManager_SNMP:cpqHeThermalFanStatus.[{#SNMPINDEX}].last(0)}=4 [TEMP.FAN] Вентилятор {#SNMPINDEX} вышел из строя 0 3 0 CMPQIDA-MIB:cpqDaAccelTable 4 {$COMMUNITY} 1.3.6.1.4.1.232.3.2.2.2.1.1 cpqDaAccelCntlrIndex 43200 0 0 0 0 0 161 : 30 Array Accelerator Board Controller Index.
This value is a logical number whose meaning is OS dependent.
The value has a direct mapping to the controller table index
such that controller 'i' has accelerator table entry 'i' {#SNMPINDEX} Код ошибки Accelator Board контроллера 4 {$COMMUNITY} 0 1.3.6.1.4.1.232.3.2.2.2.1.5.{#SNMPINDEX} cpqDaAccelErrCode.["{#SNMPINDEX}"] 180 30 0 0 3 0 0 0 0 1 0 0 161 0 RAID-контроллер(Accelerator) (CMPQIDA-MIB) HP AB Error code {#SNMPINDEX} Состояние Accelator Board контроллера(cpqDaAccelCondition) 4 {$COMMUNITY} 0 1.3.6.1.4.1.232.3.2.2.2.1.9.{#SNMPINDEX} cpqDaAccelCondition.["{#SNMPINDEX}"] 180 30 0 0 3 0 0 0 0 1 0 0 161 0 RAID-контроллер(Accelerator) (CMPQIDA-MIB) HP RAID drive status {#SNMPINDEX} Статус Accelator Board контроллера 4 {$COMMUNITY} 0 1.3.6.1.4.1.232.3.2.2.2.1.2.{#SNMPINDEX} cpqDaAccelStatus.["{#SNMPINDEX}"] 180 30 0 0 3 0 0 0 0 1 0 0 161 0 RAID-контроллер(Accelerator) (CMPQIDA-MIB) HP AB Controller Statua {Template_HP_InsightManager_SNMP:cpqDaAccelCondition.["{#SNMPINDEX}"].last(0)}=3 [RAID.AB] Accelerator board {#SNMPINDEX} статус degraded(3) 0 3 0 {Template_HP_InsightManager_SNMP:cpqDaAccelCondition.["{#SNMPINDEX}"].last(0)}=4 [RAID.AB] Accelerator board {#SNMPINDEX} статус failed(4) 0 4 0 CMPQIDA-MIB:cpqDaCntlrPerfTable 4 {$COMMUNITY} 1.3.6.1.4.1.232.3.2.7.1.1.1 cpqDaCntlrPerfCntlrIndex 48200 0 0 0 0 0 161 : 30 {#SNMPINDEX} Загрузка ЦПУ RAID-контроллера 4 {$COMMUNITY} 0 1.3.6.1.4.1.232.3.2.7.1.1.5.{#SNMPINDEX} cpqDaCntlrPerfCpuPercentBusy.[{#SNMPINDEX}] 180 90 365 0 3 % 0 0 0 0 1 0 0 161 0 RAID-контроллер(CMPQIDA-MIB) {#SNMPINDEX} Средняя задержка RAID-контроллера, с 4 {$COMMUNITY} 1 1.3.6.1.4.1.232.3.2.7.1.1.5.{#SNMPINDEX} cpqDaCntlrPerfAvgLatency.[{#SNMPINDEX}] 180 90 365 0 0 s 0 0 0 0 0.01 0 0 161 0 RAID-контроллер(CMPQIDA-MIB) {Template_HP_InsightManager_SNMP:cpqDaCntlrPerfCpuPercentBusy.[{#SNMPINDEX}].last(0)}>80&{Template_HP_InsightManager_SNMP:cpqDaCntlrPerfCpuPercentBusy.[{#SNMPINDEX}].last(0)}<1000 [RAID.CPU] {#SNMPINDEX} Загрузка процессора контроллера слишком велика 0 4 <1000 to avoid bugged readings 0 [RAID] Производительность RAID-контроллера 900 200 0.0000 100.0000 1 1 0 1 0 0.0000 0.0000 0 0 0 0 0 0 C80000 0 2 0 Template_HP_InsightManager_SNMP cpqDaCntlrPerfCpuPercentBusy.[{#SNMPINDEX}] 1 0 00C800 1 2 0 Template_HP_InsightManager_SNMP cpqDaCntlrPerfAvgLatency.[{#SNMPINDEX}] CMPQIDA-MIB:cpqDaCntlrTable 4 {$COMMUNITY} .1.3.6.1.4.1.232.3.2.2.1.1.1 cpqDaCntlrIndex 43200 0 0 0 0 0 161 : 30 {#SNMPINDEX} Кол-во внутренних портов RAID-контроллера 4 {$COMMUNITY} 0 1.3.6.1.4.1.232.3.2.2.1.1.25.{#SNMPINDEX} cpqDaCntlrNumberOfInternalPorts.[{#SNMPINDEX}] 86400 30 0 0 3 0 0 0 0 1 0 0 161 Name: cpqDaCntlrNumberOfInternalPorts
Type: OBJECT-TYPE
OID: 1.3.6.1.4.1.232.3.2.2.1.1.25
Full path: iso(1).org(3).dod(6).internet(1).private(4).enterprises(1).compaq(232).cpqDriveArray(3).cpqDaComponent(2).cpqDaCntlr(2).cpqDaCntlrTable(1).cpqDaCntlrEntry(1).cpqDaCntlrNumberOfInternalPorts(25)
Module: CPQIDA-MIB
Parent: cpqDaCntlrEntry
Previous sibling: cpqDaCntlrExpandPriority
Next sibling: cpqDaCntlrNumberOfExternalPorts
Numerical syntax: Integer (32bit)
Base syntax: INTEGER
Composed syntax: INTEGER
Status: mandatory
Max access: read-only
Description: Array Controller Number of Internal Ports.This value is the number of internal SAS connectors on thecontroller. 0 RAID-контроллер(CMPQIDA-MIB) {#SNMPINDEX} Модель RAID-контроллера 4 {$COMMUNITY} 0 1.3.6.1.4.1.232.3.2.2.1.1.2.{#SNMPINDEX} cpqDaCntlrModel.["{#SNMPINDEX}"] 86400 30 0 0 3 0 0 0 0 1 50/1-7,00:00-24:00 0 0 161 Name: cpqDaCntlrModel
Type: OBJECT-TYPE
OID: 1.3.6.1.4.1.232.3.2.2.1.1.2
Full path: iso(1).org(3).dod(6).internet(1).private(4).enterprises(1).compaq(232).cpqDriveArray(3).cpqDaComponent(2).cpqDaCntlr(2).cpqDaCntlrTable(1).cpqDaCntlrEntry(1).cpqDaCntlrModel(2)
Module: CPQIDA-MIB
Parent: cpqDaCntlrEntry
Prev sibling: cpqDaCntlrIndex
Next sibling: cpqDaCntlrFWRev
Numerical syntax: Integer (32 bit)
Base syntax: INTEGER
Composed syntax: INTEGER
Status: mandatory
Max access: read-only
Value list: 1: other(1)
2: ida(2)
3: idaExpansion(3)
4: ida-2(4)
5: smart(5)
6: smart-2e(6)
7: smart-2p(7)
8: smart-2sl(8)
9: smart-3100es(9)
10: smart-3200(10)
11: smart-2dh(11)
12: smart-221(12)
13: sa-4250es(13)
14: sa-4200(14)
15: sa-integrated(15)
16: sa-431(16)
17: sa-5300(17)
18: raidLc2(18)
19: sa-5i(19)
20: sa-532(20)
21: sa-5312(21)
22: sa-641(22)
23: sa-642(23)
24: sa-6400(24)
25: sa-6400em(25)
26: sa-6i(26)
27: sa-generic(27)
28: sa-p600(29)
29: sa-p400(30)
30: sa-e200(31)
31: sa-e200i(32)
32: sa-p400i(33)
33: sa-p800(34)
34: sa-e500(35)
35: sa-p700m(36)
Description: Array Controller Model.
The type of controller card. The valid types are:
Other (1)
You may need to upgrade your driver software and\or instrument
agent(s). You have a drive array controller in the system
that the instrument agent does not recognize.
IDA (2)
Compaq 32-Bit Intelligent Drive Array Controller.
The physical drives are located inside the system.
IDA Expansion (3)
Compaq 32-Bit Intelligent Drive Array Expansion Controller.
The physical drives are located in the Array Expansion System
that is connected to the system by a cable.
IDA - 2 (4)
Compaq Intelligent Drive Array Controller-2 (IDA-2).
The physical drives are located inside the system.
SMART (5)
Compaq SMART Array Controller. The physical drives can be
located inside the system or outside the system in a ProLiant
Storage System that is connected to the system by a cable.
SMART - 2/E (6)
Compaq SMART-2/E Array Controller. The physical drives can be
located inside the system or outside the system in a ProLiant
Storage System that is connected to the system by a cable.
SMART - 2/P (7)
Compaq SMART-2/P Array Controller. The physical drives can be
located inside the system or outside the system in a ProLiant
Storage System that is connected to the system by a cable.
SMART - 2SL (8)
Compaq SMART-2SL Array Controller. The physical drives can be
located inside the system or outside the system in a ProLiant
Storage System that is connected to the system by a cable.
Smart - 3100ES (9)
Compaq Smart Array 3100ES Controller. The physical drives are
located inside the system.
Smart - 3200 (10)
Compaq Smart Array 3200 Controller. The physical drives can
be located inside the system or outside the system in a
ProLiant Storage System that is connected to the system by a
cable.
SMART - 2DH (11)
Compaq SMART-2DH Array Controller. The physical drives can be
located inside the system or outside the system in a ProLiant
Storage System that is connected to the system by a cable.
Smart - 221 (12)
Compaq Smart Array 221 Controller. The physical drives can be
located inside the system or outside the system in a ProLiant
Storage System that is connected to the system by a cable.
Smart Array 4250ES (13)
Compaq Smart Array 4250ES Controller. The physical drives are
located inside the system.
Smart Array 4200 (14)
Compaq Smart Array 4200 Controller. The physical drives can
be located inside the system or outside the system in a
ProLiant Storage System that is connected to the system by a
cable.
Integrated Smart Array (15)
Compaq Integrated Smart Array Controller. The physical drives
can be located inside the system or outside the system in a
ProLiant Storage System that is connected to the system by a
cable.
Smart Array 431 (16)
Compaq Smart Array 431 Controller. The physical drives can be
located inside the system or outside the system in a ProLiant
Storage System that is connected to the system by a cable.
Smart Array 5300 (17)
HP Smart Array 5300 Controller.
RAID LC2 Controller (18)
Compaq RAID LC2 Controller.
Smart Array 5i (19)
HP Smart Array 5i Controller.
Smart Array 532 (20)
Compaq Smart Array 532 Controller.
Smart Array 5312 (21)
Compaq Smart Array 5312 Controller.
Smart Array 641 (22)
HP Smart Array 641 Controller.
Smart Array 642 (23)
HP Smart Array 642 Controller.
Smart Array 6400 (24)
HP Smart Array 6400 Controller.
Smart Array 6400 EM (25)
HP Smart Array 6400 EM Controller.
Smart Array 6i (26)
HP Smart Array 6i Controller.
Generic Array (27)
Array Controller.
Reserved (28)
Smart Array P600 (29)
HP Smart Array P600 Controller.
Smart Array P400 (30)
HP Smart Array P400 Controller.
Smart Array E200 (31)
HP Smart Array E200 Controller.
Smart Array E200i (32)
HP Smart Array E200i Controller.
Smart Array P400i (33)
HP Smart Array P400i Controller.
Smart Array P800 (34)
HP Smart Array P800 Controller.
Smart Array E500 (35)
HP Smart Array E500 Controller.
Smart Array P700m (36)
HP Smart Array P700m Controller. 0 RAID-контроллер(CMPQIDA-MIB) HP RAID модель {#SNMPINDEX} Слот RAID-контроллера 4 {$COMMUNITY} 0 1.3.6.1.4.1.232.3.2.2.1.1.5.{#SNMPINDEX} cpqDaCntlrSlot.["{#SNMPINDEX}"] 86400 30 0 0 3 0 0 0 0 1 0 0 161 Name: cpqDaCntlrSlot
Type: OBJECT-TYPE
OID: 1.3.6.1.4.1.232.3.2.2.1.1.5
Full path: iso(1).org(3).dod(6).internet(1).private(4).enterprises(1).compaq(232).cpqDriveArray(3).cpqDaComponent(2).cpqDaCntlr(2).cpqDaCntlrTable(1).cpqDaCntlrEntry(1).cpqDaCntlrSlot(5)
Module: CPQIDA-MIB
Parent: cpqDaCntlrEntry
Previous sibling: cpqDaCntlrStndIntr
Next sibling: cpqDaCntlrCondition
Numerical syntax: Integer (32bit)
Base syntax: INTEGER
Composed syntax: INTEGER
Status: mandatory
Max access: read-only
Size list: 1: 0..255
Description: Array Controller Slot.This identifies the physical slot where the array controllerresides in the system. For example, if this value is three,the array controller is located in slot three of your computer. 0 RAID-контроллер(CMPQIDA-MIB) {#SNMPINDEX} Статус RAID-контроллера 4 {$COMMUNITY} 0 1.3.6.1.4.1.232.3.2.2.1.1.6.{#SNMPINDEX} cpqDaCntlrCondition.["{#SNMPINDEX}"] 120 30 0 0 3 0 0 0 0 1 50/1-7,00:00-24:00 0 0 161 Name: cpqDaCntlrCondition
Type: OBJECT-TYPE
OID: 1.3.6.1.4.1.232.3.2.2.1.1.6
Full path: iso(1).org(3).dod(6).internet(1).private(4).enterprises(1).compaq(232).cpqDriveArray(3).cpqDaComponent(2).cpqDaCntlr(2).cpqDaCntlrTable(1).cpqDaCntlrEntry(1).cpqDaCntlrCondition(6)
Module: CPQIDA-MIB
Parent: cpqDaCntlrEntry
Prev sibling: cpqDaCntlrSlot
Next sibling: cpqDaCntlrProductRev
Numerical syntax: Integer (32 bit)
Base syntax: INTEGER
Composed syntax: INTEGER
Status: mandatory
Max access: read-only
Value list: 1: other(1)
2: ok(2)
3: degraded(3)
4: failed(4)
Description: The condition of the device. This value represents the overall
condition of this controller, and any associated logical drives,
physical drives, and array accelerators. 0 RAID-контроллер(CMPQIDA-MIB) HP RAID drive status {#SNMPINDEX} Текущая роль RAID-контроллера 4 {$COMMUNITY} 0 1.3.6.1.4.1.232.3.2.2.1.1.9.{#SNMPINDEX} cpqDaCntlrCurrentRole.[{#SNMPINDEX}] 3600 30 0 0 3 0 0 0 0 1 0 0 161 Array Controller Current Role.For duplexed array controllers, this is the controllers currentrole. The following values are valid:other (1) Indicates that the instrument agent does not recognize the role of the controller. You may need to upgrade the instrument agent.notDuplexed (2) This array controller is not duplexed.active (3) This duplexed array controller is the active controller.backup (4) This duplexed array controller is the backup controller. 0 RAID-контроллер(CMPQIDA-MIB) HP RAID current role {Template_HP_InsightManager_SNMP:cpqDaCntlrCondition.["{#SNMPINDEX}"].last(0)}=3 [RAID.CONT] Контроллер {#SNMPINDEX} статус degraded(3)! 0 3 0 {Template_HP_InsightManager_SNMP:cpqDaCntlrCondition.["{#SNMPINDEX}"].last(0)}=4 [RAID.CONT] Контроллер {#SNMPINDEX} статус failed(4)! 0 5 0 CMPQIDA-MIB:cpqDaLogDrvPerfTable 4 {$COMMUNITY} 1.3.6.1.4.1.232.3.2.8.1.1.2 cpqDaLogDrvPerfIndex 48200 0 0 0 0 0 161 : 30 {#SNMPINDEX} Cache hits 4 {$COMMUNITY} 0 1.3.6.1.4.1.232.3.2.8.1.1.9.{#SNMPINDEX} cpqDaLogDrvPerfCacheHits.[{#SNMPINDEX}] 600 90 365 0 3 cacheHits/s 0 0 0 0 1 0 0 161 0 Логические диски(в RAID) (CMPQIDA-MIB) {#SNMPINDEX} Cache misses 4 {$COMMUNITY} 0 1.3.6.1.4.1.232.3.2.8.1.1.10.{#SNMPINDEX} cpqDaLogDrvPerfCacheMisses.[{#SNMPINDEX}] 600 90 365 0 3 cachemisses/s 0 0 0 0 1 0 0 161 0 Логические диски(в RAID) (CMPQIDA-MIB) {#SNMPINDEX} Read Ahead Sectors 4 {$COMMUNITY} 0 1.3.6.1.4.1.232.3.2.8.1.1.11.{#SNMPINDEX} cpqDaLogDrvPerfReadAheadSectors.[{#SNMPINDEX}] 600 90 365 0 3 sectors/s 0 0 0 0 1 0 0 161 0 Логические диски(в RAID) (CMPQIDA-MIB) {#SNMPINDEX} Запись диска, Writes/s 4 {$COMMUNITY} 0 1.3.6.1.4.1.232.3.2.8.1.1.7.{#SNMPINDEX} cpqDaLogDrvPerfWrites.[{#SNMPINDEX}] 600 90 365 0 3 Writes/s 0 0 0 0 1 0 0 161 0 Логические диски(в RAID) (CMPQIDA-MIB) {#SNMPINDEX} Средняя длина очереди диска 4 {$COMMUNITY} 0 1.3.6.1.4.1.232.3.2.8.1.1.5.{#SNMPINDEX} cpqDaLogDrvPerfAvgQueueDepth.[{#SNMPINDEX}] 600 90 365 0 3 0 0 0 0 1 0 0 161 Array Logical Drive Performance Monitor Average Queue Depth.
This value indicates the average command queue depth of the
logical volume. 0 Логические диски(в RAID) (CMPQIDA-MIB) {#SNMPINDEX} Чтение диска, Read/s 4 {$COMMUNITY} 0 1.3.6.1.4.1.232.3.2.8.1.1.6.{#SNMPINDEX} cpqDaLogDrvPerfReads.[{#SNMPINDEX}] 600 90 365 0 3 Read/s 0 0 0 0 1 0 0 161 0 Логические диски(в RAID) (CMPQIDA-MIB) {Template_HP_InsightManager_SNMP:cpqDaLogDrvPerfAvgQueueDepth.[{#SNMPINDEX}].avg(300)}>2 [RAID.PERF] Длина очереди логического диска {#SNMPINDEX} слишком велика 0 2 0 [RAID.PERF] {#SNMPINDEX } Производительность логического диска 900 200 0.0000 100.0000 1 1 0 1 0 0.0000 0.0000 0 0 0 0 0 0 C80000 0 2 0 Template_HP_InsightManager_SNMP cpqDaLogDrvPerfWrites.[{#SNMPINDEX}] 1 0 00C800 0 2 0 Template_HP_InsightManager_SNMP cpqDaLogDrvPerfReads.[{#SNMPINDEX}] 2 0 0000C8 1 7 0 Template_HP_InsightManager_SNMP cpqDaLogDrvPerfAvgQueueDepth.[{#SNMPINDEX}] 3 0 C800C8 1 7 0 Template_HP_InsightManager_SNMP cpqDaLogDrvPerfCacheHits.[{#SNMPINDEX}] 4 0 00C8C8 1 7 0 Template_HP_InsightManager_SNMP cpqDaLogDrvPerfCacheMisses.[{#SNMPINDEX}] 5 0 C8C800 1 7 0 Template_HP_InsightManager_SNMP cpqDaLogDrvPerfReadAheadSectors.[{#SNMPINDEX}] CMPQIDA-MIB:cpqDaLogDrvTable 4 {$COMMUNITY} 1.3.6.1.4.1.232.3.2.3.1.1.14 cpqDaLogDrvOsName 48200 0 0 0 0 0 161 : 30 Name: cpqDaLogDrvOsName
Type: OBJECT-TYPE
OID: 1.3.6.1.4.1.232.3.2.3.1.1.14
Full path: iso(1).org(3).dod(6).internet(1).private(4).enterprises(1).compaq(232).cpqDriveArray(3).cpqDaComponent(2).cpqDaLogDrv(3).cpqDaLogDrvTable(1).cpqDaLogDrvEntry(1).cpqDaLogDrvOsName(14)
Module: CPQIDA-MIB
Parent: cpqDaLogDrvEntry
Previous sibling: cpqDaLogDrvStripeSize
Next sibling: cpqDaLogDrvBlinkTime
Numerical syntax: Octets
Base syntax: OCTET STRING
Composed syntax: DisplayString
Status: mandatory
Max access: read-only
Size list: 1: 0..255
Description: Logical Drive OS Name.The OS name for this array logical drive. This field will bea null (size 0) string if the agent does not support OS name. {#SNMPVALUE} Имя логического диска в ОС 4 {$COMMUNITY} 0 .1.3.6.1.4.1.232.3.2.3.1.1.14.{#SNMPINDEX} cpqDaLogDrvOsName.[{#SNMPINDEX}] 86400 7 365 0 1 0 0 0 0 1 0 0 161 0 Логические диски(в RAID) (CMPQIDA-MIB) {#SNMPVALUE} Статус логического диска 4 {$COMMUNITY} 0 .1.3.6.1.4.1.232.3.2.3.1.1.11.{#SNMPINDEX} cpqDaLogDrvCondition.[{#SNMPINDEX}] 180 30 0 0 3 0 0 0 0 1 0 0 161 0 Логические диски(в RAID) (CMPQIDA-MIB) HP RAID drive status {#SNMPVALUE} Текущее состояние логического диска 4 {$COMMUNITY} 0 .1.3.6.1.4.1.232.3.2.3.1.1.4.{#SNMPINDEX} cpqDaLogDrvStatus.[{#SNMPINDEX}] 180 30 0 0 3 0 0 0 0 1 0 0 161 0 Логические диски(в RAID) (CMPQIDA-MIB) HP RAID drive status {#SNMPVALUE} Тип отказоуйстойчивости логического диска 4 {$COMMUNITY} 0 .1.3.6.1.4.1.232.3.2.3.1.1.3.{#SNMPINDEX} cpqDaLogDrvFaultTol.[{#SNMPINDEX}] 180 30 0 0 3 0 0 0 0 1 0 0 161 0 Логические диски(в RAID) (CMPQIDA-MIB) HP RAID fault tolerance {Template_HP_InsightManager_SNMP:cpqDaLogDrvFaultTol.[{#SNMPINDEX}].last(0)}=2 [RAID.LDRIVE] Логический диск {#SNMPVALUE}.{#SNMPINDEX} не имеет отказоуйстойчивости. 0 2 0 CMPQIDA-MIB:cpqDaPhyDrvEntry 4 {$COMMUNITY} 1.3.6.1.4.1.232.3.2.5.1.1.5 cpqDaPhyDrvBay 43200 0 0 0 0 0 161 : 30 {#SNMPVALUE} Кол-во наработанных часов физического диска, ч 4 {$COMMUNITY} 1 1.3.6.1.4.1.232.3.2.5.1.1.9.{#SNMPINDEX} cpqDaPhyDrvRefHours.[{#SNMPINDEX}] 3600 7 0 0 3 s 0 0 0 0 3600 0 0 161 0 Физические диски(в RAID) (CMPQIDA-MIB)) {#SNMPVALUE} Кол-во перемещенных секторов физического диска 4 {$COMMUNITY} 0 1.3.6.1.4.1.232.3.2.5.1.1.8.{#SNMPINDEX} cpqDaPhyDrvUsedReallocs.[{#SNMPINDEX}] 900 7 0 0 3 0 0 0 0 1 0 0 161 0 Физические диски(в RAID) (CMPQIDA-MIB)) {#SNMPVALUE} Модель физического диска 4 {$COMMUNITY} 0 1.3.6.1.4.1.232.3.2.5.1.1.3.{#SNMPINDEX} cpqDaPhyDrvModel.[{#SNMPINDEX}] 7200 7 365 0 1 0 0 0 0 1 0 0 161 0 Физические диски(в RAID) (CMPQIDA-MIB)) {#SNMPVALUE} Номер отсека физического диска 4 {$COMMUNITY} 0 1.3.6.1.4.1.232.3.2.5.1.1.5.{#SNMPINDEX} cpqDaPhyDrvBay.[{#SNMPINDEX}] 86400 7 0 0 3 0 0 0 0 1 0 0 161 0 Физические диски(в RAID) (CMPQIDA-MIB)) {#SNMPVALUE} Скорость вращения 4 {$COMMUNITY} 0 1.3.6.1.4.1.232.3.2.5.1.1.59.{#SNMPINDEX} cpqDaPhyDrvRotationalSpeed.[{#SNMPINDEX}] 86400 7 0 0 3 0 0 0 0 1 0 0 161 0 Физические диски(в RAID) (CMPQIDA-MIB)) HP Phys disck rotation speed {#SNMPVALUE} Статус SMART физического диска 4 {$COMMUNITY} 0 1.3.6.1.4.1.232.3.2.5.1.1.57.{#SNMPINDEX} cpqDaPhyDrvSmartStatus.[{#SNMPINDEX}] 900 7 0 0 3 0 0 0 0 1 0 0 161 0 Физические диски(в RAID) (CMPQIDA-MIB)) HP RAID SMART status {#SNMPVALUE} Статус физического диска (cpqDaPhyDrvStatus) 4 {$COMMUNITY} 0 1.3.6.1.4.1.232.3.2.5.1.1.6.{#SNMPINDEX} cpqDaPhyDrvStatus.[{#SNMPINDEX}] 300 7 0 0 3 0 0 0 0 1 0 0 161 0 Физические диски(в RAID) (CMPQIDA-MIB)) HP RAID physical disk status {Template_HP_InsightManager_SNMP:cpqDaPhyDrvStatus.[{#SNMPINDEX}].last(0)}=4 [HDD.FAIL] {#SNMPINDEX} Ожидается выход из строя, статус predictiveFailure(4). 0 3 0 {Template_HP_InsightManager_SNMP:cpqDaPhyDrvStatus.[{#SNMPINDEX}].last(0)}=3 [HDD.FAIL] {#SNMPINDEX} Сбой диска, статус failed(3). 0 4 0 {Template_HP_InsightManager_SNMP:cpqDaPhyDrvUsedReallocs.[{#SNMPINDEX}].prev(0)}>0&{Template_HP_InsightManager_SNMP:cpqDaPhyDrvUsedReallocs.[{#SNMPINDEX}].change(0)}>0 [HDD.REALLOC] {#SNMPINDEX} Кол-во перемещенных секторов увеличилось! 0 4 0 {Template_HP_InsightManager_SNMP:cpqDaPhyDrvSmartStatus.[{#SNMPINDEX}].last(0)}=3 [HDD.SMART] {#SNMPINDEX} SMART статус: predictiveFailure(3). Замените диск 0 3 0 {$COMMUNITY} virton {$CPQDACNTLRPERFCNTLRINDEX} 1 {$CPQDALOGDRVPERFCNTLRINDEX} 1 {$CPQDALOGDRVPERFINDEX1} 1 {$CPQDALOGDRVPERFINDEX2} 2 {Template_HP_InsightManager_SNMP:cpqHeFltTolPwrSupplyCondition.last(0)}>2 HP: Один из БП вышел из строя! 0 5 0 {Template_HP_InsightManager_SNMP:cpqHeResilentMemStatus.0.last(0)}>2 HP: Ошибка модулей ОЗУ! 0 5 0 {Template_HP_InsightManager_SNMP:cpqHeThermalTempStatus.last(0)}>2 HP: Перегрев! 0 4 0 {Template_HP_InsightManager_SNMP:cpqHeThermalCondition.0.last(0)}>2 HP: Проблемы с охлаждением! 0 4 0 {Template_HP_InsightManager_SNMP:cpqSiMibCondition.0.last(0)}>2 HP: Проверьте сервер 0 4 0 {Template_HP_InsightManager_SNMP:cpqSiMibCondition.0.nodata(1800)}=1 [AV.SNMP] HP-SNMP-AGENT не отвечает. Мониторинг по SNMP недоступен. 0 3 0 PS
Posted by wabbit .