Amazon Web Services Hosted Web Application Clustering
The topic of highly loaded applications is widely heard. He also decided to insert his 5 kopecks and share his experience in creating a highly loaded application on the AWS infrastructure.
First, I will be banal and repeat the well-known truths. There are 2 ways to scale the application:
1) vertical scaling - this is an increase in the performance of each component of the system (processor, RAM, other components);
2) horizontal, when several elements are connected together, and the system as a whole consists of many computing nodes that solve the general problem, thereby increasing the overall reliability and availability of the system. And an increase in productivity is achieved by adding additional nodes to the system.
The first approach is not bad, but there is a significant minus - the limited power of one computing node - it is impossible to infinitely increase the frequency of the processor core and bus bandwidth.
Therefore, horizontal scaling significantly outperforms its vertical brother, because with a lack of performance you can add a node (or a group of nodes) to the system.
Recently, we once again comprehended all the delights of horizontal scaling in practice: we built a highly reliable social service for fans of American football, withstanding a peak load of 200,000 requests per minute. Therefore, I want to talk about our experience in creating a highly scalable system on the Amazon Web Services infrastructure.
Typically, a web application architecture is as follows:
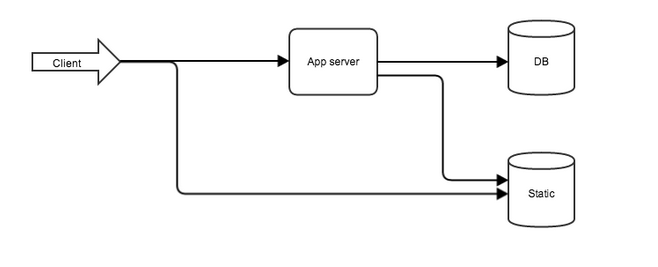
Fig. 1. Typical web application architecture
Most often, the bottlenecks of the system are the application code and the database, therefore, it is worth considering the possibility of their parallelization. We used:
First of all, we will optimize the code and database queries as much as possible, and then divide the application into several parts according to the nature of the tasks they perform. On separate servers we take out:
Each participant in the system has an individual approach. Therefore, we select a server with the most suitable parameters for the nature of the tasks to be solved.
An application is best suited for a server with the largest number of processor cores (to serve a large number of concurrent users). Amazon provides a set of Computer Optimized Instances that are best suited for these purposes.
What is database work? - Numerous disk I / O (writing and reading data). Here the server with the fastest hard disk (for example, SSD) will be the best option. And again, Amazon is happy to try and offers us Storage Optimized Instances, but the server from the General Purpose (large or xlarge) line is also suitable, since in the future I am going to scale them.
For static resources, you do not need either a powerful processor or a large amount of RAM, here the choice falls on the Amazon Simple Storage Service static resource service.
Having divided the application, I brought it to the circuit shown in Fig. 1. The
advantages of separation:
But the application itself is still non-clustered, and there are no cache servers or session replication.
For accurate experiments and testing application performance, we need one or more machines with a sufficiently wide channel. User actions will be emulated using the Apache Jmeter utility. It is good because it allows you to use real access logs from the server as test data, or proxy the browser and run several hundred parallel threads for execution.
So, the experiments showed that the resulting performance is still not enough, and the server with the application was 100% loaded (the code of the developed application turned out to be the weak link). Parallelize. 2 new elements are introduced into the game:
As it turned out, the developed application does not cope with the load assigned to it, therefore, the load must be divided between several servers.
As a load balancer, you can start another server with a wide channel and configure special software (haproxy [], nginx [], DNS []), but since work is done in the Amazon infrastructure, the existing ELB service (Elastic Load Balancer). It is very easy to configure and has good performance indicators. The first step is to clone the existing machine with the application for the subsequent addition of a couple of machines to the balancer. Cloning is done using Amazon AMI. ELB automatically monitors the status of machines added to the mailing list. To do this, the application should implement the simplest ping resource that will respond with 200 code to requests, it is indicated to the balancer.
So, after configuring the balancer to work with already two existing servers with the application, I configure the dns to work through the balancer.
This item can be skipped if the application does not have additional work, or if a simple REST service is implemented. Otherwise, it is necessary that all applications participating in the balancing have access to the common session repository. To store sessions, another large instance is launched and ram memcached storage is configured on it. Session replication is assigned to the tomcat module: memcached-session-manager [5]
Now the system looks as follows (the static server is omitted to simplify the scheme):
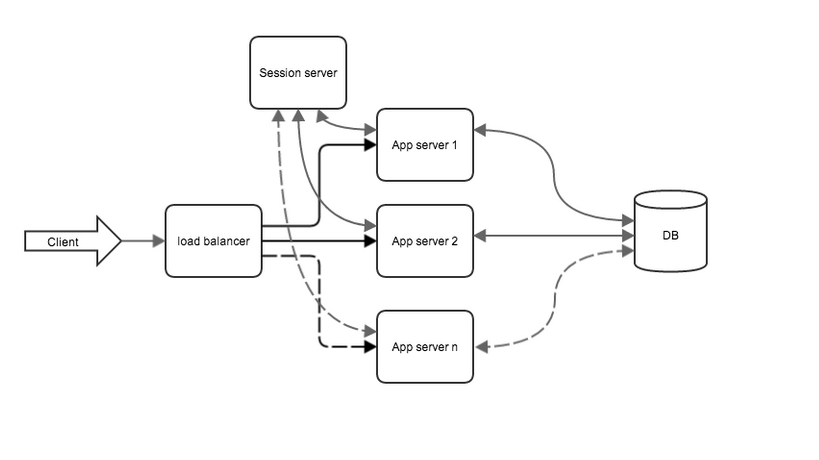
Fig. 2. System view after application
clustering. Application clustering results:
With an increasing number of servers with the application, the load on the database also increases, which it will not be able to cope with over time. It is necessary to reduce the load on the database.
So, load testing is again carried out with Apache Jmeter and this time everything depends on database performance. Optimizing work with the database, I use two approaches: caching query data and database replication for read requests.
The main idea of caching is to ensure that the data that is requested is most often stored in RAM and when repeating queries, the first thing to check is whether the requested data is in the cache, and only if there is no data, make queries to the database, followed by placing the query results to the cache. For caching, an additional server was deployed with memcached configured and sufficient RAM.
The specifics of our application involves more reading data than writing.
Therefore, we cluster the database for reading. The database replication mechanism helps here. Replication in MongoDB is organized as follows: database servers are divided into masters and slaves, while direct data recording is allowed only to the master, data is already synchronized to the slaves from it, and reading is allowed both from the master and from the slaves.

Fig. 3 DB clustering for reading
As a result of the work, we achieved what we wanted: the system processes 200,000 requests per minute.
First, I will be banal and repeat the well-known truths. There are 2 ways to scale the application:
1) vertical scaling - this is an increase in the performance of each component of the system (processor, RAM, other components);
2) horizontal, when several elements are connected together, and the system as a whole consists of many computing nodes that solve the general problem, thereby increasing the overall reliability and availability of the system. And an increase in productivity is achieved by adding additional nodes to the system.
The first approach is not bad, but there is a significant minus - the limited power of one computing node - it is impossible to infinitely increase the frequency of the processor core and bus bandwidth.
Therefore, horizontal scaling significantly outperforms its vertical brother, because with a lack of performance you can add a node (or a group of nodes) to the system.
Recently, we once again comprehended all the delights of horizontal scaling in practice: we built a highly reliable social service for fans of American football, withstanding a peak load of 200,000 requests per minute. Therefore, I want to talk about our experience in creating a highly scalable system on the Amazon Web Services infrastructure.
Typically, a web application architecture is as follows:
Fig. 1. Typical web application architecture
- the web server is the first to “meet” the user, the tasks of returning static resources and transmitting requests to the application are assigned to his shoulders;
- Further, the relay is passed to the application, where all the business logic and interaction with the database flow.
Most often, the bottlenecks of the system are the application code and the database, therefore, it is worth considering the possibility of their parallelization. We used:
- development language and core framework - java 7 and rest jersey
- application server - tomcat 7
- database - MongoDB (NoSQL)
- cache system - memcached
How it was, or through thorns to high load
Step One: Divide and Conquer
First of all, we will optimize the code and database queries as much as possible, and then divide the application into several parts according to the nature of the tasks they perform. On separate servers we take out:
- application server
- database server
- server with static resources.
Each participant in the system has an individual approach. Therefore, we select a server with the most suitable parameters for the nature of the tasks to be solved.
Application server
An application is best suited for a server with the largest number of processor cores (to serve a large number of concurrent users). Amazon provides a set of Computer Optimized Instances that are best suited for these purposes.
Database server
What is database work? - Numerous disk I / O (writing and reading data). Here the server with the fastest hard disk (for example, SSD) will be the best option. And again, Amazon is happy to try and offers us Storage Optimized Instances, but the server from the General Purpose (large or xlarge) line is also suitable, since in the future I am going to scale them.
Static Resources
For static resources, you do not need either a powerful processor or a large amount of RAM, here the choice falls on the Amazon Simple Storage Service static resource service.
Having divided the application, I brought it to the circuit shown in Fig. 1. The
advantages of separation:
- each element of the system works on a machine as adapted to its needs as possible;
- there is an opportunity for clustering the database;
- You can separately test different elements of the system to find weaknesses.
But the application itself is still non-clustered, and there are no cache servers or session replication.
Step Two: Experiments
For accurate experiments and testing application performance, we need one or more machines with a sufficiently wide channel. User actions will be emulated using the Apache Jmeter utility. It is good because it allows you to use real access logs from the server as test data, or proxy the browser and run several hundred parallel threads for execution.
Step Three: Load Balancing
So, the experiments showed that the resulting performance is still not enough, and the server with the application was 100% loaded (the code of the developed application turned out to be the weak link). Parallelize. 2 new elements are introduced into the game:
- load balancer
- session server
Load balancing
As it turned out, the developed application does not cope with the load assigned to it, therefore, the load must be divided between several servers.
As a load balancer, you can start another server with a wide channel and configure special software (haproxy [], nginx [], DNS []), but since work is done in the Amazon infrastructure, the existing ELB service (Elastic Load Balancer). It is very easy to configure and has good performance indicators. The first step is to clone the existing machine with the application for the subsequent addition of a couple of machines to the balancer. Cloning is done using Amazon AMI. ELB automatically monitors the status of machines added to the mailing list. To do this, the application should implement the simplest ping resource that will respond with 200 code to requests, it is indicated to the balancer.
So, after configuring the balancer to work with already two existing servers with the application, I configure the dns to work through the balancer.
Session Replication
This item can be skipped if the application does not have additional work, or if a simple REST service is implemented. Otherwise, it is necessary that all applications participating in the balancing have access to the common session repository. To store sessions, another large instance is launched and ram memcached storage is configured on it. Session replication is assigned to the tomcat module: memcached-session-manager [5]
Now the system looks as follows (the static server is omitted to simplify the scheme):
Fig. 2. System view after application
clustering. Application clustering results:
- increased system reliability. Even after the failure of one of the servers with the application, the balancer excludes it from the mailing list, and the system continues to function;
- to increase system performance, you just need to add another computing node with the application;
- By adding additional nodes, we were able to achieve peak performance of 70,000 requests per minute.
With an increasing number of servers with the application, the load on the database also increases, which it will not be able to cope with over time. It is necessary to reduce the load on the database.
Step 4: optimization of work with the database
So, load testing is again carried out with Apache Jmeter and this time everything depends on database performance. Optimizing work with the database, I use two approaches: caching query data and database replication for read requests.
Caching
The main idea of caching is to ensure that the data that is requested is most often stored in RAM and when repeating queries, the first thing to check is whether the requested data is in the cache, and only if there is no data, make queries to the database, followed by placing the query results to the cache. For caching, an additional server was deployed with memcached configured and sufficient RAM.
DB replication
The specifics of our application involves more reading data than writing.
Therefore, we cluster the database for reading. The database replication mechanism helps here. Replication in MongoDB is organized as follows: database servers are divided into masters and slaves, while direct data recording is allowed only to the master, data is already synchronized to the slaves from it, and reading is allowed both from the master and from the slaves.
Fig. 3 DB clustering for reading
Final: 200K requests per minute
As a result of the work, we achieved what we wanted: the system processes 200,000 requests per minute.









