Drupal 7. DIY subscription module
Instead of the foreword
The functionality of subscribing to any content is one of the most demanded in the web industry. Many sites boast similar. And our project was no exception. Given: Drupal 7 site . What is required: find or write a module that implements all the necessary functions. Which option was chosen and what came of it, you can read on.

Search for suitable modules
The most obvious and predictable option is the Subscriptions module . This module allows users to subscribe to changes to nodes and taxonomies (including new comments on content). The main reason for rejecting this option was the lack of the ability to subscribe without reloading the page and the orientation of the module mainly on email newsletters.
Another option is the Notifications module . In principle, its extensibility and scalability were suitable for us (for creating our types of subscriptions), but the lack of a stable version for 7.x did not allow us to use it.
So, there was only one solution - to write the module ourselves.
Initial setup
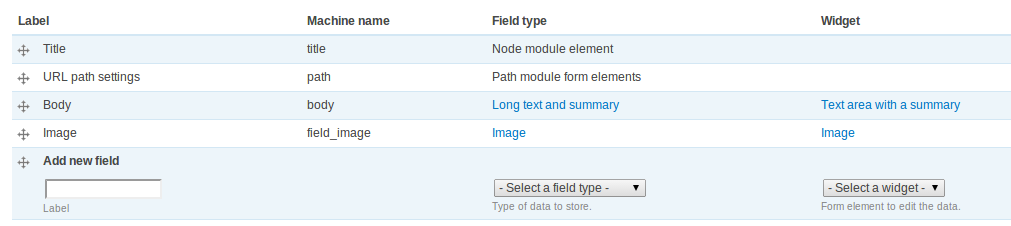
It does not make sense to fully describe the entire module (this will definitely go beyond the scope of the article), so I will describe the main functionality and start with the main points: admin settings. First, you need to create a content type (in my example, this is Item ) with a certain number of fields. Hereinafter, the main focus will be on the Title , Body , Image fields .
Secondly, the next step is the creation of Views to display nodes of this type. For example, as in the following figure:
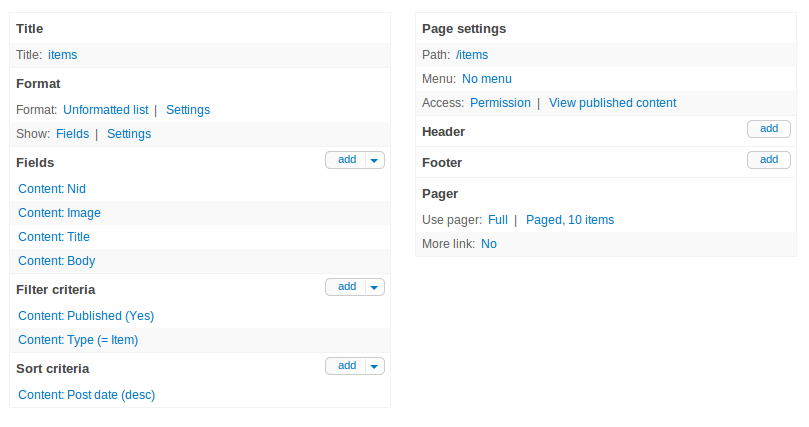
In addition to the previously described fields in this Views, Nid is also displayed. Why is this required? Having temized this field (to which the subscription event will be attached later), we can configure its output at our discretion.
Module files and their description
To start module development, create a custom_subscriptions folder in sites / all / modules . We will need 4 files: custom_subscriptions.info (basic information about the module), custom_subscriptions.install (installation settings), custom_subscriptions.module (actually the module file itself) and custom_subscriptions.js (the script will implement the subscription mechanism without reloading the page). Now about each of them in more detail.
Info file
The contents of the custom_subscriptions.info file :
name = "Custom Subscriptions"
description = "Allows users to follow content"
core = 7.x
version = 7.x-1.0
php = 5.1
scripts[] = custom_subscriptions.js
As you can see, the script file was connected here.
Installation file
For the example posted here, one table in the database will be sufficient, containing the fields uid (user identifier) and nid (identifier of the node the user is subscribed to).
The contents of the custom_subscriptions.install file :
 t('The base table for subscriptions'),
    'fields' => array(
      'sid' => array(
        'type' => 'serial',
        'unsigned' => TRUE,
        'not null' => TRUE,
      ),
      'uid' => array(
        'type' => 'int',
        'length' => 10,
        'not null' => TRUE,
      ),
      'nid' => array(
        'type' => 'int',
        'length' => 10,
        'not null' => TRUE,
      ),
    ),
   'primary key' => array('sid'),
  );
  return $schema;
}
After installation, the table will have the following structure:

Theme setup
First of all, you should create a template for displaying Nid in Views . In our case, it has the name views-view-field - items - page - nid.tpl.php (the name for the template can be obtained in the Advance d / Theme section in the View s settings ). The template file is placed in the theme (the Zen subtopic called STARTERKIT was used ), in the templates folder .
The contents of the file views-view-field - items - page - nid.tpl.php :
uid != 0): ?>
  fields('cs')
    ->condition('uid', $user->uid)
    ->condition('nid', $output)
    ->execute()
    ->rowCount();
  ?>

    FOLLOW'); ?>

    FOLLOWING'); ?>
As you can see from the presented code, the subscription field is available only to authorized users. In addition, depending on the availability of an entry in the custom_subscriptions table , the field title changes from FOLLOW (if the user is not already subscribed to the node) to FOLLOWING (if there is already a subscription). Information about the committed action ( follow / unfollow ) and the identifier of the ni d node will be stored in the href attribute .
Development of a subscription mechanism
Since the functionality of the module file and the script are interconnected, they will be considered together.
Let's start with the visual effects: in the script file, we add the appearance of a field for subscribing to hover over the content, as well as changing the text of the inscription from FOLLOWING to UNFOLLOW when you hover over this field (the same as it was done on Twitter ).
The contents of the custom_subscriptions.j s file :
(function ($) {
  Drupal.behaviors.collectiveMove = {
    attach: function(context, settings) {
      // show buttons on hover
      $('.view-items .views-row').hover(function() {
        $(this).find('.views-field-nid a').css('display', 'block');
      });
      // hide buttons on mouseleave
      $('.view-items .views-row').mouseleave(function() {
        $(this).find('.views-field-nid a.follow, .views-field-nid a.unfollow').css('display', 'none');
      });
      // show 'unfollow' when user has already had a subscription
      $('.view-items .views-row .views-field-nid .following').live('mouseover', function() {
        $(this).text('UNFOLLOW');
        $(this).addClass('unfollow');
      });
      // hide 'unfollow' when user has already had a subscription
      $('.view-items .views-row .views-field-nid .following').live('mouseout', function() {
        $(this).text('FOLLOWING');
        $(this).removeClass('unfollow');
      });
    }
  };
})(jQuery);
Now the fun part begins - data transfer between the module file and the script. The main idea is this: when you click on the FOLLOW post, the request transmits data about the action ( 'follow' ) and the node identifier to the module, where the received data is written to the database. For UNFOLLOW, the mechanism is similar, but the action will be different ( 'unfollow '), and the received data will be deleted from the database table.
First, create a page to which the request will be sent using hook_men u.
The contents of the custom_subscriptions.module file :
 'Ajax callback',
    'page callback' => 'custom_subscriptions_ajax',
    'access callback' => TRUE,
    'type' => MENU_CALLBACK,
  );
  return $items;
}
I remind you that according to the rules for writing code for Drupal modules, only the opening php tag is set .
The page is ready - add functionality.
The contents of the custom_subscriptions.module file :
fields(array(
          'uid' => $user->uid,
          'nid' => $_POST['nid'],
        ))
        ->execute();
      print(1);
    }
  }
  else if($_POST['type'] == 'unfollow') {
    if ($_POST['nid']) {
      db_delete('custom_subscriptions')
        ->condition('uid', $user->uid)
        ->condition('nid', $_POST['nid'])
        ->execute();
      print(1);
    }
  }
  else {
    print(0);
  }
}
Depending on the action ( follow / unfollow ) received from the post- request , we add or remove a record from the table. Each entry is identified by uid (take the identifier of the global user) and nid . If successful, print '1'. Now the most important thing remains - to transfer data by clicking on the nid field on the page formed using Views . The contents of the custom_subscriptions.js file :
(function ($) {
  Drupal.behaviors.collectiveMove = {
    attach: function(context, settings) {
      ...
      // click on follow/unfollow buttons
      $('.view-items .views-row .views-field-nid a').bind('click', function(e) {
        e.preventDefault();
        var href = $(this).attr('href');
        var strs = href.split('/');
        var item = $(this);
        $.post(
          Drupal.settings.basePath + 'custom_subscriptions_ajax',
          {
            type: strs[0],
            nid: strs[1],
          },
          function (data) {
            if (data == 1) {
              if (strs[0] == 'follow') {
                item.text('UNFOLLOW');
                item.removeClass('follow');
                item.addClass('following unfollow');
                item.attr('href', 'unfollow/' + strs[1]);
              }
              if (strs[0] == 'unfollow') {
                item.text('FOLLOW');
                item.removeClass('following');
                item.removeClass('unfollow');
                item.addClass('follow');
                item.attr('href', 'follow/' + strs[1]);
              }
            }
          }
        );
      });
    }
  };
})(jQuery);
When we click on the link in the nid field, we go through the following steps:
- prohibition of the default action (to prevent page reloading);
- getting the action and nid from the href attribute in which they were written in the template;
- transferring the received data to the page prepared in the module;
- after receiving a successful result, change the name and some attributes of the displayed link.
Instead of an afterword
This article described the process of creating the simplest module of node subscriptions in Drupal 7 . The main point is the implementation of subscriptions without reloading the page using the post- request.
You can take a look at the finished module here: github.com/Sacret/custom_subscriptions