 September 30, 2013 at 09:17
Create a private cloud with System Center Virtual Machine Manager 2012 R2
All fiery greetings and wishes of a sprightly beginning of the next working week!
On this wonderful day, I want to tell you about how the cloud is created using our wonderful tool - Virtual Machine Manager 2012 R2. I’m sure that the approach of using the cloud as a model for the provision of IT services and resources is gaining momentum and many administrators, and companies in general, are already familiar with virtualization - and gradually begin to move to the next level - creating a private cloud. Well - let's take a closer look at this interesting process in action!
Before we go directly to the process of creating a cloud in VMM, it will not be superfluous to once again recall why we are doing this and what will be useful.
Since virtualization technology is the foundation of any modern cloud, the first association that should arise in an inquiring mind is computing resources. In connection with the spread of virtualization, the cloud as the next level of the IT model that uses virtualization for its tasks tells us that now we are not considering servers when taking into account the capacities and deployment of services and applications, but directly computing resources. The main resources that we need and which we virtualize areCPU resources, resources of random access memory (RAM), storage resources for data storage (the notorious data storage) and communication resources (or just networks). Of course, we will not get away from the fact that the VMs and the services consisting of them need to be located somewhere, and the issue of placement will be addressed directly to the computer object, virtualization host, but from the point of view of the cloud approach, we are more interested in the amount of resources - after all, such technologies how dynamic memory does not allow longer in standard mode "in the habit" to perceive resources inflexible blocks, with which hosts and are, in fact ...
and the fact that memory is allocated dynamically, and if we are talking about providing storage space for VMs and servo s - then surely we run into methodsThin Provisioning and data deduplication mechanisms are just a few, but the most obvious examples of the fact that the approach to the consumption (and hence the allocation) of resources in the traditional style does not allow to accurately and adequately assess resources and allocate them correctly for services ... Now we look by the amount of computing and infrastructure resources we need when we want to create a new VM or service based on the VM.
We will not get too focused on the details of the cloud, the main point is that, firstly, we treat resources as pools, collections, and secondly, this is the level of abstraction, because virtualization abstracts us from the physical to the logical ( everything is simple here - after all, a VM is nothing more than a set of files - and this is a logical level already), i.e. we operate with virtual machines as with files ... For those who want to understand in more detail the features of the cloud, I suggest digging here . Well, the picture is for clarity.

Distinctive features of the cloud as a model .
So let's cross over to our cloud creation process.
In exactly the same way as the VMM management console looks like in the picture below (Figure 1), and at first glance it is not very clear what needs to be done next, but let's figure it out together.

Figure 1. VMM interface.
Mechanically, I want to get into the Clouds tab and start sculpting, creating, but let's not rush. In the context of VMM, a cloud object is a logical limiter perimeter that overlays on top of physical resources. And since we are talking about physical resources, then first of all we need to add them, i.e. Now we will add virtualization hosts to VMM - for this we will go to the Fabric section , then - as in the figure.
As you can see from the next screen, we can add many different platforms as virtualization hosts, not only Hyper-V - but also VMware ESXi / vSphere and Citrix XenServer are also supported as virtualization platforms.

Figure 2. Adding virtualization host resources to VMM.
In our case, we will focus on the Hyper-V platform and will look for hosts with this technology. Further along the movement along the Add Resources Wizard, we need to specify the names of the target hosts - these can be NetBIOS and FQDN names, as well as just an IP address. However, it is worth noting that the account under which you search for hosts must have local administrator rights on the target virtualization host - otherwise, nothing interesting will come out with you and me. After the wizard finds the necessary hosts, it remains to put checkmarks in front of the objects of interest to us and complete the process.

Figure 3. Locating hosts in the Active Directory directory service and adding them to VMM.
Well, we added virtualization hosts and now we’re running to create a cloud, but ... Let's not rush and figure out what to do next. If we stop and think for a moment, then as a result of our actions, we added 2 hosts (in this case), which has CPU resources, RAM (everything is exactly the same), but then there are 2 more very important elements - these are storages, storage and data networks. Everything is approximately clear with the story: in the simplest case, we can use the local disks of our server, if any, for hosting the VM (and in this example, this configuration is considered), but still - in real life, we will rather work with industrial storage (which can connect via iSCSI or Fiber Channel, and there may also be a whole zoo of different storage systems - since we have SMI-S in this case. SMI-S is a vendor-neutral storage management system protocol that allows you to allocate and manage storage for VMs and services directly in VMM), or as an alternative, we can use a file server and SMB 3.0 balls to host a VM, VMM It will cope without problems.

Figure 4. Adding storage resources to host VMs and services in VMM.
If in our particular case we solved the problem with load allocation thanks to the local disk resources of our hosts, now we should deal with the last infrastructural component of our cloud - networks. The topic of creating and managing virtual networks in VMM requires a separate series of articles, and detailed ones, which is why in this article I will briefly talk about the components that we need.
At first, it would be very nice to create a single virtual switch to manage the network along all our hosts. In the context of VMM, such an object is called a logical switch.However, in addition to creating a single switch, we also need a mechanism for automatically assigning a host network adapter to communicate with this switch - but for this purpose we need to create an uplink port profile . From the point of view of VMM, you first need to create a port profile (for this, go to Fabric-> Networking-> Port Profiles and right-click on the last one - then create a profile without options).

Figure 5. Creating a port profile in VMM.
I draw your attention to the fact that the port profile can be created taking into account the possibility of timing (or aggregation of interfaces) built into Windows Server 2012/2012 R2. If you create an uplink profile on a regular interface, then the timing parameters will not affect the interface properties in any way. If you are careful, then you noticed that there is an option not to create an uplink profile, but a virtual port profile. The virtual port profile, in turn, is assigned to the virtual VM adapter to map to the correct physical adapter - but this is not the case today, just to complete the picture I complete the story about this topic.
Now let's move on to creating a Logical Switch, it is created in the same place, in the Networking tab.
After starting the wizard, we will set the name of the virtual switch switch, we can select the switch extensions, if any are installed (for example, Cisco 1000 Nexus V). The most interesting things are a little further, on the Uplink tab - here we just indicate the uplink profile created earlier.

Figure 6. Creating a virtual switch and configuring communication with the uplink profile.
We are not interested in the profile of the virtual port, so we can safely complete the configuration of the virtual switch on the last screen of the wizard. After we created our virtual switch with and configured profiles, it would now be nice to apply our switch to our Hyper-V hosts. To do this, go to the sectionFabric-> Servers-> All Hosts, select the host we need and right-click on it - then we are interested in the section Virtual Switches (virtual switches). Next we select New Virtual Switch -> New Logical Switch. Select the desired network adapter and uplink profile. Repeat this operation on all necessary hosts (or whistle the PowerShell script and paste all the names there))).

Figure 7. Creating and binding a logical switch to a host.
Now the matter is left to the small. We linked the hosts together, now we need to make the network accessible to the cloud itself. Now we need to create a logical network (Logical Network) - a single continuous space along many hosts, which will host the network of virtual machines (VM Networks).
Here the question arises: "What is the difference between a logical network and a VM network?"
The answer is quite simple: VM networks are placed on top of logical networks. The point here is that a logical network is a continuous network space along multiple hosts. VM networks are built on top of logical networks using network virtualization, i.e. creation of isolated networks that behave as if they are different physical networks, i.e. they do not know about each other's existence. Thus, the combination of these mechanisms allows you to build a huge variety of isolated virtual networks along the hosts, and of course, if the networks do not know about each other's existence, then the IP addresses in them can be repeated. This is exactly what we will do when creating our network. Another important point is the fact that the cloud as a VMM element works with a network component at the logical network level, i.e.

Figure 8. Creating a logical network in VMM .
To enable network virtualization, we activate the first checkmark, as in the figure. The second check mark is necessary for us if we want to put an equal sign between the logical network and the VM network - i.e. this action will create a VM network with the same name and scope as the logical network. This is needed more for infrastructure management networks; user loads are not recommended to be placed in this way, because There is a risk of access to the infrastructure by unauthorized users.
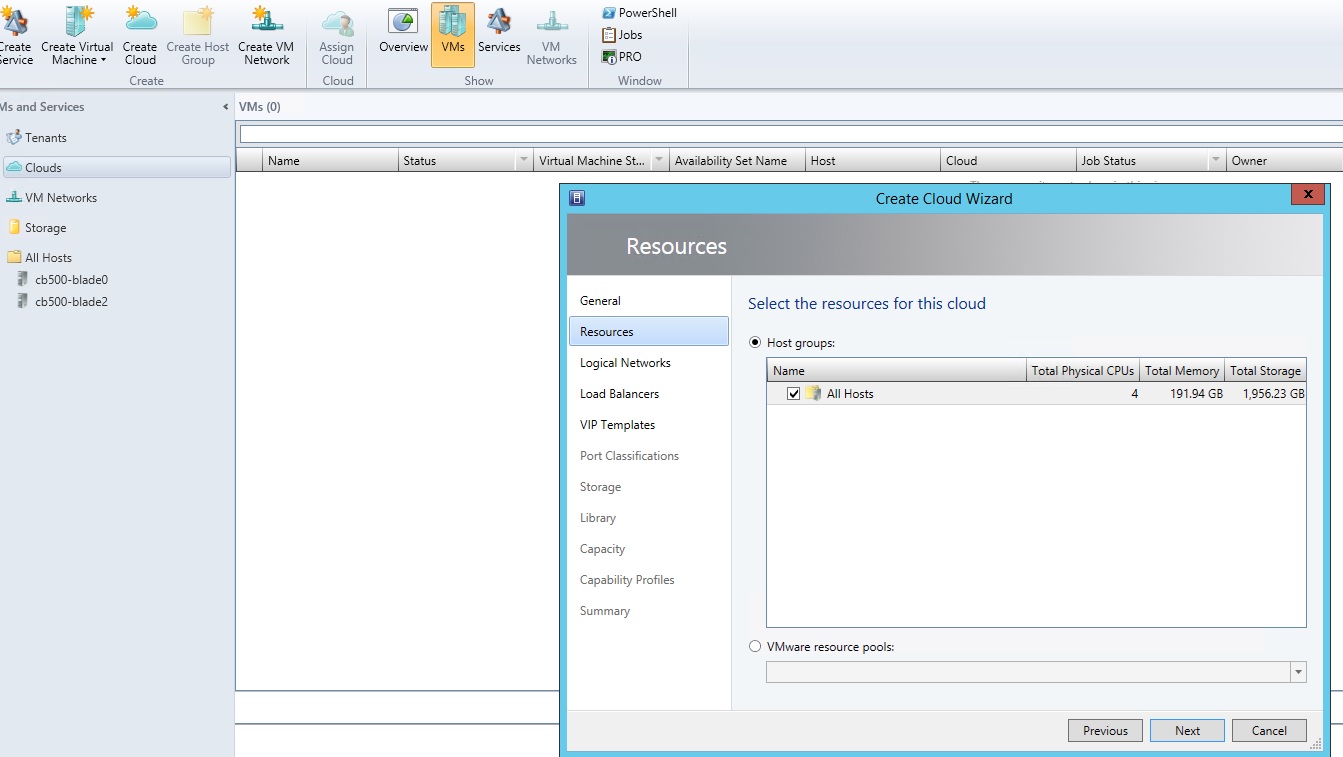
After we have prepared our infrastructure, it is time to put all the components together and connect them with the logical hypostasis of the cloud object in VMM. To do this, go to VMs and Services-> Clouds-> right-click and create . Next, a cloud creation wizard will appear that will ask us to set the cloud name, then ask you to select the perimeter of resources (virtualization hosts) over which the cloud will be pulled (I selected All Hosts), select the logical network we need, and assign storage under the VM. An interesting point in creating a cloud is the ability to limit resource consumption, both in relative and quantitative terms.
This is necessary so that cloud users do not gobble up all resources, thereby preventing a lack of resources for other users.

Figure 9. Limiting resource consumption in the cloud in VMM.
After we created the cloud, it remains to assign its users to this cloud, who will both consume its resources (on the one hand) and manage it directly (on the other hand). To do this, in the same section of VMs and Services, select the freshly created cloud and press the Assign Cloud button . If we have a previously created role, then we can assign it to the cloud, but in our case we have not created a role yet - so let's look at what role options are available to us and what is their meaning.
And so - a choice of 4 roles: Fabric Administrator (aka Delegated Administrator, Read-Only Administrator, Tenant Administrator and Application Administrator (aka Self-Service User). The first role is a full-fledged, all (almost) powerful admin, but within the boundaries of the cloud to which it is assigned Read-Only Administrator is clearly the role of the notorious helpdesk-troubleshooter - since it does not mean anything but simple monitoring of the situation ... Tenant Administrator is a role for managing Windows Azure subscriptions and is needed for hybrid cloud models.Application Administrator is actually the end user of the service and resource striker

Figure 10. User roles in the VMM cloud.
After you have created the cloud and assigned users, you can access the cloud from the user and the administrator at the web interface level, for this you need to deploy the App Controller and bind the VMM server instance - the clouds from it will automatically tighten.

Figure 11. Access to the cloud through the App Controller portal.
Well, dear colleagues! Here we have created a cloud, now you can tackle the issues of creating VMs and services in your cloud.
This process is extremely exciting and non-trivial - let's talk about it some other time in one of the next articles about the cloud and System Center 2012 R2.
It remains to add links to download products:
Windows Server 2012 R2 Preview - technet.microsoft.com/en-us/evalcenter/dn205286
System Center 2012 R2 Preview - technet.microsoft.com/en-us/evalcenter/dn205295
See you again and cloudless (hehe) weeks!
Respectfully,
Fireman,
he is also Lord Flame,
George A. Hajiyev.
On this wonderful day, I want to tell you about how the cloud is created using our wonderful tool - Virtual Machine Manager 2012 R2. I’m sure that the approach of using the cloud as a model for the provision of IT services and resources is gaining momentum and many administrators, and companies in general, are already familiar with virtualization - and gradually begin to move to the next level - creating a private cloud. Well - let's take a closer look at this interesting process in action!
What is a cloud?
Before we go directly to the process of creating a cloud in VMM, it will not be superfluous to once again recall why we are doing this and what will be useful.
Since virtualization technology is the foundation of any modern cloud, the first association that should arise in an inquiring mind is computing resources. In connection with the spread of virtualization, the cloud as the next level of the IT model that uses virtualization for its tasks tells us that now we are not considering servers when taking into account the capacities and deployment of services and applications, but directly computing resources. The main resources that we need and which we virtualize areCPU resources, resources of random access memory (RAM), storage resources for data storage (the notorious data storage) and communication resources (or just networks). Of course, we will not get away from the fact that the VMs and the services consisting of them need to be located somewhere, and the issue of placement will be addressed directly to the computer object, virtualization host, but from the point of view of the cloud approach, we are more interested in the amount of resources - after all, such technologies how dynamic memory does not allow longer in standard mode "in the habit" to perceive resources inflexible blocks, with which hosts and are, in fact ...
and the fact that memory is allocated dynamically, and if we are talking about providing storage space for VMs and servo s - then surely we run into methodsThin Provisioning and data deduplication mechanisms are just a few, but the most obvious examples of the fact that the approach to the consumption (and hence the allocation) of resources in the traditional style does not allow to accurately and adequately assess resources and allocate them correctly for services ... Now we look by the amount of computing and infrastructure resources we need when we want to create a new VM or service based on the VM.
We will not get too focused on the details of the cloud, the main point is that, firstly, we treat resources as pools, collections, and secondly, this is the level of abstraction, because virtualization abstracts us from the physical to the logical ( everything is simple here - after all, a VM is nothing more than a set of files - and this is a logical level already), i.e. we operate with virtual machines as with files ... For those who want to understand in more detail the features of the cloud, I suggest digging here . Well, the picture is for clarity.
Distinctive features of the cloud as a model .
Lego in front of the cloud
So let's cross over to our cloud creation process.
In exactly the same way as the VMM management console looks like in the picture below (Figure 1), and at first glance it is not very clear what needs to be done next, but let's figure it out together.
Figure 1. VMM interface.
Mechanically, I want to get into the Clouds tab and start sculpting, creating, but let's not rush. In the context of VMM, a cloud object is a logical limiter perimeter that overlays on top of physical resources. And since we are talking about physical resources, then first of all we need to add them, i.e. Now we will add virtualization hosts to VMM - for this we will go to the Fabric section , then - as in the figure.
As you can see from the next screen, we can add many different platforms as virtualization hosts, not only Hyper-V - but also VMware ESXi / vSphere and Citrix XenServer are also supported as virtualization platforms.
Figure 2. Adding virtualization host resources to VMM.
In our case, we will focus on the Hyper-V platform and will look for hosts with this technology. Further along the movement along the Add Resources Wizard, we need to specify the names of the target hosts - these can be NetBIOS and FQDN names, as well as just an IP address. However, it is worth noting that the account under which you search for hosts must have local administrator rights on the target virtualization host - otherwise, nothing interesting will come out with you and me. After the wizard finds the necessary hosts, it remains to put checkmarks in front of the objects of interest to us and complete the process.
Figure 3. Locating hosts in the Active Directory directory service and adding them to VMM.
Well, we added virtualization hosts and now we’re running to create a cloud, but ... Let's not rush and figure out what to do next. If we stop and think for a moment, then as a result of our actions, we added 2 hosts (in this case), which has CPU resources, RAM (everything is exactly the same), but then there are 2 more very important elements - these are storages, storage and data networks. Everything is approximately clear with the story: in the simplest case, we can use the local disks of our server, if any, for hosting the VM (and in this example, this configuration is considered), but still - in real life, we will rather work with industrial storage (which can connect via iSCSI or Fiber Channel, and there may also be a whole zoo of different storage systems - since we have SMI-S in this case. SMI-S is a vendor-neutral storage management system protocol that allows you to allocate and manage storage for VMs and services directly in VMM), or as an alternative, we can use a file server and SMB 3.0 balls to host a VM, VMM It will cope without problems.
Figure 4. Adding storage resources to host VMs and services in VMM.
If in our particular case we solved the problem with load allocation thanks to the local disk resources of our hosts, now we should deal with the last infrastructural component of our cloud - networks. The topic of creating and managing virtual networks in VMM requires a separate series of articles, and detailed ones, which is why in this article I will briefly talk about the components that we need.
At first, it would be very nice to create a single virtual switch to manage the network along all our hosts. In the context of VMM, such an object is called a logical switch.However, in addition to creating a single switch, we also need a mechanism for automatically assigning a host network adapter to communicate with this switch - but for this purpose we need to create an uplink port profile . From the point of view of VMM, you first need to create a port profile (for this, go to Fabric-> Networking-> Port Profiles and right-click on the last one - then create a profile without options).
Figure 5. Creating a port profile in VMM.
I draw your attention to the fact that the port profile can be created taking into account the possibility of timing (or aggregation of interfaces) built into Windows Server 2012/2012 R2. If you create an uplink profile on a regular interface, then the timing parameters will not affect the interface properties in any way. If you are careful, then you noticed that there is an option not to create an uplink profile, but a virtual port profile. The virtual port profile, in turn, is assigned to the virtual VM adapter to map to the correct physical adapter - but this is not the case today, just to complete the picture I complete the story about this topic.
Now let's move on to creating a Logical Switch, it is created in the same place, in the Networking tab.
After starting the wizard, we will set the name of the virtual switch switch, we can select the switch extensions, if any are installed (for example, Cisco 1000 Nexus V). The most interesting things are a little further, on the Uplink tab - here we just indicate the uplink profile created earlier.
Figure 6. Creating a virtual switch and configuring communication with the uplink profile.
We are not interested in the profile of the virtual port, so we can safely complete the configuration of the virtual switch on the last screen of the wizard. After we created our virtual switch with and configured profiles, it would now be nice to apply our switch to our Hyper-V hosts. To do this, go to the sectionFabric-> Servers-> All Hosts, select the host we need and right-click on it - then we are interested in the section Virtual Switches (virtual switches). Next we select New Virtual Switch -> New Logical Switch. Select the desired network adapter and uplink profile. Repeat this operation on all necessary hosts (or whistle the PowerShell script and paste all the names there))).
Figure 7. Creating and binding a logical switch to a host.
Now the matter is left to the small. We linked the hosts together, now we need to make the network accessible to the cloud itself. Now we need to create a logical network (Logical Network) - a single continuous space along many hosts, which will host the network of virtual machines (VM Networks).
Here the question arises: "What is the difference between a logical network and a VM network?"
The answer is quite simple: VM networks are placed on top of logical networks. The point here is that a logical network is a continuous network space along multiple hosts. VM networks are built on top of logical networks using network virtualization, i.e. creation of isolated networks that behave as if they are different physical networks, i.e. they do not know about each other's existence. Thus, the combination of these mechanisms allows you to build a huge variety of isolated virtual networks along the hosts, and of course, if the networks do not know about each other's existence, then the IP addresses in them can be repeated. This is exactly what we will do when creating our network. Another important point is the fact that the cloud as a VMM element works with a network component at the logical network level, i.e.
Figure 8. Creating a logical network in VMM .
To enable network virtualization, we activate the first checkmark, as in the figure. The second check mark is necessary for us if we want to put an equal sign between the logical network and the VM network - i.e. this action will create a VM network with the same name and scope as the logical network. This is needed more for infrastructure management networks; user loads are not recommended to be placed in this way, because There is a risk of access to the infrastructure by unauthorized users.
It's time for the clouds
After we have prepared our infrastructure, it is time to put all the components together and connect them with the logical hypostasis of the cloud object in VMM. To do this, go to VMs and Services-> Clouds-> right-click and create . Next, a cloud creation wizard will appear that will ask us to set the cloud name, then ask you to select the perimeter of resources (virtualization hosts) over which the cloud will be pulled (I selected All Hosts), select the logical network we need, and assign storage under the VM. An interesting point in creating a cloud is the ability to limit resource consumption, both in relative and quantitative terms.
This is necessary so that cloud users do not gobble up all resources, thereby preventing a lack of resources for other users.
Figure 9. Limiting resource consumption in the cloud in VMM.
After we created the cloud, it remains to assign its users to this cloud, who will both consume its resources (on the one hand) and manage it directly (on the other hand). To do this, in the same section of VMs and Services, select the freshly created cloud and press the Assign Cloud button . If we have a previously created role, then we can assign it to the cloud, but in our case we have not created a role yet - so let's look at what role options are available to us and what is their meaning.
And so - a choice of 4 roles: Fabric Administrator (aka Delegated Administrator, Read-Only Administrator, Tenant Administrator and Application Administrator (aka Self-Service User). The first role is a full-fledged, all (almost) powerful admin, but within the boundaries of the cloud to which it is assigned Read-Only Administrator is clearly the role of the notorious helpdesk-troubleshooter - since it does not mean anything but simple monitoring of the situation ... Tenant Administrator is a role for managing Windows Azure subscriptions and is needed for hybrid cloud models.Application Administrator is actually the end user of the service and resource striker
Figure 10. User roles in the VMM cloud.
After you have created the cloud and assigned users, you can access the cloud from the user and the administrator at the web interface level, for this you need to deploy the App Controller and bind the VMM server instance - the clouds from it will automatically tighten.
Figure 11. Access to the cloud through the App Controller portal.
Well, dear colleagues! Here we have created a cloud, now you can tackle the issues of creating VMs and services in your cloud.
This process is extremely exciting and non-trivial - let's talk about it some other time in one of the next articles about the cloud and System Center 2012 R2.
It remains to add links to download products:
Windows Server 2012 R2 Preview - technet.microsoft.com/en-us/evalcenter/dn205286
System Center 2012 R2 Preview - technet.microsoft.com/en-us/evalcenter/dn205295
See you again and cloudless (hehe) weeks!
Respectfully,
Fireman,
he is also Lord Flame,
George A. Hajiyev.









