September 25, 2013 at 02:26
How PHPixie Works - Life of a single request, container and paradigm

I have written many times about the PHPixie framework and programming on it. This time we look inside and look at the application life cycle, fortunately the simplicity and linearity of the code allow us to do this with relative ease.
Like Symfony, PHPixie consists of two parts: a component library and a base project, although in the case of PHPixie, the base project is thinner and consists of only a few files. Here he plays the role of an example, and therefore, changing it for himself is not only welcomed, but in some cases even necessary. It is for this that it is important to understand what is happening in the system and how. Using my somewhat limited drawing skills, I prepared a query processing diagram
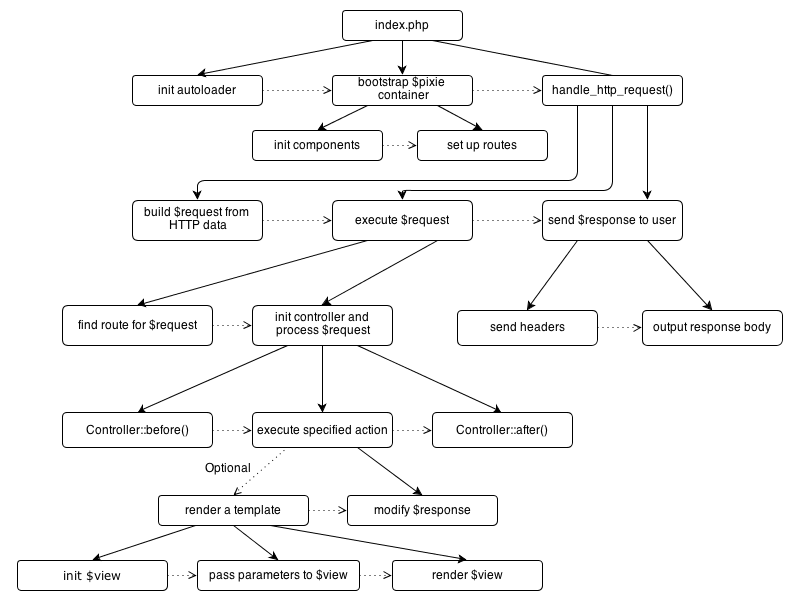
Of course, for those who are already familiar with MVC (or even VC in this case, since I did not draw a model), this scheme will probably seem familiar, but for beginners it can be very useful. So, let's start with index.php where all the queries get, here the most important lines are:
$pixie = new \App\Pixie();
$pixie->bootstrap($root)->handle_http_request();
And right away we get to the most important part, the App \ Pixie class which is the heart of the framework, its DI container. Through it, you can access all other components. App \ Pixie inherits from PHPixie \ Pixie from the PHPixie-Core library. The base project announces this class instead of using PHPixie \ Pixie directly to provide the developer with the opportunity to make changes to it (for example, plug in a module).
It’s worth noting right away that you can’t add new entities to this container on the go, like in Silex, you need to describe everything explicitly in the class. Although this may not seem so convenient at first glance, it can achieve better code readability, fully document all entities (since they all become class attributes), and also get hints for these entities in the IDE. Since PHPixie \ Pixie also contains all factoring methods, this will allow us to easily replace any class of the framework with your own by overloading the corresponding method.
The bootstrap () method initializes $ pixie, reads the configuration, enables exception handling, etc. Just in handle_http_request () the request is being processed. This process consists of three stages:
- Creating the $ request object of class PHPixie \ Request
- This object is passed to the appropriate controller and the corresponding action is performed.
- During execution, the controller modifies the $ response object (PHPixie \ Response)
- Data from $ response (headers and content) is sent to the user
All three of the most important objects $ request, $ response and $ pixie are available as attributes of the PHPixie \ Controller class. Now let’s digress a bit on a few more paradigms for writing PHPixie code:
Do not use the “new” operator anywhere except factoring methods. Each new class must have a factorial method (for example, in App \ Pixie) to create its instances. This approach makes it easy to replace one class with another, which is especially important when writing unit tests. So testing for example the controller, you can now transfer the locked App \ Pixie to it, which instead of real classes will transmit their mokee.
Do not use static properties and methods.Using statics greatly complicates the writing of tests. Using PHPixie you can easily do without them, just add an instance as an attribute of the App \ Pixie and you can access it from almost anywhere. So we actually get a singleton. By the way, you can do this by adding it to $ instance_classes.
namespace App;
class Pixie extends \PHPixie\Pixie {
    public function __construct() {
           $this->instance_classes['singleton'] = '\App\Singleton';
    }
}
// Теперь мы можем использовать $pixie->singleton в любом месте,
// и всегда получить тот же объект. В качестве дополнительного бонуса
// объект будет создан только тогда когда он будет нужен
How modules work
Each module for PHPixie is an additional class library that provides its DI container very similar to the main PHPixe \ Pixie, that is, it consists of factory methods for creating class instances that are included in the module. Then we just add it to the array of modules in the main container:
namespace App;
class Pixie extends \PHPixie\Pixie {
	protected $modules = array(
		'db' => '\PHPixie\DB',
		'orm' => '\PHPixie\ORM'
	);
}
// Теперь мы можем использовать $pixie->db и $pixie->orm
But what if I want to replace the PHPixie \ ORM \ Model class with my App \ Model, for example? It's simple, you still need to make your own App \ ORM (extends PHPixie \ ORM) get () method which, instead of the PHPixie \ ORM \ Model, will return the one we need. in this, one of the framework’s ideas manifests itself even more - to use standard OOP techniques as much as possible instead of some kind of magic. For example, to replace the class of the framework itself, you have to use subclass_prefix and do it at the configuration level rather than the actual programming. This approach allows you to greatly improve your understanding of the system, as for the most part you can figure out the file without knowing anything about the framework, just by looking at the classes themselves.
But what about hooks, events and more?
They are not and as I understand it will not. Such things are completely from a different paradigm since they make the code non-linear, especially with regard to events, where it is always not completely clear which of the listeners will start first and what happens if he calls some kind of event. Also, the readability of backtraces very often suffers from their use, since they are called by the framework itself somewhere where the programmer himself did not write the code for sure. If you need to do something in some place, it is much easier to overload the method that just does this and add to it the logic that you need.
In the next article, I will either examine in more detail how PHPixie works with databases, or more broadly describe the pros and cons of linear versus event driven programming.