Fix the USB cable on the knee
Background
In connection with studying abroad, I had to transfer completely to a laptop. I took my SS Kana gaming mouse with me. Of course, the wired mouse is not designed for frequent movements, over time, the cord began to break at the very base, more and more often the contact began to disappear. Over the past three months, I tried to maintain the performance of the mouse, even stopped taking it to classes, but day P came, and the contact disappeared completely; no manipulations have yielded results.My Greed for an expensive mouse and Laziness to go buy a new one rallied against me and forced me to make contact. I’ll make a reservation right away that I am writing this article post-factum, I didn’t write down anything step by step, but I will show with an example how this is done. The quality of the photos leaves much to be desired, but you can catch the gist.
Equipment
Knife. All. I do not have electrical tape or any tools at hand.
An ordinary kitchen knife. Sharp enough to cut insulation without any problems.
The initial version included soldering with a state soldering iron received at the university, however, due to some circumstances, which I will describe later, I had to redo everything.
Initial option
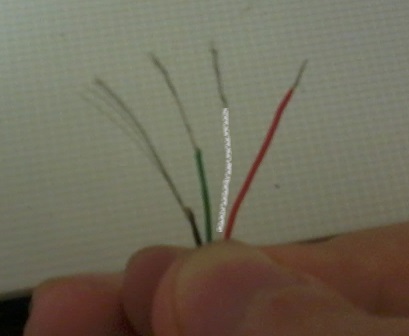
As I said, the cable broke at the very bottom. In order to get a little space, I cut a plug with a knife and stripped all four wires. He twisted the braid of the cable and turned it to the side, after which he went to the university for a soldering iron. They gave me an old soldering iron, a coil with millimeter solder and a jar of flux. I have soldering experience, so it turned out fine. The only drawback is that since all four wires are very short, located on the same level, and I didn’t have insulation, I got a kind of “rose” from wires sticking out in different directions. However, the trial run was successful - the mouse came to life, and I, proud of myself, returned to the hostel.But there I was disappointed. Without going into details, I most likely got black and red wires and the laptop blocked the USB socket. Therefore, whatever I did next, the mouse did not respond.
Trying to figure it out, I began to sin on the braid (that she was shorting the wires), even cut it off, nothing helped. In the end, I completely cut the plug and decided to do everything in a new way. It would be worth rebooting the computer and trying again, most likely, the mouse would work. Who knows ... The

connection is very small, I don’t have a normal camera. It’s just that all four wires stick out from the plug in a bundle and the corresponding wire is soldered to each. The braid is cut off because I thought she was shorting the wires. Never mind.
Cable connection
Already in the evening I took out a mouse from a desk drawer and set to work. First of all, I took a new plug from an unnecessary mini-USB cable.
USB cords are not much different from each other - four wires (black and red for power, white and green for information) and a braid. Therefore, any USB cable will do.
When fixing, I used the method described here . In short - multicore cables are connected by a “ladder”. Thus, the wires do not touch each other and the connection is thinner.
Using the remaining piece of wire as an example, I will show how this is done. First, carefully cut off the top insulation to a length of about four to five centimeters.

We unwrap the braid and set aside.

Then we bare 4 wires with a “ladder” - red is only the very tip to twist; white is a little more authentic, with the expectation of not hitting red; then green. Black we clean the farthest. We expose the other cable in the same way, only in a mirror - only the black tip, then green, white and red at the very base. Thus, we exclude the shorting of wires to each other.
It remains only to connect the two cables to each other. We connect each wire by twisting. I hope you do not confuse the colors. After twisting, it is better to cut off excess wires to avoid unnecessary contacts.

In my version, I still covered the whole thing with a piece of top insulation to avoid touching the braid. In the future, I plan to either get an electrical tape somewhere, or ask the girls for colorless varnish for insulation.
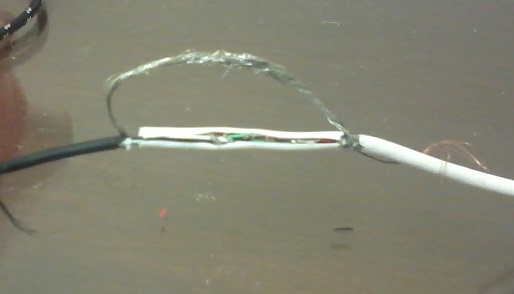
After processing the electrical tape, of course, it will all take a divine form, but for now the braid will hang in such a strange way. The connection is working, there are no extra contacts. The mouse works like new!
However
Immediately the mouse refused to work. It was already completely desperate, I noticed a message from the system about violations of the USB-inputs. As I said, the original version shorted the contacts and the laptop chopped off the USB inputs. After rebooting, the mouse worked again. Of course, the connection is short-lived, without electrical tape in any way, but the mouse works.Thanks for attention. I hope this article helped you.
PS this is my first article on Habré. Thanks for the invite!