Creating a Bashkir layout for Mac OS X
- Tutorial
Changing the operating system or device, if you write in some not very common language, for example, Bashkir, is always a challenge. Therefore, people are still sitting on Windows XP, with custom layouts crookedly written in the registry and equally crooked “Bashkir” fonts. After all, although it is crooked, it works. For many years I was sitting on Windows and somehow didn’t even think about the existence of the problem, but reseeding on the Mac, I found that by default there is no Bashkir layout in OS X. I went to look for a custom on the Internet, where I was also disappointed. How so, it seems like so many years have passed? As a result, as it once was with Android, I decided to do everything on my own.
In fact, not only the Bashkirs have problems, more numerous nations still do not have their layouts in the new OS or release them with a long delay. Therefore, I will try to describe the creation process in order to help those who are as enthusiastic as I am.

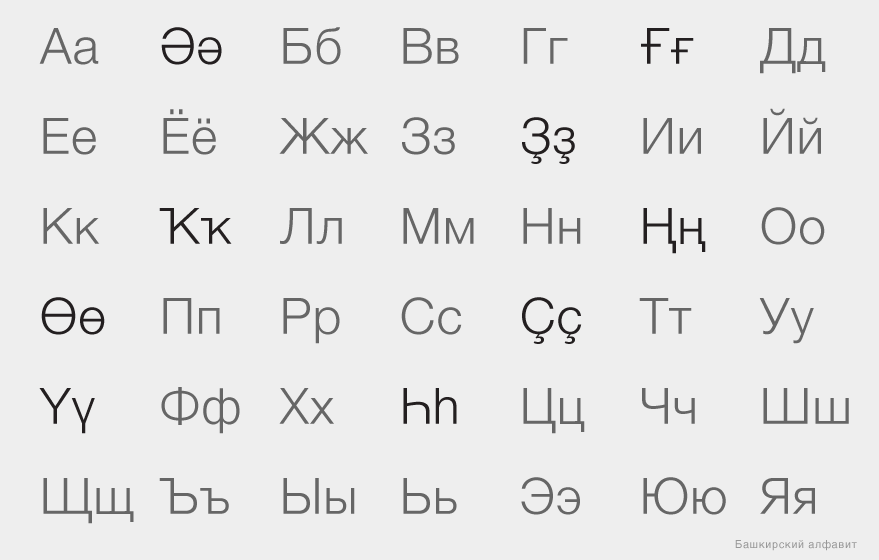
In order to better understand what will be discussed next, first take a look at the Bashkir alphabet. There are 42 letters in total, 33 of them are letters of the Russian alphabet + 9 additional. In my opinion, this is a lot, especially since some letters are used only for borrowing from Russian. Such redundancy does not allow you to comfortably fit on the keyboards. In general, many peoples in the territory of the former USSR who experienced the influence of Stalinism have the same problem.
Before you begin, you need to try to formulate simple principles from which you can build on and apply in moments of doubt. In my case, part of the original principles did not take root and fell off, faced with reality, I will talk about them below. But those that remained:
Before you start working in the editor, you need to list and draw all the states in which the keyboard may be. These states depend on the keystrokes of modifiers such as Command (cmd), Shift (⇧), Control (ctrl), Option (alt) and Caps Lock. In the case of the Bashkir keyboard, I got the following states:
Honestly, in the course of work, I constantly experimented and the conditions changed, added and removed. For example, I tried to leave the numbers only in the state with Command pressed, but this did not work during the test, the text editor did not want to type the text and waited for a command from the user. In the end, simple and familiar solutions won.
To create the layout, I used the free Ukelele program released by the SIL community , which is known, for example, for developing good free fonts and language software.
The file was based on the existing Russian layout of YTsUKEN. There are 2 ways to do this: first, select Russian as the OS input source, then in the program open File - New From Current Input Source (that is, a new one from the current input source); second, open the layout file that comes with the System Keybords / Cyrillic / Russian.keylayout program
All work takes place in a visual editor, it is simple and convenient. To assign a character to a key, double-click on the virtual keyboard button. To edit the layout state with the modifier turned on, you just need to press the modifier key, instead of the standard state, the state corresponding to the modifier will appear. In order not to suffer constantly holding down the key, turn on sticking in the Menu - View - Sticky Modifiers.
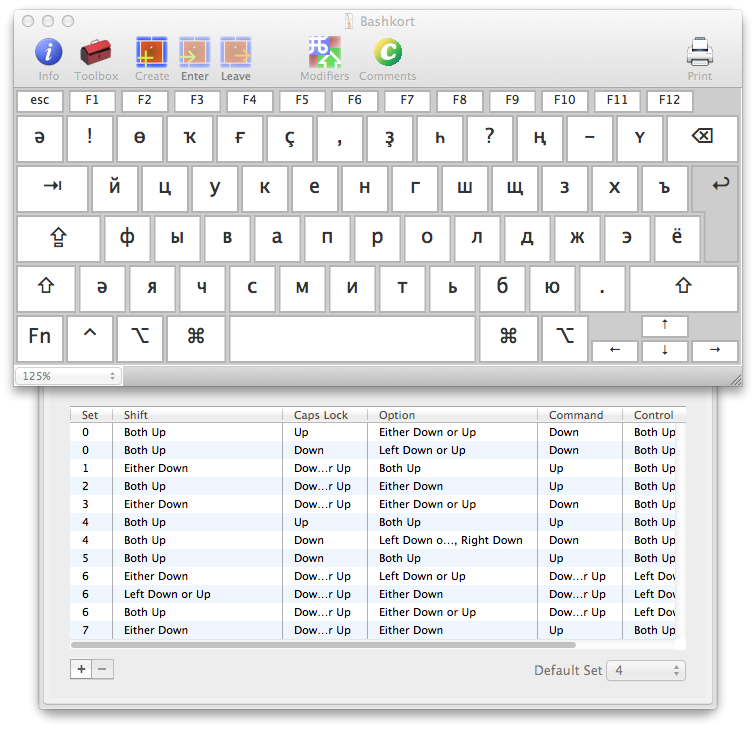
An overview of all created states can be opened using command + shift + m (in the screenshot above, the numbering does not match the one I set at the beginning). At the bottom, it is separately indicated which of the states is standard (default set). In the table, we see which modifiers are used for each state.
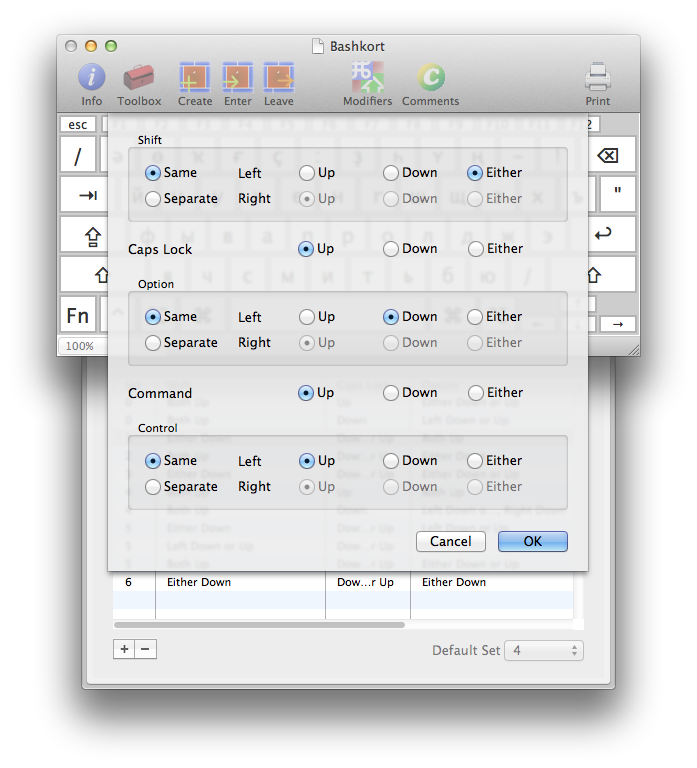
You may need to create some state yourself. To do this, click "+", and select which modifiers to use. Note that for the Shift, Option, and Control keys, you can assign the right or left key separately. My conditions turned out to be similar to those in the Russian layout.
After that, you need to choose which character set you will use.
Apple has released more than a dozen different types of keyboards, differing in key layout and standards. Therefore, you must always test the layout. A list of all keyboards opens in Menu - View - Keyboard Types.

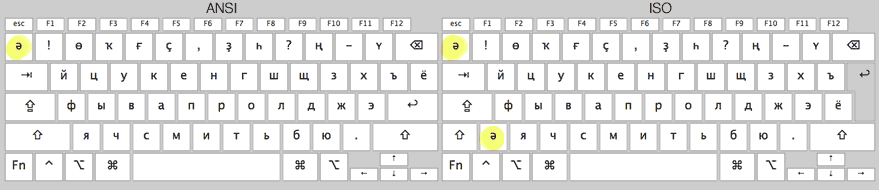
Pay particular attention to the difference between the ANSI and ISO types, the second has more keys. For example, I had a problem that in modern Apple Wireless ISO keyboards, the “>” key is located next to the numbers in place of the “клавиши” key, and when the user has an ANSI keyboard, the letter Ә suddenly disappeared. Moreover, if you transfer it to the “» ”key, to ISO it would not be in a row of numbers, but next to I in the 4th row. As a result, while I had to leave the letter Ә on both keys.
In one of the intermediate versions of the layout, the idea came to me to add compatibility with another layout popular in the tower, where additional letters are typed through alt. But during testing, I realized that it was inconvenient.
Due to differences in the configurations of the physical keyboard of Mac, it was not possible to save the top row with additional additional letters of the Bashkir alphabet exactly the same as in the PC layout. For example, “Ң” has moved to the place “No.” because “No.” is definitely not a commonly used sign. I would like to ask the authors of the initial layout how he got there at all. A comma took the place of the colon, because it is needed much more often and is marked on the physical keyboard. When you press Shift, the semicolon takes the place of the semicolon, and the dots are the colon, it is quite easy to remember.

With the states when Option and Option + Shift were pressed, I “played” the tag for the longest time. But they helped me figure out a few rules. On Option all the digits and characters of the upper row (+ part of the typographic characters depicted on the physical keyboard) moved from the standard state of the English layout, and Option + Shift from it the same state with Shift. I tried
as much as possible to use mnemonic rules, for example, the number is on the N key, and the euro sign is on the Latin E key. The states when you pressed Command, as well as Command + Shift, as planned, fully correspond to the standard English layout, with Shift + Control - English Control. This is necessary for the keyboard and keyboard shortcuts to work in the system and applications.
First of all, you need to create a small copy of the flag corresponding to the language in the graphic editor, 16x12 px (or 16x11 px in size, depending on what is drawn on the flag) and save it in PNG format. You can convert
all this to the native format of Mac .icns icons using the fasticms program . After starting the program, a cube will appear on the screen where we drag the png file and save it as icns in the window that opens. To attach the icon to the layout go to Menu - Keyboard - Attach Icon File.
It remains to do a few more steps before publishing the layout.
You need to add the name of the layout, which will be displayed in the system (Menu — Keyboard — Set Keyboard Name). Examples of names: ArmenianWesternQWERTY, Serbian-Latin and Turkish-QWERTY-PC. I named my version of Bashkir-PC.
Now you need to set the language, script, region, and script option (Menu — Keyboard — Set Keyboard Name). In the Bashkir language, Cyrillic is used.
Remember to control the versions of your layout (Menu — Keyboard — Set Version Info).
Well that's it, now you can save files and use. Please note that together with the main layout file in keylayout formatnext to it must be an icon file in icns with the same name.
You can download and install the created Bashkir layout.
Installation instructions are on the project page.
The Tatar layout is an example of a layout where additional letters are inserted through AtlGr.
Kyrgyz layout
Another instruction for creating a layout in Ukelele
You can read the training materials that come with the program (Ukelele Tutorial folder).
In fact, not only the Bashkirs have problems, more numerous nations still do not have their layouts in the new OS or release them with a long delay. Therefore, I will try to describe the creation process in order to help those who are as enthusiastic as I am.
Bashkir alphabet
In order to better understand what will be discussed next, first take a look at the Bashkir alphabet. There are 42 letters in total, 33 of them are letters of the Russian alphabet + 9 additional. In my opinion, this is a lot, especially since some letters are used only for borrowing from Russian. Such redundancy does not allow you to comfortably fit on the keyboards. In general, many peoples in the territory of the former USSR who experienced the influence of Stalinism have the same problem.
The principles used in creating the layout
Before you begin, you need to try to formulate simple principles from which you can build on and apply in moments of doubt. In my case, part of the original principles did not take root and fell off, faced with reality, I will talk about them below. But those that remained:
- Most people are used to the standard layout in Windows, first released on Vista (hereinafter referred to everywhere, PC layout). Not everything is perfect in it, it is not the most comfortable, but it has already taken root. Therefore, in order to make a working tool as quickly as possible, I started from it. And the original layout, taking into account the real frequency of the use of letters in the language, is a task for the near future.
- Compatibility of additional (typographic) characters with the English layout. It is very convenient when you see on the physical keyboard what you can type. In the Russian layout, many characters found their place according to the residual principle (and there are fewer of them), so we try not to focus on it (this applies only to additional characters).
- The numeric keypad goes under Option (Alt). Yes, at first glance, this is a very dubious decision. But there is no other choice, because letters are used much more often.
- It is important that with the help of the Bashkir layout, you can type texts in Russian without switching.
Design
Before you start working in the editor, you need to list and draw all the states in which the keyboard may be. These states depend on the keystrokes of modifiers such as Command (cmd), Shift (⇧), Control (ctrl), Option (alt) and Caps Lock. In the case of the Bashkir keyboard, I got the following states:
- Bashkir alphabet lowercase + basic punctuation marks - this is the standard state, by default;
- Bashkir uppercase + basic punctuation marks - Caps Lock;
- Uppercase letters of the alphabet + basic punctuation marks 2 - Shift;
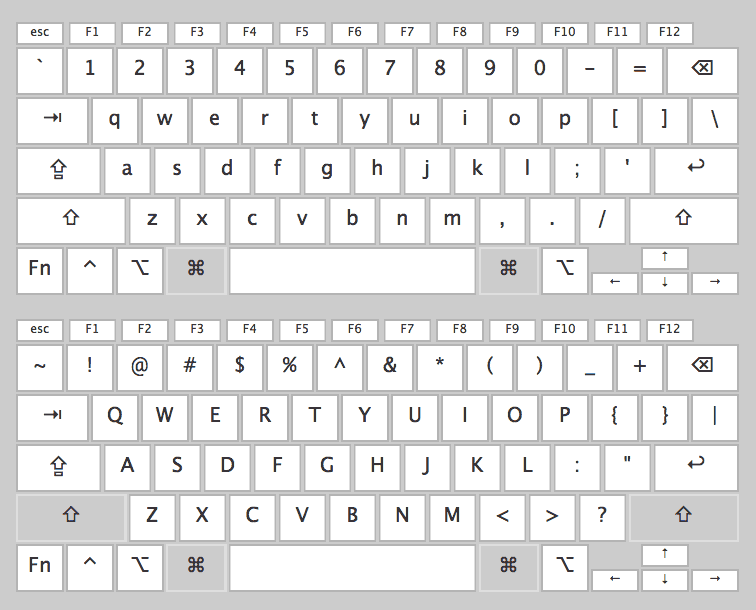
- English qwerty lowercase (for commands and hotkeys, identical to the English layout) - Сommand;
- English QWERTY uppercase (identical to the English layout) - Command + Shift;
- Additional characters + numbers - Option;
- Additional characters 2 - Option + Shift;
- Additional characters (identical to the English layout) - Control.
Honestly, in the course of work, I constantly experimented and the conditions changed, added and removed. For example, I tried to leave the numbers only in the state with Command pressed, but this did not work during the test, the text editor did not want to type the text and waited for a command from the user. In the end, simple and familiar solutions won.
Work in the editor
To create the layout, I used the free Ukelele program released by the SIL community , which is known, for example, for developing good free fonts and language software.
The file was based on the existing Russian layout of YTsUKEN. There are 2 ways to do this: first, select Russian as the OS input source, then in the program open File - New From Current Input Source (that is, a new one from the current input source); second, open the layout file that comes with the System Keybords / Cyrillic / Russian.keylayout program
All work takes place in a visual editor, it is simple and convenient. To assign a character to a key, double-click on the virtual keyboard button. To edit the layout state with the modifier turned on, you just need to press the modifier key, instead of the standard state, the state corresponding to the modifier will appear. In order not to suffer constantly holding down the key, turn on sticking in the Menu - View - Sticky Modifiers.
An overview of all created states can be opened using command + shift + m (in the screenshot above, the numbering does not match the one I set at the beginning). At the bottom, it is separately indicated which of the states is standard (default set). In the table, we see which modifiers are used for each state.
You may need to create some state yourself. To do this, click "+", and select which modifiers to use. Note that for the Shift, Option, and Control keys, you can assign the right or left key separately. My conditions turned out to be similar to those in the Russian layout.
After that, you need to choose which character set you will use.
- If you select Empty, a clean layout with no characters opens.
- Standart, you can open some of the common sets, for example, English QWERTY.
- And if you need to select an existing set, select Copy of existing map.
Apple has released more than a dozen different types of keyboards, differing in key layout and standards. Therefore, you must always test the layout. A list of all keyboards opens in Menu - View - Keyboard Types.
Pay particular attention to the difference between the ANSI and ISO types, the second has more keys. For example, I had a problem that in modern Apple Wireless ISO keyboards, the “>” key is located next to the numbers in place of the “клавиши” key, and when the user has an ANSI keyboard, the letter Ә suddenly disappeared. Moreover, if you transfer it to the “» ”key, to ISO it would not be in a row of numbers, but next to I in the 4th row. As a result, while I had to leave the letter Ә on both keys.
In one of the intermediate versions of the layout, the idea came to me to add compatibility with another layout popular in the tower, where additional letters are typed through alt. But during testing, I realized that it was inconvenient.
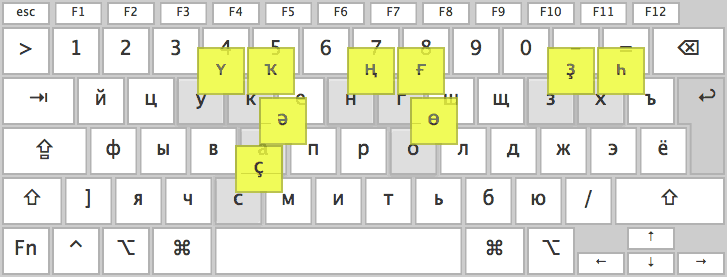
The final layout layout
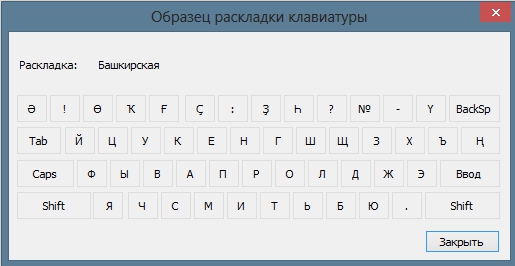
Due to differences in the configurations of the physical keyboard of Mac, it was not possible to save the top row with additional additional letters of the Bashkir alphabet exactly the same as in the PC layout. For example, “Ң” has moved to the place “No.” because “No.” is definitely not a commonly used sign. I would like to ask the authors of the initial layout how he got there at all. A comma took the place of the colon, because it is needed much more often and is marked on the physical keyboard. When you press Shift, the semicolon takes the place of the semicolon, and the dots are the colon, it is quite easy to remember.
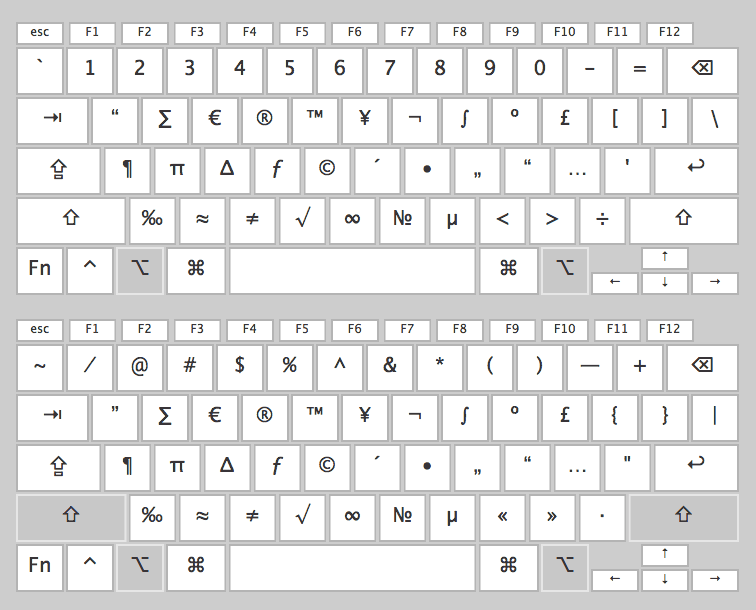
With the states when Option and Option + Shift were pressed, I “played” the tag for the longest time. But they helped me figure out a few rules. On Option all the digits and characters of the upper row (+ part of the typographic characters depicted on the physical keyboard) moved from the standard state of the English layout, and Option + Shift from it the same state with Shift. I tried
as much as possible to use mnemonic rules, for example, the number is on the N key, and the euro sign is on the Latin E key. The states when you pressed Command, as well as Command + Shift, as planned, fully correspond to the standard English layout, with Shift + Control - English Control. This is necessary for the keyboard and keyboard shortcuts to work in the system and applications.
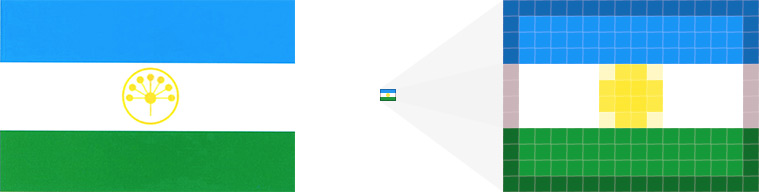
Adding an Icon
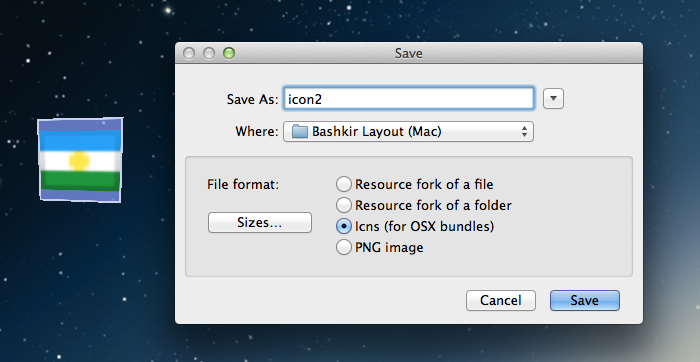
First of all, you need to create a small copy of the flag corresponding to the language in the graphic editor, 16x12 px (or 16x11 px in size, depending on what is drawn on the flag) and save it in PNG format. You can convert
all this to the native format of Mac .icns icons using the fasticms program . After starting the program, a cube will appear on the screen where we drag the png file and save it as icns in the window that opens. To attach the icon to the layout go to Menu - Keyboard - Attach Icon File.
Setting advanced options
It remains to do a few more steps before publishing the layout.
You need to add the name of the layout, which will be displayed in the system (Menu — Keyboard — Set Keyboard Name). Examples of names: ArmenianWesternQWERTY, Serbian-Latin and Turkish-QWERTY-PC. I named my version of Bashkir-PC.
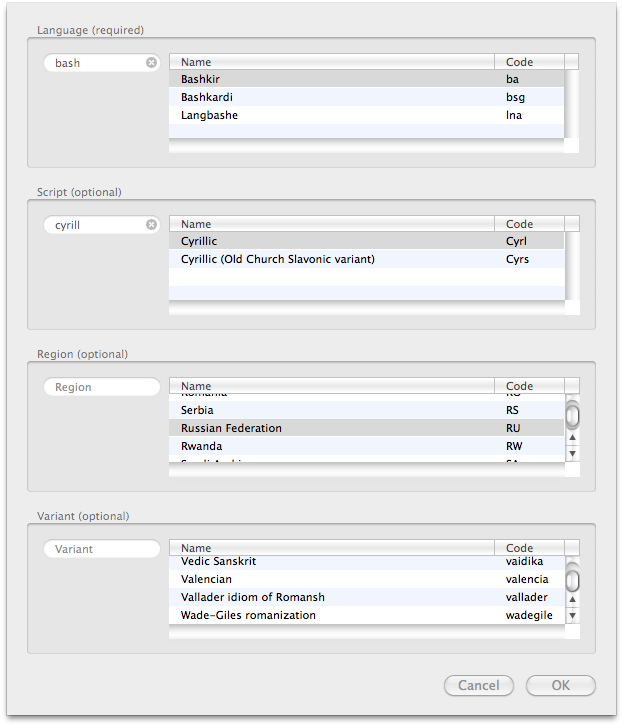
Now you need to set the language, script, region, and script option (Menu — Keyboard — Set Keyboard Name). In the Bashkir language, Cyrillic is used.
Remember to control the versions of your layout (Menu — Keyboard — Set Version Info).
Well that's it, now you can save files and use. Please note that together with the main layout file in keylayout formatnext to it must be an icon file in icns with the same name.
You can download and install the created Bashkir layout.
Installation instructions are on the project page.
Additional materials on the topic
The Tatar layout is an example of a layout where additional letters are inserted through AtlGr.
Kyrgyz layout
Another instruction for creating a layout in Ukelele
You can read the training materials that come with the program (Ukelele Tutorial folder).