Install Tiny Tiny RSS on Zyxel Keenetic Router
Most recently, the Good Corporation closed Google Reader. Thousands of users faced the choice of reading RSS feeds. Someone immediately found what he liked, and someone is still in search. But all online readers have one significant drawback - they, like Google Reader, can be closed at any time. The way out of this situation is to install one of the most popular self-hosted readers - Tiny Tiny RSS (hereinafter tt-rss). It can be installed on a VDS server, or a home computer. But you need to pay for the server, albeit small, but money, and it is problematic to keep the PC always on (in order to have access to the reader from everywhere). However, if you have a Zyxel Keenetic router, then tt-rss can install a reader on it!
To install, you must:
More about firmware. Keenetic routers have two series of firmware V1 and V2, respectively. The firmware of the first series is noteworthy in that they allow you to install packages on an external usb drive / flash drive. And this is realized without the firmware of the router itself! However, for the second generation of Keenetic routers (Keenetic II / Keenetic Giga II / Keenetic Ultra), the V1 firmware is unofficial (technical support is not provided for them). In my case, there was a Keenetic Giga II router, which was flashed with V1 firmware. Firmware V1 for the second generation of routers can be taken here (navigate by the latest date). The firmware process is quite simple, for this, in the system settings of the router you need to go to "system file management" and replace the file
Let's move on to the next step - installing the necessary packages. You must first install the opkg package manager. I will not consider this process, because it is described in sufficient detail on the author’s website , which is engaged in the assembly of these packages, for which special thanks to him.
So, after opkg is installed, we directly proceed to the installation of the necessary packages. We connect to the router via ssh and execute the following command:
Now configure them. To configure, you need to edit the configuration files on a USB flash drive / disk. It is convenient to do this using the WinSCP program (select the SCP protocol in the connection settings).
Set up a lighttpd server. In the file we
Add index.php to the list of index file names:
And add the mime type svg to correctly display the icons in the tt-rss interface:
Uncomment the following lines:
We remove the restriction on the execution time of php scripts, for this we edit
We will configure the autoload of http, mysql servers, and cron, which will be needed to automatically update feeds. This is done by renaming the scripts in the folder
Download the tarball from the official site . Download it to a folder
We reboot the router to start all services. Again, connect to the router via ssh. Create a database with a name
Change the password for access to the database:
Next we enter:
Upon request, enter the password that was set and enter the following commands:
To access the mysql-based need to add iptables rule to resolve the lo interface:
Restarting the mysql server:
Open the address in the browser
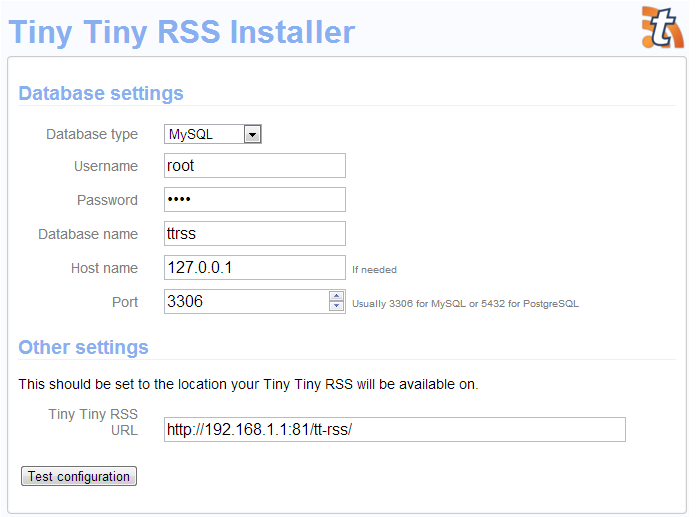
Fill in the fields as in the screenshot. Click test confiduration. If everything is okay, the following messages will appear:

Feel free to click Initialize database. And then Save configuration.
Let's try to open the address
We update the page in the browser, enter the admin login, password password. Everything, you can use it!
To update feeds, add a task to cron, open a file
This command updates feeds every 30 minutes.
To access the reader from the outside, you need to uncomment the iptables rule in the startup script of the http server
In tt-rss, an annoying bug was discovered on the router, which consists in the fact that win-1251 encoded feeds do not want to be processed. The following crutches can be used to solve this problem. In file
add (thanks for the Star Per tip from the forum ):
Thus, we got an rss reader, which at one point will not be closed for one reason or another. In addition, this reader works in multi-user mode, it can be shared with your friends.
Do not forget to change the default password in the reader! Enjoy reading.
To install, you must:
- Any router from the Zyxel Keenetic family with firmware V1
- USB flash drive, or USB hard drive (preferred)
More about firmware. Keenetic routers have two series of firmware V1 and V2, respectively. The firmware of the first series is noteworthy in that they allow you to install packages on an external usb drive / flash drive. And this is realized without the firmware of the router itself! However, for the second generation of Keenetic routers (Keenetic II / Keenetic Giga II / Keenetic Ultra), the V1 firmware is unofficial (technical support is not provided for them). In my case, there was a Keenetic Giga II router, which was flashed with V1 firmware. Firmware V1 for the second generation of routers can be taken here (navigate by the latest date). The firmware process is quite simple, for this, in the system settings of the router you need to go to "system file management" and replace the file
firmwarewith the downloaded firmware file.Let's move on to the next step - installing the necessary packages. You must first install the opkg package manager. I will not consider this process, because it is described in sufficient detail on the author’s website , which is engaged in the assembly of these packages, for which special thanks to him.
So, after opkg is installed, we directly proceed to the installation of the necessary packages. We connect to the router via ssh and execute the following command:
opkg install libiconv-full libmysqlclient libncurses libncursesw libopenssl libpcre libreadline libxml2 lighttpd lighttpd-mod-fastcgi mysql-server php5 php5-cgi php5-mod-ctype php5-mod-dom php5-mod-hash php5-mod-iconv php5-mod-json php5-mod-mbstring php5-mod-mysql php5-mod-session uclibcxx mysql-server php5-mod-json php5-mod-mysql php5-mod-mbstring php5-mod-hash php5-mod-ctype php5-mod-iconv php5-mod-dom
Now configure them. To configure, you need to edit the configuration files on a USB flash drive / disk. It is convenient to do this using the WinSCP program (select the SCP protocol in the connection settings).
Set up a lighttpd server. In the file we
/media/DISK_A1/system/etc/lighttpd/lighttpd.confactivate the fastcgi module, for this we uncomment the lines:server.modules = (
"mod_fastcgi"
)
Add index.php to the list of index file names:
index-file.names = ( "index.html", "default.html", "index.htm", "default.htm", "index.php" )
And add the mime type svg to correctly display the icons in the tt-rss interface:
mimetype.assign = (
...
".xml"   => "text/xml",
".svg"   => "image/svg+xml"
)
Uncomment the following lines:
fastcgi.server = (
	".php" => (
		"localhost" => (
			"min-procs" => 1,
			"max-procs" => 1,
			"max-load-per-proc" => 4,
			"socket" => "/media/DISK_A1/system/tmp/php-fastcgi.socket",
			"bin-path" => "/media/DISK_A1/system/usr/bin/php-fcgi"
		)
	)
)
We remove the restriction on the execution time of php scripts, for this we edit
/media/DISK_A1/system/etc/php.iniChange the parameter max_execution_time, setting the value 0. We will configure the autoload of http, mysql servers, and cron, which will be needed to automatically update feeds. This is done by renaming the scripts in the folder
/media/disk_a1/system/etc/init.d/. To do this, run the following commands:mv /media/DISK_A1/system/etc/init.d/K02cron /media/DISK_A1/system/etc/init.d/S02cron
mv /media/DISK_A1/system/etc/init.d/K27mysqld /media/DISK_A1/system/etc/init.d/S27mysqld
mv /media/DISK_A1/system/etc/init.d/K50lighttpd /media/DISK_A1/system/etc/init.d/S50lighttpd
Download the tarball from the official site . Download it to a folder
/media/DISK_A1/system/www/. This can be done, for example, using the same WinSCP. To unpack, we perform:cd /media/DISK_A1/system/www/
tar -xvzf ./Tiny-Tiny-RSS-1.8.tar.gz
rm ./Tiny-Tiny-RSS-1.8.tar.gz
mv /media/DISK_A1/system/www/Tiny-Tiny-RSS-1.8/ /media/DISK_A1/system/www/tt-rss
We reboot the router to start all services. Again, connect to the router via ssh. Create a database with a name
mysql(for a user with a name root). We execute the commands:mysql_install_db --datadir=/media/DISK_A1/system/var/mysql --basedir=/media/DISK_A1/system/usr --force
/media/DISK_A1/system/etc/init.d/S27mysqld restart
Change the password for access to the database:
/media/DISK_A1/system/usr/bin/mysqladmin -u root password "new-password"
Next we enter:
mysql -u root -p
Upon request, enter the password that was set and enter the following commands:
create database ttrss;
use ttrss;
source /media/DISK_A1/system/www/tt-rss/schema/ttrss_schema_mysql.sql;
quit;
To access the mysql-based need to add iptables rule to resolve the lo interface:
iptables -I INPUT -i lo -j ACCEPT. To automatically execute this command upon reboot, you can add this command to the mysql server autostart script /media/DISK_A1/system/etc/init.d/S27mysqld:case "" in
start)
start
iptables -I INPUT -i lo -j ACCEPT
;;
Restarting the mysql server:
/media/DISK_A1/system/etc/init.d/S27mysqld restart
Open the address in the browser
192.168.1.1:81/tt-rss/where the tt-rss installer opens: Fill in the fields as in the screenshot. Click test confiduration. If everything is okay, the following messages will appear:
Feel free to click Initialize database. And then Save configuration.
Let's try to open the address
192.168.1.1:81/tt-rss/. Swears that you can not run from the root. There are no other users in the router, so turn off this check, and allow launch as root. We’ll edit for this /media/DISK_A1/system/www/tt-rss/include/sanity_check.php. if (function_exists('posix_getuid') && posix_getuid() == 0) {Install in the line posix_getuid() == -1. We update the page in the browser, enter the admin login, password password. Everything, you can use it!
To update feeds, add a task to cron, open a file
/media/DISK_A1/system/etc/crontabs/rootand add*/30 * * * * /media/DISK_A1/system/usr/bin/php-cgi /media/DISK_A1/system/www/tt-rss/update.php --feeds --quiet
This command updates feeds every 30 minutes.
To access the reader from the outside, you need to uncomment the iptables rule in the startup script of the http server
/media/DISK_A1/system/etc/init.d/S50lighttpd:iptables -A INPUT -p tcp --dport $PORT_F -j ACCEPT
In tt-rss, an annoying bug was discovered on the router, which consists in the fact that win-1251 encoded feeds do not want to be processed. The following crutches can be used to solve this problem. In file
/media/DISK_A1/system/www/tt-rss/include/rssfuncs.phpbeforeif (!$rss) {
$rss = new FeedParser($feed_data);
$rss->init();
}
add (thanks for the Star Per tip from the forum ):
if (stripos($feed_data, 'encoding="windows-1251"'))
{
    $feed_data = str_ireplace(
        'encoding="windows-1251"',
        'encoding="utf-8"',
        iconv(
            'CP1251',
            'UTF-8',
            $feed_data
        )
    );
}
Thus, we got an rss reader, which at one point will not be closed for one reason or another. In addition, this reader works in multi-user mode, it can be shared with your friends.
Do not forget to change the default password in the reader! Enjoy reading.