Adding Ads to Windows Phone 8 with NAX
In this article, we’ll show an example of the practical use of Nokia Ad Exchange (NAX) based on Inneractive technology .
.
NAX gives you access to the largest ad exchange networks, all you need is a PayPal account to earn money.
Key features of NAX:
- Access to more than 120 ad networks with one SDK.
- Payments are available in more than 200 countries.
- The ability to independently adjust the advertising campaign to promote your application.
- Functional ad control panel.
- NAX is free for software developers.
To start using NAX, you need to register and download the SDK on the page with development tools for Windows Phone 8.

We strongly recommend that you read the Ad Placement Strategy.html file in the Documentation folder, which discusses the options for placing an ad unit. The selected location significantly affects the profit received from advertising.
From the InneractiveAdSDK folder of the unpacked SDK, you need to copy the files to the root folder of your Visual Studio project (placement in the root directory is necessary for simplicity, the files can also be placed in a separate folder):
- Inneractive.Ad.dll,
- InneractiveAdLocation.cs (this file should be retrieve only if you want to use location-sensitive ads in your WP application).
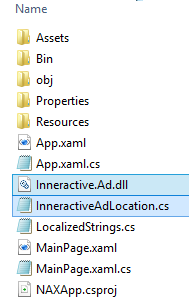
Then open the Add / Existing Item item in Visual Studio and select both files.
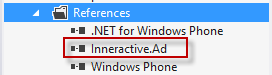
Now register the file Inneractive.Ad.dll. To do this, use References / Add Reference, then click the Browse button and locate the dll file in the Windows Phone folder. After successfully adding the dll file, you will need this link:
If the error adding the link "A reference to a higher version or incompatible assembly cannot be added to the project" appears, it means that you need to unlock the dll file. To do this, go to the "Security" tab in the file properties and select the "Unlock" option, then - "Apply".
For NAX to work in the application, you must enable the necessary capabilities. To do this, in the Properties / WMAppManifest.xaml file, check the following checkboxes in the Capabilities section:
ID_CAP_LOCATION
ID_CAP_NETWORKING
ID_CAP_WEBBROWSERCOMPONENT
ID_CAP_PHONEDIALER
ID_CAP_IDENTITY_DEVICE
To get started, add a control to Xaml to determine the position of the banner. We use the StackPanel control using the Grid:
List of available banner resolutions:
• 300 x 50
• 320 x 53
• 300 x 250 (Rectangle)
• 320 x 480 (Full screen)
In this example, we add a banner size of 320 * 53 pixels at the bottom of the page using the Grid.
Here is the result:

Nax banner embedded in the application for Windows Phone
After you add the control to Xaml, you need to write some C # code. To do this, first add two namespaces to the page where the ad will be placed. In this case, it is MainPage.xaml.cs.
Also add the third:
NetworkInformation is necessary to check the availability of an Internet connection using the method: DeviceNetworkInformation.IsNetworkAvailable.
Then set optionalParams in front of the main constructor in the class. All logic in two methods: MainPage_Loaded () and iaLocation_Done ().
ApplicationId_NAX is generated on nax.nokia.com under the Add App item.
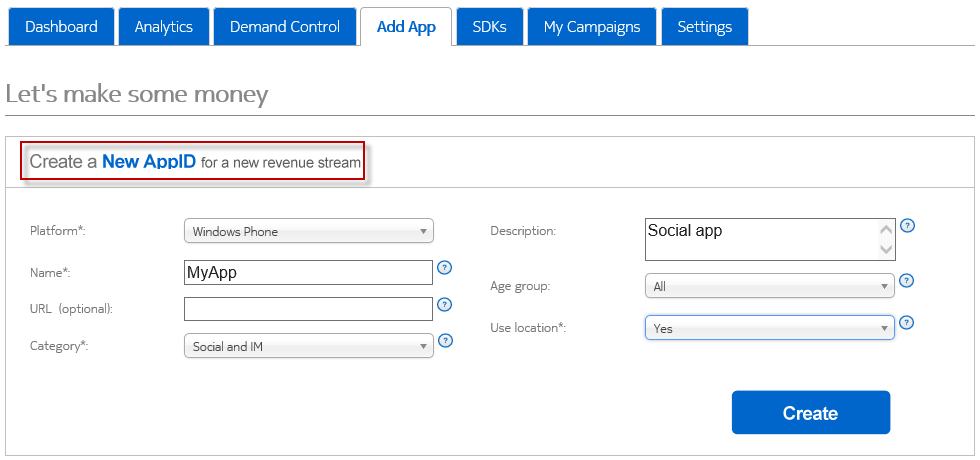
You will need to enter the following information:
• Mobile platform.
• Application Name.
• Category.
• Does the application use location information.
After that, you will get the generated Application Id for your application. This information will be needed to track your ads in the NAX control panel.
Here's what the generated AppID looks like that will be used in the application:

The generated AppID, which must be specified in the C # code.
That's all.
We wish you successful earnings using Nokia NAX advertising!
.
NAX gives you access to the largest ad exchange networks, all you need is a PayPal account to earn money.
Key features of NAX:
- Access to more than 120 ad networks with one SDK.
- Payments are available in more than 200 countries.
- The ability to independently adjust the advertising campaign to promote your application.
- Functional ad control panel.
- NAX is free for software developers.
To start using NAX, you need to register and download the SDK on the page with development tools for Windows Phone 8.
We strongly recommend that you read the Ad Placement Strategy.html file in the Documentation folder, which discusses the options for placing an ad unit. The selected location significantly affects the profit received from advertising.
Placing an advertisement file in a Windows Phone project
From the InneractiveAdSDK folder of the unpacked SDK, you need to copy the files to the root folder of your Visual Studio project (placement in the root directory is necessary for simplicity, the files can also be placed in a separate folder):
- Inneractive.Ad.dll,
- InneractiveAdLocation.cs (this file should be retrieve only if you want to use location-sensitive ads in your WP application).
Then open the Add / Existing Item item in Visual Studio and select both files.
Registering the Inneractive.Ad.dll File
Now register the file Inneractive.Ad.dll. To do this, use References / Add Reference, then click the Browse button and locate the dll file in the Windows Phone folder. After successfully adding the dll file, you will need this link:
If the error adding the link "A reference to a higher version or incompatible assembly cannot be added to the project" appears, it means that you need to unlock the dll file. To do this, go to the "Security" tab in the file properties and select the "Unlock" option, then - "Apply".
Turn on Capabilities
For NAX to work in the application, you must enable the necessary capabilities. To do this, in the Properties / WMAppManifest.xaml file, check the following checkboxes in the Capabilities section:
ID_CAP_LOCATION
ID_CAP_NETWORKING
ID_CAP_WEBBROWSERCOMPONENT
ID_CAP_PHONEDIALER
ID_CAP_IDENTITY_DEVICE
Display NAX banner ad in Xaml
To get started, add a control to Xaml to determine the position of the banner. We use the StackPanel control using the Grid:
<Grid x:Name="ContentPanel" Grid.Row="1" Margin="12,0,12,0">
    <Grid.RowDefinitions>
        <RowDefinition Height="*"/>
        <RowDefinition Height="53"/>
    </Grid.RowDefinitions>
    <ListBox Grid.Row="0">
    </ListBox>
    <StackPanel Height="53" Name="nax_control" Grid.Row="1">
    </StackPanel>
</Grid>
List of available banner resolutions:
• 300 x 50
• 320 x 53
• 300 x 250 (Rectangle)
• 320 x 480 (Full screen)
In this example, we add a banner size of 320 * 53 pixels at the bottom of the page using the Grid.
Here is the result:
Nax banner embedded in the application for Windows Phone
C # Code for NAX
After you add the control to Xaml, you need to write some C # code. To do this, first add two namespaces to the page where the ad will be placed. In this case, it is MainPage.xaml.cs.
using Inneractive.Nokia.Ad;
using InneractiveAdLocation;
Also add the third:
usingMicrosoft.Phone.Net.NetworkInformation;
NetworkInformation is necessary to check the availability of an Internet connection using the method: DeviceNetworkInformation.IsNetworkAvailable.
Then set optionalParams in front of the main constructor in the class. All logic in two methods: MainPage_Loaded () and iaLocation_Done ().
public partial class MainPage : PhoneApplicationPage
{
    Dictionary<InneractiveAd.IaOptionalParams, string> optionalParams;
    // Constructor
    public MainPage()
    {
        InitializeComponent();
        // Sample code to localize the ApplicationBar
        //BuildLocalizedApplicationBar();
        this.Loaded += new RoutedEventHandler(MainPage_Loaded);
    }
    private void MainPage_Loaded(object sender, RoutedEventArgs e)
    {
        if (DeviceNetworkInformation.IsNetworkAvailable)
        {
            // Watch location
            IaLocationClass iaLocation = new IaLocationClass();
            iaLocation.Done += newSystem.EventHandler<IaLocationEventArgs>(iaLocation_Done);
            iaLocation.StartWatchLocation();
            optionalParams = newDictionary<InneractiveAd.IaOptionalParams, string>();
            optionalParams.Add(InneractiveAd.IaOptionalParams.Key_OptionalAdWidth, "320"); //ad width
            optionalParams.Add(InneractiveAd.IaOptionalParams.Key_OptionalAdHeight, "53"); //add height
        }
        //ShowAdd Banner. Remarks: pay attention to use Application Id from NAX
        if (optionalParams != null)
        {
            InneractiveAd iaBanner = new InneractiveAd("ApplicationId", InneractiveAd.IaAdType.IaAdType_Banner, 30, optionalParams);
            nax_control.Children.Add(iaBanner);
        }
    }
    void iaLocation_Done(object sender, IaLocationEventArgs e)
    {
        try
        {
            // Addlocation, if received
            if (e != null && e.location != null)
                optionalParams.Add(InneractiveAd.IaOptionalParams.Key_Gps_Coordinates, e.location);
        }
        catch (Exception ex)
        {
            System.Diagnostics.Debug.WriteLine("Error: " + ex.ToString());
        }
    }
}
Create AppId
ApplicationId_NAX is generated on nax.nokia.com under the Add App item.
You will need to enter the following information:
• Mobile platform.
• Application Name.
• Category.
• Does the application use location information.
After that, you will get the generated Application Id for your application. This information will be needed to track your ads in the NAX control panel.
Here's what the generated AppID looks like that will be used in the application:
The generated AppID, which must be specified in the C # code.
That's all.
We wish you successful earnings using Nokia NAX advertising!