A detailed analysis of the audio effects Premiere Pro CS6 Part 1/3
- Tutorial
Good day to all! As promised, in the continuation of the article “Working with sound in Adobe Premiere Pro CS6” I’m doing a complete analysis of the sound effects of Premiere Pro CS6.
There are not so many “native” effects, and more specifically - 31. And we will begin the analysis in alphabetical order. For your convenience, I decided to break the description into three parts. (For those perverts who use the program in Russian, I will indicate the POSSIBLE name in Russian)
Balance (Balance)
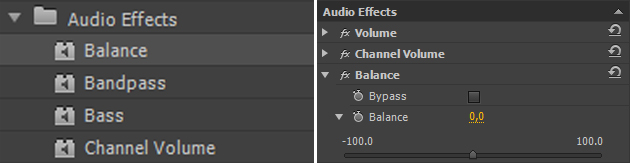
This effect allows you to control the relative volume of the left and right channels. The only configuration option is intuitive. Move the slider to the left, the value changes to negative (-60.2) This means that 60% of the outgoing sound will come from the left speaker. Exactly the same rule applies to the right side.
Bandpass

This effect creates a frequency band and deletes all frequencies that are not in that band.
Now about the settings:
Center - Indicates the frequency in the center of the selected range.
Q - Indicates the bandwidth. All that falls inside the strip remains, all that is outside is removed. High values will create a narrow band, and low values will create a wide one.
For a clearer understanding of how the effect works, I will use the chart from Adobe Audition.

The image above shows a frequency range diagram.
The Center parameter is marked in blue with
Green Q
In the first case, the Q parameter has low values, and in the second, high.
Bass
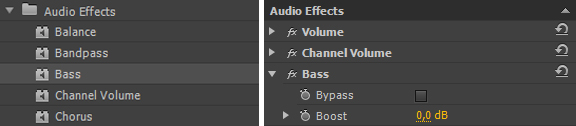
The Bass effect allows you to increase or decrease the bass. The Boost parameter (Amplifier) sets the number of dB (decibels) by which you want to increase the low frequencies.
Channel Volume
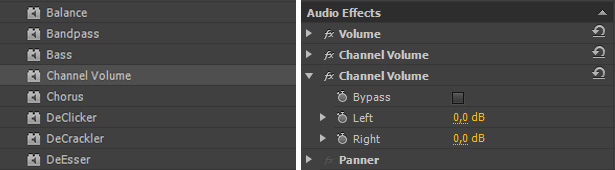
Allows you to independently adjust the volume of the audio channels. As you may have guessed, the Left parametercontrols the left channel, Right right.
Chorus (Chorus, Chorus) An
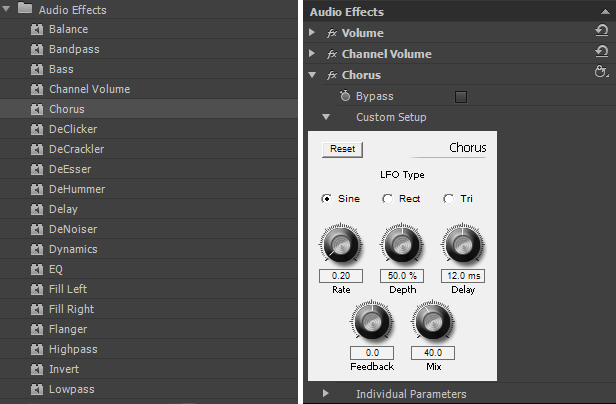
effect created to simulate a polyphonic (choral) sound. The effect of the chorus arises from copying the sound and playing it with a delay. But, as a rule, the effect is used to make the sound warmer.
LFO Type - Defines the type of low-purity wave. Sine - sinusoidal , Rect - rectangular Tri - triangular .
Rate - sets the rate of change in amplitude. If the value of this parameter is high, then the changing voice will be trembling and nervous. If low, you will get a light vibrato effect .
Depth (depth)- determines the maximum value in the resulting amplitude. For example, you can adjust so that the difference in voices of the Chorus effect changes 5 dB quieter or louder than the original. With low settings, any changes will be barely noticeable. If the values are too high, the sound will be intermittent and unnatural.
Delay - sets the delay time. One of the most important effect settings. If the values of this parameter are underestimated, then the voices begin to merge into the original. At too high values we get the effect of chewing the film in a cassette recorder.
Feedback - Adds a percentage of the processed votes cast back to the input of the effect.
Mix- determines the percentage of mixing the original sound and the processed one.
In general, the effect is quite difficult to understand, and for beginners for the first time there will be enough presets prepared by the guys from Adobe.

I will not describe presets, you will figure it out yourself.
DeClicker (remove clicks) - this effect detects and removes clicks.

In the settings we can see two small monitor windows. At the top, labeled as INPUT, we see a beep and all clicks detected.
The lower one, labeled OUTPUT, displays the processed and cleared signal. Immediately we can choose the processing mode of the audio signal. (But in practice, I never heard the difference.)
Threshold (threshold, limit)- sets the threshold for detecting defects that we eliminate.
DePlop - determines the degree of removal of low-frequency clicks.
Audition - allows you to listen to only those sounds that will be deleted.
DeCrackler (crackle removal) - very similar to the effect described by me above. Only for wider use, it removes the noise and crackling of wired and wireless microphones, digitized video and audio tapes, vinyl records and more.
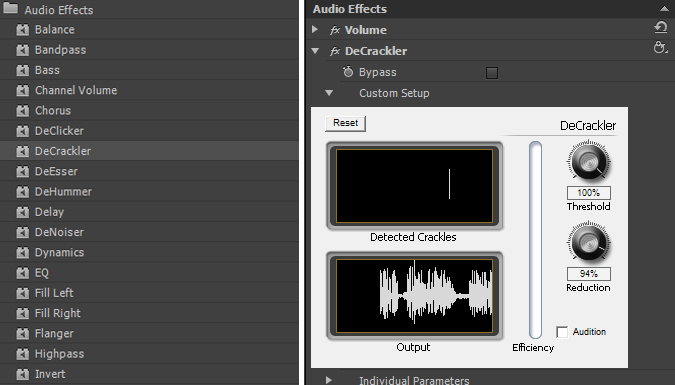
As in the DeClicker effect , there are two monitor windows in the settings. The top DETECTED CRACKLES (cracking detection) shows the detected marriage in your audio (crack, noise, squeaks, etc.) The bottom OUTPUT window (Exit)shows the processed signal.
Threshold (threshold, limit) - determines the detection level for crackles and thus determines how much of the signal will be affected.
Reduction (reduction) - determines the degree of reduction of crackles.
Audition - allows you to listen to only those sounds that will be deleted.
Efficiency - the higher the score, the more effective the effect.
DeEsser (Noise reduction) - removes all sorts of noise or hiss. For me, one of the most irreplaceable effects in Premiere Pro.
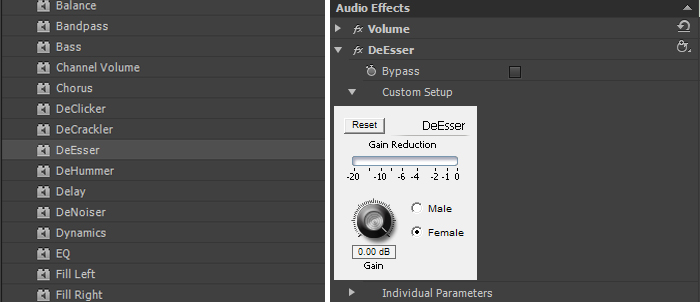
The switches Male (male) and Female (female) help the effect to adapt to the difference between the tones.
Gain (Receiving) - sets the amount of noise removal.
And in order to better control the effect, the gentlemen from Adobe gave us the Gain Reduction scale.
DeHummer (?) - the effect removes the hum of the mains, lighting, poorly shielded cable.
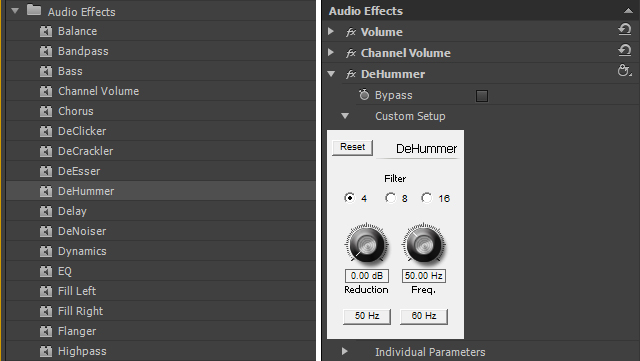
Filter - determines how many filters to allocate to reduce your interference. The greater the number of filters, the more processor is loaded.
Reduction - Determines the degree of interference reduction.
Frequency (Frequency) - the regulator of the frequency of interference, as a rule it is either 50 or 60 hertz for this we brought the buttons below.
Delay - Delivers an echo to your sound.
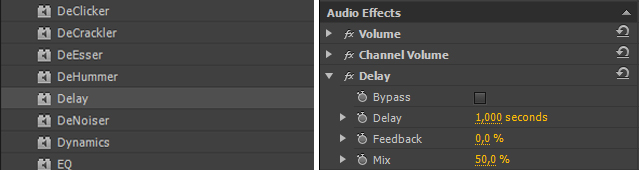
Delay (delay)- determines the very time before which the echo will begin playing.
Feedback (feedback, feedback) - the percentage of delay signal power.
Mix - determines the amount of echo.
That's all for today. As last time, for those who may have had something that didn’t clearly record the video