Simple GUI for XNA
Good day. This article will not open you new facets of programming, it will not tell you about a cool way to solve the problem, nothing like that. Just another old bike, rusty, but on the go, and it’s a long ride to go ...
When I started writing the first “serious” game on XNA, there was a problem with the lack of a standard GUI on this engine. Since I’m learning, I don’t have much experience, it was decided to write my own interface system,instead of using ready-made tools. The basis was taken from an implementation known in the past engine HGE. There was nothing revolutionary there: the Gui class, the GuiObject class, various buttons, lists, etc. are inherited from the latter.
So, the base was ready. The next problem is event handling. Shortly before writing this code, the university told us about the delegates. Being able to call functions unknown to you is a pretty good ability. It was decided to dwell on them. In other matters, it is delegates that are used to create buttons in Windows Forms applications in C #. The following code has been added to GuiObject.
Now it was necessary to make the handler itself. Processing is done by the Gui class. It iterates over all the elements, and if the drawstate of the element matches the passed state argument, processing continues. I'll show you now.
We figured out the processing, there was only a rendering left. Remember, there is an Any item in GameState? If you want the button to always be ... and other things look.
So the main part of the code is ready. Now you just need to create a button, create a handler and a draftsman for it, and send it through the compiler to an endless execution loop. In the game (at least for me) quite often you need to draw the same elements - the background, stroke and text inside. Therefore, the draftsman for them can be universal, but the processing will have to be described separately for each element.
The main drawback of this approach is that when adding a new element to Gui, you need to climb into the class and resize the array. It is solved using lists.
In general, this is all I wanted to talk about. Thanks for attention.
PS Please write what you did not like. Cons without a description are not accepted. :)
so
When I started writing the first “serious” game on XNA, there was a problem with the lack of a standard GUI on this engine. Since I’m learning, I don’t have much experience, it was decided to write my own interface system,instead of using ready-made tools. The basis was taken from an implementation known in the past engine HGE. There was nothing revolutionary there: the Gui class, the GuiObject class, various buttons, lists, etc. are inherited from the latter.
Base code
classGui
{
	public  GuiObject elements[];
        publicGui()
        {
            elements = new GuiObject[6];
        }
}
classGuiObject
{
	public Rectangle rect; //нужно для определения попадания мыши, отрисовки, и т.д.publicbool lpressed; //флажок зажатой левой кнопки мышиpublicbool rpressed;
	publicbool lclick;// флажок клика левой кнопкой мышиpublicbool rclick;
        public GameState drawstate; // используется для обработки событий, об этом позже publicbool darktransparency; // используется для разнообразия кнопочек, об этом позжеpublicbool lighttransparency;
        publicstring text;
        publicbool undercursor;
        publicGuiObject(Rectangle rec, bool dtr, bool ltr, GameState st, UpdateFunction f,DrawFunction f2, string text = "")
        {
            rect = rec;
            lpressed = false;
            rpressed = false;
            enable = true;
            lclick = false;
            rclick = false;
            darktransparency = dtr;
            lighttransparency = ltr;
            drawstate = st;
            this.text = text;
            updateFunction = f;
            drawFunction = f2;
        }
}
publicenum GameState
{
        Any,
        MainMenu,
        Game
}
So, the base was ready. The next problem is event handling. Shortly before writing this code, the university told us about the delegates. Being able to call functions unknown to you is a pretty good ability. It was decided to dwell on them. In other matters, it is delegates that are used to create buttons in Windows Forms applications in C #. The following code has been added to GuiObject.
Code with delegates
publicdelegatevoidUpdateFunction(ref GuiObject me);
        publicdelegatevoidDrawFunction(Texture2D line, Texture2D darkbackground, Texture2D lightbackground, ref GuiObject me);
        public DrawFunction drawFunction;
        public UpdateFunction updateFunction;
        /*Указатели на себя используются для возможности изменения членов класса из других функций. Полезно, например, при создании переключателей*//*Текстуры line, darkbackground, lightbackground - это текстуры окантовки, и два фона*/
Now it was necessary to make the handler itself. Processing is done by the Gui class. It iterates over all the elements, and if the drawstate of the element matches the passed state argument, processing continues. I'll show you now.
Treatment
//Gui.cspublicvoidUpdate(MouseState mstate,GameState state,GameTime gameTime)
        {
            for (int i = 0; i < elements.Length; i++)
            {
                if (elements[i].drawstate == state&&elements[i].enable)
                {
                    elements[i].Update(mstate);
                    elements[i].updateFunction(ref elements[i]);
                }
            }
        }
/*Конечно можно использовать foreach вместо for, но в первом варианте нельзя делать ссылку на себя*//*Почему две функции обновления? Потому что первая обновляет состояние (разные click и pressed), а вторая удалённо вызывает обработчик именно для данного элемента (делегат короче).*/// GuiObject.cspublicvoidUpdate(MouseState state)
        {
            lclick = false;
            rclick = false;
            if (rect.Contains(new Point(state.X, state.Y)))
            {
                if (state.LeftButton == ButtonState.Pressed)
                    if (!lpressed) { lclick = true; lpressed = true; }
                if (lpressed && state.LeftButton == ButtonState.Released)
                    lpressed = false;
                if (state.RightButton == ButtonState.Pressed)
                    if (!rpressed) { rclick = true; rpressed = true; }
                if (rpressed && state.RightButton == ButtonState.Released)
                    rpressed = false;
                undercursor = true;
            }
            else undercursor = false;
        }
We figured out the processing, there was only a rendering left. Remember, there is an Any item in GameState? If you want the button to always be ... and other things look.
Drawing
//Gui.cspublicvoidDraw(Texture2D line, Texture2D darkbackground, Texture2D lightbackground, GameState state)
        {
            for (int i = 0; i < elements.Length; i++)
            {
                if ((elements[i].drawstate == GameState.Any || elements[i].drawstate == state)&&elements[i].enable)
                    elements[i].drawFunction(line, darkbackground, lightbackground, ref elements[i]);
            }
        }
So the main part of the code is ready. Now you just need to create a button, create a handler and a draftsman for it, and send it through the compiler to an endless execution loop. In the game (at least for me) quite often you need to draw the same elements - the background, stroke and text inside. Therefore, the draftsman for them can be universal, but the processing will have to be described separately for each element.
A terrible example of using code from a developed game
// void Init()
            state = GameState.MainMenu;
            gui = new Gui();
            gui.elements[0] = new GuiObject(new Rectangle(0, 0, width-205, height), false, false, GameState.Game, Main, MapGuiDraw);
            gui.elements[1] = new GuiObject(new Rectangle(width - 205, 0, 205, height), false, false, GameState.Game, RightPanel, RightPanelDraw);
            gui.elements[2] = new GuiObject(new Rectangle(width - 205, 0, 205, 39), false, false, GameState.Game, GameMenuButton, GameMenuButtonDraw);
            gui.elements[3] = new GuiObject(new Rectangle((width - 150) / 2, height / 2, 150, 30), false, false, GameState.MainMenu, StartGameButton, StandartButtonDraw, "Start game");
            gui.elements[4] = new GuiObject(new Rectangle((width - 150) / 2, height / 2 + 50, 150, 30), false, false, GameState.StartGameMenu, GenerateButton, StandartButtonDraw, "Generate");
//Draw Functions ExamplevoidStandartGuiDraw( Texture2D line, Texture2D darkbackground, Texture2D lightbackground,  ref GuiObject me)
        {
            if (me.darktransparency) DrawTexturedRect( darkbackground, me.rect);
            if (me.lighttransparency) DrawTexturedRect( lightbackground, me.rect);
            DrawOutLine(line, me.rect);
            if (me.text != "")
            {
                Vector2 size = font.MeasureString(me.text);
                spriteBatch.DrawString(font, me.text, new Vector2((int)(me.rect.X + me.rect.Width / 2 - size.X / 2), (int)(me.rect.Y + me.rect.Height / 2 - size.Y / 2)), Color.White);
            }
        }
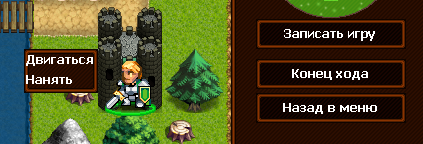
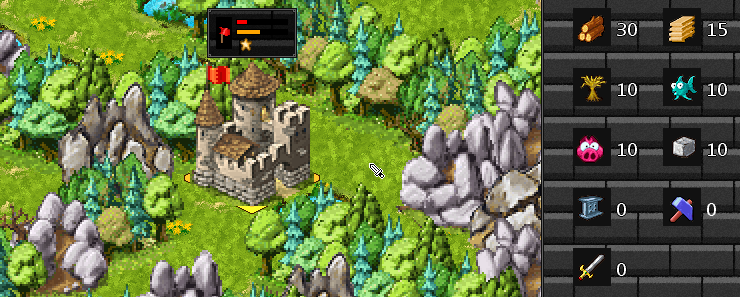
An example of work in pictures
Townsman game (under construction)
Menu:

Map generator menu:

Game screen:
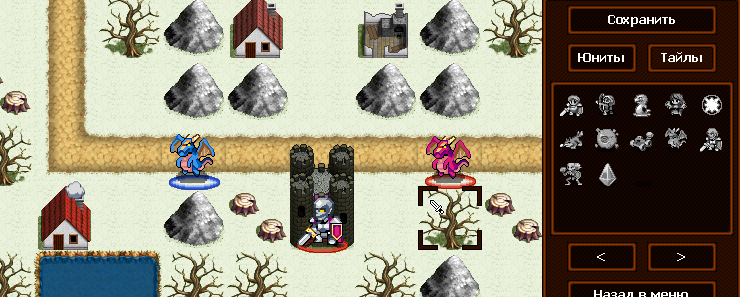
Ancient Empires game
Menu:

Map editor menu: Map

editor:
Menu:
Map generator menu:
Game screen:
Ancient Empires game
Menu:
Map editor menu: Map
editor:
Features of work
The main drawback of this approach is that when adding a new element to Gui, you need to climb into the class and resize the array. It is solved using lists.
In general, this is all I wanted to talk about. Thanks for attention.
About games
Об материалах: игры мои, Townsman ещё пишутся, скоро доделаю, и дам об этом знать.
Ancient Empires можно найти на ex.ua или в гугле со связкой small games.
Ancient Empires можно найти на ex.ua или в гугле со связкой small games.
PS Please write what you did not like. Cons without a description are not accepted. :)