Live streaming via Nginx-RTMP: some ready-made recipes
I recently stumbled upon the topic " nginx-based Online Broadcast Server " about the wonderful module of Roman Harutyunyan (@rarutyunyan) for nginx: nginx-rtmp-module . The module is very easy to configure and allows creating a server for publishing videos and live broadcasts based on nginx.
You can read about the module on its page on GitHub , but I want to give some simple examples of use. I hope the topic will help beginners in video business (like me).
RTMP (Real Time Messaging Protocol) is a proprietary broadcast protocol from Adobe. The default transport is TCP (port 1935). You can also encapsulate RTMP in HTTP (RTMPT). The RTMP client is primarily Adobe Flash Player.
Video codec - H.264, AAC audio codec, nellymoser or MP3, MP4 or FLV containers.
In other words, video on demand (VOD). Just add in nginx.conf to the rtmp section {server {...}}.
(Note: of course, the section does not have to be called vod)
Now you can put the video file in the correct format in the / var / videos folder and “feed” the player to the player, for example rtmp: //server/vod/file.flv. As I understand it, MP4 natively supports video rewinding, and FLV will have to be indexed separately.
All the following examples will already be about the "live" broadcast using ffmpeg for Windows. However, this information will be useful for Linux users.
We can send the video and audio stream to the server using the same RTMP protocol for publication. And our customers will be able to watch the broadcast. To do this, add a section on the server:
I recommend immediately blocking access to the publication to everyone except trusted IPs, as shown in the example.
On the machine with which we will broadcast, first you need to get a list of DirectShow devices. Start - Run - cmd, go to the ffmpeg / bin folder and run:
If there are Russian letters in the name of your source, then they can be displayed as krakozyabrami. Trub admins are hatching iconv, and simple guys like me will decode the byak on Lebedev’s website . FFmpeg needs to feed a readable inscription.
Now, knowing the name of the video and audio source, you can capture it with ffmpeg and send it to the server.
At a minimum, you need to specify the video source, codec and server:
Instead of “Webcam C170” you need to substitute the name of your camera from the list.
The -an switch indicates that we are not transmitting an audio stream. If an audio stream is needed, the launch line will look something like this:
Here we use the libfaac codec, sampling rate 44100, 2 channels (stereo). You can use MP3 (libmp3lame codec) instead of AAC.
If your camera has an analog output, you can connect it to a computer using a capture device. I use a cheap PAL camera and a USB capture card with Dealextreme.
There are two options: install FFSplit or use screen-capture-recorder with FFmpeg.
FFSplit is easier to use because it has a convenient GUI, but it does not work under XP / 2003.
If you decide to choose the second method, the FFmpeg launch line will look something like this:
The audio stream can be captured with virtual-audio-capturer.
Screen capture example in application
Naturally, you can relay the video or audio file (or stream) of FFmpeg to the server. In the example below, we transmit MJPEG video from a remote camera:
But for such purposes, it is more reasonable to use the push option on the RTMP server itself to exclude the intermediate link and pull the stream on the server itself.
Some kind of webcam in Japan
-preset name H.264 has several sets of compression / speed ratios: ultrafast, superfast, veryfast, faster, fast, medium, slow, slower, veryslow. Therefore, if you want to increase productivity, you should use:
-crf number directly affects bitrate and quality. It takes values from 0 to 51 - the more, the lower the picture quality. The default is 23, 18 - losless quality. The bit rate approximately doubles when CRF is reduced by 6.
-r the number sets the input and output FPS. For sources from which you capture a picture, you can set -r -re instead to use the native FPS.
-rtbufsize number is the size of the real-time buffer. If you constantly get messages about buffer overflow and frame drop, you can put a large buffer (for example, 100000k), however, this can increase the transmission delay.
-pix_fmtsets the color model. If you see a black square instead of a picture and the sound works, try installing yuv420p or yuv422p .
-s widthxheight of the input and output image size.
-g number as far as I understand, this is the maximum number of frames between the key. If your FPS is very small, you can set this value lower to reduce the delay in starting the broadcast.
-keyint_min number is the minimum number of frames between key frames.
-vf "crop = w: h: x: y" crop video
-tune zerolatency "magic" option to reduce broadcast delay. What she specifically does, I never found (-:
-analyzeduration 0disables duration analysis, which helps reduce broadcast latency.
In addition to the audio options discussed above, you may need -acodec copy if your audio stream does not require additional conversion to MP3 / AAC.
Example: broadcasting from a low-latency webcam without sound, draw the current time at the top of the picture
Everything is simple here. Put on your site one of the popular players, for example Flowplayer or JW Player .
You can see an example of JW Player connection on the demo page .
Using the rtmp module, you can create not only video broadcasts, but also video chat, Internet radio, a simple platform for webinars. Go for it!
I considered only the basic functionality of nginx-rtmp-module and ffmpeg. They have much wider possibilities, so pay attention to the documentation:
nginx-rtmp-module blog
Wiki nginx-rtmp-module
FFmpeg
Streaming Guide
x264 Documentation Encoding Guide
Filtering Guide
You can read about the module on its page on GitHub , but I want to give some simple examples of use. I hope the topic will help beginners in video business (like me).
Briefly about RTMP
RTMP (Real Time Messaging Protocol) is a proprietary broadcast protocol from Adobe. The default transport is TCP (port 1935). You can also encapsulate RTMP in HTTP (RTMPT). The RTMP client is primarily Adobe Flash Player.
Video codec - H.264, AAC audio codec, nellymoser or MP3, MP4 or FLV containers.
Publish a video
In other words, video on demand (VOD). Just add in nginx.conf to the rtmp section {server {...}}.
application vod {
     play /var/videos;
  }
(Note: of course, the section does not have to be called vod)
Now you can put the video file in the correct format in the / var / videos folder and “feed” the player to the player, for example rtmp: //server/vod/file.flv. As I understand it, MP4 natively supports video rewinding, and FLV will have to be indexed separately.
All the following examples will already be about the "live" broadcast using ffmpeg for Windows. However, this information will be useful for Linux users.
On-line translation
We can send the video and audio stream to the server using the same RTMP protocol for publication. And our customers will be able to watch the broadcast. To do this, add a section on the server:
application live {
     allow publish 1.2.3.4;
     allow publish 192.168.0.0/24;
     deny publish all;
     allow play all;
     live on;
  }
I recommend immediately blocking access to the publication to everyone except trusted IPs, as shown in the example.
On the machine with which we will broadcast, first you need to get a list of DirectShow devices. Start - Run - cmd, go to the ffmpeg / bin folder and run:
ffmpeg -list_devices true -f dshow -i dummyIf there are Russian letters in the name of your source, then they can be displayed as krakozyabrami. Trub admins are hatching iconv, and simple guys like me will decode the byak on Lebedev’s website . FFmpeg needs to feed a readable inscription.
Now, knowing the name of the video and audio source, you can capture it with ffmpeg and send it to the server.
Webcam
At a minimum, you need to specify the video source, codec and server:
ffmpeg -f dshow -i video="Webcam C170" -c:v libx264 -an -f flv "rtmp://1.2.3.4/live/test.flv live=1"Instead of “Webcam C170” you need to substitute the name of your camera from the list.
The -an switch indicates that we are not transmitting an audio stream. If an audio stream is needed, the launch line will look something like this:
ffmpeg -f dshow -i video="Webcam C170" -f dshow -i audio="Микрофон ..." -c:v libx264 -c:a libfaac -ar 44100 -ac 2 -f flv "rtmp://1.2.3.4/live/test.flv live=1"Here we use the libfaac codec, sampling rate 44100, 2 channels (stereo). You can use MP3 (libmp3lame codec) instead of AAC.
Analog camera
If your camera has an analog output, you can connect it to a computer using a capture device. I use a cheap PAL camera and a USB capture card with Dealextreme.
ffmpeg -r pal -s pal -f dshow -i video="USB2.0 ATV" -c:v libx264 -an -f flv "rtmp://1.2.3.4/live/test.flv live=1"Screen capture
There are two options: install FFSplit or use screen-capture-recorder with FFmpeg.
FFSplit is easier to use because it has a convenient GUI, but it does not work under XP / 2003.
If you decide to choose the second method, the FFmpeg launch line will look something like this:
ffmpeg -f dshow -i video="screen-capture-recorder" -c:v libx264 -an -r 2 -f flv "rtmp://1.2.3.4/live/test.flv live=1"The audio stream can be captured with virtual-audio-capturer.
Screen capture example in application
Relay
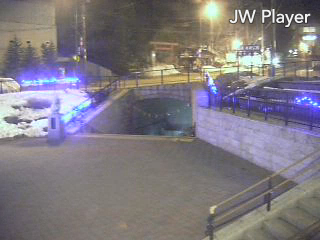
Naturally, you can relay the video or audio file (or stream) of FFmpeg to the server. In the example below, we transmit MJPEG video from a remote camera:
ffmpeg -f mjpeg -i video="http://iiyudana.miemasu.net/nphMotionJpeg?Resolution=320x240&Quality=Standard" -c:v libx264 -f flv "rtmp://1.2.3.4/live/test.flv live=1"But for such purposes, it is more reasonable to use the push option on the RTMP server itself to exclude the intermediate link and pull the stream on the server itself.
Some kind of webcam in Japan
Tuning, problem solving
-preset name H.264 has several sets of compression / speed ratios: ultrafast, superfast, veryfast, faster, fast, medium, slow, slower, veryslow. Therefore, if you want to increase productivity, you should use:
-preset ultrafast -crf number directly affects bitrate and quality. It takes values from 0 to 51 - the more, the lower the picture quality. The default is 23, 18 - losless quality. The bit rate approximately doubles when CRF is reduced by 6.
-r the number sets the input and output FPS. For sources from which you capture a picture, you can set -r -re instead to use the native FPS.
-rtbufsize number is the size of the real-time buffer. If you constantly get messages about buffer overflow and frame drop, you can put a large buffer (for example, 100000k), however, this can increase the transmission delay.
-pix_fmtsets the color model. If you see a black square instead of a picture and the sound works, try installing yuv420p or yuv422p .
-s widthxheight of the input and output image size.
-g number as far as I understand, this is the maximum number of frames between the key. If your FPS is very small, you can set this value lower to reduce the delay in starting the broadcast.
-keyint_min number is the minimum number of frames between key frames.
-vf "crop = w: h: x: y" crop video
-tune zerolatency "magic" option to reduce broadcast delay. What she specifically does, I never found (-:
-analyzeduration 0disables duration analysis, which helps reduce broadcast latency.
In addition to the audio options discussed above, you may need -acodec copy if your audio stream does not require additional conversion to MP3 / AAC.
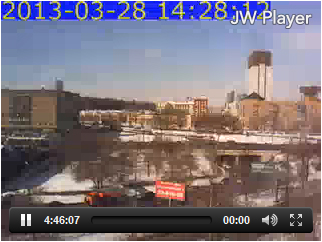
Example: broadcasting from a low-latency webcam without sound, draw the current time at the top of the picture
ffmpeg -r 25 -rtbufsize 1000000k -analyzeduration 0 -s vga -copyts -f dshow -i video="Webcam C170" -vf "drawtext=fontfile=verdana.ttf:fontcolor=yellow@0.8:fontsize=48:box=1:boxcolor=blue@0.8:text=%{localtime}" -s 320x240 -c:v libx264 -g 10 -keyint_min 1 -preset UltraFast -tune zerolatency -crf 25 -an -r 3 -f flv "rtmp://1.2.3.4:1935/live/b.flv live=1"Player on site
Everything is simple here. Put on your site one of the popular players, for example Flowplayer or JW Player .
You can see an example of JW Player connection on the demo page .
What's next?
Using the rtmp module, you can create not only video broadcasts, but also video chat, Internet radio, a simple platform for webinars. Go for it!
I considered only the basic functionality of nginx-rtmp-module and ffmpeg. They have much wider possibilities, so pay attention to the documentation:
nginx-rtmp-module blog
Wiki nginx-rtmp-module
FFmpeg
Streaming Guide
x264 Documentation Encoding Guide
Filtering Guide