Writing your bootloader
This article was written for people who are always interested to know how different things work. For those developers who usually write their programs at a high level, C, C ++ or Java is not important, but at the same time they are faced with the need to do something at a low level. We will consider low-level programming using bootloader as an example.
We will describe what happens after the computer is turned on and how the system boots up. As a practical example, consider how you can write your own bootloader, which is actually the starting point for booting the system.
Boot loader is a program that is recorded on the first sector of the hard drive. The BIOS automatically reads all the contents of the first sector into memory, immediately after turning on the power. The first sector is also called the master boot record. In fact, it is not necessary for the first sector of the hard drive to load anything. This name was historically established, as the developers used such a mechanism to load the operating system.
In this section, I will talk about what knowledge and tools are needed to develop your own bootloader, as well as some useful information about booting the system.
First of all, when the computer is running, hardware control is carried out mainly through the BIOS functions, known as “interrupts”. You can only cause interruption in assembler - it will be great if you are at least a little familiar with this language. But this is not a prerequisite. Why? We will use "mixed code" technology, where you can combine high-level designs with low-level teams. This does not greatly simplify our task.
This article will mainly use the C ++ language. But if you know C, then it will be easy for you to learn the necessary C ++ elements. In general, even knowledge of the C language will be enough, but then you will have to change the source code of the examples.
If you know Java or C #, then unfortunately this will not help for our task. The fact is that the Java and C # code that is produced after compilation is intermediate. A special virtual machine is used for further processing (Java machine for Java and .NET for C #), converting intermediate code into instructions for the processor. After conversion, it can be performed. This architecture makes it impossible to use mixed code technology - but we will use it to make our lives easier, so Java and C # will not help here.
And so, to develop a simple bootloader, you must know C or C ++, and it would also be nice if you know a little Assembler.
To use mixed code technology, you need at least two compilers: for assembler and for C / C ++, as well as a linker that combines object files (.obj) into one executable file.
Now, let's talk about some special points. There are two modes of processor operation: real and protected mode. Real mode is 16-bit and has some limitations. Protected mode is 32-bit and is fully used by the operating system. When the computer just starts, the processor runs in 16-bit mode. Thus, to write a program and get an executable file, you need a compiler and linker for assembler for 16-bit mode. For C / C ++, you only need a compiler that can create object files for 16-bit mode.
Modern compilers are made for 32-bit applications, so we won’t be able to use them.
I tried several free and commercial compilers for 16-bit mode and chose a product from Microsoft. The compiler along with the assembler for assembler, C and C ++ are included in Microsoft Visual Studio 1.52, it can be downloaded from the official website of the company. Some details about the compilers we need are given below.
ML 6.15 is Microsoft's assembler compiler for 16-bit mode.
LINK 5.16 is a linker that can create COM files for 16-bit mode.
CL - C, C ++ compiler for 16-bit mode.
You can also use several alternative options.
DMC- a free compiler for compiling assembler, C, C ++ for 16 and 32-bit Digital Mars mode.
LINK is a free linker for the DMC compiler.
There are also some products from Borland.
BCC 3.5 - C, C ++ compiler that can create files for 16-bit mode.
TASM is an assembler compiler for 16-bit mode.
TLINK is a linker that can create COM files for 16-bit mode.
All the code examples in this article were developed with tools from Microsoft.
In order to solve our problem, we must remember how the system loads.
Let us briefly consider how the components of the system interact when the system boots.
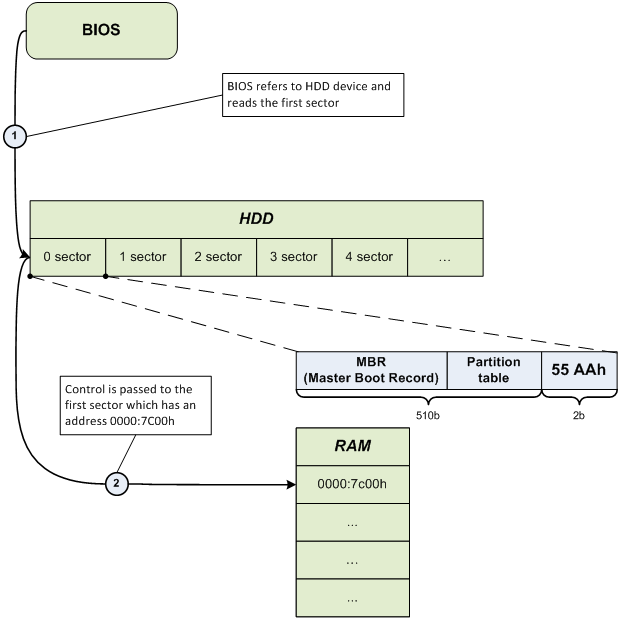
After the control has been transferred to the address 0000: 7C00, the Master Boot Record (MBR) starts its work and starts loading the operating system.
In the following sections, we will be directly involved in low-level programming - we will write our own bootloader.
We develop a bootloader for ourselves. Its tasks are only the following:
The architecture of the program.
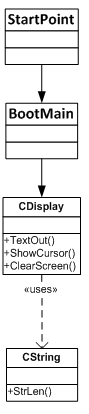
The first object is StartPoint, which is written exclusively in assembler, because high-level languages do not have the instructions we need. This tells the compiler what type of memory should be used, and the address of the instruction in RAM that should be executed after reading it. It also corrects processor registers and transfers control to the BootMain function, which is written in a high-level language.
The next object, BootMain, is an analog of main, which, in turn, is the main function in which all the program functions are concentrated.
The CDisplay and CString classes take care of the functional part of the program and display a message on the screen. As you can see in the previous picture, the CDisplay class uses the CString class in its work.
Here I use the standard development environment Microsoft Visual Studio 2005 or 2008. You can use any other tools, but I am sure that these two, with some settings, compile and work easily and conveniently.
First we need to create a Makefile Project, where the main work will be done.
File-> New \ Project-> General \ Makefile Project
To display a message on the screen, we must clear it first. We will use special BIOS interrupts for this purpose.
The BIOS offers a number of interrupts for working with hardware, such as a video card, keyboard, system disk. Each interrupt has the following structure:
Where "number_of_interrupt" is the interrupt number.
Each interrupt has a number of parameters that must be set before it is called. The processor register is ah, always responsible for the number of functions for the current interrupt, and other registers are usually used for other parameters of the current operation. Let's see how the interrupt number 10h works in assembler. We will use the 00 function, it changes the video mode and clears the screen:
We will consider only those interrupts and functions that will be used in our application. We will need:
The C ++ compiler supports built-in assembler, that is, when writing code in a high-level language, you can also use a low-level language. Assembler instructions that are used at a high level are also called asm inserts. They consist of the keyword "__asm" and a block of assembler instructions:
To demonstrate an example of mixed code, we will use the previously mentioned assembler code, which performs screen cleaning and combines it with code written in C ++.
The CString class is designed to work with strings. It includes the Strlen () method, which takes a pointer to a string as a parameter and returns the number of characters in that string.
CDisplay class is designed to work with the screen. It includes several methods:
Types.h is a header file that includes data type and macro definitions.
BootMain () is the main function of the program, which is the first entry point (analogous to main ()). The main work is done here.
Now that the code is developed, we must convert it to a file for 16-bit OS. Such files are .COM files. We can start the compiler from the command line, passing the necessary parameters, as a result we get several object files. Next, we run the linker to convert all .COM files into one executable file with the extension. Com. This is a workable option but not very easy.
Let's better automate this process. To do this, we need to create a .bat file and write the necessary commands with the necessary parameters into it.
Put the compilers and linker in the project directory. In the same directory, we create a batch file and fill it in accordance with the example (you can use any directory instead of VC152, the main thing is that the compilers and linker are in it):
As a final step in this section, we describe how to turn Microsoft Visual Studio 2005, 2008, into a development environment that supports any compiler. To do this, go to the project properties: Project-> Properties-> Configuration Properties \ General-> Configuration Type .
The Configuration Properties tab includes three items: General , Debugging, and NMake . Select NMake and specify the path to "build.bat" in the Build Command Line and Rebuild Command Lin .
If everything is done correctly, then you can compile by pressing F7 or Ctrl + F7. In this case, all related information will be displayed in the output window. The main advantage here is not only the automation of the assembly, but also the monitoring of errors in the code, if any.
This section will tell you how to see the bootloader done in action, how to perform testing and debugging.
You can check the bootloader on real hardware or using virtual machines developed for these purposes - VMware. Testing on real hardware gives you more confidence that it works as well as on a virtual machine. Of course, we can say that VmWare is a great way to test and debug. We will consider both methods.
First of all, we need a tool to write our bootloader to a virtual or physical disk. As far as I know, there are several free and commercial consoles and GUI applications. I used Disk Explorer for NTFS 3.66 (a version for FAT called Disk Explorer for FAT) to work on Windows and Norton Disk Editor 2002 to work on MS-DOS.
I will only describe Disk Explorer for NTFS 3.66 because it is the easiest way and is most suitable for our purposes.
We will need VmWare software version 5.0, 6.0 or higher. To test the bootloader, we will create a new virtual machine with a minimum disk size, for example, 1 Gb. Format it to the NTFS file system. Now we need to map the formatted hard drive to VmWare as a virtual drive. To do this, select:
File-> Map or Disconnect Virtual Disks ...
After that, a window will appear. There you must click the Map button. In the next window that appears, you must specify the path to the disk. Now you can also select a drive letter.
Do not forget to uncheck the box “Open file in read-only mode (recommended)”. After you have completed all of the above indications, the drive must be available in read-only mode to avoid data corruption.
After that, we can work with the virtual machine drive, as with a regular logical drive in Windows. Now we have to use Disk Explorer for NTFS 3.66 to write the boot record from position 0.
After starting the program, we go to our disk (File-> Drive). In the window that appears, go to the logical drives section and select our created drive (in my case it's Z).
Now we select the menu item View as a Hex command. In this window, we can see the disk information in a 16-bit representation, divided into sectors. Now we only have 0, since the disk is empty for now.
Now we have to write our bootloader to the first sector. We set the marker to position 00, as shown in the previous picture. To copy the bootloader we use the menu item Edit-> Paste from file command . In the window that opens, specify the path to the file and click Open. After that, the content of the first sector should change and look like it is shown in the picture - if you, of course, did not change anything in the code.
You must also write the 55AAh signature at position 1FE from the start of the sector. If you do not do this, the BIOS will check the last two bytes, and not finding the specified signature, it will consider that this sector is not bootable and will not load it into memory.
To switch to the editing mode, press the F2 key and write the necessary numbers - 55AAh signature. To exit edit mode, press ESC .
Now we need to confirm the recorded data.
To apply the recorded we go to Tools-> Options , now we go to Modeand select the recording method - Virtual Write and click the Write button .
Finally, most of the routine actions have been completed, and now you can see what we have developed from the very beginning of this article. Let's go back to VwWare to disconnect the virtual disk (File-> Map or Disconnect Virtual Disks ... and click Disconnect).
Let's start the virtual machine. We now see how familiar lines appear from the depths of the realm of machine codes - "Hello World ...", from low-level ... ".
Testing on real hardware is almost the same as on a virtual machine, except that if something does not work, you will need much more time to restore it than creating a new virtual machine. To check the bootloader without being able to lose data (everything can happen), I suggest using a flash drive, but first you must restart the computer, go into the BIOS and make sure that it supports booting from a flash drive. If he supports him, then everything is in order. If not, then you should limit testing to a virtual test machine.
The process of writing a bootloader to a flash drive in Disk Explorer for NTFS 3.66 is the same as for a virtual machine. You just have to choose the hard drive itself instead of your logical partition.
In this article, we examined what a boot loader is, how the BIOS works, and how system components interact when a system boots. The practical part gave us an understanding of how you can develop your own, simple bootloader. We demonstrated mixed-code technology and the build automation process using Microsoft Visual Studio 2005, 2008.
Of course, this is only a small part compared to the huge topic of low-level programming, but if you were interested in this article, then this is cool.
UPD: source link
We will describe what happens after the computer is turned on and how the system boots up. As a practical example, consider how you can write your own bootloader, which is actually the starting point for booting the system.
What is Boot Loader?
Boot loader is a program that is recorded on the first sector of the hard drive. The BIOS automatically reads all the contents of the first sector into memory, immediately after turning on the power. The first sector is also called the master boot record. In fact, it is not necessary for the first sector of the hard drive to load anything. This name was historically established, as the developers used such a mechanism to load the operating system.
Get ready to dive deeper
In this section, I will talk about what knowledge and tools are needed to develop your own bootloader, as well as some useful information about booting the system.
So what language do you need to know to write Boot Loader
First of all, when the computer is running, hardware control is carried out mainly through the BIOS functions, known as “interrupts”. You can only cause interruption in assembler - it will be great if you are at least a little familiar with this language. But this is not a prerequisite. Why? We will use "mixed code" technology, where you can combine high-level designs with low-level teams. This does not greatly simplify our task.
This article will mainly use the C ++ language. But if you know C, then it will be easy for you to learn the necessary C ++ elements. In general, even knowledge of the C language will be enough, but then you will have to change the source code of the examples.
If you know Java or C #, then unfortunately this will not help for our task. The fact is that the Java and C # code that is produced after compilation is intermediate. A special virtual machine is used for further processing (Java machine for Java and .NET for C #), converting intermediate code into instructions for the processor. After conversion, it can be performed. This architecture makes it impossible to use mixed code technology - but we will use it to make our lives easier, so Java and C # will not help here.
And so, to develop a simple bootloader, you must know C or C ++, and it would also be nice if you know a little Assembler.
Which compiler do you need
To use mixed code technology, you need at least two compilers: for assembler and for C / C ++, as well as a linker that combines object files (.obj) into one executable file.
Now, let's talk about some special points. There are two modes of processor operation: real and protected mode. Real mode is 16-bit and has some limitations. Protected mode is 32-bit and is fully used by the operating system. When the computer just starts, the processor runs in 16-bit mode. Thus, to write a program and get an executable file, you need a compiler and linker for assembler for 16-bit mode. For C / C ++, you only need a compiler that can create object files for 16-bit mode.
Modern compilers are made for 32-bit applications, so we won’t be able to use them.
I tried several free and commercial compilers for 16-bit mode and chose a product from Microsoft. The compiler along with the assembler for assembler, C and C ++ are included in Microsoft Visual Studio 1.52, it can be downloaded from the official website of the company. Some details about the compilers we need are given below.
ML 6.15 is Microsoft's assembler compiler for 16-bit mode.
LINK 5.16 is a linker that can create COM files for 16-bit mode.
CL - C, C ++ compiler for 16-bit mode.
You can also use several alternative options.
DMC- a free compiler for compiling assembler, C, C ++ for 16 and 32-bit Digital Mars mode.
LINK is a free linker for the DMC compiler.
There are also some products from Borland.
BCC 3.5 - C, C ++ compiler that can create files for 16-bit mode.
TASM is an assembler compiler for 16-bit mode.
TLINK is a linker that can create COM files for 16-bit mode.
All the code examples in this article were developed with tools from Microsoft.
How the system boots
In order to solve our problem, we must remember how the system loads.
Let us briefly consider how the components of the system interact when the system boots.
After the control has been transferred to the address 0000: 7C00, the Master Boot Record (MBR) starts its work and starts loading the operating system.
Let's move on to coding
In the following sections, we will be directly involved in low-level programming - we will write our own bootloader.
Program architecture
We develop a bootloader for ourselves. Its tasks are only the following:
- Correct loading into memory at address 0000: 7 C00.
- Calling BootMain a function that we wrote in a high-level language.
- Display the phrase - ”Hello, world ...", from low-level.
The architecture of the program.
The first object is StartPoint, which is written exclusively in assembler, because high-level languages do not have the instructions we need. This tells the compiler what type of memory should be used, and the address of the instruction in RAM that should be executed after reading it. It also corrects processor registers and transfers control to the BootMain function, which is written in a high-level language.
The next object, BootMain, is an analog of main, which, in turn, is the main function in which all the program functions are concentrated.
The CDisplay and CString classes take care of the functional part of the program and display a message on the screen. As you can see in the previous picture, the CDisplay class uses the CString class in its work.
Development environment
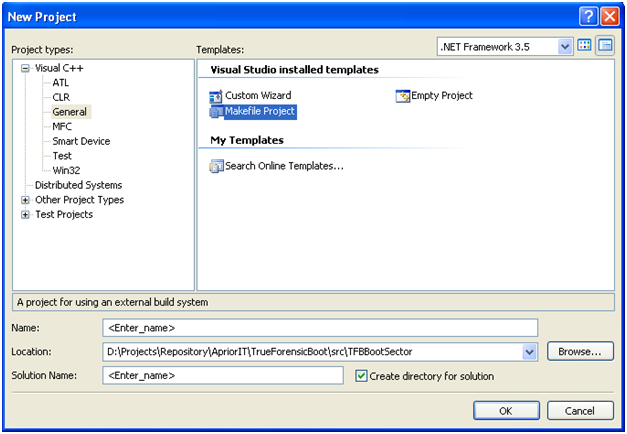
Here I use the standard development environment Microsoft Visual Studio 2005 or 2008. You can use any other tools, but I am sure that these two, with some settings, compile and work easily and conveniently.
First we need to create a Makefile Project, where the main work will be done.
File-> New \ Project-> General \ Makefile Project
BIOS interrupts and screen cleaning
To display a message on the screen, we must clear it first. We will use special BIOS interrupts for this purpose.
The BIOS offers a number of interrupts for working with hardware, such as a video card, keyboard, system disk. Each interrupt has the following structure:
int [number_of_interrupt];Where "number_of_interrupt" is the interrupt number.
Each interrupt has a number of parameters that must be set before it is called. The processor register is ah, always responsible for the number of functions for the current interrupt, and other registers are usually used for other parameters of the current operation. Let's see how the interrupt number 10h works in assembler. We will use the 00 function, it changes the video mode and clears the screen:
mov al, 02h; настройка графического режима 80x25 (текст)
mov ah, 00h; код функции изменения видео режима
int 10h; вызов прерывания
We will consider only those interrupts and functions that will be used in our application. We will need:
int 10h, function 00h – выполняет меняет видео режим и очищает экран;
int 10h, function 01h – устанавливает тип курсора;
int 10h, function 13h – показывает строку на экране;
"Mixed code"
The C ++ compiler supports built-in assembler, that is, when writing code in a high-level language, you can also use a low-level language. Assembler instructions that are used at a high level are also called asm inserts. They consist of the keyword "__asm" and a block of assembler instructions:
__asm ;  ключевое слово, которое показывает начало ASM вставки
{ ;  начало блока
    … ; какой нибудь ассемблеровский код
} ;  конец блока
To demonstrate an example of mixed code, we will use the previously mentioned assembler code, which performs screen cleaning and combines it with code written in C ++.
void ClearScreen()
{
    __asm
    {
        mov al, 02h; настройка графического режима 80x25 (текст)
        mov ah, 00h; код функции изменения видео режима
        int 10h; вызов прерывания
    }
}
Cstring implementation
The CString class is designed to work with strings. It includes the Strlen () method, which takes a pointer to a string as a parameter and returns the number of characters in that string.
CDisplay class is designed to work with the screen. It includes several methods:
- TextOut () - displays a line on the screen.
- ShowCursor () - controls the view cursor on the screen: show, hide.
- ClearScreen () - changes the video mode and thus clears the screen.
// CString.h
#ifndef __CSTRING__
#define __CSTRING__
#include "Types.h"
class CString
{
    public:
    static byte Strlen(const char far* inStrSource);
};
#endif // __CSTRING__
// CString.cpp
#include "CString.h"
byte CString::Strlen(const char far* inStrSource)
{
    byte lenghtOfString = 0;
    while(*inStrSource++ != '\0')
    {
        ++lenghtOfString;
    }
    return lenghtOfString;
}
CDisplay - implementation
  // CDisplay.h
#ifndef __CDISPLAY__
#define __CDISPLAY__
//
// colors for TextOut func
//
#define BLACK			0x0
#define BLUE			0x1
#define GREEN			0x2
#define CYAN			0x3
#define RED			0x4
#define MAGENTA		0x5
#define BROWN			0x6
#define GREY			0x7
#define DARK_GREY		0x8
#define LIGHT_BLUE		0x9
#define LIGHT_GREEN		0xA
#define LIGHT_CYAN		0xB
#define LIGHT_RED	                0xC
#define LIGHT_MAGENTA   	0xD
#define LIGHT_BROWN		0xE
#define WHITE			0xF
#include "Types.h"
#include "CString.h"
class CDisplay
{
    public:
    static void ClearScreen();
    static void TextOut(
        const char far* inStrSource,
        byte            inX = 0,
        byte            inY = 0,
        byte            inBackgroundColor   = BLACK,
        byte            inTextColor         = WHITE,
        bool            inUpdateCursor      = false
    );
    static void ShowCursor(
        bool inMode
    );
};
#endif // __CDISPLAY__
// CDisplay.cpp
#include "CDisplay.h"
void CDisplay::TextOut(
        const char far* inStrSource,
        byte            inX,
        byte            inY,
        byte            inBackgroundColor,
        byte            inTextColor,
        bool            inUpdateCursor
        )
{
    byte textAttribute = ((inTextColor) | (inBackgroundColor << 4));
    byte lengthOfString = CString::Strlen(inStrSource);
    __asm
    {
        push    bp
        mov     al, inUpdateCursor
        xor	     bh, bh
        mov     bl, textAttribute
        xor	     cx, cx
        mov     cl, lengthOfString
        mov     dh, inY
        mov     dl, inX
        mov     es, word ptr[inStrSource + 2]
        mov     bp, word ptr[inStrSource]
        mov     ah, 13h
        int	     10h
        pop	     bp
    }
}
void CDisplay::ClearScreen()
{
    __asm
    {
        mov  al, 02h
        mov  ah, 00h
        int     10h
    }
}
void CDisplay::ShowCursor(
        bool inMode
        )
{
    byte flag = inMode ? 0 : 0x32;
    __asm
    {
        mov     ch, flag
        mov     cl, 0Ah
        mov     ah, 01h
        int     10h
    }
}
Types.h - implementation
Types.h is a header file that includes data type and macro definitions.
// Types.h
#ifndef __TYPES__
#define __TYPES__
typedef unsigned char   byte;
typedef unsigned short  word;
typedef unsigned long   dword;
typedef char            bool;
#define true            0x1
#define false           0x0
#endif // __TYPES__
BootMain.cpp - implementation
BootMain () is the main function of the program, which is the first entry point (analogous to main ()). The main work is done here.
// BootMain.cpp
#include "CDisplay.h"
#define HELLO_STR               "\"Hello, world…\", from low-level..."
extern "C" void BootMain()
{
    CDisplay::ClearScreen();
    CDisplay::ShowCursor(false);
    CDisplay::TextOut(
        HELLO_STR,
        0,
        0,
        BLACK,
        WHITE,
        false
        );
    return;
}
StartPoint.asm - implementation
;------------------------------------------------------------
.286							   ; CPU type
;------------------------------------------------------------
.model TINY						   ; memory of model
;---------------------- EXTERNS -----------------------------
extrn				_BootMain:near	   ; prototype of C func
;------------------------------------------------------------
;------------------------------------------------------------
.code
org				07c00h		   ; for BootSector
main:
				jmp short start	   ; go to main
				nop
;----------------------- CODE SEGMENT -----------------------
start:
        cli
        mov ax,cs               ; Setup segment registers
        mov ds,ax               ; Make DS correct
        mov es,ax               ; Make ES correct
        mov ss,ax               ; Make SS correct
        mov bp,7c00h
        mov sp,7c00h            ; Setup a stack
        sti
                                ; start the program
        call           _BootMain
        ret
        END main                ; End of program
Let's put it all together
Creating a COM File
Now that the code is developed, we must convert it to a file for 16-bit OS. Such files are .COM files. We can start the compiler from the command line, passing the necessary parameters, as a result we get several object files. Next, we run the linker to convert all .COM files into one executable file with the extension. Com. This is a workable option but not very easy.
Let's better automate this process. To do this, we need to create a .bat file and write the necessary commands with the necessary parameters into it.
Put the compilers and linker in the project directory. In the same directory, we create a batch file and fill it in accordance with the example (you can use any directory instead of VC152, the main thing is that the compilers and linker are in it):
.\VC152\CL.EXE /AT /G2 /Gs /Gx /c /Zl *.cpp
.\VC152\ML.EXE /AT /c *.asm
.\VC152\LINK.EXE /T /NOD StartPoint.obj bootmain.obj cdisplay.obj cstring.obj
del *.obj
Assembling - Automation
As a final step in this section, we describe how to turn Microsoft Visual Studio 2005, 2008, into a development environment that supports any compiler. To do this, go to the project properties: Project-> Properties-> Configuration Properties \ General-> Configuration Type .
The Configuration Properties tab includes three items: General , Debugging, and NMake . Select NMake and specify the path to "build.bat" in the Build Command Line and Rebuild Command Lin .
If everything is done correctly, then you can compile by pressing F7 or Ctrl + F7. In this case, all related information will be displayed in the output window. The main advantage here is not only the automation of the assembly, but also the monitoring of errors in the code, if any.
Testing and Demonstration
This section will tell you how to see the bootloader done in action, how to perform testing and debugging.
How to check the bootloader
You can check the bootloader on real hardware or using virtual machines developed for these purposes - VMware. Testing on real hardware gives you more confidence that it works as well as on a virtual machine. Of course, we can say that VmWare is a great way to test and debug. We will consider both methods.
First of all, we need a tool to write our bootloader to a virtual or physical disk. As far as I know, there are several free and commercial consoles and GUI applications. I used Disk Explorer for NTFS 3.66 (a version for FAT called Disk Explorer for FAT) to work on Windows and Norton Disk Editor 2002 to work on MS-DOS.
I will only describe Disk Explorer for NTFS 3.66 because it is the easiest way and is most suitable for our purposes.
Тестирование с помощью виртуальной машины VmWare
Создание виртуальной машины
We will need VmWare software version 5.0, 6.0 or higher. To test the bootloader, we will create a new virtual machine with a minimum disk size, for example, 1 Gb. Format it to the NTFS file system. Now we need to map the formatted hard drive to VmWare as a virtual drive. To do this, select:
File-> Map or Disconnect Virtual Disks ...
After that, a window will appear. There you must click the Map button. In the next window that appears, you must specify the path to the disk. Now you can also select a drive letter.
Do not forget to uncheck the box “Open file in read-only mode (recommended)”. After you have completed all of the above indications, the drive must be available in read-only mode to avoid data corruption.
After that, we can work with the virtual machine drive, as with a regular logical drive in Windows. Now we have to use Disk Explorer for NTFS 3.66 to write the boot record from position 0.
Working with Disk Explorer for NTFS
After starting the program, we go to our disk (File-> Drive). In the window that appears, go to the logical drives section and select our created drive (in my case it's Z).
Now we select the menu item View as a Hex command. In this window, we can see the disk information in a 16-bit representation, divided into sectors. Now we only have 0, since the disk is empty for now.
Now we have to write our bootloader to the first sector. We set the marker to position 00, as shown in the previous picture. To copy the bootloader we use the menu item Edit-> Paste from file command . In the window that opens, specify the path to the file and click Open. After that, the content of the first sector should change and look like it is shown in the picture - if you, of course, did not change anything in the code.
You must also write the 55AAh signature at position 1FE from the start of the sector. If you do not do this, the BIOS will check the last two bytes, and not finding the specified signature, it will consider that this sector is not bootable and will not load it into memory.
To switch to the editing mode, press the F2 key and write the necessary numbers - 55AAh signature. To exit edit mode, press ESC .
Now we need to confirm the recorded data.
To apply the recorded we go to Tools-> Options , now we go to Modeand select the recording method - Virtual Write and click the Write button .
Finally, most of the routine actions have been completed, and now you can see what we have developed from the very beginning of this article. Let's go back to VwWare to disconnect the virtual disk (File-> Map or Disconnect Virtual Disks ... and click Disconnect).
Let's start the virtual machine. We now see how familiar lines appear from the depths of the realm of machine codes - "Hello World ...", from low-level ... ".
Testing on real hardware
Testing on real hardware is almost the same as on a virtual machine, except that if something does not work, you will need much more time to restore it than creating a new virtual machine. To check the bootloader without being able to lose data (everything can happen), I suggest using a flash drive, but first you must restart the computer, go into the BIOS and make sure that it supports booting from a flash drive. If he supports him, then everything is in order. If not, then you should limit testing to a virtual test machine.
The process of writing a bootloader to a flash drive in Disk Explorer for NTFS 3.66 is the same as for a virtual machine. You just have to choose the hard drive itself instead of your logical partition.
Conclusion
In this article, we examined what a boot loader is, how the BIOS works, and how system components interact when a system boots. The practical part gave us an understanding of how you can develop your own, simple bootloader. We demonstrated mixed-code technology and the build automation process using Microsoft Visual Studio 2005, 2008.
Of course, this is only a small part compared to the huge topic of low-level programming, but if you were interested in this article, then this is cool.
UPD: source link