Slit shooting: Catching birds using python
After reading an article about slit shooting a few months ago , I firmly decided to write a small utility that allows you to create slit photos. Shaking the bins, I found the following resources: a Python training course , an old laptop, a GoPro camera, several hours of free time, the month of March and a bird feeder.
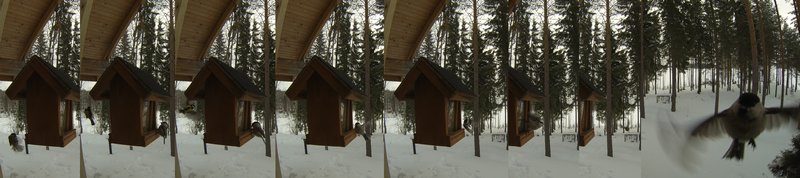
Watching the heavy traffic of tits at the feeder, I had no doubt that shooting a tit in flight would be "like sending two bytes." Having put the camera on a tripod, I moved it to the edge and, turning on the single-frame shooting mode with an interval of 0.5 seconds, I hid in the house. Titmouse returned in a couple of minutes. After waiting another five minutes, I joyfully ran out onto the terrace, grabbed the camera and rushed to the laptop. Imagine my disappointment when after half an hour I saw the processed results of the survey - alternating light and dark horizontal stripes with small specks of vertical “slices” of blue ticks, a few pixels wide. It seems that the tits flew too fast.
It doesn’t matter, let's switch the camera to the sports video mode (60 frames / second) and try again. Titmouse, obviously, are already used to a tripod, so air traffic recovered after a few seconds. An hour later, I was the proud owner of a series of photographs taken with an interval of 1/60 sec. ( ffmpeg helped a lot in decomposing the video in the photo ). I was sure of success. But the result turned out to be deplorable anyway - the strips of blue became a little wider, but they did not form a coherent picture. After analyzing (using the gaze method) of several photoseries, it became clear that the titmouse fly not only fast, but very fast. Less than 0.3 seconds pass from the moment a titmouse takes off until it dissolves among the trees!

That is, to make a gap photo of a tit flight at least 120px wide, you need to shoot at a frequency of 400 frames / second! It was a fiasco.
In heavy thought, tearing my child from playing MineCraft and putting on his skis, I went on a ski trip. I took the camera with me. The child, imbued with my problem, suggested - "Dad, can you shoot a fire in a ski house?"
Eureka! After walking a few kilometers along the track, we reached the hut. Having made a fire and set sausages to fry, I strengthened the chamber opposite ...

After spending an hour or two in the hut, we were full and satisfied, returned home.
The result was curious, but boring:

After scratching my head, I decided to add the -hz switch to the code so that I could make a slit photo not only a vertical slit, but also horizontal. This time everything turned out to be much more interesting:

Video fragment corresponding to the slit photo:
My son’s entrance, exit and again the entrance through the space-time window are visible on the slit photo. Pay attention to the sinusoidal distortion of the door leaf! The intuitively guessed slit displacement (600px, ~ 55% of the photo height) turned out to be the most interesting; running through the remaining displacements did not produce such a spectacular result.
Brief conclusions: Searching for suitable objects for a slit photo is an exciting and exciting activity. Slit photo is not just another effect, but a very interesting and funny view of the world. I hope that the simple code below will lower your threshold for entering it. Good luck
PS <thinking> Where would I get a camera with a frame rate of 400 frames / second? </ Thoughtfully> You don’t, by chance?
#Slit-scan photography#CopyLeft 2013 OlloSnowimport os, Image, argparse
defadd_slice(img_slt, img, offst, wdth, hz, num):if hz:
    img_tmp = img.crop((0, offst, img.size[0], offst+wdth))
    img_slt.paste(img_tmp, (0, num*wdth, img.size[0], (num+1)*wdth))
  else:
    img_tmp = img.crop((offst, 0, offst+wdth, img.size[1]))
    img_slt.paste(img_tmp, (num*wdth, 0, (num+1)*wdth, img.size[1]))
  returndefmain():
  parser = argparse.ArgumentParser(usage=\
    '%(prog)s dir_images res_image [-hz] [-o slit_offset] [-w slit_width] [--help]')
  parser.add_argument('dir_img', type = str,\
    help = 'images directory')
  parser.add_argument('res_img', type = str,\
    help = 'result slit-scan image')
  parser.add_argument('-hz', '--horizontal', action='store_true',\
    help = 'horizontal orientation of the slit (vertical by default)')
  parser.add_argument('-o', '--offset', type = int, default = 0,\
    help = 'slit offset (pixels; 0 by default)')
  parser.add_argument('-w', '--width',type = int, default = 1,\
    help = 'slit width (pixels; 1 by default)')
  args = parser.parse_args()
  filenames = sorted(os.listdir(args.dir_img))
  img = Image.open(os.path.join(args.dir_img, filenames[0]))
  if args.horizontal:
    width = img.size[0]
    height = len(filenames)*args.width
  else:
    width = len(filenames)*args.width
    height = img.size[1]
  img_slt = Image.new('RGB',(width,height))
  max_i = len(filenames)
  for i, file in enumerate(filenames):
    img = Image.open(os.path.join(args.dir_img, file))
    add_slice(img_slt, img, args.offset, args.width, args.horizontal, i)
    print max_i - i, '\r',
  img_slt.save(args.res_img, 'JPEG')
if __name__ == "__main__":
  main()