How sound is created for another reality
- Tutorial
We continue the cycle of articles on Windows Mixed Reality and develop from scratch the application with mixed reality on Unity in lab work format (lab work). You can, in parallel with the publication of articles, create such an application. Today we will talk about spatial sound and how to create the feeling of being in another reality.
The speaker is ready, now we try to start and stop the reproduction of spatial sound. In this section, we will add a sound source and sound playback controls.
Since some of the tasks that confront us are similar to those performed earlier, we will provide instructions in the form of lists in order to speed up the process.
Verify your actions with screenshots that are at the end of each major stage, and for additional reference materials, see the links in the instructions.
To play sound from the speaker, you need to add the Unity AudioSource component (Sound Source) to it.
To add a play button to the speaker, follow these steps:
1. On the Project panel, find the CircleButton prefab in the Assets folder -> HoloToolkit -> UX -> Prefabs -> Buttons (Resources -> HoloToolkit -> UX -> Prefabs -> Buttons) and drag it to the Hierarchy panel, adding this prefab to the scene as a child of the Speaker object.
2. Give the added button the name of the PlayButton.

3. Increase the size of the PlayButton object by setting its Transform Scale property to (90, 90, 90).
4. After selecting the PlayButton object, click Add Component -> Event -> Event Trigger (Add Component -> Event -> Event Trigger).
5. Click Add New Event Type -> Pointer Click (Add new event type ->
6. Click the “+” button at the bottom of the empty event list.
7. Drag the Speaker object from the Hierarchy panel onto the field to reset the events labeled None (Object).
8. In the No Function drop-down list, select AudioSource-> Play ().
To add a pause button to the speaker, do the following:
1. Duplicate the PlayButton object by pressing Ctrl + D or right-clicking a resource in the Hierarchy panel and selecting Duplicate, and then rename it to PauseButton.
2. Set the PauseButton object's Event Trigger function to AudioSource-> Pause ().
Now these buttons should work, but they are difficult to use, since they overlap each other. Another problem is that the user does not see them when the speaker is turned away. To solve this problem, do the following:
1. For the Transform Position property of the PlayButton object, set the values (-6, 18, 0).
2. For the Transform Position property of the PauseButton object, set the values (6, 18, 0).
3. In the Hierarchy panel, right-click the Speaker object and select Create Empty to create an empty child object. Rename the added GameObject to ButtonBillboard. To rename an object, right-click the object and select Rename.
4. Drag both buttons onto the ButtonBillboard object, making them child objects of this object.
5. With the ButtonBillboard object selected in the Inspector panel, click Add Component -> Billboard (Add component -> Billboard). The Billboard component can be found using the search bar. The Billboard script from the Mixed Reality Toolkit toolkit makes an object constantly facing the camera and is often used for user interface elements.
6. You need to get the following structure for a billboard:

To make the play and pause buttons easier to distinguish, you can replace their standard icons with others. This can be done in several ways, but we will use the simplest, given the size of our project.
1. After selecting the PlayButton object, scroll the Inspector panel to the Compound Button Icon component.
2. Select the Override Icon checkbox.
3. Drag the Start sprite from the Assets -> Textures folder (Resources -> Textures) to the Icon Override property of the Compound Button Icon component.
4. Repeat these steps for the PauseButton object using the Pause sprite.

Now we have a speaker that can be turned on, off and moved around the virtual living room. However, we do not have a spatial sound that would enhance the effect of presence in our application.
In Unity, spatial sound is implemented using a spatial sound plug-in (Spatializer). Plug-in files are part of Unity, so it’s easy to implement spatial sound.
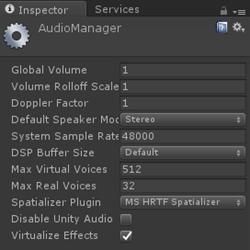
1. Go to Edit -> Project Settings -> Audio (Edit -> Project Settings -> Sound).
2. For the Spatializer Plugin parameter, change the value from None to MS HRTF Spatializer.
Since Microsoft's spatial audio system currently only supports a sampling rate of 48,000 Hz, the System Sample Rate parameter should also be set to 48,000 (if not already done) to prevent the HRTF module from crashing.
Now you need to make settings for the sound clip itself.
1. In the Hierarchy panel, select the Speaker object.
2. Scroll the Inspector panel to the Audio Source component and select the Spatialize option.
3. For the Spatial Blend parameter, select the 3D value (numerical value - 1).
4. Expand the 3D Sound Settings menu.
5. To set the optimal three-dimensional sound settings for our application, set the Logarithmic Rolloff value for the Volume Rolloff parameter and set the Min Distance parameter to 3.
6. Select the Speaker object and click Add. Component -> Audio Emitter (Add Component -> Sound Emitter). This is a class from the Mixed Reality Toolkit, which uses the connected AudioSource component and the Unity sound filter subgroup to apply and control sound effects, such as absorption.

Now our speaker is completely ready. Let's turn it into a prefab.
1. Drag the Speaker object into the Assets -> Prefabs folder (Resources -> Prefabs) to turn it into a prefab.
By turning the speaker into a prefab, we will make an object of it that can be reused. After that we will be able to create any number of instances of the speaker for our scene or other scenes of this project.
Now let's save the scene (by pressing Ctrl + S) and run it to see the results of our work.
Now we can do a lot of interesting things:
Do not forget that you can teleport yourself to different points in the room by pressing the “Forward” button on the jumpstick and selecting the point on the floor that you want to go to. In this way, you can move further away from the speaker.
Original
Authors: Eric Ahlstrom, cbarkerms, Madison Hight
The entire manual will consist of 5 parts. It will be updated every week. Below you can go to the part you need.
Part 1: Export a UWP app for Windows Mixed Reality from Unity ;
Part 2: Setting up the environment (VR) ;
Part 3: Controllers ;
Part 4: Spatial sound ;
Part 5: HoloLens and graphics .
Spatial sound
The speaker is ready, now we try to start and stop the reproduction of spatial sound. In this section, we will add a sound source and sound playback controls.
Since some of the tasks that confront us are similar to those performed earlier, we will provide instructions in the form of lists in order to speed up the process.
Verify your actions with screenshots that are at the end of each major stage, and for additional reference materials, see the links in the instructions.
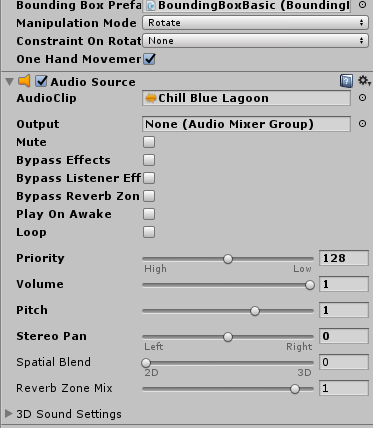
Add sound source
To play sound from the speaker, you need to add the Unity AudioSource component (Sound Source) to it.
- Select the Speaker object on the stage and click Add Component -> Audio -> Audio Source (Add Component -> Sound -> Sound Source).
- Click the small sight icon to the right of the Audio Clip property of the Audio Source component and select Chill Blue Lagoon.
- Uncheck the Play On Awake checkbox, as we will control the playback using the buttons. Settings for spatial sound will be changed later.
Adding playback controls to the speaker
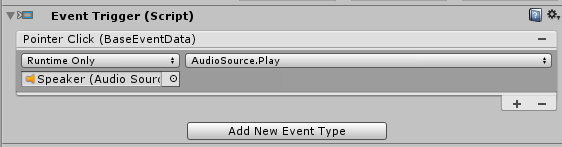
To add a play button to the speaker, follow these steps:
1. On the Project panel, find the CircleButton prefab in the Assets folder -> HoloToolkit -> UX -> Prefabs -> Buttons (Resources -> HoloToolkit -> UX -> Prefabs -> Buttons) and drag it to the Hierarchy panel, adding this prefab to the scene as a child of the Speaker object.
2. Give the added button the name of the PlayButton.
3. Increase the size of the PlayButton object by setting its Transform Scale property to (90, 90, 90).
4. After selecting the PlayButton object, click Add Component -> Event -> Event Trigger (Add Component -> Event -> Event Trigger).
5. Click Add New Event Type -> Pointer Click (Add new event type ->
6. Click the “+” button at the bottom of the empty event list.
7. Drag the Speaker object from the Hierarchy panel onto the field to reset the events labeled None (Object).
8. In the No Function drop-down list, select AudioSource-> Play ().
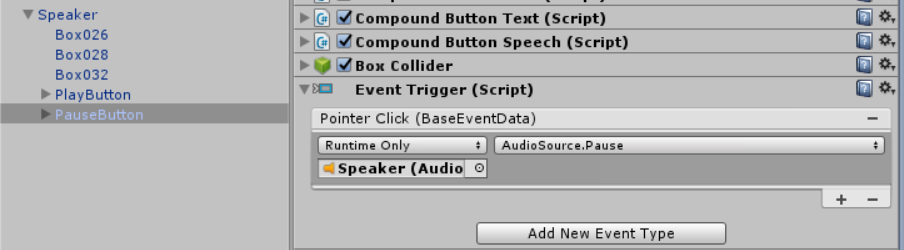
To add a pause button to the speaker, do the following:
1. Duplicate the PlayButton object by pressing Ctrl + D or right-clicking a resource in the Hierarchy panel and selecting Duplicate, and then rename it to PauseButton.
2. Set the PauseButton object's Event Trigger function to AudioSource-> Pause ().
Now these buttons should work, but they are difficult to use, since they overlap each other. Another problem is that the user does not see them when the speaker is turned away. To solve this problem, do the following:
1. For the Transform Position property of the PlayButton object, set the values (-6, 18, 0).
2. For the Transform Position property of the PauseButton object, set the values (6, 18, 0).
3. In the Hierarchy panel, right-click the Speaker object and select Create Empty to create an empty child object. Rename the added GameObject to ButtonBillboard. To rename an object, right-click the object and select Rename.
4. Drag both buttons onto the ButtonBillboard object, making them child objects of this object.
5. With the ButtonBillboard object selected in the Inspector panel, click Add Component -> Billboard (Add component -> Billboard). The Billboard component can be found using the search bar. The Billboard script from the Mixed Reality Toolkit toolkit makes an object constantly facing the camera and is often used for user interface elements.
6. You need to get the following structure for a billboard:
To make the play and pause buttons easier to distinguish, you can replace their standard icons with others. This can be done in several ways, but we will use the simplest, given the size of our project.
1. After selecting the PlayButton object, scroll the Inspector panel to the Compound Button Icon component.
2. Select the Override Icon checkbox.
3. Drag the Start sprite from the Assets -> Textures folder (Resources -> Textures) to the Icon Override property of the Compound Button Icon component.
4. Repeat these steps for the PauseButton object using the Pause sprite.
Adding spatial sound
Now we have a speaker that can be turned on, off and moved around the virtual living room. However, we do not have a spatial sound that would enhance the effect of presence in our application.
In Unity, spatial sound is implemented using a spatial sound plug-in (Spatializer). Plug-in files are part of Unity, so it’s easy to implement spatial sound.
1. Go to Edit -> Project Settings -> Audio (Edit -> Project Settings -> Sound).
2. For the Spatializer Plugin parameter, change the value from None to MS HRTF Spatializer.
Since Microsoft's spatial audio system currently only supports a sampling rate of 48,000 Hz, the System Sample Rate parameter should also be set to 48,000 (if not already done) to prevent the HRTF module from crashing.
Now you need to make settings for the sound clip itself.
1. In the Hierarchy panel, select the Speaker object.
2. Scroll the Inspector panel to the Audio Source component and select the Spatialize option.
3. For the Spatial Blend parameter, select the 3D value (numerical value - 1).
4. Expand the 3D Sound Settings menu.
5. To set the optimal three-dimensional sound settings for our application, set the Logarithmic Rolloff value for the Volume Rolloff parameter and set the Min Distance parameter to 3.
6. Select the Speaker object and click Add. Component -> Audio Emitter (Add Component -> Sound Emitter). This is a class from the Mixed Reality Toolkit, which uses the connected AudioSource component and the Unity sound filter subgroup to apply and control sound effects, such as absorption.
Save and Run
Now our speaker is completely ready. Let's turn it into a prefab.
1. Drag the Speaker object into the Assets -> Prefabs folder (Resources -> Prefabs) to turn it into a prefab.
By turning the speaker into a prefab, we will make an object of it that can be reused. After that we will be able to create any number of instances of the speaker for our scene or other scenes of this project.
Now let's save the scene (by pressing Ctrl + S) and run it to see the results of our work.
Now we can do a lot of interesting things:
- play and stop sound;
- move the speaker closer to you, noting that the sound is getting louder and clearer;
- move the speaker away from you, noting that the volume of the sound is decreasing.
Do not forget that you can teleport yourself to different points in the room by pressing the “Forward” button on the jumpstick and selecting the point on the floor that you want to go to. In this way, you can move further away from the speaker.
Original
Authors: Eric Ahlstrom, cbarkerms, Madison Hight