Conference DEFCON 23. How I lost my second eye, or further research in the field of data destruction. Part 1
- Transfer
Hi DEFCON! I'm going to break the tradition and this time start the performance a minute earlier, because I want to show you so much of everything that I am afraid not to be in time. I am sure that this presentation has a lot more explosive moments than in the entire history of presentations over the 25 years of Defcon's existence.

This is not a solo project, I used a lot of ideas from my friends. This presentation was inspired by the speeches of Bruce Potter, who already spoke here, Shane Lawson and Diviant Ollam at the DefCon 19 conference. They told how they launched a data center where they placed very valuable information on network hard drives, and they put forward some ideas. As you know, this can really be a target for some criminals who want to steal all the data, so they considered the possibility of some kind of switch that you can turn on and physically destroy all the disks in the data center. I thought it would be pretty cool, and I wanted to do something like a continuation, conduct a series of my own experiments, and then, four years later, I saw several data centers being physically attacked,
This showed how much cryptography can trust and how insecure our endpoints are. Our encryption is as secure as encryption keys are. Do you know what the NSA does when they get rid of encrypted hard drives - they do not just throw them away, but destroy them completely.
So here are the goals of protection:
And the protection rules that Bruce, Shane, and Diviant have basically come up with:
Briefly tell you what is the design of HDD. The technology of their manufacture still uses a lot of rotating aluminum plates, now they are often made of glass, and the glass is extremely easy to break. Covering discs is extremely interesting. It is a substrate of an alloy of cobalt, nickel and iron, on top of which a magnetic layer of cobalt, chromium and platinum is located, and these layers are separated by a four-atom ruthenium layer.

There are also solid-state drives SSD, not too common in data centers, I also invented something to destroy them.
Let me remind you of the results of research reported on DEFCON 19. The guys came up with 3 categories of “weapons of destruction” and divided them among themselves. So, Diviant worked on 1 category - incendiary mixtures. There were some questions about the legality of use, because he worked with tannerite, which is used to make targets that explode when they hit a bullet. They managed to melt aluminum HDD plates a little using propane and MAPP gas, but they concluded that HDD plates are a great radiator that “sucks” heat like crazy, so it’s very difficult to melt the disks.
The second category was a chemical means of destruction. They tried to “infect” the disk with rust, but it turned out to be so resistant to corrosion that it had to be abandoned.
The third category became the most fun category - mechanical weapons. They used circular saws for wood, grinding wheels, and blade blades. Then moved to the use of electricity. It coped well with glass plates, but could not do anything with aluminum.

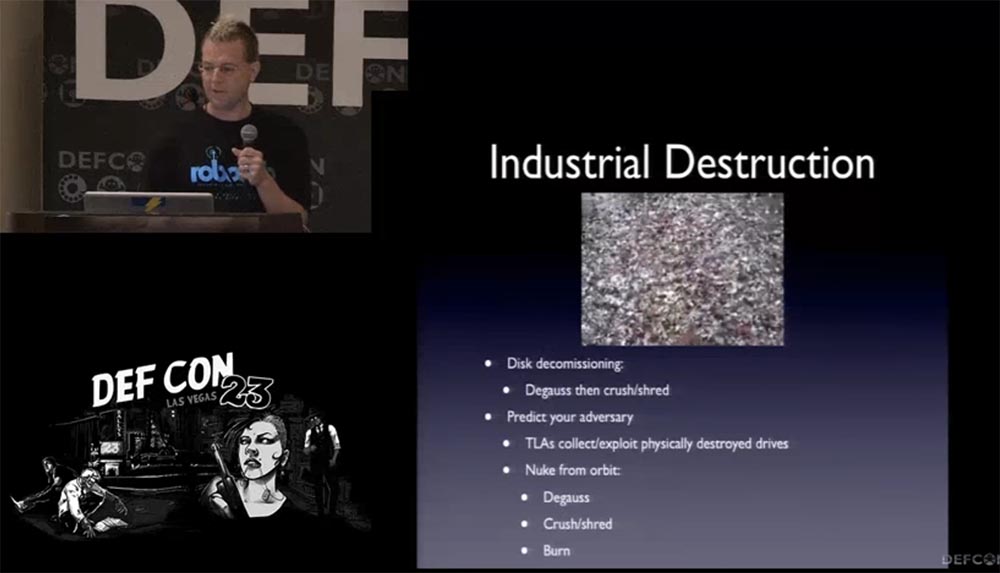
After that, they moved to industrial methods of destruction. The discs are first demagnetized, then ground in a shredder, and the remnants are burned. This video fragment shows a kind of “meat grinder” for HDD, it just grinds them right in the enclosures. TLA collects physically destroyed hard drives. I met with one guy who worked in Iraq, so TLA told him - if he finds HDDs that could not be broken or burned, let him send them.
Next, I'll show you the slide number 101, it shows my own method of destroying HDD. So if nothing from the description described below suits you, you can go back to this slide and follow the recommendations.
The destruction procedure is as follows:

I hope this method will be interesting for you, but not very useful. I also decided to use three different data destruction technologies: thermal, kinetic and electrical.

The thermal method was to heat the plates to the Curie point, the temperature at which the metal loses its magnetic properties; for cobalt, it is 1115 ° C. After that, nothing is possible to read from metal. I have not tried some things, you can try to make them yourself or understand why I have not done them. I wanted to find some flameless chemical reactions, but I could not. Of course, you can make an awesome oven and bake a disk, but it's not interesting to watch. You can melt aluminum inductively, in a large induction furnace, but I did not consider this possibility in method number 1.
Thermal method number 1 was to use the good old plasma cutter. This video shows the HDD cutting process, it looks amazing.
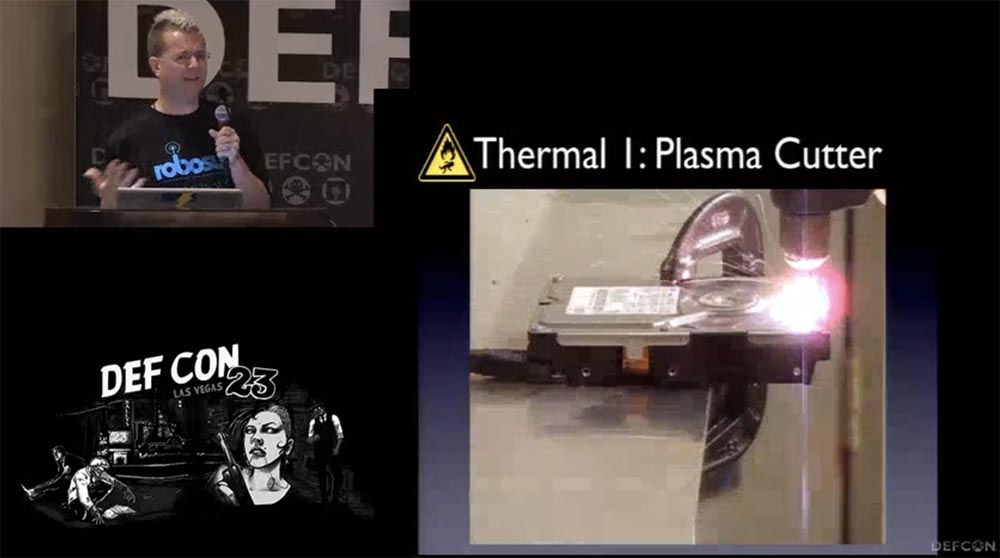
I carefully selected the size of the plasma cutter and honestly, I expected that it would cause much greater damage to the HDD. As you can see, the whole cutting process is only 40 seconds. You can adjust the plasma intensity, use additional cutters, etc. As a result, we got a rather large melted hole. The drive cooled down for a very long time, and when I disassembled it, I saw a melted through hole in the upper plate and the same through hole in the lower plate, but nothing else was damaged.
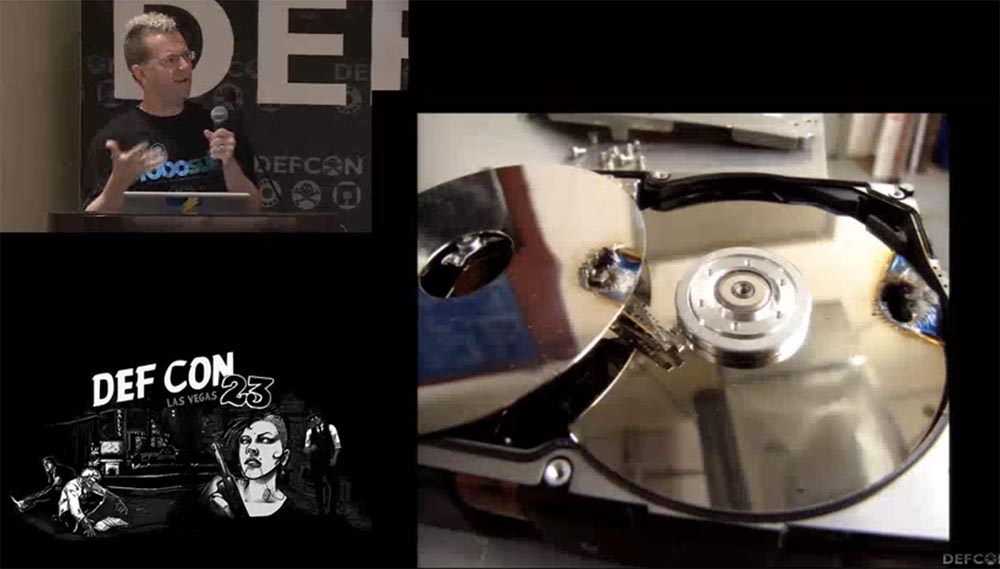
Thus, if you need to destroy all the data on the surface of the disks, you will need to burn a lot of such holes around its circumference. The next slide shows a fully disassembled HDD, as you can see, in each of the 4 plates there is one hole of different size and shape, but the remaining surface of the disc plates remained intact. In my opinion, this is a completely feasible data destruction method.
Thermal method number 2 was to inject oxygen into the disc, which, burning out, would burn everything inside. I thought that if I could use the drive itself as fuel? They would pump oxygen there and add some magnesium. This is what an oxygen injector looks like - a hole is drilled in the drive, a metal pipe is inserted, and a hose for supplying oxygen is connected to it. Now I will show you how the burnout process takes place in slow motion. First, the disk envelops the oxygen mist, then sparks, and now the flame is raging. The whole process takes less than 5 seconds.
Of course, I could come up with a more elegant engineering solution for this oxygen burner, but let's leave it to the professionals. This is how the HDD looks inside and outside after the injection of oxygen, followed by ignition. On the one hand the plates melted very well. If I had more engineering capabilities, and I could safely supply more oxygen to capture all the space inside the case with a flame, then the disk plates could be completely melted and destroyed.
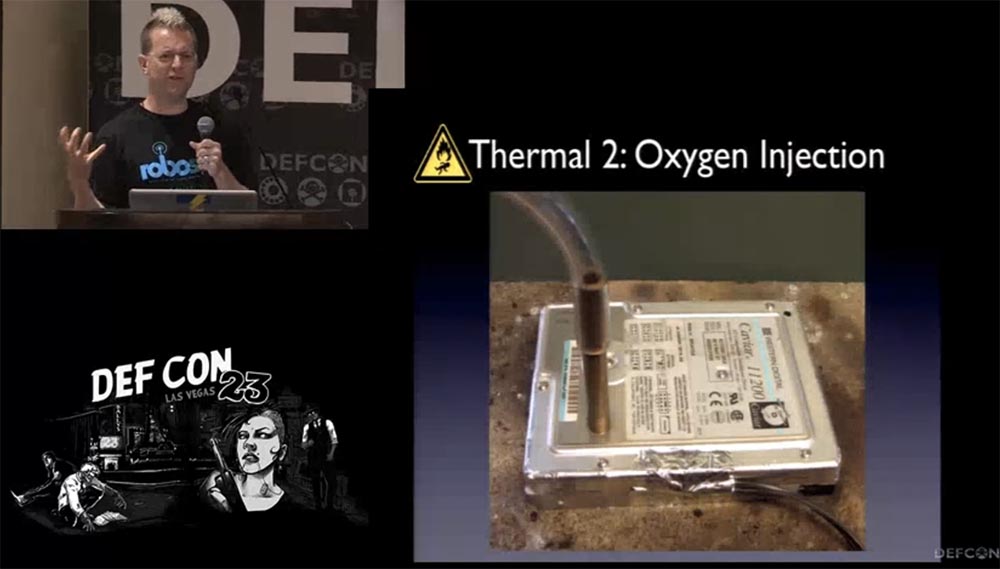
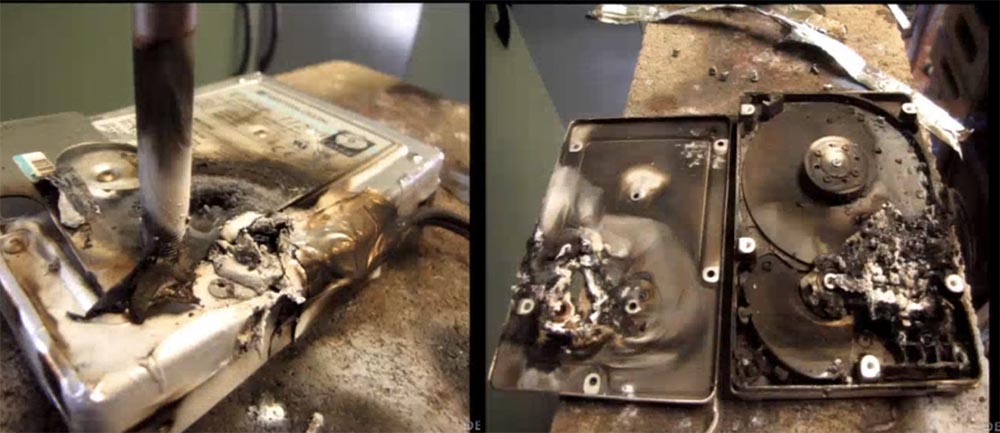
So we can say that this method is potentially feasible.
The third thermal method of destruction was that instead of an injection of oxygen, perform an injection of a thermite mixture, so that after pressing the switch, it would go inside the HDD, ignite and burn the disk.
This compound, called termites, is an aluminum powder mixed with iron oxide. By weight it is taken in a ratio of 3: 1, for the connection I added a solvent there. Termite burns with a temperature of 2500 ° C with little or no oxygen, and it can not be extinguished. It is very easily prepared by simple mixing and is a viscous, sticky mass of silver. This compound is perfect for injecting HDD inside.
The video shows the process of testing the resulting combustible mass, which I placed on the reverse side of the HDD housing cover. I set fire to it with a blowtorch, and the video playback speed was increased 8 times, because the burning starts for a long time. I decided that the reason was a solvent, which delays the reaction by placing iron atoms under a layer of oxide film, and tried a bunch of different solvents: glycerin, kerosene, naphtha.

After the combustion, I brought a magnet to the remnants of the burned mixture, and quite a lot of combustion products — pure iron derived from oxide — adhered to it. The combustion reaction proceeded with the release of a large amount of smoke, indicating an incomplete combustion of the components of the mixture. As you can see, after the burning of thermite, the metal cap of the drive remained almost intact, so this method proved to be ineffective.
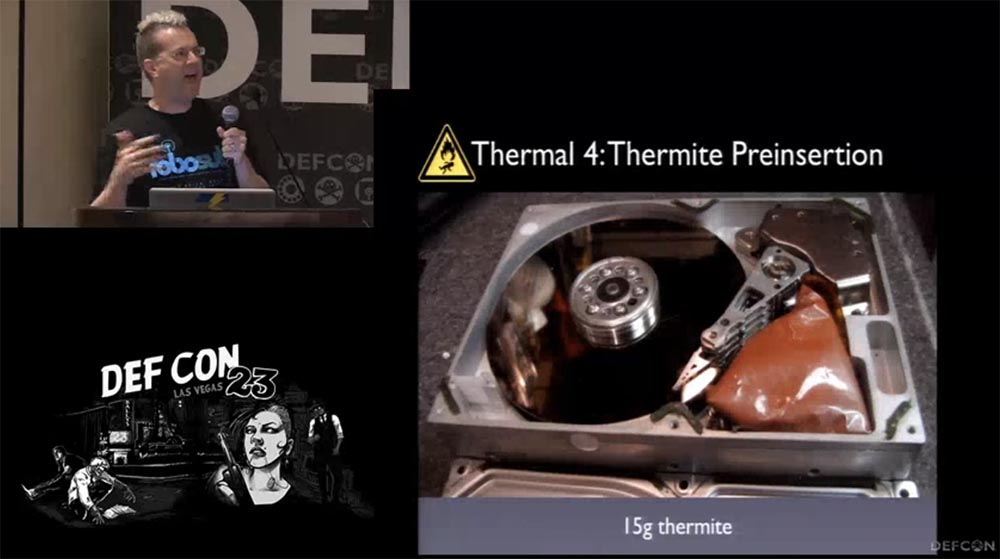
The fourth method of thermal destruction was to pre-place combustible matter inside the HDD housing. There is a lot of free space, and if you remove some unnecessary partitions, you can put as many as 15 grams of termite inside the case! In this case, I used the electrical contact leads located inside as a fuse for the combustible mixture. This arrangement of the termite did not prevent the drive from working at all; it was free to write and read data from it.
Such things make me feel like a drug dealer or killer. You know, when you get to the airport, you are forced to turn off all the electronics there, which is completely useless from a security point of view. Because inside this electronics there is plenty of space to put any destructive crap there.
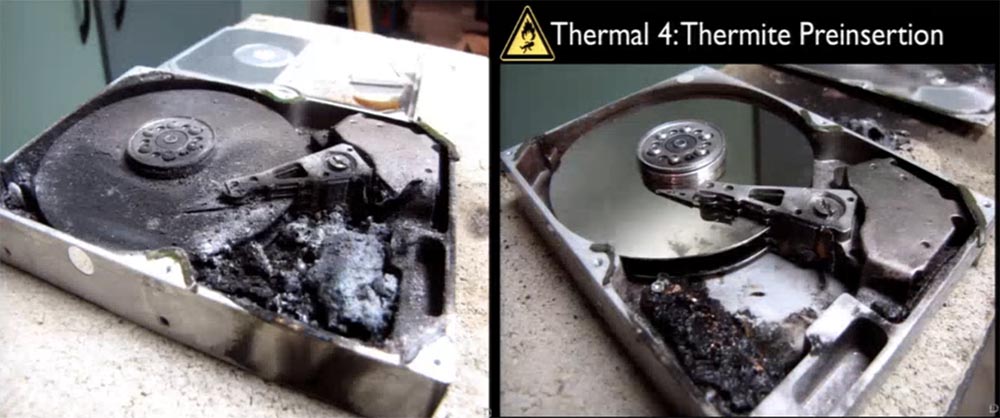
The following video recorded my experiment - I remotely set fire to a thermite inside the drive using a powered electrical cable, a fire flashes, which is knocked out. Burning lasts about 3 seconds. The result is such damage. You see burnt material inside the body and partially burnt plates. But after we cleaned and washed them, we saw a shiny non-stick surface that turned out to be chemically inert to such an effect. Thus, this method of influencing the HDD was a complete failure.
But I was not ready to give up yet. I know that the military uses incendiary grenades charged with a substance called “thermate”. It is a mixture of 70% thermite and 30% barium nitrate. When it burns, additional gas is released, which spreads combustion around and it burns with a higher temperature. In this video, you see the use of 15 g of thermite charge - there is no longer burning, but just an explosion with the ejection of a column of flame. Much more effective.
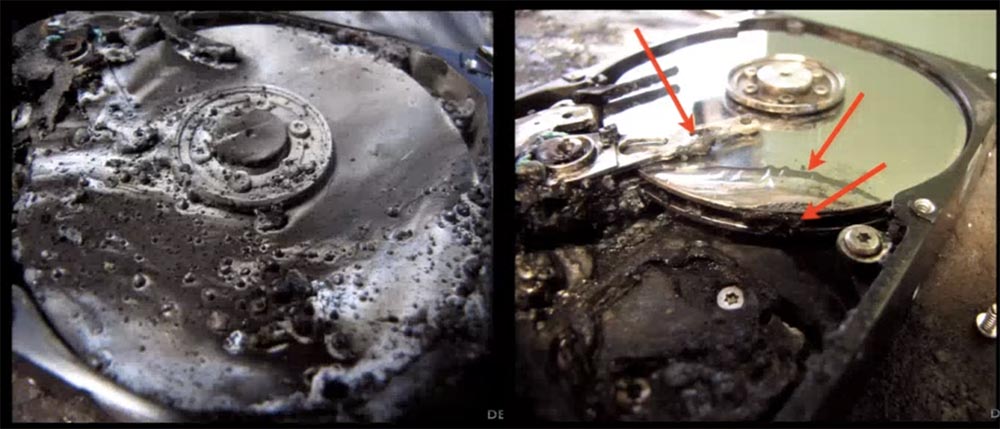
In slow motion, you can see how the flames inflame under the cover of the HDD, it is somewhat similar to the operation of the plasma cutter. So, the following video shows the consequences of using the 5th method of thermal destruction - the use of Thermate combustible mixture. As you can see, damage to the disc plates is more serious this time.
After cleaning and washing, we saw a clear deformation of the upper and lower plate of the disk in places marked with red arrows. However, most of the plates were still to be restored using electron microscopes. Another failure!

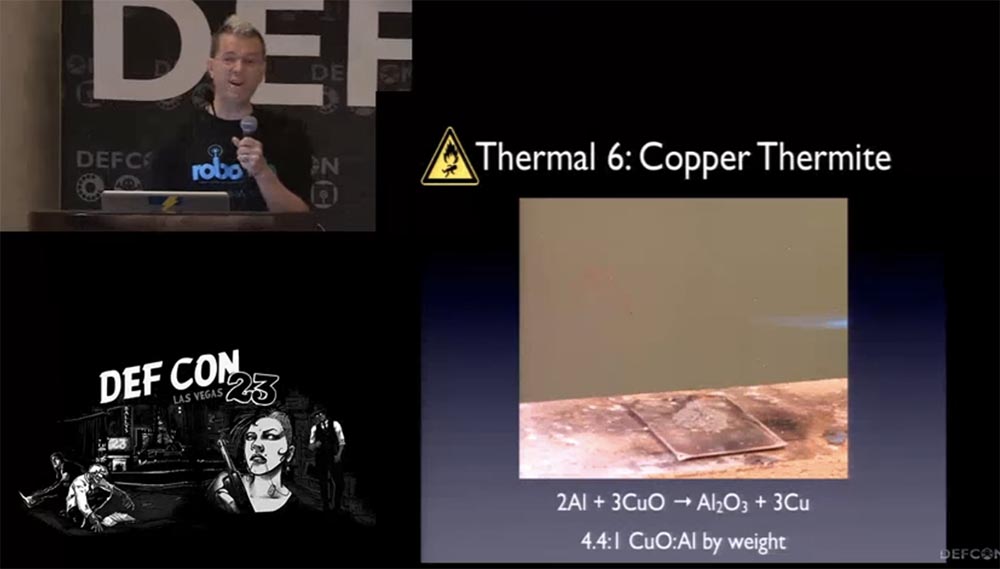
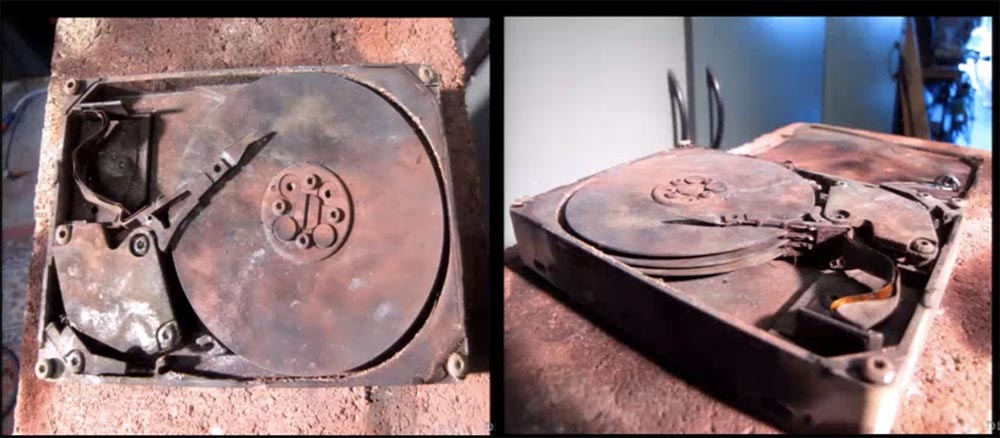
So, the 6th thermal method of exposure is the copper termite. The raw material is a mixture of copper oxide and pure aluminum in a weight ratio of 4.4: 1. This is a very aggressive termite. The video shows how I approach the torch of a gas burner, and it literally explodes. The following video shows the process of burning a mixture with a characteristic sound, as if something explodes inside, it resembles the sounds of a shootout. It does not burn at all like an iron-based thermite mixture. And finally, the third video in slow motion playback is the HDD test. An explosion with a bright flame, which leaves behind a lot of smoke, is knocked out from under the case cover. And then - look carefully - the force of the explosion tears one of the covers, it flies away to the side, and then the rest of the HDD flies up and is thrown to the side.
You see the burned inside of the top cover and what the drive looks like after the explosion. He really burned out everywhere.
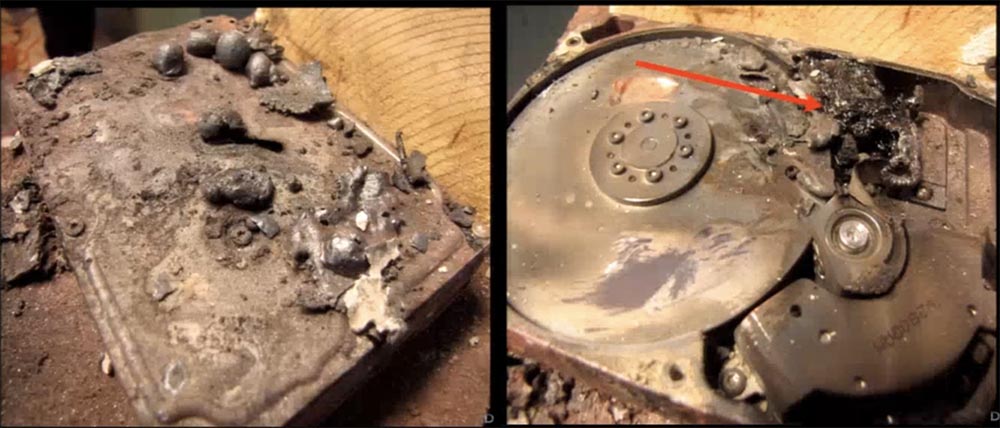
We are trying to wash the disc under running water, and we get a clean shiny surface of the plates. Some copper particles still burned to the surface of the plates, but in general they are subject to recovery. So, this method is not effective, but it looks fun!
The seventh development was a cover of termite. I made a special ceramic form into which the HDD was placed and was covered with a combustible mixture — an iron termite weighing as much as 250 grams with a layer of foam plastic to fill irregularities, to accurately fix the disk.


Let's look at the video if this was enough to seriously destroy the drive. You see that my ceramic form did an excellent job and kept the explosion and burning inside. By the way, in my workshop there was a large rug on the floor, so as a result of a spark from this explosion, a significant part of the rug burned down.
It looks impressive, and I hoped that the HDD will remain quite a bit. On the next slide, you can see how the hard drive looked inside and out after we shook it out of shape. When I scratched the disk plate with my finger, I realized that this raid can be scrubbed. Well, we cleaned it, washed it, and the disc plates looked like new again. So, this method also turned out to be unsuitable for our purposes.
It should be noted that the disk is a large radiator, and probably it can still be destroyed by a sufficiently large number of termite. However, this does not suit us.
So, we turn to the second method of impact on the disk - kinetic. His goal was to deform, twist, cripple the disc plate. This method, as I said at the beginning, could be combined with the demagnetization of a disk. One of the unrealized ideas was a horizontal hydraulic piston, a mixture of a cutter and a crusher that would compress the HDD with such force that it turned into a piece of metal. I was sure that it would work, so I did not try to build such a system. I had an idea to use a cutting tool that works under high pressure, but installing such “scissors” in the data center would not be a very suitable solution.
The first mechanical tool was a construction pistol for driving dowels into concrete. He had a 22-gauge barrel and the process itself looked so fast that I had to slow down the video playback. The dowel itself is not visible on it, because it slipped down through the broken wall of the block. Then you see a demonstration of the "shot" in the HDD - it punches it without problems. All plates were punched through and twisted at the point of impact.
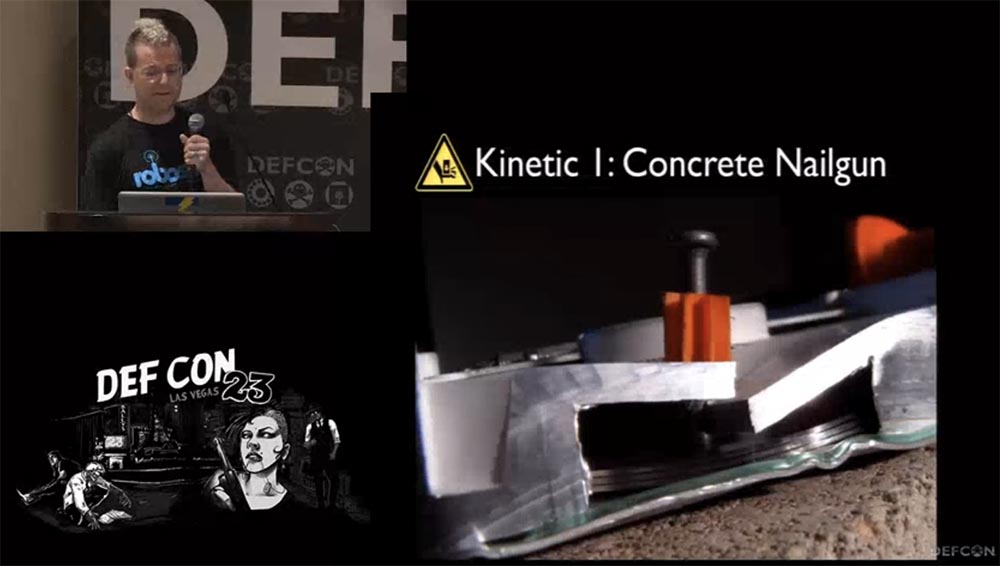
Thus, it would be possible to create a certain tool from several construction pistols, which would pierce disc plates in several places. I believe that this method is fully applicable to the physical destruction of the disk.
I also tested a pneumatic construction gun. I did not really hope for him, because there is no chemical fuel or explosives here. I didn’t even want to use a new disk for this experiment, but it showed acceptable results, literally splitting the drive disks. This is a rather large pistol, but one could make a low-profile pneumatic cylinder to fit into the dimensions and pierce the disc in several places. So, this method also turned out to be quite acceptable.
And now I will show what you all came here for - the use of high-power explosives. No one doubts that the disks can be destroyed with the help of explosives of high power. There are also thermal factors of the type of welding effect. My goals were to limit the impact of the explosion on the rack equipment of the data center and to conduct an experiment using new technology. I used a two-component liquid explosive and printed on a 3-D printer precision tubes to charge. And another additional goal for me was to save $ 200 and not go to jail for it.
Let me introduce you to what I called "Felix". Liquid explosive used in industry is expensive, and I did not want to pay for it. Therefore, I created what I designated as Field Expedient LIquid eXplosive, FELIX (liquid explosive for field testing). Its composition is very close to Tannerite / KinePack, it is a mixture of ammonium nitrate with aluminum powder. Its composition was taken from a commercial product and was a powder of aluminum (5-50 microns) coated with stearic acid (1-2%) mixed with nitromethane. These components are easy to buy separately, and while they are not mixed, they are not explosives.
The slide shows a chemical reaction, as a result of which these components turn into explosives.

Since the manufacture of explosives is an illegal occupation, I turned to my friends who had a license to manufacture explosives for industrial purposes. On the slide, you see this license and permission from the state authorities, so now we could legally engage in the manufacture of these things.
We also needed to have some kind of site for the work, because the state could send an inspection. We said fine, but our workshop is not very suitable for such things. However, it all ended well. We were helped by local sappers, bomb squad, which allowed them to use their range, which was really nice. As a result of working with all these things, my friends and I have created a consulting group, so if you want to do this, feel free to contact me.
27:20 min.
Continuation:
Conference DEFCON 23. How I lost my second eye, or further research in the field of data destruction. Part 2
Thank you for staying with us. Do you like our articles? Want to see more interesting materials? Support us by placing an order or recommending to friends, 30% discount for Habr's users on a unique analogue of the entry-level servers that we invented for you: The whole truth about VPS (KVM) E5-2650 v4 (6 Cores) 10GB DDR4 240GB SSD 1Gbps from $ 20 or how to share the server? (Options are available with RAID1 and RAID10, up to 24 cores and up to 40GB DDR4).
Dell R730xd 2 times cheaper? Only we have 2 x Intel Dodeca-Core Xeon E5-2650v4 128GB DDR4 6x480GB SSD 1Gbps 100 TV from $ 249 in the Netherlands and the USA! Read about How to build an infrastructure building. class c using servers Dell R730xd E5-2650 v4 worth 9000 euros for a penny?

This is not a solo project, I used a lot of ideas from my friends. This presentation was inspired by the speeches of Bruce Potter, who already spoke here, Shane Lawson and Diviant Ollam at the DefCon 19 conference. They told how they launched a data center where they placed very valuable information on network hard drives, and they put forward some ideas. As you know, this can really be a target for some criminals who want to steal all the data, so they considered the possibility of some kind of switch that you can turn on and physically destroy all the disks in the data center. I thought it would be pretty cool, and I wanted to do something like a continuation, conduct a series of my own experiments, and then, four years later, I saw several data centers being physically attacked,
This showed how much cryptography can trust and how insecure our endpoints are. Our encryption is as secure as encryption keys are. Do you know what the NSA does when they get rid of encrypted hard drives - they do not just throw them away, but destroy them completely.
So here are the goals of protection:
- clicked the switch - the disk is destroyed, not a single bit of data is left;
- We protect data centers from highly motivated organized crime, such as a well-known government agency with a name of 3 letters.
And the protection rules that Bruce, Shane, and Diviant have basically come up with:
- You have 1 U server;
- You have another 1 U server above and below it just in case. I wanted to be able to keep all the destructive equipment on one, and the other two to use to protect against leakage of flammable gas, etc.
- 60 seconds - the maximum duration of the destruction procedure. Here I really want to joke about Bruce, Shane and Diviant, but I will not do that.
- Do not turn on fire systems;
- Do not turn on seismic sensors in nearby banks;
- do not release damage beyond the equipment;
- Protect people nearby.
Briefly tell you what is the design of HDD. The technology of their manufacture still uses a lot of rotating aluminum plates, now they are often made of glass, and the glass is extremely easy to break. Covering discs is extremely interesting. It is a substrate of an alloy of cobalt, nickel and iron, on top of which a magnetic layer of cobalt, chromium and platinum is located, and these layers are separated by a four-atom ruthenium layer.

There are also solid-state drives SSD, not too common in data centers, I also invented something to destroy them.
Let me remind you of the results of research reported on DEFCON 19. The guys came up with 3 categories of “weapons of destruction” and divided them among themselves. So, Diviant worked on 1 category - incendiary mixtures. There were some questions about the legality of use, because he worked with tannerite, which is used to make targets that explode when they hit a bullet. They managed to melt aluminum HDD plates a little using propane and MAPP gas, but they concluded that HDD plates are a great radiator that “sucks” heat like crazy, so it’s very difficult to melt the disks.
The second category was a chemical means of destruction. They tried to “infect” the disk with rust, but it turned out to be so resistant to corrosion that it had to be abandoned.
The third category became the most fun category - mechanical weapons. They used circular saws for wood, grinding wheels, and blade blades. Then moved to the use of electricity. It coped well with glass plates, but could not do anything with aluminum.

After that, they moved to industrial methods of destruction. The discs are first demagnetized, then ground in a shredder, and the remnants are burned. This video fragment shows a kind of “meat grinder” for HDD, it just grinds them right in the enclosures. TLA collects physically destroyed hard drives. I met with one guy who worked in Iraq, so TLA told him - if he finds HDDs that could not be broken or burned, let him send them.
Next, I'll show you the slide number 101, it shows my own method of destroying HDD. So if nothing from the description described below suits you, you can go back to this slide and follow the recommendations.

The destruction procedure is as follows:
- open the HDD case using the T8 hex screwdriver;
- pull out the plates using a T6 hex screwdriver;
- demagnetize the discs with a rare earth magnet;
- break, break or deform them;
- burn them;
- Peel and chop the leftovers, and then throw away.

I hope this method will be interesting for you, but not very useful. I also decided to use three different data destruction technologies: thermal, kinetic and electrical.

The thermal method was to heat the plates to the Curie point, the temperature at which the metal loses its magnetic properties; for cobalt, it is 1115 ° C. After that, nothing is possible to read from metal. I have not tried some things, you can try to make them yourself or understand why I have not done them. I wanted to find some flameless chemical reactions, but I could not. Of course, you can make an awesome oven and bake a disk, but it's not interesting to watch. You can melt aluminum inductively, in a large induction furnace, but I did not consider this possibility in method number 1.
Thermal method number 1 was to use the good old plasma cutter. This video shows the HDD cutting process, it looks amazing.

I carefully selected the size of the plasma cutter and honestly, I expected that it would cause much greater damage to the HDD. As you can see, the whole cutting process is only 40 seconds. You can adjust the plasma intensity, use additional cutters, etc. As a result, we got a rather large melted hole. The drive cooled down for a very long time, and when I disassembled it, I saw a melted through hole in the upper plate and the same through hole in the lower plate, but nothing else was damaged.

Thus, if you need to destroy all the data on the surface of the disks, you will need to burn a lot of such holes around its circumference. The next slide shows a fully disassembled HDD, as you can see, in each of the 4 plates there is one hole of different size and shape, but the remaining surface of the disc plates remained intact. In my opinion, this is a completely feasible data destruction method.
Thermal method number 2 was to inject oxygen into the disc, which, burning out, would burn everything inside. I thought that if I could use the drive itself as fuel? They would pump oxygen there and add some magnesium. This is what an oxygen injector looks like - a hole is drilled in the drive, a metal pipe is inserted, and a hose for supplying oxygen is connected to it. Now I will show you how the burnout process takes place in slow motion. First, the disk envelops the oxygen mist, then sparks, and now the flame is raging. The whole process takes less than 5 seconds.
Of course, I could come up with a more elegant engineering solution for this oxygen burner, but let's leave it to the professionals. This is how the HDD looks inside and outside after the injection of oxygen, followed by ignition. On the one hand the plates melted very well. If I had more engineering capabilities, and I could safely supply more oxygen to capture all the space inside the case with a flame, then the disk plates could be completely melted and destroyed.


So we can say that this method is potentially feasible.
The third thermal method of destruction was that instead of an injection of oxygen, perform an injection of a thermite mixture, so that after pressing the switch, it would go inside the HDD, ignite and burn the disk.
This compound, called termites, is an aluminum powder mixed with iron oxide. By weight it is taken in a ratio of 3: 1, for the connection I added a solvent there. Termite burns with a temperature of 2500 ° C with little or no oxygen, and it can not be extinguished. It is very easily prepared by simple mixing and is a viscous, sticky mass of silver. This compound is perfect for injecting HDD inside.
The video shows the process of testing the resulting combustible mass, which I placed on the reverse side of the HDD housing cover. I set fire to it with a blowtorch, and the video playback speed was increased 8 times, because the burning starts for a long time. I decided that the reason was a solvent, which delays the reaction by placing iron atoms under a layer of oxide film, and tried a bunch of different solvents: glycerin, kerosene, naphtha.

After the combustion, I brought a magnet to the remnants of the burned mixture, and quite a lot of combustion products — pure iron derived from oxide — adhered to it. The combustion reaction proceeded with the release of a large amount of smoke, indicating an incomplete combustion of the components of the mixture. As you can see, after the burning of thermite, the metal cap of the drive remained almost intact, so this method proved to be ineffective.

The fourth method of thermal destruction was to pre-place combustible matter inside the HDD housing. There is a lot of free space, and if you remove some unnecessary partitions, you can put as many as 15 grams of termite inside the case! In this case, I used the electrical contact leads located inside as a fuse for the combustible mixture. This arrangement of the termite did not prevent the drive from working at all; it was free to write and read data from it.
Such things make me feel like a drug dealer or killer. You know, when you get to the airport, you are forced to turn off all the electronics there, which is completely useless from a security point of view. Because inside this electronics there is plenty of space to put any destructive crap there.
The following video recorded my experiment - I remotely set fire to a thermite inside the drive using a powered electrical cable, a fire flashes, which is knocked out. Burning lasts about 3 seconds. The result is such damage. You see burnt material inside the body and partially burnt plates. But after we cleaned and washed them, we saw a shiny non-stick surface that turned out to be chemically inert to such an effect. Thus, this method of influencing the HDD was a complete failure.

But I was not ready to give up yet. I know that the military uses incendiary grenades charged with a substance called “thermate”. It is a mixture of 70% thermite and 30% barium nitrate. When it burns, additional gas is released, which spreads combustion around and it burns with a higher temperature. In this video, you see the use of 15 g of thermite charge - there is no longer burning, but just an explosion with the ejection of a column of flame. Much more effective.
In slow motion, you can see how the flames inflame under the cover of the HDD, it is somewhat similar to the operation of the plasma cutter. So, the following video shows the consequences of using the 5th method of thermal destruction - the use of Thermate combustible mixture. As you can see, damage to the disc plates is more serious this time.
After cleaning and washing, we saw a clear deformation of the upper and lower plate of the disk in places marked with red arrows. However, most of the plates were still to be restored using electron microscopes. Another failure!


So, the 6th thermal method of exposure is the copper termite. The raw material is a mixture of copper oxide and pure aluminum in a weight ratio of 4.4: 1. This is a very aggressive termite. The video shows how I approach the torch of a gas burner, and it literally explodes. The following video shows the process of burning a mixture with a characteristic sound, as if something explodes inside, it resembles the sounds of a shootout. It does not burn at all like an iron-based thermite mixture. And finally, the third video in slow motion playback is the HDD test. An explosion with a bright flame, which leaves behind a lot of smoke, is knocked out from under the case cover. And then - look carefully - the force of the explosion tears one of the covers, it flies away to the side, and then the rest of the HDD flies up and is thrown to the side.

You see the burned inside of the top cover and what the drive looks like after the explosion. He really burned out everywhere.

We are trying to wash the disc under running water, and we get a clean shiny surface of the plates. Some copper particles still burned to the surface of the plates, but in general they are subject to recovery. So, this method is not effective, but it looks fun!
The seventh development was a cover of termite. I made a special ceramic form into which the HDD was placed and was covered with a combustible mixture — an iron termite weighing as much as 250 grams with a layer of foam plastic to fill irregularities, to accurately fix the disk.


Let's look at the video if this was enough to seriously destroy the drive. You see that my ceramic form did an excellent job and kept the explosion and burning inside. By the way, in my workshop there was a large rug on the floor, so as a result of a spark from this explosion, a significant part of the rug burned down.
It looks impressive, and I hoped that the HDD will remain quite a bit. On the next slide, you can see how the hard drive looked inside and out after we shook it out of shape. When I scratched the disk plate with my finger, I realized that this raid can be scrubbed. Well, we cleaned it, washed it, and the disc plates looked like new again. So, this method also turned out to be unsuitable for our purposes.
It should be noted that the disk is a large radiator, and probably it can still be destroyed by a sufficiently large number of termite. However, this does not suit us.

So, we turn to the second method of impact on the disk - kinetic. His goal was to deform, twist, cripple the disc plate. This method, as I said at the beginning, could be combined with the demagnetization of a disk. One of the unrealized ideas was a horizontal hydraulic piston, a mixture of a cutter and a crusher that would compress the HDD with such force that it turned into a piece of metal. I was sure that it would work, so I did not try to build such a system. I had an idea to use a cutting tool that works under high pressure, but installing such “scissors” in the data center would not be a very suitable solution.
The first mechanical tool was a construction pistol for driving dowels into concrete. He had a 22-gauge barrel and the process itself looked so fast that I had to slow down the video playback. The dowel itself is not visible on it, because it slipped down through the broken wall of the block. Then you see a demonstration of the "shot" in the HDD - it punches it without problems. All plates were punched through and twisted at the point of impact.

Thus, it would be possible to create a certain tool from several construction pistols, which would pierce disc plates in several places. I believe that this method is fully applicable to the physical destruction of the disk.
I also tested a pneumatic construction gun. I did not really hope for him, because there is no chemical fuel or explosives here. I didn’t even want to use a new disk for this experiment, but it showed acceptable results, literally splitting the drive disks. This is a rather large pistol, but one could make a low-profile pneumatic cylinder to fit into the dimensions and pierce the disc in several places. So, this method also turned out to be quite acceptable.
And now I will show what you all came here for - the use of high-power explosives. No one doubts that the disks can be destroyed with the help of explosives of high power. There are also thermal factors of the type of welding effect. My goals were to limit the impact of the explosion on the rack equipment of the data center and to conduct an experiment using new technology. I used a two-component liquid explosive and printed on a 3-D printer precision tubes to charge. And another additional goal for me was to save $ 200 and not go to jail for it.
Let me introduce you to what I called "Felix". Liquid explosive used in industry is expensive, and I did not want to pay for it. Therefore, I created what I designated as Field Expedient LIquid eXplosive, FELIX (liquid explosive for field testing). Its composition is very close to Tannerite / KinePack, it is a mixture of ammonium nitrate with aluminum powder. Its composition was taken from a commercial product and was a powder of aluminum (5-50 microns) coated with stearic acid (1-2%) mixed with nitromethane. These components are easy to buy separately, and while they are not mixed, they are not explosives.
The slide shows a chemical reaction, as a result of which these components turn into explosives.

Since the manufacture of explosives is an illegal occupation, I turned to my friends who had a license to manufacture explosives for industrial purposes. On the slide, you see this license and permission from the state authorities, so now we could legally engage in the manufacture of these things.
We also needed to have some kind of site for the work, because the state could send an inspection. We said fine, but our workshop is not very suitable for such things. However, it all ended well. We were helped by local sappers, bomb squad, which allowed them to use their range, which was really nice. As a result of working with all these things, my friends and I have created a consulting group, so if you want to do this, feel free to contact me.
27:20 min.
Continuation:
Conference DEFCON 23. How I lost my second eye, or further research in the field of data destruction. Part 2
Thank you for staying with us. Do you like our articles? Want to see more interesting materials? Support us by placing an order or recommending to friends, 30% discount for Habr's users on a unique analogue of the entry-level servers that we invented for you: The whole truth about VPS (KVM) E5-2650 v4 (6 Cores) 10GB DDR4 240GB SSD 1Gbps from $ 20 or how to share the server? (Options are available with RAID1 and RAID10, up to 24 cores and up to 40GB DDR4).
Dell R730xd 2 times cheaper? Only we have 2 x Intel Dodeca-Core Xeon E5-2650v4 128GB DDR4 6x480GB SSD 1Gbps 100 TV from $ 249 in the Netherlands and the USA! Read about How to build an infrastructure building. class c using servers Dell R730xd E5-2650 v4 worth 9000 euros for a penny?
