Introduction to the Timeline in Unity
- Transfer
[In the tutorial about 50 MB of images, including animated GIFs].
To tell a part of the plot of the game or to captivate a player, developers often use the cut scenes. In some games, specially rendered animated scenes with high-detail models are created, while in others, real in-game models are used. Through the use of in-game models, you can save a lot of time and money, because you do not have to create new models, rigs and animations exclusively for the cutscenes. But even if you use ready-made models, this does not mean that you need to sacrifice special effects or drama! Unity has a powerful tool to create exciting cutscenes - Unity Timeline!
In this tutorial, you will learn about the Timeline and learn how to create cutscenes with animations and camera shifts.
Download the draft project and the finished project from here .
Open the Starter Project file and load the Main scene. She will be our foundation. In it there is a hero standing on the tower and looking at the world:
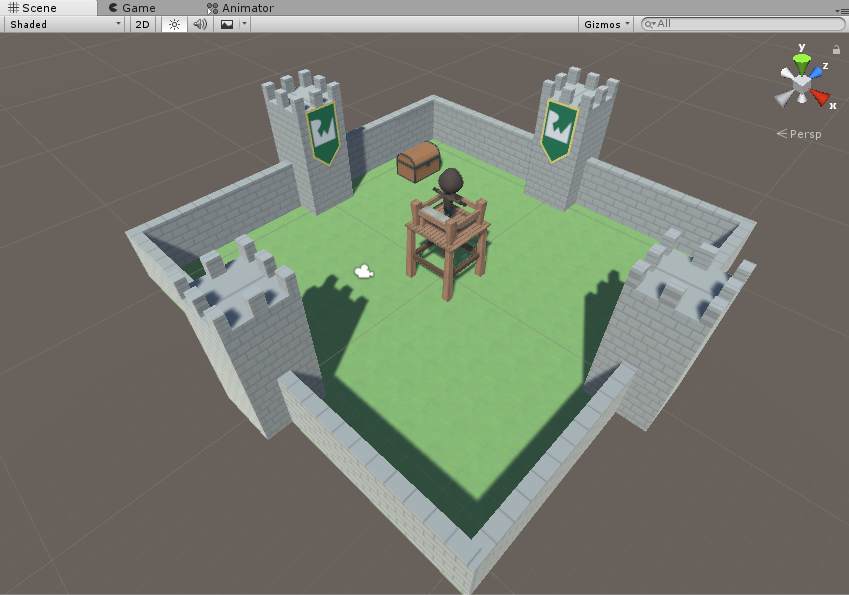
With your help, he will be able to jump off the tower, turn around, go to the treasure chest and kick open it. With these animations, the camera will also change its position. Here is what the finished scene looks like:

In this tutorial we will work with Unity Timeline - but what is the timeline? The Timeline is a GameObject with a timeline component that can be edited in the Unity Timeline window, which controls keyframes of animation and object life cycles. When creating a cutscene using Unity Timeline, we set the animation keys and determine when they should work. In this tutorial, we will also use an AnimationController, which can be perceived as a superset of keyframe animations.
When a character performs an animation, for example, a walk, each individual moving top of the object must indicate its path. In this tutorial, we will not be engaged in creating a model and rigging animations - everything has already been done for us. But it will be useful to know that when you manually set a keyframe of an animation or use an animation of AnimationController, then in essence they are the same: the position of the objects at a given point in time. Timeline controls all these movements to create a scene. All this you will understand when you begin to understand Unity Timeline.
But before you dive into the study, it is useful to make a brief overview of the Timeline window. Look at the image and read the descriptions under the numbers:

Do not worry if this information seems too complicated for you so far - in the course of the tutorial, we will return to it. At this stage, the most important thing to remember is where the Timeline window is located, and that when choosing a GameObject Timeline, you can access the Timeline window.
After loading the main scene, click Play. You should see the hero standing on top of the tower:
This is the default animation set in the Animation controller. In this tutorial, we will use pre-created animations, so you do not need to worry about the internal structure of models, animations or controllers. But if you want to understand this process, you can study our tutorial Introduction to Unity Animation .
The first step is to create a GameObject Timeline . Create an empty GameObject by clicking with the right mouse button (on a Mac - with Command pressed) on the Hierarchy window and selecting Create Empty . So we will add a GameObject to the scene and select it:
Without removing the selection from the GameObject, open the Window menu and select Timeline . The Timeline window opens. Click the Create button , the Save dialog box opens. Change the name of the file to Timeline and click on Save:
Rename the GameObject to Timeline by clicking on it, pressing the F2 key and typing the Timeline :

We created GameObject Timeline, which will coordinate all animations and camera changes in the cutscene. Inside the engine, Unity saved an asset file called Timeline.playable to disk. In GameObject Timeline Unity added components Playable Director and Animator .
The Playable Director component contains the Playable field associated with the Timeline asset we just saved. The added Unity component of Animator in theory should allow us to animate the GameObject Timeline, but we will not do this, so you can simply ignore it.
Before moving on, I want to drag the Timeline tab to the bottom of the screen. This will allow us to simultaneously open the Scene and Timeline windows:

Select GameObject Timeline and return to the Timeline window. We currently have an Animation Track for GameObject Timeline. We do not need it, so you can select it and click Delete to delete:
Now we are ready to start the animations. Expand the GameObject Hero to see the GameObject Model . Select GameObject Timeline . Drag the GameObject Model into the Timeline window; this will open the track menu, so select Animation Track . Repeat this step for GameObject Hero :
Since the GameObject Hero track is the position of the hero, we need to set its position as the initial keyframe.
Select the Hero track in the Timeline window and click on the Record button (red circle) to start recording. Select GameObject Hero in the Hierarchy window and set its X Position to -1 , and then immediately set its X Position to 0 .
Return to the Timeline window and click the Record button on the Hero track to complete the recording . So we added a keyframe for the initial position of the hero:
In our project, the hero is already in the position from which to begin. However, until we change the position, it will not be recorded during the recording as a keyframe. Therefore, if you ever need to specify a keyframe when recording for a position that already has a keyframe, just move it and return it to register.
The easiest way to do this is to assign the X Position of the object to -1 relative to its current position, and then return the value to its place. In this tutorial we will use this trick several times.
Next, we need the hero to wait 100 frames before jumping from the tower. At the moment we have set only the initial position of the hero, but we need to set the hero to the same position (that is, on the top of the tower) after 100 frames. Otherwise, Unity will immediately begin to interpol the motion.
As before, select GameObject Timeline , but this time you need to click on the frame field at the top of the window and enter "100" . So we will move the keyframe to frame 100.
Click the Hero's Record button . Select GameObject Hero and in the Transform field of the Inspector window, set its X Position to -1, and then immediately return it to 0 . Click the Record button again to stop recording.

So, we set up the initial keyframe of Hero and are ready to continue working with animations.
Setting position data
First we need to set position data.
Click on GameObject Timeline to select it. In the Timeline window, add an Animation animation to the Model track by right-clicking (on a Mac - by clicking with Command pressed) on the Model track and selecting Add From Animation Clip . Now select the Idle animation :
Next, we animate the hero's jump from the tower, but first we need to move it up and over the railing, and then down to the ground.
To do this, first select the Timeline window, and then go to frame 138 . Click the Record button in the Hero track . Now select GameObject Hero . In the Transform field of the Inspector window, set the Y Position value to 3.934, and the Z Position value to 1.97 .
Return to the Timeline window and go to frame 176 . Select GameObject Hero again and set the Y Position to 0, and the Z Position to 5.159 . Finish recording by clicking on the Record button :

Save the scene and click Play to see the result of your work!
Adding Animations
We set the position data, but the animations not performed with them. Now we will do this.
With the Timeline window selected, right-click (on a Mac, click with Command pressed) on the Model track and click Add From Animation Clip , then select Jump . This will add the Jump animation immediately after the Idle animation.
Drag the right side of the Jump animation so that it is in frame 176 . Now we’ll add another Animation Clip , but this time we’ll add a Land animation (you don’t need to change its length, just add it):
Save the scene, click Play and look at the result!
It is a bit difficult to follow the action after the hero’s jump from the tower, so it’s time to work with the cameras.
In the Hierarchy window, rename MainCamera to Camera1 . Select GameObject Timeline . Drag Camera1 into the Timeline window, and the track selection menu will open; select Activation Track . Drag the Active strip of Camera1 so that it ends at frame 157 :
The activation or inactivity of a GameObject during a scene is controlled by the Activation Track . Our main camera will now turn off after frame 157. Click Play and see the result:
Now we will add another camera, only it will look from top to bottom to show the hero after jumping over the handrail of the tower.
In the Hierarchy window, select Camera1 and create a duplicate of it by pressing Control-D (Command-D on Mac). Rename the duplicate to Camera2 and disable it.
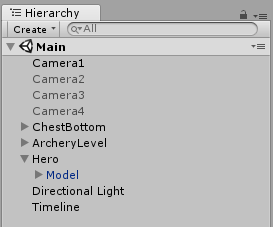
In this tutorial, we use two more cameras, so we will create them now, repeating the same algorithm; rename them to Camera3 and Camera4 and disable it. After that, all Camera game objects, except Camera1, should be disabled. Here is what the hierarchy should look like:
Now we will locate Camera2. Select Camera2 and in the Transform field of the Inspector window set the Y Position value to 10.75, and the Z Position value to 2.84 . Set the X Rotation parameter to 79.5 :

As for Camera1, select the Timeline window and drag the Camera2 object into the Hierarchy ; the track selection menu will reappear, so select the Activation Track . Drag the Active bar so that it starts immediately after the activation of Camera1 (frame 158). Drag the right side of the Active track for Camera2 so that it ends at frame 216 .
Save the scene, click Play and watch the camera change in your scene.
Now that our hero has landed on the ground, he must turn to the treasure chest and start walking.
Select GameObject Timeline and set frame 202 . Click the Record button in the Hero track to start recording.
Select GameObject Hero and in the Transform field of the Inspector window, set the Y Rotation value to -1, and then immediately change the value back to 0 to set the initial key frame of the GameObject Hero rotation.
When finished with this, select the GameObject Timeline again and set the frame to 216 . Select GameObject Hero again and in the Transform field of the Inspector window set Y Rotation to -90 .
In addition, the hero must be in a waiting state at this moment, so add an Idle animation to the Model Animation Track and make it last until frame 216 :
So, our hero has landed and is ready to search for treasure. It is time to go to him and open the chest!
Hint: if the Timeline track becomes too large, you can spin the mouse wheel to change its scale. To move left or right, press and hold the middle mouse button, moving it left or right.
Select GameObject Timeline and set frame 216 . Click the Record button on the Hero track to start recording.
Select GameObject Hero and in the Transform field of the Inspector window, set the X Position to -1 , and then go back to 0 to set the keyframe to the starting position. Next on the Timeline, select frame 361 on the Hero track .
Return to GameObject Hero and set the X Position value to -6 in the Transform field of the Inspector window . Return to the Hero track and complete the recording.
Finally set the Model object to Walk animation.by performing the same steps as before, and then stretch it to frame 361 :
You may notice that the hero seems to be passing through the treasure, but in reality this is a problem with the preview of the Timeline, because, as we will see shortly, the hero goes straight to the chest and stops.
In order for Camera2 not to follow the whole path of the hero, we can now use Camera3 to shoot from behind the hero.
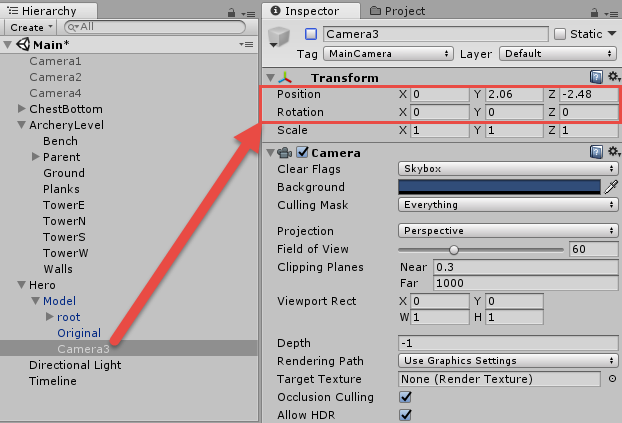
To do this, in the main menu of the Hierarchy window, select and drag Camera3 onto the GameObject Model , which is inside GameObject Hero, to make the camera its child.
Set the Camera3 position (X: 0, Y: 2.06, Z: -2.5) . Give it a turn (X: 0, Y: 0, Z: 0) . The hierarchy should look like this:
Due to the fact that Camera3 is now a child of the GameObject Model, it will repeat all the movements of the GameObject Model, looking at it from behind. However, Camera3 still needs an activation track to activate at the right time.
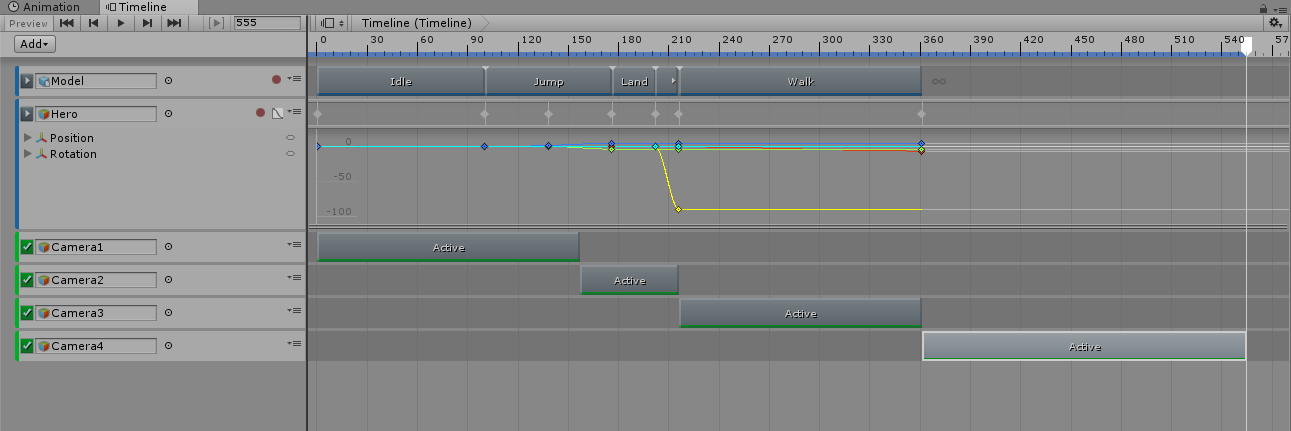
Drag GameObject Camera3 onto the Timeline and select the Activation Track , as we did with Camera1 and Camera2. Set as the starting frame of Camera3 the ending frame of Camera2, and as the ending frame of Camera3 set 361 :

Now save the scene, click Play and see how everything turns out:
We have almost done everything! Now the hero just has to open the chest ... of course, by kicking it!
For the last perspective, we use Camera4, adjusting it the way we did with Camera1 and Camera2.
Drag Camera4 to the Timeline and add the Activation Track . Set the starting frame of Camera4 to the end of the Camera3 activity phase and drag it to frame 555 . It should look like this:
Add the animation of Kick . Right-click (on a Mac, click with Command pressed) on the Model track. Select Add Animation From Clip , and then select Kick . Do not change the duration. Now the Model track should look like this:

We need to open the chest, so now we will add an animation of its cover. Setting up this animation is similar to what we did before.
Expand ChestBottom GameObject in the Hierarchy window. Drag the ChestLid GameObject into the Timeline and select Animation Track . In the Timeline, set the frame to 389 . Now select the ChestLid track . Click on the Record button .
Now, when recording is in progress , select the GameObject ChestLid in the Hierarchy window and set the X Position to -1 , and then return to 0 to set the initial position. In the Timeline window, set the frame to 555. Finally, in the Transform field of the Inspector window, set the Y Position ChestLid value to 6 . Press the Record button on the track again to complete the recording.
So we animate the lid of the chest so that it flew through the wall.
Now you need to place Camera4 so that it is above the chest when the cover flies away. We will repeat the same steps as for the previous camera, so I will not describe each action in detail.
Set the Camera4 position (X: -9.00, Y: 5.4, Z: 5.18) . Set Camera4 rotation (X: 90, Y: 0, Z: 0) .

As with all other added cameras, adding animation makes the scene more interesting, so you should make a camera hit after opening the chest.
Select the Timeline window . Drag GameObject Camera4 into it and create an Animation Track . Frame 389 for the track . Click on the Camera4 track , and then click the Record button . Select GameObject Camera4 . In the Transform field of the Inspector window, set the X Position value to 0, and then -9 again .
In the Timeline window, drag the Animation Track to frame 555 .
Finally set the Y Position of the objectCamera4 value 3.74 :
The scene is finally complete. Click on Play and rate it!
It was a short animation with just a couple of “actors”, so it was quite easy for us to track game objects and tracks. But when creating more complex scenes with a lot of moving parts and actors, it becomes very difficult to control them. That is why orderliness is very necessary. Although the scene is ready, let's spend a few minutes organizing it — in the future, thank you for it.
One way to organize work is to group tracks. First, right-click under the tracks in the Timeline window and select Track Group . Click on the Track Group and in the Inspector change its name to Activations :

Repeat this process and create a Track Group called Animations . Now the Timeline should look like this:

Now drag all tracks with Active sections to the Activations group , and all the others to the Animations group . Now you can open and close each group for the convenience of working with them:
Do not forget to save your work. Lean back on your director's chair and praise yourself - you have finished your first timeline.
If you missed some parts of the tutorial, then do not forget that you can download both the blank and the finished project from here .
We did a good job and created a cutscene using model animations, camera changes and object lifecycle updates, but there is still a lot to be learned. One of the most important aspects related to Timeline is creating your own scripts in which you can associate animations with code that can be executed with them. Learn more about the scripts here . If you have already mastered it well, then try adding a script to the scene after opening the treasure chest.
If it is interesting to you to learn more about animations in Unity as a whole, then study our wonderful tutorial Introduction to Unity Animation .
To learn more about creating 3D models and about the Animation window, check out the detailed series of Unity tutorials presented here .
And the last - if you are interested in creating games, you can purchase our book Unity Games By Tutorial . It tells about the creation from scratch of four types of games with a detailed description of each stage of the process.
To tell a part of the plot of the game or to captivate a player, developers often use the cut scenes. In some games, specially rendered animated scenes with high-detail models are created, while in others, real in-game models are used. Through the use of in-game models, you can save a lot of time and money, because you do not have to create new models, rigs and animations exclusively for the cutscenes. But even if you use ready-made models, this does not mean that you need to sacrifice special effects or drama! Unity has a powerful tool to create exciting cutscenes - Unity Timeline!
In this tutorial, you will learn about the Timeline and learn how to create cutscenes with animations and camera shifts.
Getting Started
Download the draft project and the finished project from here .
Open the Starter Project file and load the Main scene. She will be our foundation. In it there is a hero standing on the tower and looking at the world:
With your help, he will be able to jump off the tower, turn around, go to the treasure chest and kick open it. With these animations, the camera will also change its position. Here is what the finished scene looks like:
What is the timeline?
In this tutorial we will work with Unity Timeline - but what is the timeline? The Timeline is a GameObject with a timeline component that can be edited in the Unity Timeline window, which controls keyframes of animation and object life cycles. When creating a cutscene using Unity Timeline, we set the animation keys and determine when they should work. In this tutorial, we will also use an AnimationController, which can be perceived as a superset of keyframe animations.
When a character performs an animation, for example, a walk, each individual moving top of the object must indicate its path. In this tutorial, we will not be engaged in creating a model and rigging animations - everything has already been done for us. But it will be useful to know that when you manually set a keyframe of an animation or use an animation of AnimationController, then in essence they are the same: the position of the objects at a given point in time. Timeline controls all these movements to create a scene. All this you will understand when you begin to understand Unity Timeline.
But before you dive into the study, it is useful to make a brief overview of the Timeline window. Look at the image and read the descriptions under the numbers:
- Timeline Asset: this is a track tied to a GameObject in the hierarchy. It stores the keyframes associated with this GameObject, which are used to perform animations or to determine whether a GameObject is active.
- Associated GameObject: this is the GameObject the track is associated with.
- Frame: this is the currently specified timeline frame. When we need to change animations, we set keyframes in the start and end frames.
- Track Group: as the scene increases, the number of tracks increases. You can organize tracks by grouping them.
- Record Button: when this button is active, we can change the current frame and set the position and / or rotation of the GameObject in the scene. Changes will be recorded.
- Curves Icon: Clicking this icon will open the Curves window, where you can fine-tune the details of the associated animation keyframes to change them in the desired way.
Do not worry if this information seems too complicated for you so far - in the course of the tutorial, we will return to it. At this stage, the most important thing to remember is where the Timeline window is located, and that when choosing a GameObject Timeline, you can access the Timeline window.
Light, camera, MOTOR!
After loading the main scene, click Play. You should see the hero standing on top of the tower:
This is the default animation set in the Animation controller. In this tutorial, we will use pre-created animations, so you do not need to worry about the internal structure of models, animations or controllers. But if you want to understand this process, you can study our tutorial Introduction to Unity Animation .
Creating a Timeline GameObject
The first step is to create a GameObject Timeline . Create an empty GameObject by clicking with the right mouse button (on a Mac - with Command pressed) on the Hierarchy window and selecting Create Empty . So we will add a GameObject to the scene and select it:
Without removing the selection from the GameObject, open the Window menu and select Timeline . The Timeline window opens. Click the Create button , the Save dialog box opens. Change the name of the file to Timeline and click on Save:
Rename the GameObject to Timeline by clicking on it, pressing the F2 key and typing the Timeline :
We created GameObject Timeline, which will coordinate all animations and camera changes in the cutscene. Inside the engine, Unity saved an asset file called Timeline.playable to disk. In GameObject Timeline Unity added components Playable Director and Animator .
The Playable Director component contains the Playable field associated with the Timeline asset we just saved. The added Unity component of Animator in theory should allow us to animate the GameObject Timeline, but we will not do this, so you can simply ignore it.
Before moving on, I want to drag the Timeline tab to the bottom of the screen. This will allow us to simultaneously open the Scene and Timeline windows:
Select GameObject Timeline and return to the Timeline window. We currently have an Animation Track for GameObject Timeline. We do not need it, so you can select it and click Delete to delete:
Animate the jump!
Now we are ready to start the animations. Expand the GameObject Hero to see the GameObject Model . Select GameObject Timeline . Drag the GameObject Model into the Timeline window; this will open the track menu, so select Animation Track . Repeat this step for GameObject Hero :
Note: we have added both Hero and Model in order to correctly use zero local space. GameObject Hero is a container for the GameObject Model that allows you to play animations without affecting the position from which they are played. When we need to move the hero, we will animate the GameObject Hero. When the hero needs to be animated - which can be done while moving - we will use the GameObject Model. Without this parent-child connection, the animations reproduced by the Model object will incorrectly override the motion parameters of the Hero object, unless you configure it as a child.
We write down key frames
Since the GameObject Hero track is the position of the hero, we need to set its position as the initial keyframe.
Select the Hero track in the Timeline window and click on the Record button (red circle) to start recording. Select GameObject Hero in the Hierarchy window and set its X Position to -1 , and then immediately set its X Position to 0 .
Return to the Timeline window and click the Record button on the Hero track to complete the recording . So we added a keyframe for the initial position of the hero:
In our project, the hero is already in the position from which to begin. However, until we change the position, it will not be recorded during the recording as a keyframe. Therefore, if you ever need to specify a keyframe when recording for a position that already has a keyframe, just move it and return it to register.
The easiest way to do this is to assign the X Position of the object to -1 relative to its current position, and then return the value to its place. In this tutorial we will use this trick several times.
Next, we need the hero to wait 100 frames before jumping from the tower. At the moment we have set only the initial position of the hero, but we need to set the hero to the same position (that is, on the top of the tower) after 100 frames. Otherwise, Unity will immediately begin to interpol the motion.
As before, select GameObject Timeline , but this time you need to click on the frame field at the top of the window and enter "100" . So we will move the keyframe to frame 100.
Click the Hero's Record button . Select GameObject Hero and in the Transform field of the Inspector window, set its X Position to -1, and then immediately return it to 0 . Click the Record button again to stop recording.
So, we set up the initial keyframe of Hero and are ready to continue working with animations.
Adding Animated Clips
Setting position data
First we need to set position data.
Click on GameObject Timeline to select it. In the Timeline window, add an Animation animation to the Model track by right-clicking (on a Mac - by clicking with Command pressed) on the Model track and selecting Add From Animation Clip . Now select the Idle animation :
Next, we animate the hero's jump from the tower, but first we need to move it up and over the railing, and then down to the ground.
To do this, first select the Timeline window, and then go to frame 138 . Click the Record button in the Hero track . Now select GameObject Hero . In the Transform field of the Inspector window, set the Y Position value to 3.934, and the Z Position value to 1.97 .
Return to the Timeline window and go to frame 176 . Select GameObject Hero again and set the Y Position to 0, and the Z Position to 5.159 . Finish recording by clicking on the Record button :
Save the scene and click Play to see the result of your work!
Adding Animations
We set the position data, but the animations not performed with them. Now we will do this.
With the Timeline window selected, right-click (on a Mac, click with Command pressed) on the Model track and click Add From Animation Clip , then select Jump . This will add the Jump animation immediately after the Idle animation.
Drag the right side of the Jump animation so that it is in frame 176 . Now we’ll add another Animation Clip , but this time we’ll add a Land animation (you don’t need to change its length, just add it):
Save the scene, click Play and look at the result!
Add cameras
It is a bit difficult to follow the action after the hero’s jump from the tower, so it’s time to work with the cameras.
In the Hierarchy window, rename MainCamera to Camera1 . Select GameObject Timeline . Drag Camera1 into the Timeline window, and the track selection menu will open; select Activation Track . Drag the Active strip of Camera1 so that it ends at frame 157 :
Hint: the current frame marker can be set using the frame counter field in the Timeline Inspector. If you set a marker on the frame to which you want to drag the track, the track will be attached to the frame marker.
The activation or inactivity of a GameObject during a scene is controlled by the Activation Track . Our main camera will now turn off after frame 157. Click Play and see the result:
Now we will add another camera, only it will look from top to bottom to show the hero after jumping over the handrail of the tower.
In the Hierarchy window, select Camera1 and create a duplicate of it by pressing Control-D (Command-D on Mac). Rename the duplicate to Camera2 and disable it.
In this tutorial, we use two more cameras, so we will create them now, repeating the same algorithm; rename them to Camera3 and Camera4 and disable it. After that, all Camera game objects, except Camera1, should be disabled. Here is what the hierarchy should look like:
Now we will locate Camera2. Select Camera2 and in the Transform field of the Inspector window set the Y Position value to 10.75, and the Z Position value to 2.84 . Set the X Rotation parameter to 79.5 :
As for Camera1, select the Timeline window and drag the Camera2 object into the Hierarchy ; the track selection menu will reappear, so select the Activation Track . Drag the Active bar so that it starts immediately after the activation of Camera1 (frame 158). Drag the right side of the Active track for Camera2 so that it ends at frame 216 .
Save the scene, click Play and watch the camera change in your scene.
It's time to get to the treasure!
We look at the chest
Now that our hero has landed on the ground, he must turn to the treasure chest and start walking.
Select GameObject Timeline and set frame 202 . Click the Record button in the Hero track to start recording.
Select GameObject Hero and in the Transform field of the Inspector window, set the Y Rotation value to -1, and then immediately change the value back to 0 to set the initial key frame of the GameObject Hero rotation.
When finished with this, select the GameObject Timeline again and set the frame to 216 . Select GameObject Hero again and in the Transform field of the Inspector window set Y Rotation to -90 .
Note: the task of key frames of position and rotation occurs independently of each other. Earlier, when we set the initial position of the hero, the key frame for the rotation was not saved, so we need to set a new frame before moving to the desired turn in the direction of the treasure.
In addition, the hero must be in a waiting state at this moment, so add an Idle animation to the Model Animation Track and make it last until frame 216 :
So, our hero has landed and is ready to search for treasure. It is time to go to him and open the chest!
Hint: if the Timeline track becomes too large, you can spin the mouse wheel to change its scale. To move left or right, press and hold the middle mouse button, moving it left or right.
We are approaching the treasure
Select GameObject Timeline and set frame 216 . Click the Record button on the Hero track to start recording.
Select GameObject Hero and in the Transform field of the Inspector window, set the X Position to -1 , and then go back to 0 to set the keyframe to the starting position. Next on the Timeline, select frame 361 on the Hero track .
Return to GameObject Hero and set the X Position value to -6 in the Transform field of the Inspector window . Return to the Hero track and complete the recording.
Finally set the Model object to Walk animation.by performing the same steps as before, and then stretch it to frame 361 :
You may notice that the hero seems to be passing through the treasure, but in reality this is a problem with the preview of the Timeline, because, as we will see shortly, the hero goes straight to the chest and stops.
In order for Camera2 not to follow the whole path of the hero, we can now use Camera3 to shoot from behind the hero.
To do this, in the main menu of the Hierarchy window, select and drag Camera3 onto the GameObject Model , which is inside GameObject Hero, to make the camera its child.
Set the Camera3 position (X: 0, Y: 2.06, Z: -2.5) . Give it a turn (X: 0, Y: 0, Z: 0) . The hierarchy should look like this:
Due to the fact that Camera3 is now a child of the GameObject Model, it will repeat all the movements of the GameObject Model, looking at it from behind. However, Camera3 still needs an activation track to activate at the right time.
Drag GameObject Camera3 onto the Timeline and select the Activation Track , as we did with Camera1 and Camera2. Set as the starting frame of Camera3 the ending frame of Camera2, and as the ending frame of Camera3 set 361 :
Now save the scene, click Play and see how everything turns out:
We have almost done everything! Now the hero just has to open the chest ... of course, by kicking it!
Opening the chest
For the last perspective, we use Camera4, adjusting it the way we did with Camera1 and Camera2.
Drag Camera4 to the Timeline and add the Activation Track . Set the starting frame of Camera4 to the end of the Camera3 activity phase and drag it to frame 555 . It should look like this:
Add the animation of Kick . Right-click (on a Mac, click with Command pressed) on the Model track. Select Add Animation From Clip , and then select Kick . Do not change the duration. Now the Model track should look like this:
We need to open the chest, so now we will add an animation of its cover. Setting up this animation is similar to what we did before.
Expand ChestBottom GameObject in the Hierarchy window. Drag the ChestLid GameObject into the Timeline and select Animation Track . In the Timeline, set the frame to 389 . Now select the ChestLid track . Click on the Record button .
Now, when recording is in progress , select the GameObject ChestLid in the Hierarchy window and set the X Position to -1 , and then return to 0 to set the initial position. In the Timeline window, set the frame to 555. Finally, in the Transform field of the Inspector window, set the Y Position ChestLid value to 6 . Press the Record button on the track again to complete the recording.
So we animate the lid of the chest so that it flew through the wall.
Now you need to place Camera4 so that it is above the chest when the cover flies away. We will repeat the same steps as for the previous camera, so I will not describe each action in detail.
Set the Camera4 position (X: -9.00, Y: 5.4, Z: 5.18) . Set Camera4 rotation (X: 90, Y: 0, Z: 0) .
As with all other added cameras, adding animation makes the scene more interesting, so you should make a camera hit after opening the chest.
Select the Timeline window . Drag GameObject Camera4 into it and create an Animation Track . Frame 389 for the track . Click on the Camera4 track , and then click the Record button . Select GameObject Camera4 . In the Transform field of the Inspector window, set the X Position value to 0, and then -9 again .
In the Timeline window, drag the Animation Track to frame 555 .
Finally set the Y Position of the objectCamera4 value 3.74 :
The scene is finally complete. Click on Play and rate it!
Manage complexity: grouping tracks
It was a short animation with just a couple of “actors”, so it was quite easy for us to track game objects and tracks. But when creating more complex scenes with a lot of moving parts and actors, it becomes very difficult to control them. That is why orderliness is very necessary. Although the scene is ready, let's spend a few minutes organizing it — in the future, thank you for it.
One way to organize work is to group tracks. First, right-click under the tracks in the Timeline window and select Track Group . Click on the Track Group and in the Inspector change its name to Activations :
Repeat this process and create a Track Group called Animations . Now the Timeline should look like this:
Now drag all tracks with Active sections to the Activations group , and all the others to the Animations group . Now you can open and close each group for the convenience of working with them:
Do not forget to save your work. Lean back on your director's chair and praise yourself - you have finished your first timeline.
Where to go next
If you missed some parts of the tutorial, then do not forget that you can download both the blank and the finished project from here .
We did a good job and created a cutscene using model animations, camera changes and object lifecycle updates, but there is still a lot to be learned. One of the most important aspects related to Timeline is creating your own scripts in which you can associate animations with code that can be executed with them. Learn more about the scripts here . If you have already mastered it well, then try adding a script to the scene after opening the treasure chest.
If it is interesting to you to learn more about animations in Unity as a whole, then study our wonderful tutorial Introduction to Unity Animation .
To learn more about creating 3D models and about the Animation window, check out the detailed series of Unity tutorials presented here .
And the last - if you are interested in creating games, you can purchase our book Unity Games By Tutorial . It tells about the creation from scratch of four types of games with a detailed description of each stage of the process.