Mobile services, blobs and Windows 8. Store data in the cloud
Good afternoon.
We live in a world of total globalization, both in real life and in virtual. I mean, we want to have the same data, the same settings and the same program behavior on different devices. Such synchronization of everything and everything in our time is easy to achieve with the help of clouds. This will be discussed in this article, namely, the crossing of a Windows 8 application (WinRT) with a Windows Azure cloud for storing data and metadata.
Introductory
So, suppose we have an application for Windows 8 (let it be a service for storing some text records), which:
1) Should display a list of records with minimal information about each of them (for example, the title or date of creation). Call it metadata.
2) It should be able to show detailed information about the record (content) when moving to a specific element. Call it data.
3) It should synchronize data between various devices running Windows 8 (created a record at home, looked at it at work).
The most correct approach that I see is to split the data and metadata and store them in different places. This will allow us to quickly get small metadata for display in a list, and load “heavy” data at the user's request.
In this article, we will introduce Windows Azure Mobile Services for storing metadata and Windows Azure Blob Storage for storing data. Ahead is a lot of text and pictures.
Step 1. Work with cloud storage
For more flexible and cross-platform work with Windows Azure Blob Storage, I additionally recommend introducing another layer in the form of a WCF service that will receive and process requests from mobile clients. Therefore, the first step of this guide will consist of several steps.
Creating the Windows Azure Services We Need
First, we need to prepare the cloud environment by creating two services in Windows Azure - Cloud Service and Storage. Let's start with the second one. We go to the Windows Azure management portal . At the bottom of the page there is a big button with a plus. By clicking, a selection of services to create will open. We need DATA SERVICES -> STORAGE :
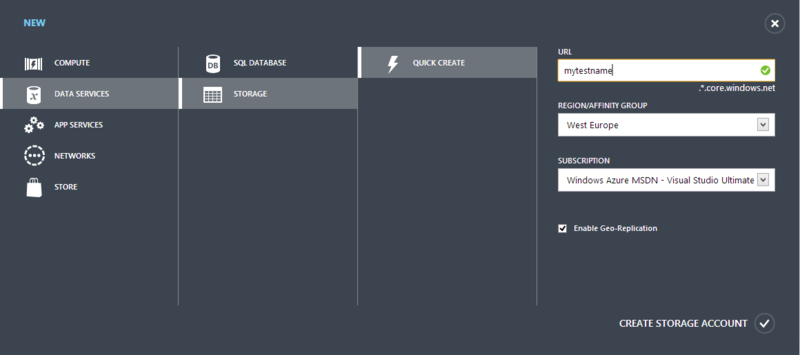
Enter any name of the new service that is convenient for us, click the check box below and wait until the service receives Online status. After that, we go into the settings of our storage and look with our eyes and mouse for the “Mange keys” button with the letter i icon on board. We click on it and we see three fields in front of us. The first will contain the name of this service, which we assigned to it during creation, and the second and third will store access keys. Remember the first of them, it will come in handy to us soon.
Creating a WCF Service
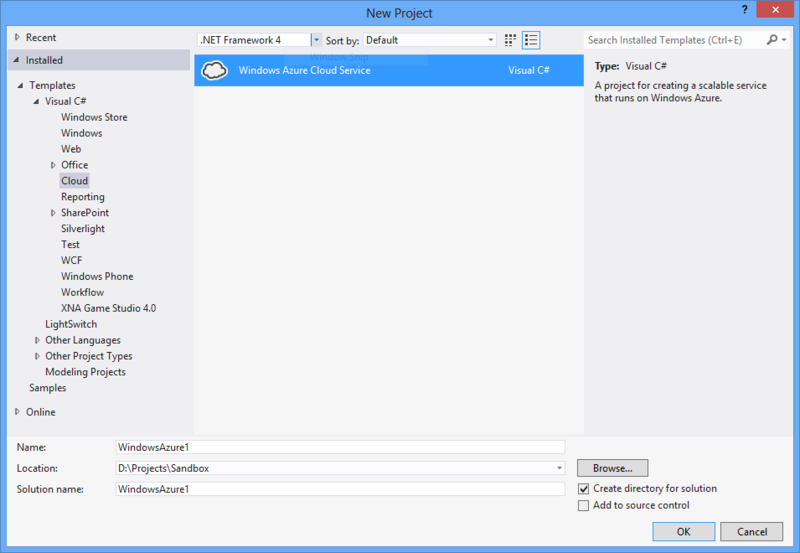
We will use Visual Studio 2012 to create the WCF service and the corresponding service in Windows Azure. I will use the Ultimate version as an example, but the Web version will be suitable for free use.
So, open the studio and create a new project with the Cloud type:
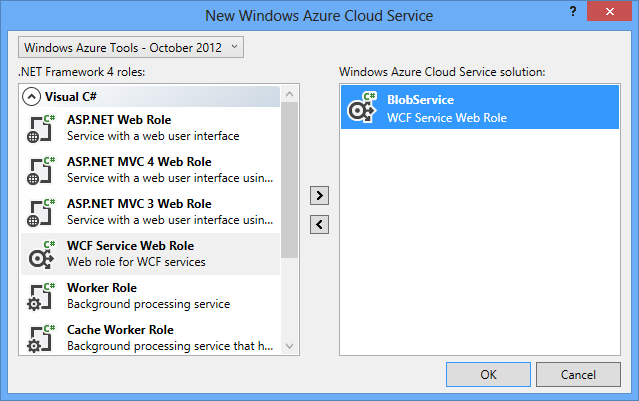
In the window that appears, we will be asked to select the types of projects that need to be placed in the cloud. We are interested in WCF Service Web Role. We select it and add it to the list of created ones (do not forget to rename):
Visual Studio, after some deliberation, will create two projects for us, one of which will be a WCF service project, and the second is a special project for publication in the Windows Azure cloud. Let's tweak them a bit.
To painlessly publish our service to the cloud, Visual Studio must know which cloud it needs to do this for, and also understand that we have the right to do so. To convince her, just right-click on the Cloud project and select the Publish menu item:
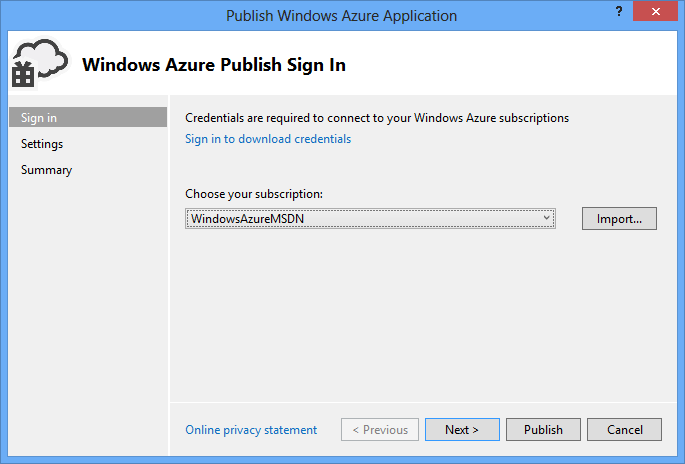
If you have not previously published anything to the cloud, then instead of the WindowsAzureMSDN value, you will be empty. To be thick, just follow the link , download the publication profile and import it using the Import button in Visual Studio. This will allow you to perform operations on cloud services directly from the IDE.
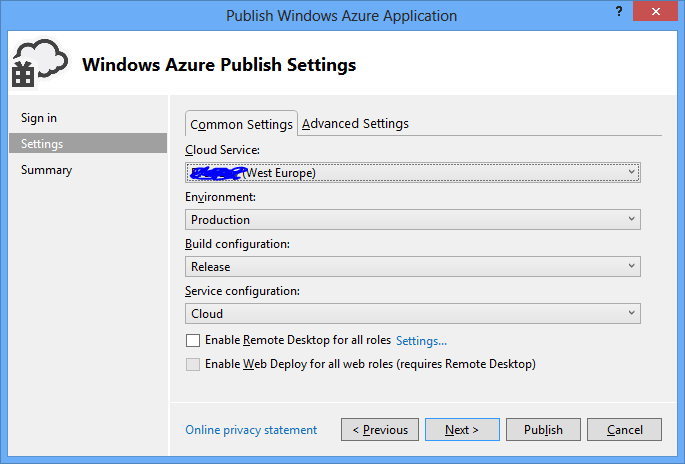
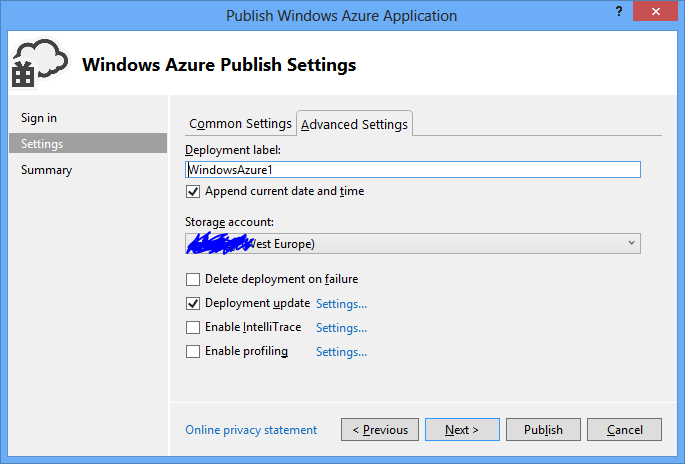
After we have access to the cloud from VS2012, we proceed to the next step, where we will create the Cloud Service directly for hosting our WCF service. On the Common Settings tab, selectCloud Service -> Create New , and on the Advanced Settings tab, specify the existing Storage Account (it should already be available for selection in the list). Try to keep both Cloud Service and Storage Account in the same zone:
After completing these steps, we just need to click the Publish button and the project will leak to the network.
Step 2. Using storage
The first step is to add the connection string to the web.config file of our service. The line looks like this:
DefaultEndpointsProtocol = https; AccountName = service_name; AccountKey = that_story_key_of_Storage
There are two ways to work with cloud storage - using the REST API and using the .NET wrapper. In this article I will use the second option as the simplest. Moreover, it was not in vain that we created our own service.
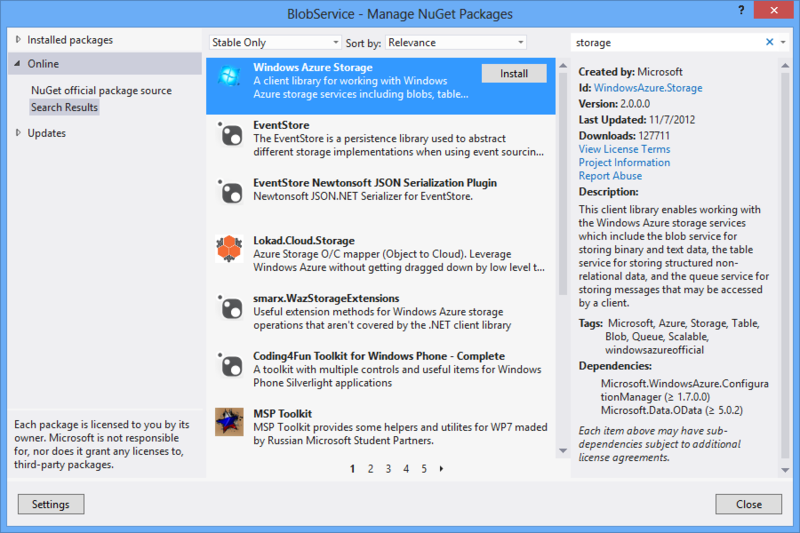
So, in order to use this functionality, you need to connect the Windows Azure Storage package to your NuGet project:
Connecting and managing BLOB containers is done using the client:
using Microsoft.WindowsAzure.Storage;
using Microsoft.WindowsAzure.Storage.Blob;
CloudStorageAccount storageAccount = CloudStorageAccount.Parse(_connectionString);
_blobClient = storageAccount.CreateCloudBlobClient();
Further work with the storage is quite simple:
// Получение контейнера
CloudBlobContainer container = BlobClient.GetContainerReference(ContainerName);
// Создание, если его не существует
container.CreateIfNotExists();
// Получение блока по принципу "префикс-"
CloudBlockBlob blockBlob = container.GetBlockBlobReference(BlobNamePrefix + data.Id);
// Сериализуем данные
var serializer = new XmlSerializer(typeof(CompositeType));
using (var s = new MemoryStream())
{
    serializer.Serialize(s, data);
    s.Seek(0, SeekOrigin.Begin);
    // И пишем в blob
    blockBlob.UploadFromStream(s);
}
Similarly, the data can be obtained:
// Получение контейнера
CloudBlobContainer container = BlobClient.GetContainerReference(ContainerName);
// Если не существует - возвращаем null
if (!container.Exists())
    return null;
// Так же пытаемся получить блок
var blockBlob = container.GetBlockBlobReference(BlobNamePrefix + id);
if (!blockBlob.Exists())
    return null;
// И десериализуем бинарные данные
var serializer = new XmlSerializer(typeof(CompositeType));
CompositeType result = null;
using (var s = new MemoryStream())
{
    // Скачиваем данные из блоба
    blockBlob.DownloadToStream(s);
    s.Seek(0, SeekOrigin.Begin);
    result = serializer.Deserialize(s) as CompositeType;
}
return result;
The above methods were placed in a wrapper class, and the WCF service itself has a simple contract of two actions:
[ServiceContract]
public interface IBlobService
{
    [OperationContract]
    CompositeType GetData(int value);
    [OperationContract]
    void PutData(CompositeType data);
}
!!! Here it is necessary to mention an important, but absolutely non-obvious thing. The names of blob containers and blocks must be in a small case. That is, the name BlobContainer will cause an error when trying to create, and, for example, a blob-container will be created without problems.
After we wrote the service, publish it to the cloud again and after this procedure is completed it will be available at your_service_name.cloudapp.net / BlobService.svc .
Step 3. Mobile Services
The previous two steps were aimed at creating an infrastructure for storing “data” - large-volume information that is not always needed, but upon request. Now let's move on to storing the “metadata”. To do this, we will take advantage of the recent new in Windows Azure - Mobile Services.
Creating a new mobile service is as easy as other services in Windows Azure. Again we go to the management portal , where below in the creation menu we select COMPUTE -> MOBILE SERVICE and we see a wizard in front of us:
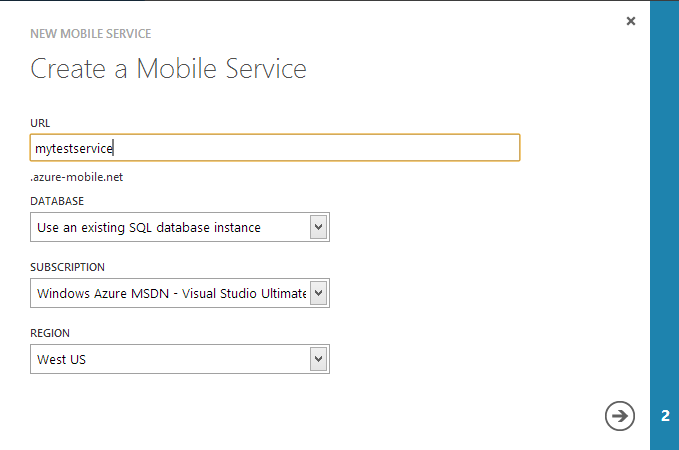
Indicate the name of the future service in it, the region of location (do not forget to be located somewhere in one place), indicate Storage, where they will be stored our data (you can use an existing one or create a new one) and complete the wizard.
Once the service is created, go to its page in the section marked with a cloud icon with lightning (I don’t know the name). There are two options on this page - Create a new Windows Store app and Connect an existing Windows Store app . The first will allow you to download the archive with the application configured to work with your mobile service, and the second will simply give a piece of code that needs to be embedded in an existing application. In principle, it doesn’t matter now which option you choose. I suggest using the second one and creating the application manually.
In the meantime, we have not done so, let's prepare Mobile Services for use. To do this, first go to the Data section (in the top menu) and add a new table for storing records. You can call it anything you like, I have TestItem:
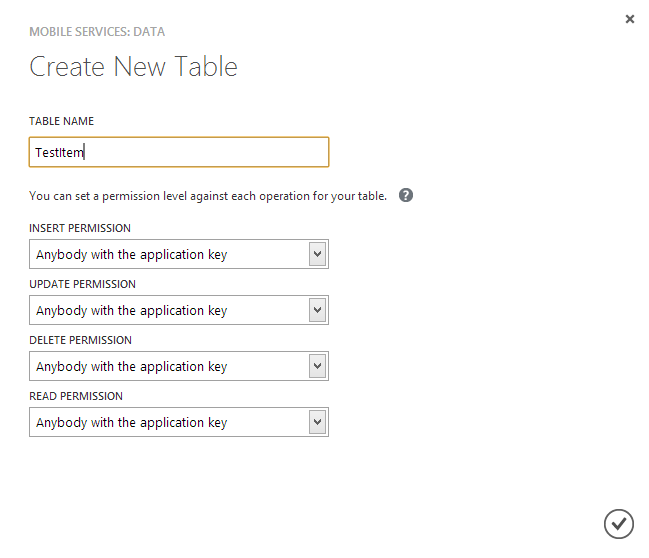
This table will subsequently host the metadata entries entered in the Windows 8 application.
Step 4. Windows 8
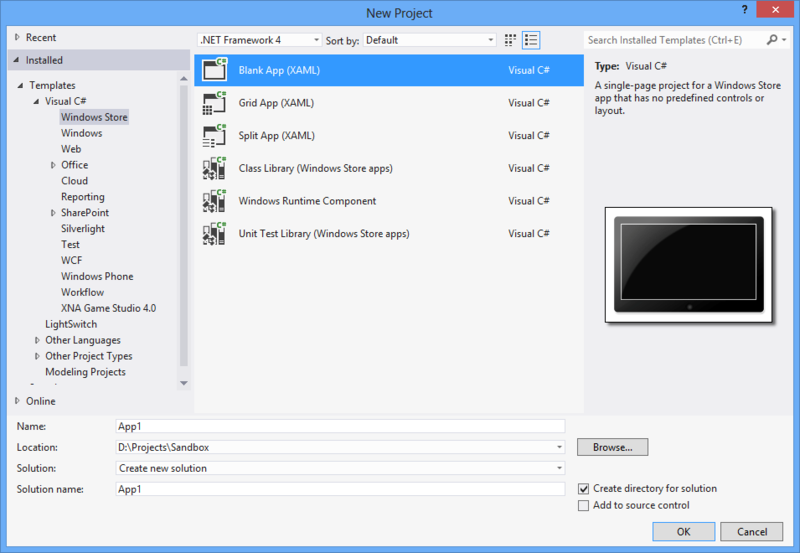
It is time to do what it was all about. An application for Windows 8 (WinRT) can be created for free in Express versions of Visual Studio 2012 (like the one we used for the WCF service, but now for Win8 applications).
File -> New Project -> Windows Store:
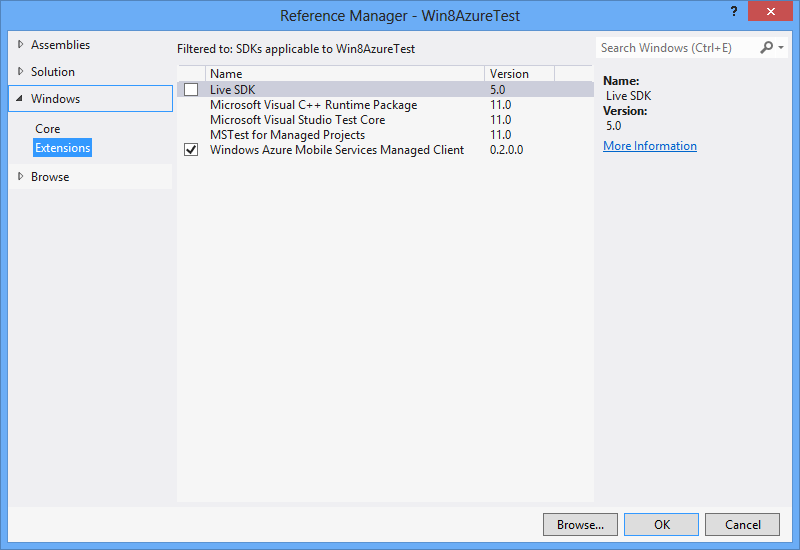
First you need to add the necessary links to the libraries so that you can use the benefits of Mobile Services. If you noticed, then in the previous step, Windows Azure offered us to download and install the Mobile Services SDK . This needs to be done, because with it we will work with cloud services for mobile devices.
Once the SDK is installed, we can connect it to the project using the standard Add Reference procedure :
Then we’ll also connect a link to our WCF service. This is also done easily using the standard Add Service Reference dialog :

As a result of connecting the Service Reference, Visual Studio will create for us a special class wrapper that will look like a regular class with a service contract, but will actually access the remote WCF at the specified address.
And finally, we’ll add the code for using mobile services, which, as I said above, can be obtained on the page with cloud and lightning in Windows Azure. It looks something like this:
public static MobileServiceClient MobileService = new MobileServiceClient(
            "https://***.azure-mobile.net/",
            "secret_key");
I added this field to the App.xaml page to have access to mobile services from anywhere in the application.
Step 5. Putting It All Together
It is time to connect all the paths at one point and write code that, when you add a new record, will place it in Azure Blob Storage and Mobile Services.
private async Task PutDataTestWCF(CompositeType data)
{
    // Получаем клиент для работы с WCF
    var cli =
        await
        Task.Run(() => new BlobServiceClient(new BasicHttpBinding(), new EndpointAddress(CloudServiceEndpoint)));
    // Вызываем сгенеренный метод добавления данных (асинхронный)
    await cli.PutDataAsync(data);
    // Не забываем закрыть клиент
    await cli.CloseAsync();
    // Получаем таблицу в мобильных сервисах
    var table = App.MobileService.GetTable();
    // Выбираем из нее записи
    var list = await table.Select(x => x.Id == data.Id).ToListAsync();
    // Если такая запись есть, то делаем обновление, иначе - вставку
    if (list != null && list.Count > 0)
        await table.UpdateAsync(new TestItem() {Id = data.Id, Text = data.Text});
    else
        await table.InsertAsync(new TestItem() {Text = data.Text});
}
Here it is worth paying attention to several things. First, all methods that somehow work with the network are asynchronous. Even the client class for the WCF service, which was generated automatically, also contains asynchronous methods (PutDataAsync). This is great because it allows you to make the application more responsive without forcing the user to watch the blocked interface while the application is trying to connect to the Internet.
In addition, working with both services has become quite simple and transparent. What work with WCF, what with Mobile Services, both of them look like simple calls to .Net code, hiding all the details “somewhere out there”. I didn’t write any abstract layers of data access here, but if we get confused and do everything correctly, we can easily make mock plug-ins for testing the application.
Conclusion
In this article, first of all, I wanted to show not how to write Windows 8 applications, but how to embed the ability to work with different types of cloud storage in different ways in them. I deliberately cited not so much code, since the article turned out to be large and, possibly, difficult to understand. Below I am attaching an archive with a code that can be used for training:
Download the archive
In it, I replaced all references to my service with *** or ****. I think it will be clear what and where to substitute so that everything takes off.
In preparing the article and the test application, the following materials were used:
- The official guide to working with Blob Storage
- The official guide to working with data in mobile services
-Google , Bing , Yandex
-
P.S. A big request to the indifferent minusers - please write the argumentation of your minuses either in the comments or in PM. It is important for me to know my flaws in order to correct them in future publications. Thanks a lot.