September 28, 2012 at 12:53
SharePoint 2013 Farm on Windows Azure AD DC
- Tutorial

As you know, you can already download and try SharePoint 2013 (currently the product is in Preview status).
In order to work with the new version, it is not necessary to buy a new server or create virtual machines with obviously inappropriate requirements .
- SharePoint 2013 Farm on Windows Azure AD DC (this article)
- SharePoint 2013 Farm on Windows Azure SQL Server 2012
- SharePoint 2013 Farm on Windows Azure SharePoint 2013
We’ll show you how to use the capabilities of Windows Azure to create a farm with SharePoint 2013.
The necessary conditions
- Windows Azure PowerShell Cmdlets
- Subscription to Windows Azure with the included ability to preview virtual machines - you can register for free here
Retrieving Subscription Credentials
To complete all further steps, you will need security credentials for your subscription. Windows Azure allows you to download the Publish Settings file with all the information you need to manage the account in your development environment.
Download and import Publish Settings file
At this stage, you need to log in to the Windows Azure portal and upload the file with the publication settings. This file contains security credentials and additional Windows Azure subscription information that will be used in your development environment. Then you need to import this file using the Windows Azure cmdlets in order to install the certificate and obtain account information.
Go to https://windows.azure.com/download/publishprofile.aspx and log in using the Microsoft Account credentials that match your Windows Azure account .
Save the file with the publication settings on your local PC.
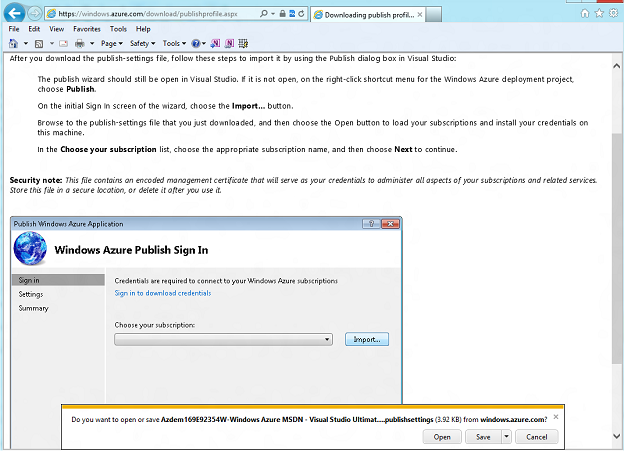
Download the publication settings file
Start Windows Azure PowerShell and as administrator.
Next, you need to import the file with the parameters and generate an XML file with your credentials using PowerShell
Import-AzurePublishSettingsFile '[YOUR-PUBLISH-SETTINGS-PATH]'Run the following commands and pay attention to the name of the subscription and the name of the storage account, we still need them
Get-AzureSubscription | select SubscriptionName
Get-AzureStorageAccount | select StorageAccountName[/sourcecode]
Run the following commands to assign the current storage account to your subscription
Set-AzureSubscription -SubscriptionName '[YOUR-SUBSCRIPTION-NAME]' -CurrentStorageAccount '[YOUR-STORAGE-ACCOUNT]'[/sourcecode]Let's move on to setting up a virtual network.
Set up a virtual network
To work in an Active Directory domain, clients will need static IP addresses; clients must connect to a DNS server that supports Active Directory. Internal DNS (iDNS) deployed on Windows Azure will not work because it assigns dynamic IP addresses to virtual machines. For this solution, a virtual network will be created in which virtual machines can be connected to specific subnets.
- Virtual network called SP2013-VNET, address prefix: 192.168.0.0/16
- Subnet called SP2013AD-Subnet, Address Prefix: 192.168.1.0/24
- Subnet called SP2013Farm-Subnet, Address Prefix: 192.168.2.0/24
Create a territorial group
Go to https://manage.windowsazure.com/ . Enter your credentials for Windows Azure when prompted. To the Windows Azure portal, click Networks' (Network) , Affinity the Groups (Local Group) , at the bottom, click the Create (Create) .
Give the group a name territorial SP2013-AG and select the region ( Region ). To create a territorial group, click Finish.
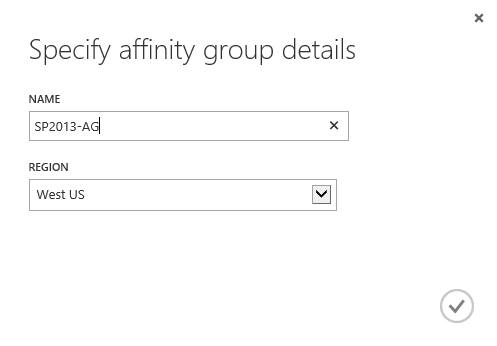
Creating a territorial group
Create a new virtual network
Create a new virtual network for your subscription.
To the Windows Azure portal, click Networks ' (Network) , and then the Virtual Networks' (VLANs) . At the bottom, click the Create (Create) .
Name the new virtual network SP2013-VNET , enter a description and click the arrow button to continue.
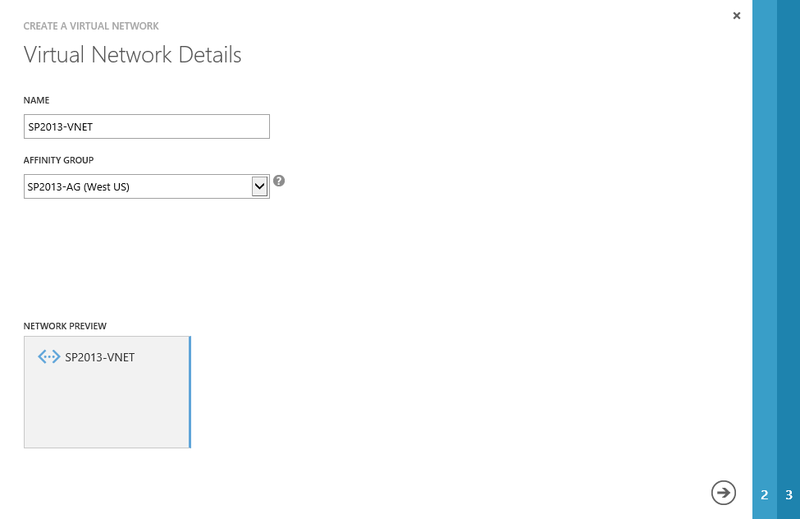
Creating a new virtual network
in the field of the Address Space (address space) , type 192.168.0.0/16 and add two subnets: SP2013AD-Subnet with the prefix 192.168.1.0/24 and SP2013Farm-Subnet with the prefix 192.168.2.0/24 .
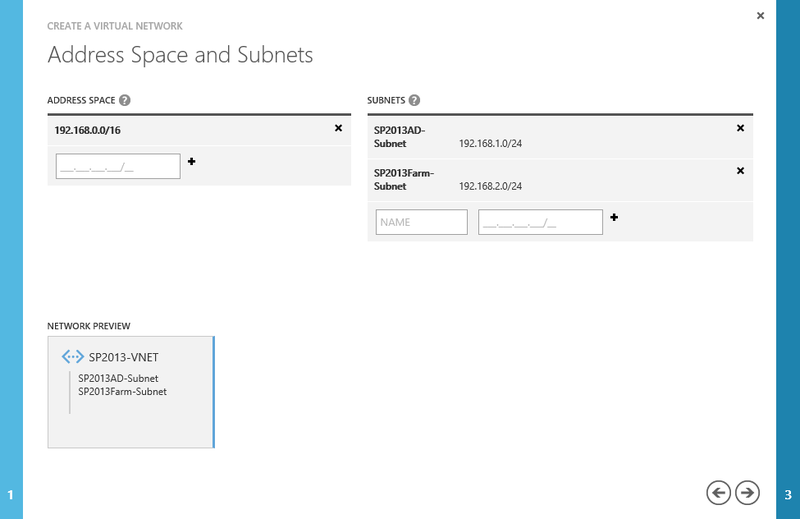
Adding an Address Space and Subnets
Leave the default values for DNS and click Finish.
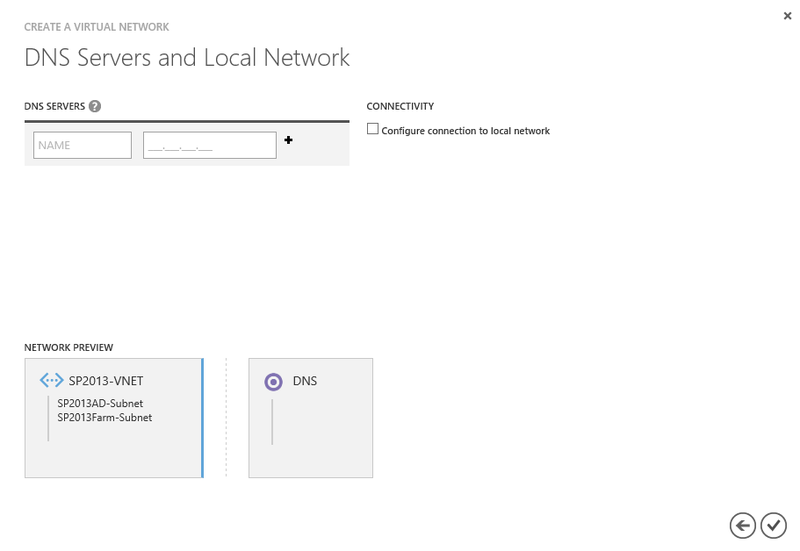
Creating a virtual network
Thus, we created a virtual network through the management portal.
A similar task can be performed using PowerShell scripts.
Using a PowerShell Script
Content of CreateVnet .ps 1 script
# Подписки к Azure
Get-AzureSubscription | Select SubscriptionName
# Данные о вашей подписке
$subscriptionName = "ВАША-ПОДПИСКА"
$storageAccount = "ВАША-АККАУНТ-ХРАНИЛИЩА"
Select-AzureSubscription $subscriptionName
Set-AzureSubscription $subscriptionName -CurrentStorageAccount $storageAccount
# Список возможных территорий
Get-AzureLocation | Select Name
# Параметры территориальной группы
$AGLocation = "West US"
$AGDesc = "SharePoint 2013 Affinity Group"
$AGName = "SP2013-AG"
$AGLabel = "SP2013-AG"
# Создаем новую территориальную группу
New-AzureAffinityGroup -Location $AGLocation -Description $AGDesc -Name $AGName -Label $AGLabel
# Создаем новую виртуальную сеть
Set-AzureVNetConfig -ConfigurationPath "C:\SharePoint2013FarmVNET.xml"
Contents of the SharePoint2013FarmVNET.xml configuration file
192.168.0.0/16 192.168.1.0/24 192.168.2.0/24 Deploy a domain controller
You can use the Windows Azure portal or PowerShell to prepare a virtual machine that will become a domain controller.
Create a new virtual machine through a portal
on the Windows Azure portal, click the New (New) and choose the Virtual Machine | From Gallery (Virtual Machine | From Gallery) .
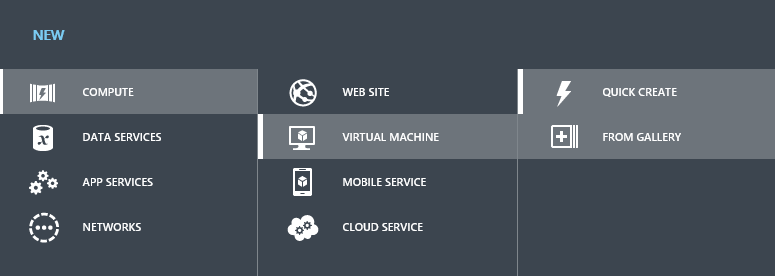
New virtual machine from the gallery
Select a Windows Server 2012 image from the list . Click the arrow to continue.
Enter a name for the virtual machine, for example, SP2013-DC1, in the field of the Virtual Machine the Name (virtual machine name)and set a password for the Administrator user . Click the arrow to continue.
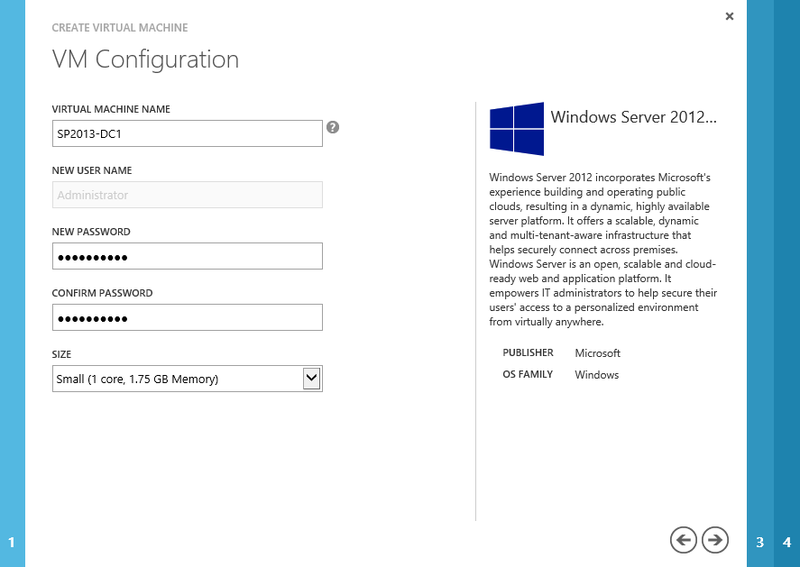
Creating a new virtual machine
The DNS name must be unique. You can select an existing storage account or automatically create a new one. Select your virtual network from the Region / Affinity Group / Virtual Network drop-down list . Click the arrow to continue.

Selecting a virtual network for a virtual machine
Select the checkbox next SP2013AD-Subnet on the list of the Virtual the Subnets the Network (Subnet VLAN) . To create a virtual machine, click Finish.
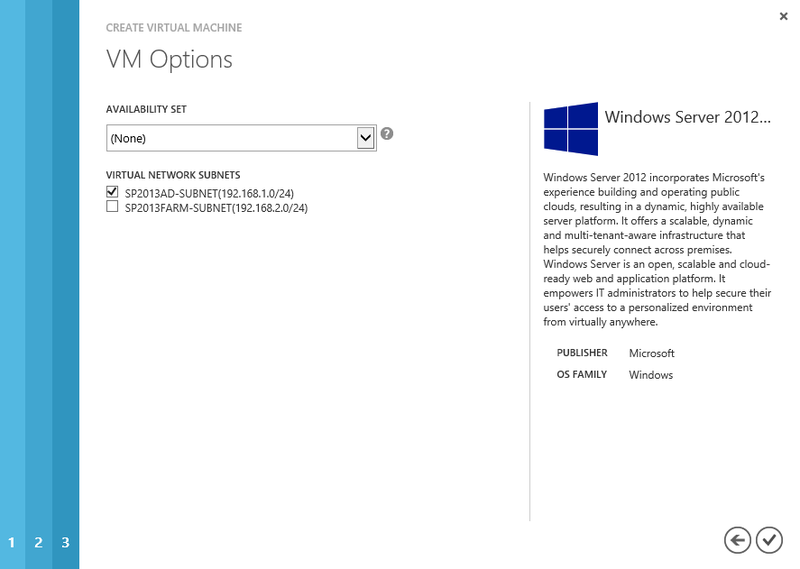
Active Directory Subnet Selection
Wait for the virtual machine creation process to complete. Click the name of the virtual machine and select Dashboard .
Click the Attach (Attach) from the menu at the bottom of the page and select the Attach the Empty Disk (Attach a blank disc).
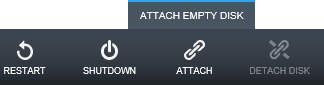
Joining an empty disc
on the page, the Attach empty disk to virtual machine (empty disk connection to the virtual machine) , set the parameter Size (size) value of " 20 GB» (20 GB), and click the Finish button to create the disk.
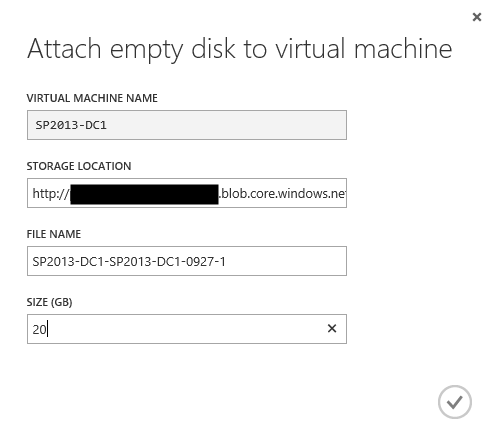
Create a new disc
In addition to the above method for creating new machines through the portal, you can use PowerShell.
Create a new virtual machine using a PowerShell script
# Подписки к Azure
Get-AzureSubscription | Select SubscriptionName
$subscriptionName = "ВАША-ПОДПИСКА"
$storageAccount = "ВАША-АККАУНТ-ХРАНИЛИЩА"
Select-AzureSubscription $subscriptionName
Set-AzureSubscription $subscriptionName -CurrentStorageAccount $storageAccount
# Список всех образов виртуальных машин
Get-AzureVMImage | Select ImageName
# Параметры контроллера домена #1
$vmName = 'SP2013-DC1'
$imageName = 'MSFT__Windows-Server-2012-Datacenter-201208.01-en.us-30GB.vhd'
$size = "ExtraSmall"
$subnet = 'SP2013AD-Subnet'
$password = 'pass@word1'
# Параметры виртуальной машины
$dc1 = New-AzureVMConfig -Name $vmName -InstanceSize $size -ImageName $imageName
Add-AzureProvisioningConfig -Windows -Password $password -VM $dc1 | Add-AzureDataDisk -CreateNew -DiskSizeInGB 20 -DiskLabel 'data' -LUN 0
Set-AzureSubnet -SubnetNames $subnet -VM $dc1
# Параметры облачного сервиса
$serviceName = "SP2013DC-Service"
$serviceLabel = "SP2013DC-Service"
$serviceDesc = "Domain Controller for SharePoint 2013"
$vnetname = 'SP2013-VNET'
$ag = 'SP2013-AG'
# Создаем контроллер домена
New-AzureVM -ServiceName $serviceName -ServiceLabel $serviceLabel -ServiceDescription $serviceDesc -AffinityGroup $ag -VNetName $vnetname -VMs $dc1
Create a domain controller
Wait until the virtual machine is ready: this may take several minutes. Log on to the newly created virtual machine in the Windows Azure portal. To do this, go to the section of Virtual Machines (VMs) , select the SP2013-DC1 and press the Connect (Connect) below.
Open the Computer Management (Computer Management) , expand the Storage (Storage) , and then click Disk Management (Disk Management).
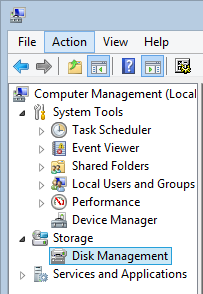
Open the Disk Management window.
Initialize Disk 2 by clicking OK in the dialog box.Disk the Initialize (Initialize Disk) .
Initializing a Disk
Right-click the unallocated space on the disk and select New Simple Volume .
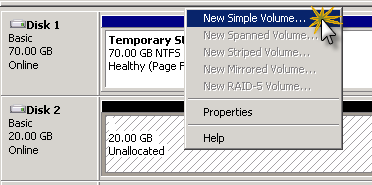
Creating a New Simple Volume
Wizard appears to create a new simple volume the New the Simple the Volume Wizard . Click the Next (Next) and leave the default settings on the screens of the Specify the Volume Size (Specifying the size of the volume) and the Assign Drive Letter-or the Path (Assign Drive Letter or path) .
On the screen the Format of Partition (Format Partition) , set the field Volume label(Volume Label) DIT value and click Next .
To start the formatting process, click Finish . After this process is completed, the disk will be ready to use.

Formatted disk
In Windows Server 2012, the mechanism for creating a domain controller has changed (DCPROMO is deprecated). Open Server Manager , then select Manage (Manage) and Adding Roles and capabilities (the Add the Roles and Features)
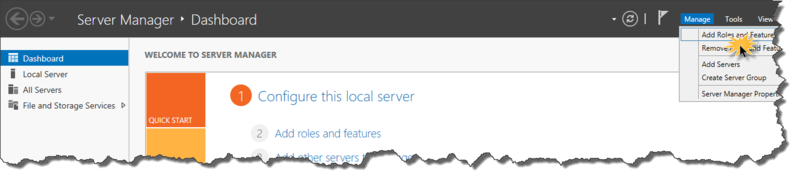
Server Manager
In the wizard, click the Next , continue to select the Create a new domain in a forest ( Createdomain in the new forest ) and click Next. Next, select Role-based or feature-based installation and click Next.
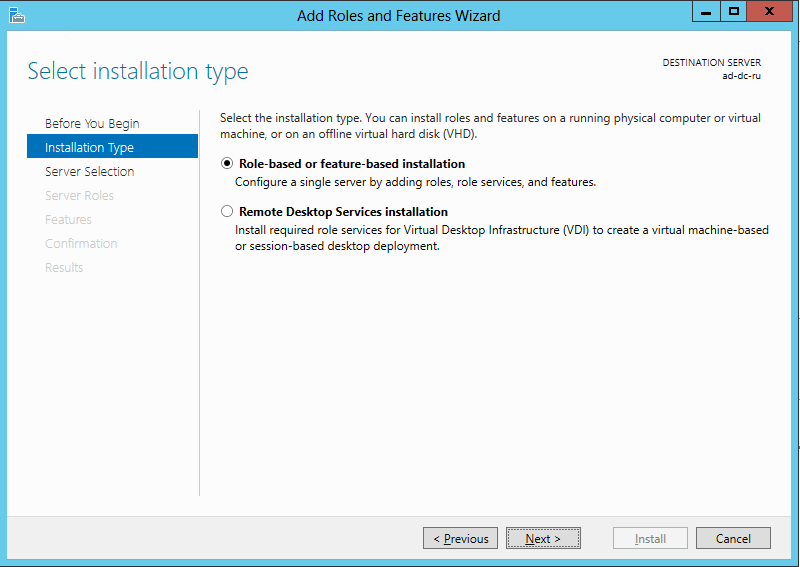
Select a method for adding roles.
Select a server to add roles and click Next.

Select a server to add roles.
In the next step, select Active Directory Domain Services . After that, in the window that appears, select Add Features
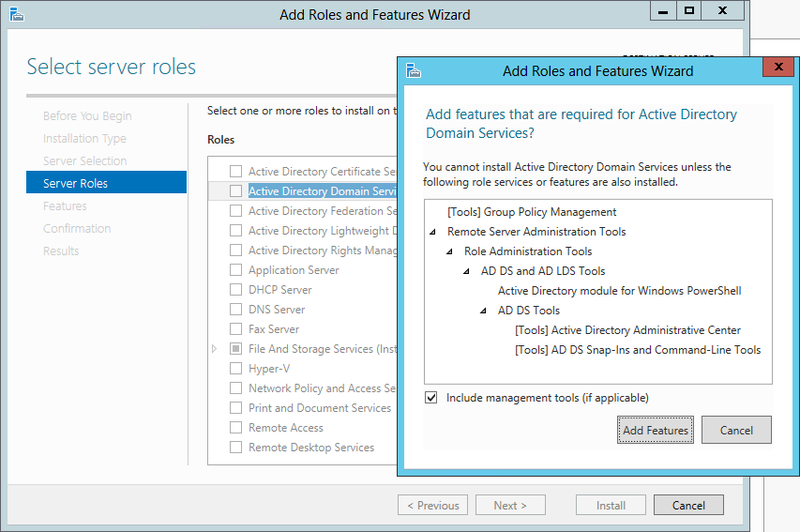
Add the AD DS role.
In all the next steps of the wizard, click Next .

Last step to install AD roleDS
The server now has the AD DS role, but it is not yet a domain controller. To make our DC server, open Server Manager

Make the server a domain controller from the Server Manager
Select the Add a new forest (Create a new forest), set the root domain ( Root the Domain the Name ) name contoso.com, and then click Next
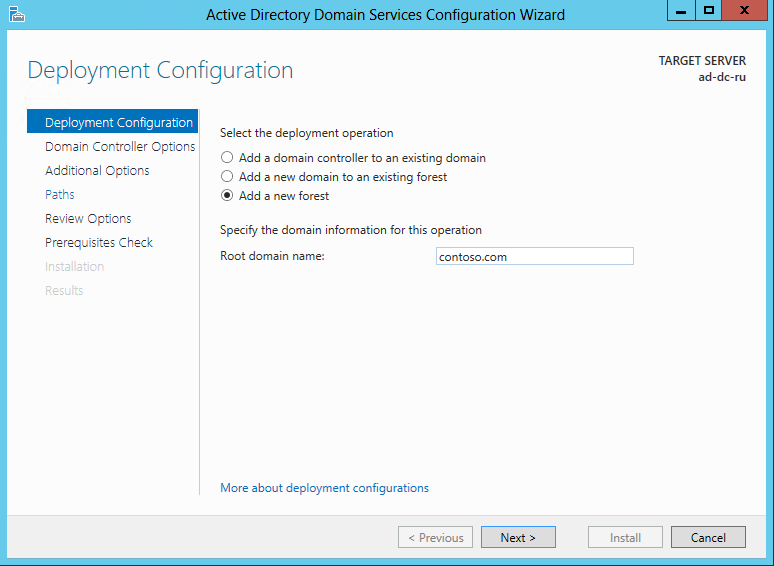
Select deployment type
Select mode Windows Server 2012, use the default settings to create a DNS serverand set the password of the domain administrator (preferably different from the administrator password on the created server). Click Next
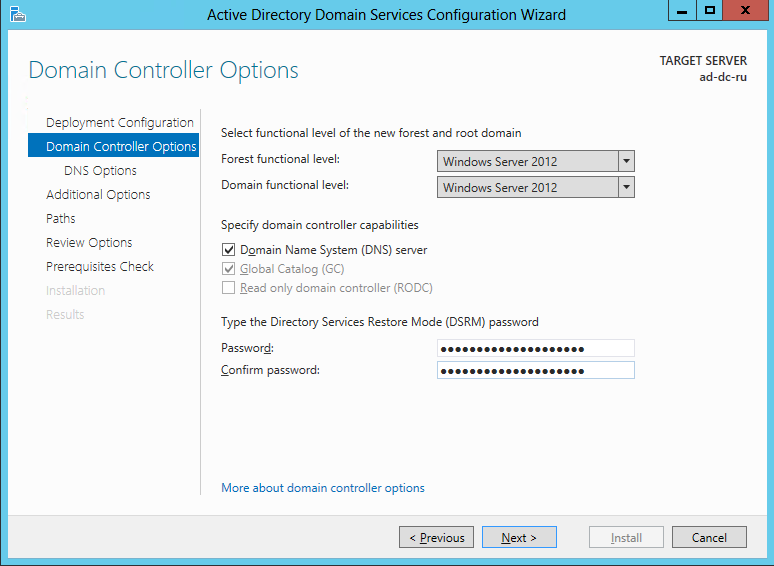
. Domain Controller Options.
During this practical lesson, you will not integrate into your existing Active Directory environment, so click Next .

Warning message about creating DNS
As a storage for the Database , Log files, and SYSVOL folders, specify a recently formatted data disk (for example, F: \ NTDS for the database, F: \ NTDSLogs for logs, and F: \ SYSVOL for SYSVOL). Click Next to continue.
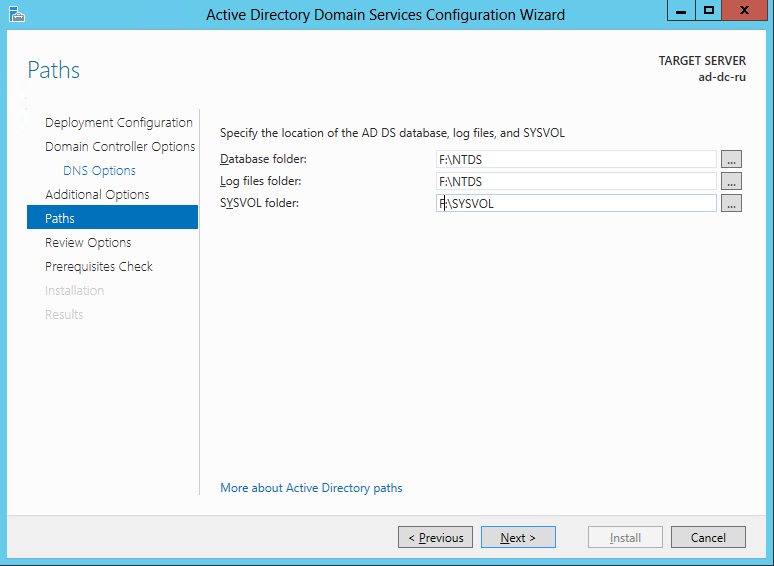
Settings for the location of the Database, Logs and SYSVOL folders
Finally, click Next again and wait for the Active Directory setup process to complete, it may take several minutes. When a restart request appears, click Restart Now .
Thus, we created a domain controller for the SharePoint 2013 farm.