Webcam software capture
 Recently, I needed to get data from a webcam to automatically process it. After going through several programs, I found that none of them allows you to steer the camera programmatically - only the forms and buttons, at best there is a recording scheduler, but for this you have to constantly keep the program running. Plus, not cross-platform, binding to specific software in the project. The solution is to use your favorite programming language.
 So, we have a webcam and Python. First of all, one cannot help but praise the camera I purchased at dealextreme: the baby is half the size of a matchbox, works in Windows and Linux without installing third-party software (checked in Win 7 and Mint 13, turned it on and went), reasonable quality and price. During operation, the camera does not give out glowing indicators or other effects. Small sizes contribute to its invisible installation.
Since I work in both Windows and Linux, the solution should satisfy both OSs. The OpenCV computer vision library and its binning for Python will help. An alternative solution could be video4linux . But, firstly, it was interesting for me to learn OpenCV, and secondly, about the use of v4l was already excellent habrastatya .
Install the numpy and opencv libraries. Linux users open a terminal and write:
sudo apt-get install python-numpy
sudo apt-get install python-opencv
Those under Windows go here and pump out numpy and opencv distributions for the correct version of Python.
There is an alternative installation method for Windows. Just download the official library distribution . In the archive we find /build/python/2.x/cv2.pyd. We throw it in site-packages. In the same place we create the cv.py file with the contents:
from cv2.cv import *
All is ready. Test import:
import cv
We will use a part of the library called higui . We start the experiments. Test ball - receiving a frame and writing it to a file:
import cv
capture = cv.CaptureFromCAM(0)
frame = cv.QueryFrame(capture)
cv.SaveImage("capture.jpg", frame)
The CaptureFromCAM function creates the object from which the capture will occur. 0 is the index of the device, it can be more than zero if there are several cameras. A value of -1 carries the meaning "any available camera."
Now you can start collecting frames in a loop. It will be great if the frames are simultaneously displayed in a separate window:
import cv
capture = cv.CaptureFromCAM(-1)
cv.NamedWindow("capture", cv.CV_WINDOW_AUTOSIZE)
i = 0
while True:
    frame = cv.QueryFrame(capture)
    cv.ShowImage("capture", frame)
    cv.WaitKey(10)
    path = "capture%.4d.jpg" % i # Уникальное имя для каждого кадра
    cv.SaveImage(path, frame)
    i += 1
The NamedWindow function creates and displays a window into which each frame is displayed in a loop. The WaitKey handler sets the delay in milliseconds for processing window events, such as pressing a key or displaying an image. If you omit it, the window will not display frames (and, possibly, will not appear at all).
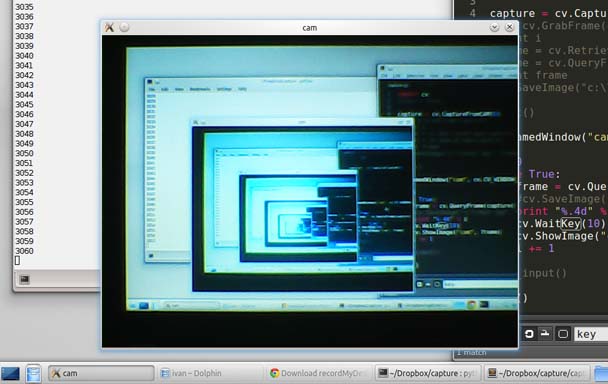
Capture frames in action. The camera looks at the monitor, so there is a recursion - a dekstop, inside which there is a desktop, inside which ...
Collecting many frames is useful when you need to insert a temporary pause between images, for example, 1 frame every minute. It is enough to substitute time.sleep (60) in the loop.
If you need continuous shooting, you need to record frames in the video stream.
import cv
capture = cv.CaptureFromCAM(-1)
fourcc = cv.CV_FOURCC('M','J','P','G')
fps = 16
w, h = 640, 480
stream = cv.CreateVideoWriter("test.avi", fourcc, fps, (w, h))
while True:
    frame = cv.QueryFrame(capture)
    cv.WriteFrame(stream, frame)
At first glance, everything here is also obvious: the CreateVideoWriter function creates a stream into which frames are written. It is enough to interrupt the cycle to get the finished video file. However, you should deal with the input parameters.
fourcc is a codec, an integer, the result of mapping a four- character codec name to a numerical index. For example, CV_FOURCC ('P', 'I', 'M,' 1 ') is MPEG-1 compression. In Windows, you can pass -1 to select the codec interactively in the dialog box or 0 for recording without compression (the file size will turn out great!). Elsedar Habraiser suggests where you can see the full list of codecs: www.fourcc.org/codecs.php
fps- frame rate per second. The parameter directly depends on the model of your camera. At this place, the real state of affairs went against the documentation. It is believed that the recording parameters should not be set by eye, but in the exact way, for which the GetCaptureProperty function serves . She can get device parameters for correctly initializing the capture. But if the height and width of the frame are extracted without problems, then getting fps:
fps = cv.GetCaptureProperty(capture, cv.CV_CAP_PROP_FPS)
returns -1, which does not satisfy the CreateVideoWriter function, so the frequency is selected empirically. Typically, in most cameras, it ranges from 14 to 16 frames per second. If you set 25, then the resulting file will resemble a silent movie of the 20s.
The last parameter frame_size is a pair of integers of the height and width of the frame. To use the camera settings, initialize them as follows:
w = cv.GetCaptureProperty(capture, cv.CV_CAP_PROP_FRAME_WIDTH)
h = cv.GetCaptureProperty(capture, cv.CV_CAP_PROP_FRAME_HEIGHT)
w, h = int(w), int(h) # По умолчанию возвращаются как float
Now you can touch on the topic of color grading. If the output frames do not suit you, it is quite reasonable to adjust the capture parameters than to overtake mountains of jeeps or a video clock in batches. To set the parameters there is a function SetCaptureProperty . It is convenient to fill out several properties by enumerating a dictionary:
config = {
	cv.CV_CAP_PROP_BRIGHTNESS: 50,
	cv.CV_CAP_PROP_CONTRAST: 50,
	cv.CV_CAP_PROP_SATURATION: 50,
}
for param, value in config.iteritems():
	cv.SetCaptureProperty(capture, param, value)
The brightness, contrast and saturation parameters are set in the range from 1 to 100. Their combination can significantly improve the quality of shooting in darkened rooms.
Some examples:

Frame with default parameters

Brightness, contrast and saturation are 50 points

Brightness 50, contrast 70, saturation 0
It happens that the frames from the camera need to be processed with the PIL library. To convert them from cv format to PIL, it is not necessary to save them to disk, it is enough to execute the code:
pil_img = Image.fromstring("L", cv.GetSize(frame), frame.tostring())
And in the opposite direction:
cv_img = cv.CreateImageHeader(pil_img.size, cv.IPL_DEPTH_8U, 3)
cv.SetData(cv_img, pil_img.tostring())
As a result, we have programmatic access to the camera, we can shoot frames and send them by mail, do some analysis, write video. The solution is cross-platform. I think it’s easy to stream. Here, by the way, a program with a GUI interface on wx suggests itself, for example.
Links:
1) OpenCV Library
2) Python Binding Documentation
3) Highgui Section