Geek sniper or how to make a "keen eye"
They invited me somehow to the shooting range using high-precision weapons (in simple terms - to shoot with a sniper). This is shooting from a gun, which hits targets at fairly long distances, for example, a kilometer. Having shot my first three bullets, I wanted to see where I finally got. The target is very far away and the holes from entering the sight are not visible. The only possible solution turned out to be - move to the target and see all hits directly on the spot.
Shooting and running for the day, I decided that I needed to somehow simplify this process. At the shooting range, you want to have fun, and not roll over a kilometer every three shots for amendments. The result of thought and decision was a device that shows the target right in the mobile phone.
Attention, under the cut a lot of photos!
Returning from the shooting, one thought did not give rest - you need to somehow detect the hits and display the results somewhere near the shooter. At first there were ideas to make a special target, when it hits the contacts and the data is transferred to the arrow. But such an idea had to be rejected, since the target was a one-time target. Then there was the idea to scan the target for irregularities, but it was also quite difficult, plus it was not immediately clear how to calibrate it in field conditions. The simplest and most correct solution lay on the surface - you just need to photograph the target, and the hits are already looking at the photo. So: the device must be compact, self-powered, work for a long time and be quite unpretentious. And most importantly - it should be very easy to use. Ideally - turned on and went to take a position.
Getting to the assembly.
We will need:
I had more than half of what we needed, so there was almost nothing to buy.
The technical part is ready for assembly - now you need to think about the aesthetic. At first it was decided to order a beautiful case for all this. And here I faced the first problem. The sites are full of housing manufacturing services, but the prices are so high that I stopped wondering at the clumsy design of domestic appliances and understood themeaning of being that I have my own way. Create a case, ordering it from someone - VERY expensive, even if you ask to make just a square aluminum cube with a hole under the camera. Perhaps I was looking badly, but with suggestions I was put into a stupor. I tried to explain that I needed a primitive - simple and reliable. I was offered solutions for half a million rubles!
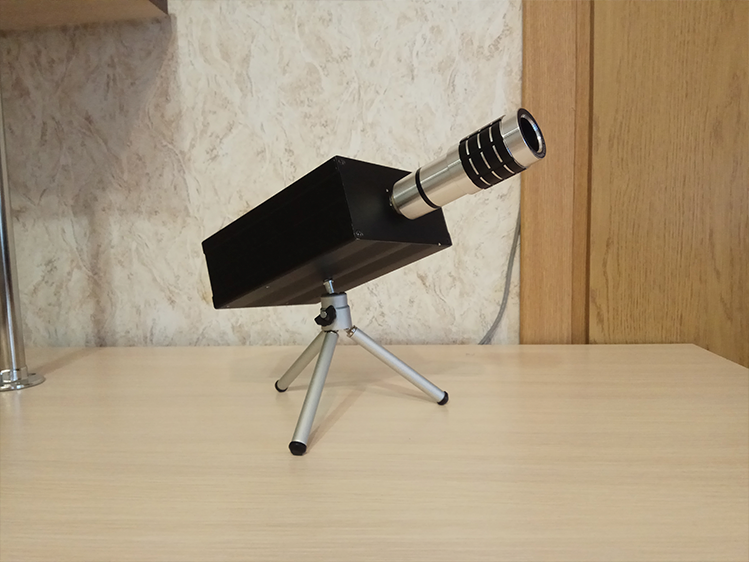
Let's go another way - we order on the Asian site a regular aluminum case for DIY. Costing 700 rubles. Beautiful, neat aluminum case. Already polished. The most important thing is not to miss the size. And we drill holes ourselves.
In the same place we find a mini-tripod and a magnifying nozzle (telescope) on the lens.
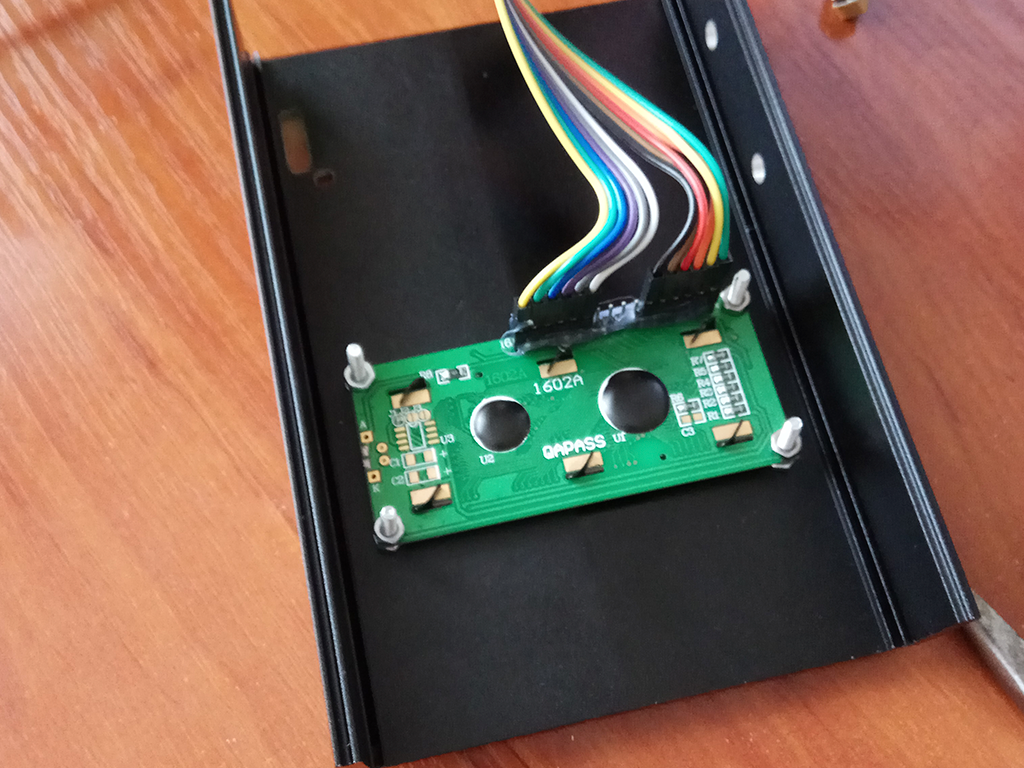
There are no difficulties with the assembly - the raspberry has a connector for the camera, and the GPIO of the legs is enough for the display and the GPS sensor.

(we connect the information display and GPS)
For power supply, we use a set of 18650 batteries. Each battery is 2600 mAh each, and a pack of 4 pieces gives us a total of more than 10,000 mAh. This is pretty good for Malinka and covers our needs with interest. We collect the charger for our battery and try to power the raspberry.

We glue the batteries together and very carefully solder the contacts. It is better to use contact welding.
While our body is on the way, let's start writing the program part. Following the proverb “Take the burden on your own so as not to fall while walking,” we will use only those tools that have a lot of experience to work with. Therefore, in C ++, we will not threaten, but take your favorite Java.
I will not spread the code, but I will explain the essence of what has been done.
To begin, write the server. To do this, we are suitable Jetty in tying with MySQL. The server must register the device and establish a connection between the device and the smartphone.
Install on raspberry linux, connect java and write the first client. The client must be able to log in to our server, get a team to take pictures, take a photo and send the result to the server. A little thought, as we write a system of software updates and distribution of versions. Surely, such a device will be needed by someone else in case there is another iron and / or other sensors - the software will also be different and it will also need to be updated.
Next, we write a client for Android. Everything is simple here - we add the device to the list accessible by its “token”, and if the device exists and is activated, we get access to it. In order not to drive a complex token manually - we encrypt it into a QR code that we put on the device case (I didn’t have time to apply it, so I just printed it, laminated it and put it in the case). When adding a device to a smartphone, we just need to scan the QR code.
By the time the software was ready, the corps arrived. We make a drawing for cutting holes in this handsome man and rent to any advertising agency. They do everything fast and cheap on the mill. We place the
display
We collect the components in the case and get a couple of unpleasant moments. First, the GPS antenna with my transmitter was passive - ceramic, and despite the fact that it is attached outside the device, it finds satellites for a very long time. Apparently, any proximity to the metal is harmful to her, because outside the body the speed of finding satellites was about twice as fast. Secondly, it is very difficult to solder something with my Chinesekettlesoldering iron to the microUSB connector feet. Therefore it was necessary to fix the connector with hot glue. Next time I will do such things only on textolite. (Oh, how I dream of a soldering station!)

Putting it all into the case
Everything is assembled - we are testing.
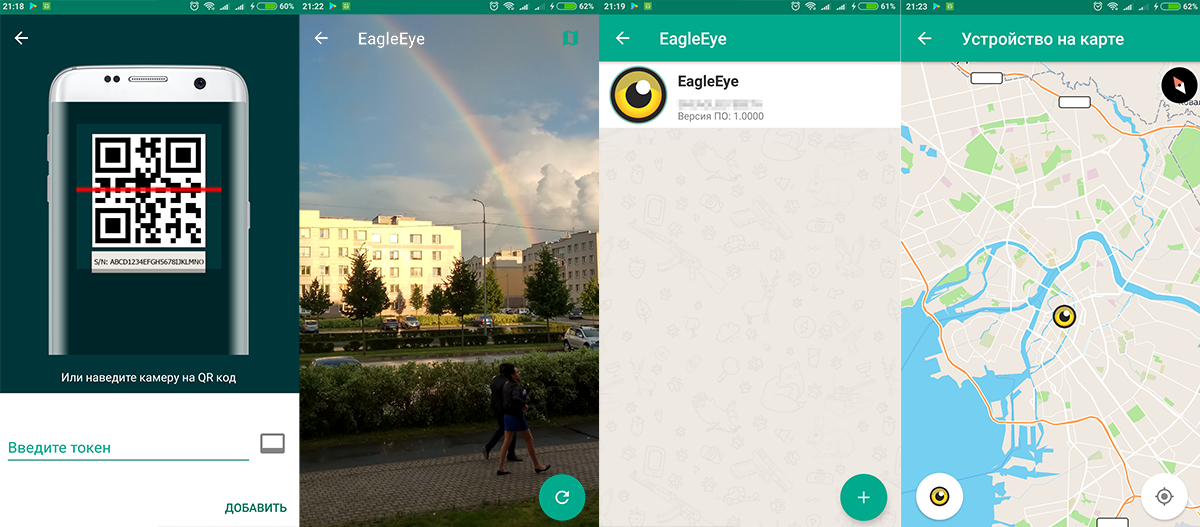
Application screens
Works with a bang, images can be transmitted in two modes - in low quality mode (to adjust the device's lens to a target) and in high quality mode, so to speak, “combat mode”.
Unfortunately, I am not the owner of the weapon, I don’t even have anything to do, and I can’t make a photo report on the shooting range myself. He managed home tests and decided to donate the device to professionals for running in.
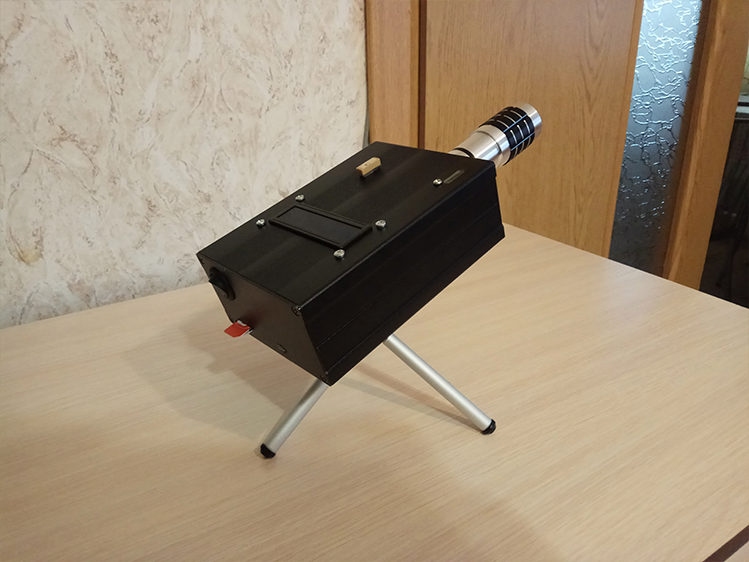
We bring the final touch: we buy a “weapon” case, we pack everything beautifully and carry it to the post office.


UPD: At the time of this writing, they have already given feedback that the device does not need a “telescope”, since everything is perfectly visible without it. Asked to mark new hits on the target.
Well, the launch video:
I apologize for the quality of the video, shot not for the report.
In conclusion, I want to say that I discovered a new direction in self-development. I always thought thatmy hands from jo transistor works for magic.
The device was able to identify both pros and cons.
Pros:
Minuses:
Having tried the first pancake - I would like more. Namely - a more professional approach. It is necessary to correct errors in the current implementation and add new features, up to a ballistic calculator with humidity, temperature, wind and distance sensors. Next, there is an idea for "deaf" places where the device will work without the Internet at all. So most likely this article is only the beginning of a series of articles.
Shooting and running for the day, I decided that I needed to somehow simplify this process. At the shooting range, you want to have fun, and not roll over a kilometer every three shots for amendments. The result of thought and decision was a device that shows the target right in the mobile phone.
Attention, under the cut a lot of photos!
Returning from the shooting, one thought did not give rest - you need to somehow detect the hits and display the results somewhere near the shooter. At first there were ideas to make a special target, when it hits the contacts and the data is transferred to the arrow. But such an idea had to be rejected, since the target was a one-time target. Then there was the idea to scan the target for irregularities, but it was also quite difficult, plus it was not immediately clear how to calibrate it in field conditions. The simplest and most correct solution lay on the surface - you just need to photograph the target, and the hits are already looking at the photo. So: the device must be compact, self-powered, work for a long time and be quite unpretentious. And most importantly - it should be very easy to use. Ideally - turned on and went to take a position.
Getting to the assembly.
We will need:
- Raspberry Pi so that this thing can think
- Camera to see
- 3G modem to talk
- GPS sensor so that the thing knows where it is (we will display the distance from the arrow to the target)
- Battery , so she ate tasty.
I had more than half of what we needed, so there was almost nothing to buy.
The technical part is ready for assembly - now you need to think about the aesthetic. At first it was decided to order a beautiful case for all this. And here I faced the first problem. The sites are full of housing manufacturing services, but the prices are so high that I stopped wondering at the clumsy design of domestic appliances and understood the
Let's go another way - we order on the Asian site a regular aluminum case for DIY. Costing 700 rubles. Beautiful, neat aluminum case. Already polished. The most important thing is not to miss the size. And we drill holes ourselves.
In the same place we find a mini-tripod and a magnifying nozzle (telescope) on the lens.
There are no difficulties with the assembly - the raspberry has a connector for the camera, and the GPIO of the legs is enough for the display and the GPS sensor.
(we connect the information display and GPS)
For power supply, we use a set of 18650 batteries. Each battery is 2600 mAh each, and a pack of 4 pieces gives us a total of more than 10,000 mAh. This is pretty good for Malinka and covers our needs with interest. We collect the charger for our battery and try to power the raspberry.
We glue the batteries together and very carefully solder the contacts. It is better to use contact welding.
While our body is on the way, let's start writing the program part. Following the proverb “Take the burden on your own so as not to fall while walking,” we will use only those tools that have a lot of experience to work with. Therefore, in C ++, we will not threaten, but take your favorite Java.
I will not spread the code, but I will explain the essence of what has been done.
To begin, write the server. To do this, we are suitable Jetty in tying with MySQL. The server must register the device and establish a connection between the device and the smartphone.
Install on raspberry linux, connect java and write the first client. The client must be able to log in to our server, get a team to take pictures, take a photo and send the result to the server. A little thought, as we write a system of software updates and distribution of versions. Surely, such a device will be needed by someone else in case there is another iron and / or other sensors - the software will also be different and it will also need to be updated.
Next, we write a client for Android. Everything is simple here - we add the device to the list accessible by its “token”, and if the device exists and is activated, we get access to it. In order not to drive a complex token manually - we encrypt it into a QR code that we put on the device case (I didn’t have time to apply it, so I just printed it, laminated it and put it in the case). When adding a device to a smartphone, we just need to scan the QR code.
By the time the software was ready, the corps arrived. We make a drawing for cutting holes in this handsome man and rent to any advertising agency. They do everything fast and cheap on the mill. We place the
display
We collect the components in the case and get a couple of unpleasant moments. First, the GPS antenna with my transmitter was passive - ceramic, and despite the fact that it is attached outside the device, it finds satellites for a very long time. Apparently, any proximity to the metal is harmful to her, because outside the body the speed of finding satellites was about twice as fast. Secondly, it is very difficult to solder something with my Chinese
Putting it all into the case
Everything is assembled - we are testing.
Application screens
Works with a bang, images can be transmitted in two modes - in low quality mode (to adjust the device's lens to a target) and in high quality mode, so to speak, “combat mode”.
Unfortunately, I am not the owner of the weapon, I don’t even have anything to do, and I can’t make a photo report on the shooting range myself. He managed home tests and decided to donate the device to professionals for running in.
We bring the final touch: we buy a “weapon” case, we pack everything beautifully and carry it to the post office.
UPD: At the time of this writing, they have already given feedback that the device does not need a “telescope”, since everything is perfectly visible without it. Asked to mark new hits on the target.
Well, the launch video:
I apologize for the quality of the video, shot not for the report.
In conclusion, I want to say that I discovered a new direction in self-development. I always thought that
The device was able to identify both pros and cons.
Pros:
- Price.
- Independence from distance and direct visibility. Image quality is always equally good and does not depend on distance. You can monitor targets from behind cover.
- Unpretentious and easy to use.
- Can be used for other purposes.
- You can combine an unlimited number of devices to monitor a large number of targets.
Minuses:
- The device must be in the coverage area of the mobile Internet, which is not always possible according to shooters reviews.
- Passive GPS antenna. Need to change to active.
Having tried the first pancake - I would like more. Namely - a more professional approach. It is necessary to correct errors in the current implementation and add new features, up to a ballistic calculator with humidity, temperature, wind and distance sensors. Next, there is an idea for "deaf" places where the device will work without the Internet at all. So most likely this article is only the beginning of a series of articles.