July 15, 2012 at 18:39
Restore defocused and blurry images. Practice
Not so long ago I published the first part of an article on the restoration of defocused and blurry images on the hub , which described the theoretical part. Judging by the comments, this topic aroused a lot of interest and I decided to continue this direction and show you what problems appear in the practical implementation of seemingly simple formulas.
In addition to this, I wrote a demo program that implements basic algorithms for eliminating defocus and blur. The program is posted on GitHub along with source codes and distributions.
The result of processing a real blurred image (not with synthetic blur) is shown below. The original image was taken with a Canon 500D camera with an EF 85mm / 1.8 lens. Focus was set manually to get blur. As you can see, the text is completely unreadable, only the Windows 7 dialog box is guessed.

And here is the result of the processing:
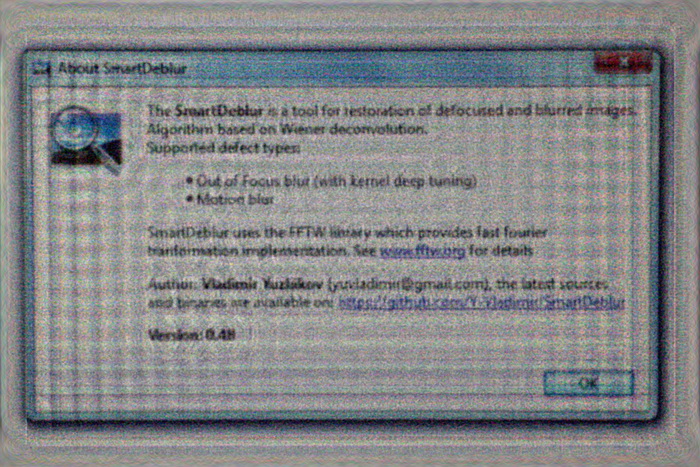
Almost all the text is read quite well, although some characteristic distortions appeared.
Under the cat a detailed description of the problems of deconvolution, methods for solving them, as well as many examples and comparisons. Caution, a lot of pictures!
A detailed description of the theory was in the first part, but still I recall briefly the main points. In the process of distortion from each pixel of the original image, a certain spot is obtained in the case of defocusing and a segment for the case of a conventional smear. All this is superimposed on each other and as a result we get a distorted image - this is called image convolution or convolution. The way in which one pixel is smeared is called the distortion function. Other synonyms are PSF (Point spread function, i.e. the distribution function of a point), the kernel of the distorting operator, kernel, and others.
To restore the original image, we need to somehow reverse the convolution, while not forgetting about the noise. But this is not so simple - if you act, as they say, “in the forehead”, you get a huge system of equations that cannot be solved in an acceptable time.
But the Fourier transform and the convolution theorem come to our aid, which states that the convolution operation in the spatial domain is equivalent to ordinary multiplication in the frequency domain (moreover, element-wise multiplication, not matrix multiplication). Accordingly, the inverse convolution operation is equivalent to division in the frequency domain. Therefore, the distortion process can be rewritten as follows:
 (1),
(1),
where all elements are Fourier images of the corresponding functions:
G (u, v) is the result of distortion, i.e. what we observe as a result (blurry or defocused image)
H (u, v) is a distorting function, PSF
F (u, v) is the original undistorted image
N (u, v) is additive noise
So, we need to restore the maximum approximation to the original image F (u, v). Just dividing the right and left parts by H (u, v) will not work, because in the presence of even a very small noise (and it is always on real images), the term N (u, v) / H (u, v) will dominate, which will lead to the fact that the original image will be completely hidden under noise.
To solve this problem, more sustainable methods have been developed, one of which is the Wiener filter. He considers the image and noise as random processes and finds such an estimate f 'for the undistorted image f so that the standard deviation of these quantities is minimal:
 (2)
(2)
The function S here denotes the energy spectra of the noise and the original image, respectively - since these quantities are rarely known, then the fraction S n / S f is replaced by some constant K, which can be approximately characterized as a signal-to-noise ratio.
So, let's take the described Wiener filter as a starting point - generally speaking, there are many other approaches, but they all give approximately the same results. So everything described below will be true for other methods of deconvolution.
The main task is to obtain an estimate of the point distribution function (PSF). This can be done in several ways:
1. Modeling.Very difficult and time-consuming, as modern lenses consist of a dozen, different lenses and optical elements, some of which are aspherical in shape, each grade of glass has its own unique characteristics of the refraction of rays with a particular wavelength. As a result, the task of correctly calculating the propagation of light in such a complex optical system, taking into account the influence of aperture, reflections, etc. becomes almost impossible. And its solution, perhaps, is available only to developers of modern lenses.
2. Direct observation.Recall that PSF is what every point in the image turns into. Those. if we form a black background and one white dot on it, and then photograph it with the desired defocus value, then we will get the PSF directly. It seems simple, but there are many nuances and subtleties.
3. Calculation or indirect observation. We look at formula (1) of the distortion process and think about how to get H (u, v)? The solution comes right away - you need to have the original F (u, v) and distorted G (u, v) images. Then, dividing the Fourier transform of the distorted image into the Fourier transform of the original image, we get the desired PSF.
Before we get into the details, I’ll tell you a bit of the theory of defocusing with respect to optics. An ideal lens has a PSF in the form of a circle, so each point turns into a circle of some diameter. By the way, this is a surprise for many, because at first glance it seems that defocus just shades the entire image. This also explains why the Photoshop blurring of Gauss does not at all resemble the background pattern (also called bokeh) that we see with lenses. In fact, these are two different types of blurring - according to Gauss, each point turns into a fuzzy spot (Gaussian bell), and defocus turns each point into a circle. Accordingly, different results.
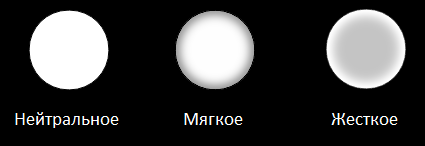
But we do not have ideal lenses and in reality we get one or another deviation from the ideal circle. This is what forms the unique bokeh pattern of each lens, forcing photographers to spend a lot of money on lenses with beautiful bokeh :) Bokeh can be conditionally divided into three types:
- Neutral. This is the closest possible approach to the circle
- Soft. When the edges are less bright than the center
- Rigid. When the edges have more brightness than the center.
The figure below illustrates this:
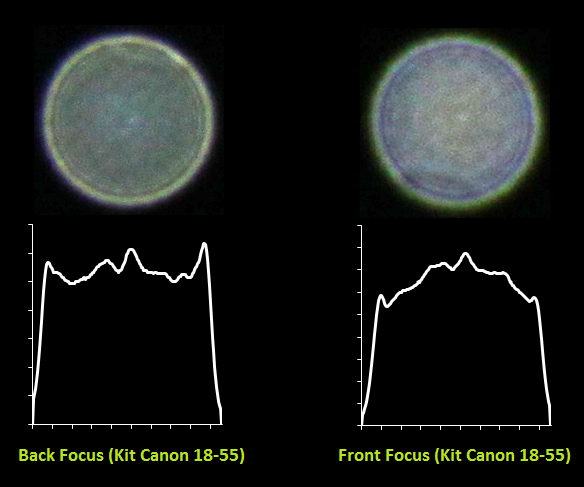
Moreover, the type of bokeh - soft or hard also depends on whether the front focus or the rear. Those. the camera is focused in front of or behind the subject. For example, if the lens has a soft bokeh pattern in the front focus (when, say, the focus is on the face and the background is blurred), then the bokeh of the same lens will be hard in the back focus. And vice versa. Only neutral bokeh does not change depending on the type of focus.
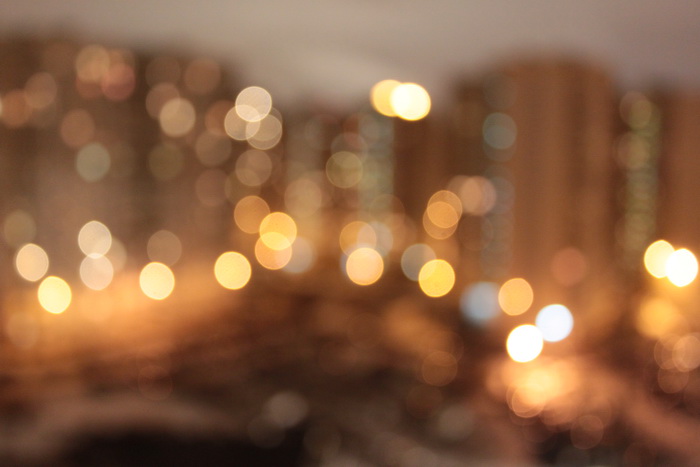
But this is not all - since each lens has certain geometric distortions, the type of PSF also depends on the position. In the center - close to the circle, along the edges - ellipses and other flattened figures. This can be clearly seen in the next photo - pay attention to the lower right corner:
Now, let us consider in more detail the last two methods of obtaining PSF.
As mentioned above, it is necessary to form a black background and a white dot. But just printing one dot on the printer is not enough. A much greater difference is needed in the brightness of the black background and the white dot, because one point will be blurred in a large circle - accordingly, it must have a greater brightness in order to be visible after blurring.
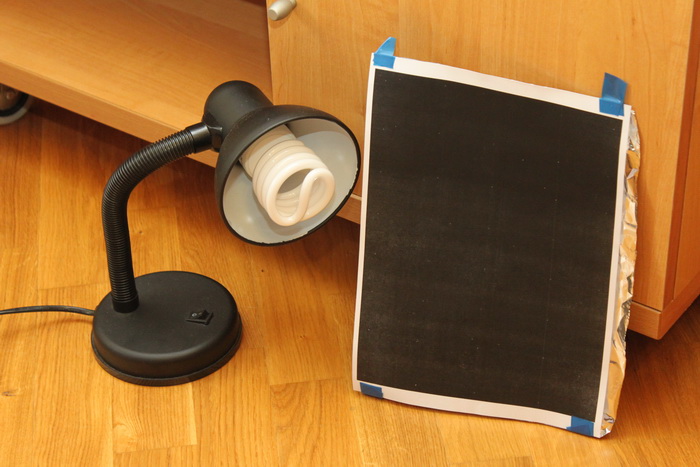
To do this, I printed out Malevich’s black square (yes, there’s a lot of toner left, but what can’t be done for the sake of science!), I applied foil on the other side, because a sheet of paper nevertheless shines well and pierced a small hole with a needle. Then he built a simple structure of a 200-watt lamp and a sandwich of black sheet and foil. It looked like this:
Then he turned on the lamp, closed it with a sheet, turned off the general light and took several photos using two lenses - the Canon EF 18-55 kit and the Canon EF 85mm / 1.8 portrait. From the resulting photos, I cut out the PSF and then built the profile graphics.
Here's what happened for the whale lens:
And for the portrait portrait of Canon EF 85mm / 1.8: You
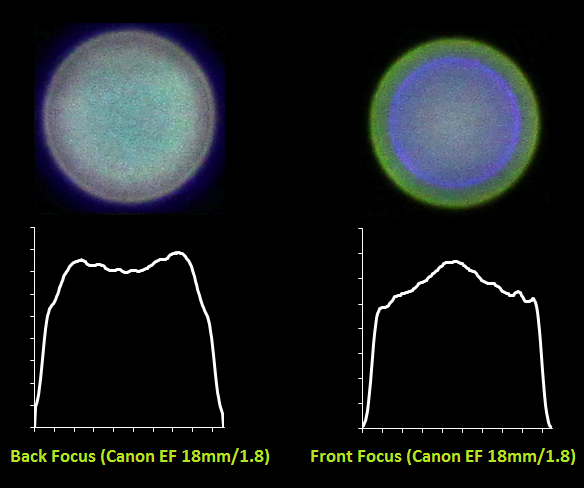
can clearly see how the nature of the bokeh changes from hard to soft for the same lens in the case of front and back focus. You can also see how difficult the PSF is - it is very far from the ideal circle. Large chromatic aberrations are also visible for the portrait because of the large aperture of the lens and the small aperture of 1.8.
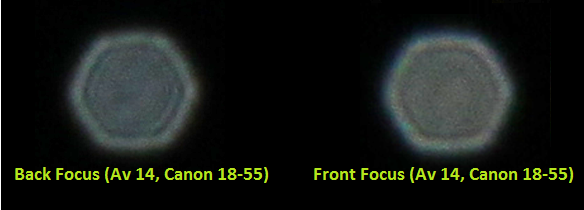
And here are a couple of shots with aperture of 14 - it shows how the shape has changed from a circle to a regular hexagon:
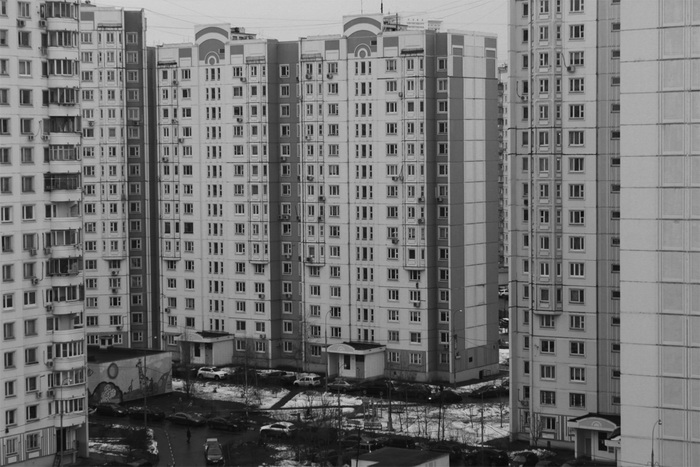
The next approach is indirect observation. For this, as described above, we need to have the original F (u, v) and distorted G (u, v) images. How to get them? Very simple - you need to put the camera on a tripod and take one sharp and one blurry picture of the same image. Further, by dividing the Fourier transform of the distorted image by the Fourier transform of the original image, we obtain the Fourier transform of our desired PSF. Then, applying the inverse Fourier transform, we get the PSF in the direct form.
I took two pictures:
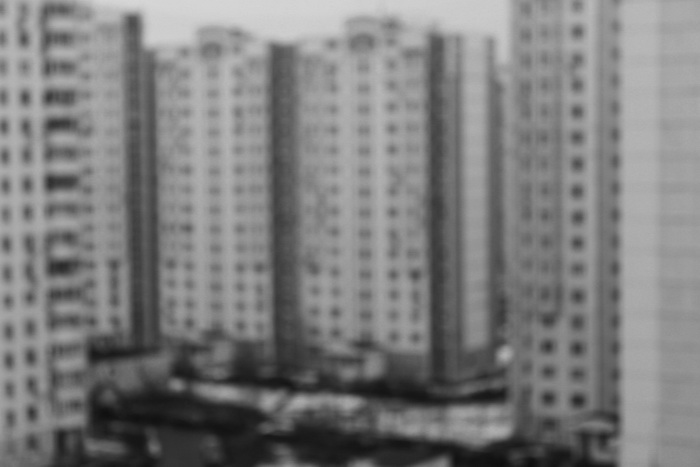
And as a result I got this PSF:
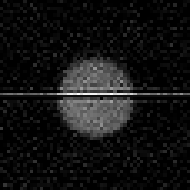
Don’t pay attention to the horizontal line, this is an artifact after the Fourier transform in matlab. The result, let's say, is mediocre - a lot of noise and PSF details are not so visible. However, the method has a right to exist.
The described methods can and should be used to build PSF when restoring blurry images. Because the quality of restoration of the original image directly depends on how close this function is to the real one. If the assumed and real PSF do not match, numerous artifacts will be observed in the form of “ringing”, halos and a decrease in clarity. In most cases, it is assumed that the PSF is in the form of a circle, however, to achieve the maximum degree of recovery, it is recommended to play with the shape of this function by trying several options from common lenses - as we have seen, the shape of the PSF can vary significantly depending on the aperture, lens and other conditions.
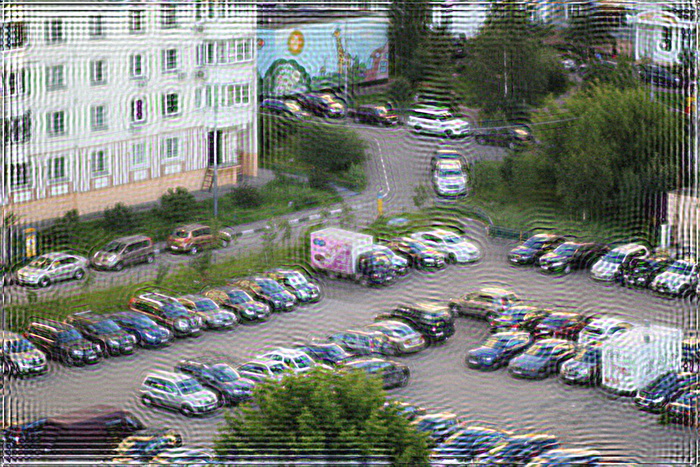
The next problem is that if you directly apply the Wiener filter, then at the edges of the image there will be a kind of “ringing”. Its reason, if you explain it on your fingers, is this: when deconvolution is done for those points that are located on the edges, when assembling, there are not enough pixels that are outside the edges of the image and they are either taken equal to zero or taken from the opposite side (depends from the implementation of the Wiener filter and the Fourier transform). It looks like this:
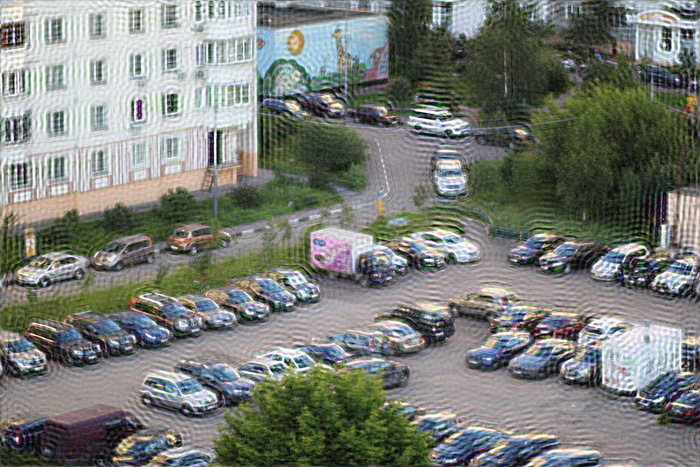
One solution to avoid this is to preprocess the edges of the image. They are blurred using the same PSF. In practice, this is implemented as follows - the input image F (x, y) is taken, blurred using PSF and F '(x, y) is obtained, then the final input image F' '(x, y) is formed by summing F (x, y ) and F '(x, y) using the weight function, which at the edges takes the value 1 (the whole point is taken from the blurry F' (x, y)), and at a distance equal to (or greater) the radius of the PSF from the edge of the image, takes the value 0. The result is this - the ringing at the edges has disappeared:
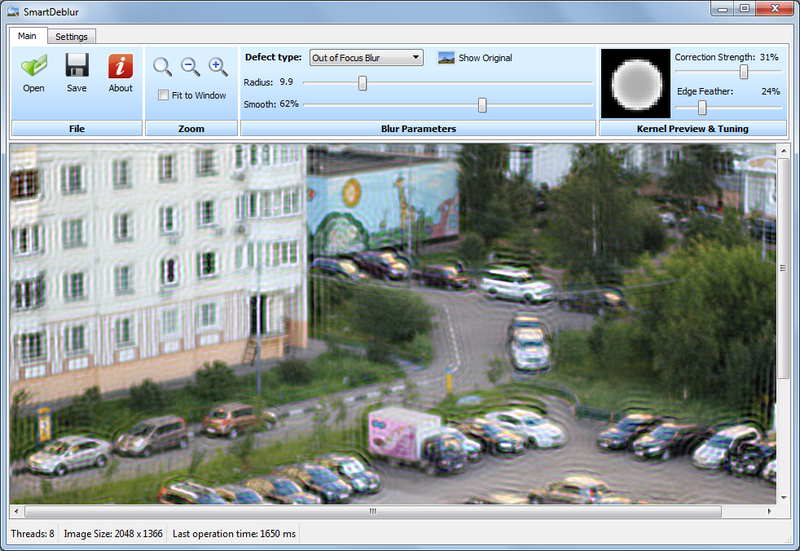
I made a program demonstrating the restoration of blurry and defocused images. It is written in C ++ using Qt. As the implementation of the Fourier transform, I chose the FFTW library as the fastest of open source implementations. My program is called SmartDeblur, you can download it at github.com/Y-Vladimir/SmartDeblur , all sources are open under the GPL v3 license.
Screenshot of the main window:
Main functions:
- High speed. Processing an image of 2048 * 1500 pixels in size takes about 300ms in Preview mode (when the sliders are moved) and 1.5 seconds in finish mode (when the sliders are released).
- Selection of parameters in real-time mode. There is no need to click the Preview buttons, everything is done automatically, you just need to move the sliders of the distortion settings
- All processing is for the image in full resolution. Those. there is no small preview window and Apply buttons.
- Support for recovering blurry and defocused images
- Ability to adjust the appearance of PSF
The main emphasis in the development was placed on speed. As a result, it turned out to be such that it surpasses commercial analogues tenfold. All processing is done in an adult way, in a separate thread. For 300 ms, the program manages to generate a new PSF, make 3 Fourier transforms, do deconvolution according to Wiener and display the result - and all this for an image of 2048 * 1500 pixels in size. In finishing mode, 12 Fourier transforms are done (3 for each channel, plus one for each channel to suppress edge effects) - this takes about 1.5 seconds. All times are for the Core i7 processor.
While the program has a number of bugs and features - let's say, for some settings, the image becomes rippled. It was not possible to find out the exact reason, but presumably - the features of the FFTW library.
Well, in general, during the development process, I had to circumvent many hidden problems as in FFTW (for example, images with an odd size of one of the sides, such as 423 * 440, are not supported.). There were problems with Qt - it turned out that rendering the line with Antialiasing turned on does not work exactly. At some values of the angles, the line jumped to fractions of a pixel, which gave artifacts in the form of strong ripples. To work around this problem, added the lines:
It remains to compare the quality of processing with commercial counterparts.
I chose the 2 most famous programs
1. Topaz InFocus - www.topazlabs.com/infocus
2. Focus Magic - www.focusmagic.com
For the purity of the experiment, we will take those advertising images that are listed on the official websites - it is guaranteed that the parameters of those programs selected as optimal (because I think the developers carefully selected the images and selected the parameters before publishing in advertising on the site).
So, let's go - restore the grease:
We take an example from the Topaz InFocus website:
www.topazlabs.com/infocus/_images/licenseplate_compare.jpg We

process it with these parameters:
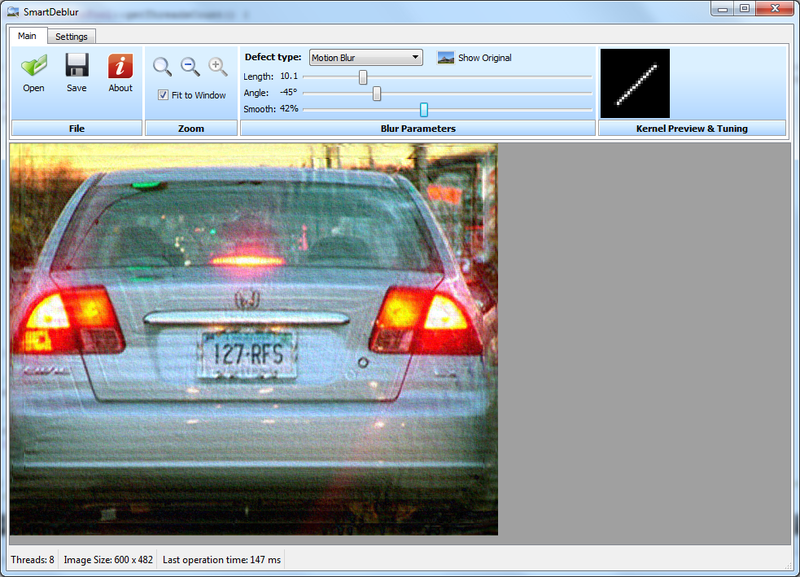
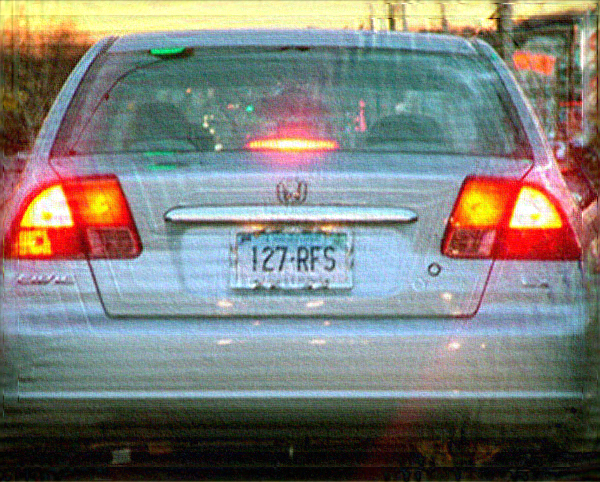
and we get the following result:
Result from Topaz InFocus website:
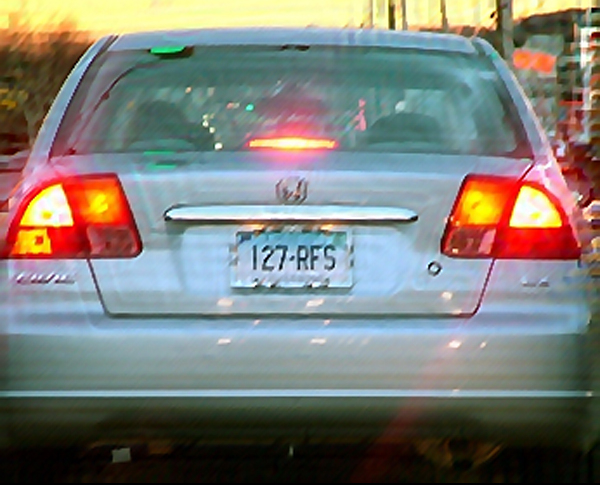
The result is very similar, this suggests that the basis of Topaz InFocus uses a similar deconvolution algorithm plus post-processing in the form of smoothing-out noise and underlining contours.
We could not find any examples of severe defocusing on the site of this program, and it is not intended for this (the maximum blur radius is only a few pixels).
One more thing can be noted - the angle of inclination was exactly 45 degrees, and the length of the smear was 10 pixels. This suggests that the image is artificially blurred. This fact is also supported by the fact that the recovery quality is very good.
Example number two is restoring defocus. To do this, take an example from the Focus Magic website:www.focusmagic.com/focusing-examples.htm
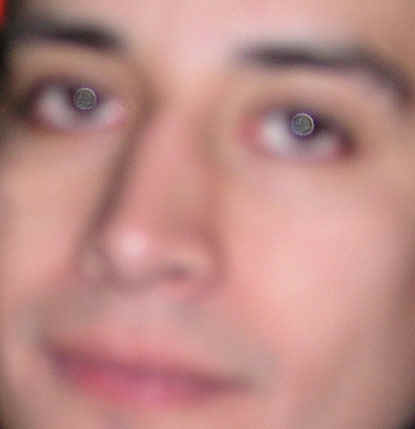
We got this result:
It is not so obvious what is better.
On this I would like to end this article. Although I still wanted to write a lot of things, the already long text turned out. I would be very grateful if you try to download SmartDeblur and test on real images - I, unfortunately, do not have many defocused and blurry images, everything was deleted.
And I will be especially grateful if you send me (there is soap in the profile) your feedback and examples of successful / unsuccessful recoveries. Well, please report all bugs, comments, suggestions - as the application is still somewhat damp and a little unstable.
PS Sources are not very clean in terms of style yet - there are still a bunch of memory leaks, I haven’t managed to transfer them to smart pointers yet, so after several images they may stop opening files. But overall it works.
Link to SmartDeblur:github.com/Y-Vladimir/SmartDeblur
UPD: Continuation Link
Vladimir Yuzhikov
In addition to this, I wrote a demo program that implements basic algorithms for eliminating defocus and blur. The program is posted on GitHub along with source codes and distributions.
The result of processing a real blurred image (not with synthetic blur) is shown below. The original image was taken with a Canon 500D camera with an EF 85mm / 1.8 lens. Focus was set manually to get blur. As you can see, the text is completely unreadable, only the Windows 7 dialog box is guessed.
And here is the result of the processing:
Almost all the text is read quite well, although some characteristic distortions appeared.
Under the cat a detailed description of the problems of deconvolution, methods for solving them, as well as many examples and comparisons. Caution, a lot of pictures!
Recall the theory
A detailed description of the theory was in the first part, but still I recall briefly the main points. In the process of distortion from each pixel of the original image, a certain spot is obtained in the case of defocusing and a segment for the case of a conventional smear. All this is superimposed on each other and as a result we get a distorted image - this is called image convolution or convolution. The way in which one pixel is smeared is called the distortion function. Other synonyms are PSF (Point spread function, i.e. the distribution function of a point), the kernel of the distorting operator, kernel, and others.
To restore the original image, we need to somehow reverse the convolution, while not forgetting about the noise. But this is not so simple - if you act, as they say, “in the forehead”, you get a huge system of equations that cannot be solved in an acceptable time.
But the Fourier transform and the convolution theorem come to our aid, which states that the convolution operation in the spatial domain is equivalent to ordinary multiplication in the frequency domain (moreover, element-wise multiplication, not matrix multiplication). Accordingly, the inverse convolution operation is equivalent to division in the frequency domain. Therefore, the distortion process can be rewritten as follows:
(1), where all elements are Fourier images of the corresponding functions:
G (u, v) is the result of distortion, i.e. what we observe as a result (blurry or defocused image)
H (u, v) is a distorting function, PSF
F (u, v) is the original undistorted image
N (u, v) is additive noise
So, we need to restore the maximum approximation to the original image F (u, v). Just dividing the right and left parts by H (u, v) will not work, because in the presence of even a very small noise (and it is always on real images), the term N (u, v) / H (u, v) will dominate, which will lead to the fact that the original image will be completely hidden under noise.
To solve this problem, more sustainable methods have been developed, one of which is the Wiener filter. He considers the image and noise as random processes and finds such an estimate f 'for the undistorted image f so that the standard deviation of these quantities is minimal:
(2) The function S here denotes the energy spectra of the noise and the original image, respectively - since these quantities are rarely known, then the fraction S n / S f is replaced by some constant K, which can be approximately characterized as a signal-to-noise ratio.
How to get PSF
So, let's take the described Wiener filter as a starting point - generally speaking, there are many other approaches, but they all give approximately the same results. So everything described below will be true for other methods of deconvolution.
The main task is to obtain an estimate of the point distribution function (PSF). This can be done in several ways:
1. Modeling.Very difficult and time-consuming, as modern lenses consist of a dozen, different lenses and optical elements, some of which are aspherical in shape, each grade of glass has its own unique characteristics of the refraction of rays with a particular wavelength. As a result, the task of correctly calculating the propagation of light in such a complex optical system, taking into account the influence of aperture, reflections, etc. becomes almost impossible. And its solution, perhaps, is available only to developers of modern lenses.
2. Direct observation.Recall that PSF is what every point in the image turns into. Those. if we form a black background and one white dot on it, and then photograph it with the desired defocus value, then we will get the PSF directly. It seems simple, but there are many nuances and subtleties.
3. Calculation or indirect observation. We look at formula (1) of the distortion process and think about how to get H (u, v)? The solution comes right away - you need to have the original F (u, v) and distorted G (u, v) images. Then, dividing the Fourier transform of the distorted image into the Fourier transform of the original image, we get the desired PSF.
About bokeh
Before we get into the details, I’ll tell you a bit of the theory of defocusing with respect to optics. An ideal lens has a PSF in the form of a circle, so each point turns into a circle of some diameter. By the way, this is a surprise for many, because at first glance it seems that defocus just shades the entire image. This also explains why the Photoshop blurring of Gauss does not at all resemble the background pattern (also called bokeh) that we see with lenses. In fact, these are two different types of blurring - according to Gauss, each point turns into a fuzzy spot (Gaussian bell), and defocus turns each point into a circle. Accordingly, different results.
But we do not have ideal lenses and in reality we get one or another deviation from the ideal circle. This is what forms the unique bokeh pattern of each lens, forcing photographers to spend a lot of money on lenses with beautiful bokeh :) Bokeh can be conditionally divided into three types:
- Neutral. This is the closest possible approach to the circle
- Soft. When the edges are less bright than the center
- Rigid. When the edges have more brightness than the center.
The figure below illustrates this:
Moreover, the type of bokeh - soft or hard also depends on whether the front focus or the rear. Those. the camera is focused in front of or behind the subject. For example, if the lens has a soft bokeh pattern in the front focus (when, say, the focus is on the face and the background is blurred), then the bokeh of the same lens will be hard in the back focus. And vice versa. Only neutral bokeh does not change depending on the type of focus.
But this is not all - since each lens has certain geometric distortions, the type of PSF also depends on the position. In the center - close to the circle, along the edges - ellipses and other flattened figures. This can be clearly seen in the next photo - pay attention to the lower right corner:
Now, let us consider in more detail the last two methods of obtaining PSF.
PSF - Direct Observation
As mentioned above, it is necessary to form a black background and a white dot. But just printing one dot on the printer is not enough. A much greater difference is needed in the brightness of the black background and the white dot, because one point will be blurred in a large circle - accordingly, it must have a greater brightness in order to be visible after blurring.
To do this, I printed out Malevich’s black square (yes, there’s a lot of toner left, but what can’t be done for the sake of science!), I applied foil on the other side, because a sheet of paper nevertheless shines well and pierced a small hole with a needle. Then he built a simple structure of a 200-watt lamp and a sandwich of black sheet and foil. It looked like this:
Then he turned on the lamp, closed it with a sheet, turned off the general light and took several photos using two lenses - the Canon EF 18-55 kit and the Canon EF 85mm / 1.8 portrait. From the resulting photos, I cut out the PSF and then built the profile graphics.
Here's what happened for the whale lens:
And for the portrait portrait of Canon EF 85mm / 1.8: You
can clearly see how the nature of the bokeh changes from hard to soft for the same lens in the case of front and back focus. You can also see how difficult the PSF is - it is very far from the ideal circle. Large chromatic aberrations are also visible for the portrait because of the large aperture of the lens and the small aperture of 1.8.
And here are a couple of shots with aperture of 14 - it shows how the shape has changed from a circle to a regular hexagon:
PSF - Calculation or Indirect Observation
The next approach is indirect observation. For this, as described above, we need to have the original F (u, v) and distorted G (u, v) images. How to get them? Very simple - you need to put the camera on a tripod and take one sharp and one blurry picture of the same image. Further, by dividing the Fourier transform of the distorted image by the Fourier transform of the original image, we obtain the Fourier transform of our desired PSF. Then, applying the inverse Fourier transform, we get the PSF in the direct form.
I took two pictures:
And as a result I got this PSF:
Don’t pay attention to the horizontal line, this is an artifact after the Fourier transform in matlab. The result, let's say, is mediocre - a lot of noise and PSF details are not so visible. However, the method has a right to exist.
The described methods can and should be used to build PSF when restoring blurry images. Because the quality of restoration of the original image directly depends on how close this function is to the real one. If the assumed and real PSF do not match, numerous artifacts will be observed in the form of “ringing”, halos and a decrease in clarity. In most cases, it is assumed that the PSF is in the form of a circle, however, to achieve the maximum degree of recovery, it is recommended to play with the shape of this function by trying several options from common lenses - as we have seen, the shape of the PSF can vary significantly depending on the aperture, lens and other conditions.
Edge effects
The next problem is that if you directly apply the Wiener filter, then at the edges of the image there will be a kind of “ringing”. Its reason, if you explain it on your fingers, is this: when deconvolution is done for those points that are located on the edges, when assembling, there are not enough pixels that are outside the edges of the image and they are either taken equal to zero or taken from the opposite side (depends from the implementation of the Wiener filter and the Fourier transform). It looks like this:
One solution to avoid this is to preprocess the edges of the image. They are blurred using the same PSF. In practice, this is implemented as follows - the input image F (x, y) is taken, blurred using PSF and F '(x, y) is obtained, then the final input image F' '(x, y) is formed by summing F (x, y ) and F '(x, y) using the weight function, which at the edges takes the value 1 (the whole point is taken from the blurry F' (x, y)), and at a distance equal to (or greater) the radius of the PSF from the edge of the image, takes the value 0. The result is this - the ringing at the edges has disappeared:
Practical implementation
I made a program demonstrating the restoration of blurry and defocused images. It is written in C ++ using Qt. As the implementation of the Fourier transform, I chose the FFTW library as the fastest of open source implementations. My program is called SmartDeblur, you can download it at github.com/Y-Vladimir/SmartDeblur , all sources are open under the GPL v3 license.
Screenshot of the main window:
Main functions:
- High speed. Processing an image of 2048 * 1500 pixels in size takes about 300ms in Preview mode (when the sliders are moved) and 1.5 seconds in finish mode (when the sliders are released).
- Selection of parameters in real-time mode. There is no need to click the Preview buttons, everything is done automatically, you just need to move the sliders of the distortion settings
- All processing is for the image in full resolution. Those. there is no small preview window and Apply buttons.
- Support for recovering blurry and defocused images
- Ability to adjust the appearance of PSF
The main emphasis in the development was placed on speed. As a result, it turned out to be such that it surpasses commercial analogues tenfold. All processing is done in an adult way, in a separate thread. For 300 ms, the program manages to generate a new PSF, make 3 Fourier transforms, do deconvolution according to Wiener and display the result - and all this for an image of 2048 * 1500 pixels in size. In finishing mode, 12 Fourier transforms are done (3 for each channel, plus one for each channel to suppress edge effects) - this takes about 1.5 seconds. All times are for the Core i7 processor.
While the program has a number of bugs and features - let's say, for some settings, the image becomes rippled. It was not possible to find out the exact reason, but presumably - the features of the FFTW library.
Well, in general, during the development process, I had to circumvent many hidden problems as in FFTW (for example, images with an odd size of one of the sides, such as 423 * 440, are not supported.). There were problems with Qt - it turned out that rendering the line with Antialiasing turned on does not work exactly. At some values of the angles, the line jumped to fractions of a pixel, which gave artifacts in the form of strong ripples. To work around this problem, added the lines:
    // Workarround to have high accuracy, otherwise drawLine method has some micro-mistakes in the rendering
    QPen pen = kernelPainter.pen();
    pen.setWidthF(1.01);
    kernelPainter.setPen(pen);
Comparison
It remains to compare the quality of processing with commercial counterparts.
I chose the 2 most famous programs
1. Topaz InFocus - www.topazlabs.com/infocus
2. Focus Magic - www.focusmagic.com
For the purity of the experiment, we will take those advertising images that are listed on the official websites - it is guaranteed that the parameters of those programs selected as optimal (because I think the developers carefully selected the images and selected the parameters before publishing in advertising on the site).
So, let's go - restore the grease:
We take an example from the Topaz InFocus website:
www.topazlabs.com/infocus/_images/licenseplate_compare.jpg We
process it with these parameters:
and we get the following result:
Result from Topaz InFocus website:
The result is very similar, this suggests that the basis of Topaz InFocus uses a similar deconvolution algorithm plus post-processing in the form of smoothing-out noise and underlining contours.
We could not find any examples of severe defocusing on the site of this program, and it is not intended for this (the maximum blur radius is only a few pixels).
One more thing can be noted - the angle of inclination was exactly 45 degrees, and the length of the smear was 10 pixels. This suggests that the image is artificially blurred. This fact is also supported by the fact that the recovery quality is very good.
Example number two is restoring defocus. To do this, take an example from the Focus Magic website:www.focusmagic.com/focusing-examples.htm
We got this result:
 | 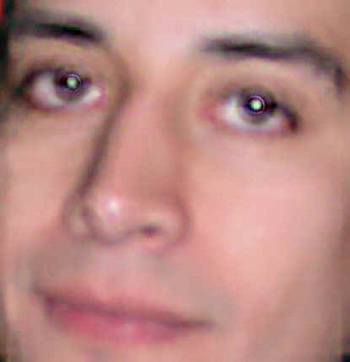 |
| SmartDeblur Result | Focus Magic Result |
It is not so obvious what is better.
Conclusion
On this I would like to end this article. Although I still wanted to write a lot of things, the already long text turned out. I would be very grateful if you try to download SmartDeblur and test on real images - I, unfortunately, do not have many defocused and blurry images, everything was deleted.
And I will be especially grateful if you send me (there is soap in the profile) your feedback and examples of successful / unsuccessful recoveries. Well, please report all bugs, comments, suggestions - as the application is still somewhat damp and a little unstable.
PS Sources are not very clean in terms of style yet - there are still a bunch of memory leaks, I haven’t managed to transfer them to smart pointers yet, so after several images they may stop opening files. But overall it works.
Link to SmartDeblur:github.com/Y-Vladimir/SmartDeblur
UPD: Continuation Link
--Vladimir Yuzhikov