Speech Recognition on STM32F4-Discovery
In this article I want to talk about how you can recognize speech on the microcontroller using the STM32F4-Discovery debug board. Since speech recognition is a rather difficult task even for a computer, in this case it is carried out using the Google service. Speech recognition in this way can be useful in various tasks, for example, in one of the smart home devices.
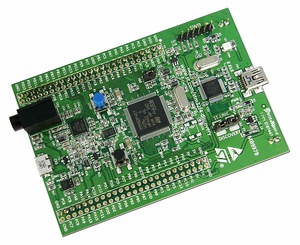
The STM32F4-Discovery debug card differs noticeably from the STM32-Discovery debug card often mentioned in articles. The microcontroller STM32F407VGT6 is installed on it, using the Cortex-M4F architecture, which has 1 MB Flash and 192 KB RAM. The controller is capable of operating at a frequency of 168 MHz.
An audio-DAC with a built-in amplifier (its output is connected to the headphone jack) and a digital MEMS microphone are installed on the debug board, thanks to which it is possible to easily make a device working with sound based on the STM32F4-Discovery.
Speech recognition using Google Voice Search is described here: Article.
In order to recognize any spoken phrase using the microcontroller, you need to perform a number of actions:
• Record the sound in the controller's memory.
• Perform audio encoding.
• Connect to a Google server.
• Send a POST request and encoded audio data to the server.
• Receive a response from the server.
Voice recording
Since the board already has a digital microphone, we will record sound with it. In this case, it is a PDM microphone. It has only two signal outputs - clock and data. If there is a clock signal, a signal encoded using PDM modulation appears on the microphone data output (see Wikipedia: Pulse-density modulation for more details ). On the STM32F4-Discovery, the microphone is connected to SPI / I2S - to receive data from the microphone, it is enough to configure I2S to receive data, and after interruption from I2S, read the received data from the register. These data are stored in the controller memory, and after a sufficient amount of data has been recorded, they are filtered, the result of which are several samples of audio data.
Work with a microphone is described in document AN3998 from ST - it explains the principle of the microphone, the features of its connection and describes the work with the filter function.
On the ST website, among various examples for the board, there is an example of working with sound, but it’s quite sophisticated - the example shows how to play sound from the controller’s memory and from a USB flash drive connected to the board. Sound recording on a flash drive is also demonstrated. I took the code for playing and recording sound from there. Here are just a few errors and imperfections in this code - probably, the example was written in a hurry.
Recoding Sound Encoding
Descriptions of working with the speech recognition service have been repeatedly provided on the Internet. In all cases, the authors use the FLAC audio codec, since Google uses non-standard Speex encoding of data.
This can be seen from the Chromium browser code: The code responsible for recording sound.
The description of the POST request indicates that the data type is “audio / x-speex-with-header-byte”.
That's just that on STM32 it will not be possible to encode data in the FLAC format - there are no such libraries. But Speex code is ported to STM32, so I used this codec for encoding. From the Chromium code, it’s quite easy to understand what the codec modification is like: before the start of each frame of encoded audio data an extra byte is inserted, equal to the length of the frame in bytes.
Sound recording and encoding are performed simultaneously using double buffering: while 160 samples of audio data are being written to one of the buffers, data from the other buffer is encoded into Speex format. The encoded data is stored in the controller memory. Recording takes 2 seconds, resulting in the formation of 2100 bytes of encoded audio data. Sampling frequency - 8 kHz.
Communication with the Google server.
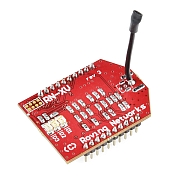
For connection to the Internet, a debugging board with a WIFI module - RN-XV is used. It has a WIFI module RN-171 (bottom of the board), an antenna, 3 setiodes and pin connectors. Communication with the module is via UART, so 4 wires are enough to work with it. The cost of the board in sparkfun, where I ordered it from is $ 35. WIFI itself - the module costs $ 30. Read more about the module on the sparkfun website:RN-XV WiFly Module.
In order to transfer data to the server, you need to connect to it via TCP, and then send a request of this kind:
POST http://www.google.com/speech-api/v1/recognize?xjerr=1&client=chromium&lang=ru-RU HTTP/1.1@#Content-type: audio/x-speex-with-header-byte; rate=8000@#Connection: close@#Content-length: 2100@#@#The program replaces @ # characters with CRLF. After sending the request, you need to send 2100 bytes of encoded audio data to the server. Having received all the data, the server performs speech recognition and transmits the recognized string along with additional information, after which the connection to the server is closed.
After the server response is accepted, the program extracts the recognized line from it and displays it through another UART microcontroller. Data from this UART is transmitted to the computer in the terminal, in the window of which the recognized phrase appears. After that, the controller is ready to start recording a new phrase.
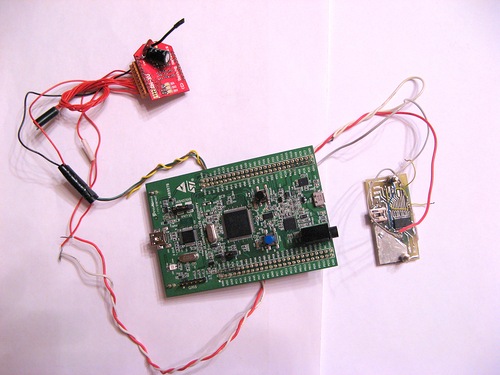
The resulting design looks like this:
And here is how it works:
Update:
Already after I posted the article, I was able to start recording when a loud sound (including speech) appears. For this, the program constantly records and encodes sound. The encoded data is placed in an array. After reaching its end, data begins to fit at its beginning. At the same time, the program constantly checks whether a loud sound has appeared. When it appears, the program saves the value of the record pointer and records for 2 seconds. After stopping the recording, the program copies the data to another buffer. Since it is known at what point the sound appeared, you can take data shortly before. Thus, the first sounds of the word are not lost.
VAD work video:
The program is written in the IAR.
The program allows you to play the recorded phrase before sending it to the server. To do this, it is enough to uncomment some lines in the main function.
There are several projects in the attached archive:
my_audio_test - records and immediately reproduces sound from the microphone.
speex_out - reproduces the sound in Speex format stored in the controller’s Flash memory.
speex_rec - records and encodes sound using Speex for 2 seconds, after which it plays the recording.
speech_wifi - the speech recognition project itself, this project uses WIFI.
speech_wifi_vad is a speech recognition project with VAD, this project uses WIFI.
www.dropbox.com/s/xke5rq8lzi980x5/NEW_VOICE.zip?dl=0