CNC in the hobby workshop (part 2)

→ The first part
→ The second part
→ The third part
In the article we will consider the standard and non-standard use of a CNC router. For that, besides cutting wooden images, you can adapt such a machine. Caution traffic.
Tool change
When I was still considering the purchase of CNC, I reviewed a bunch of videos on Youtube. In most cases, people use such machines for all kinds of monograms, some relief images and the like. I did not plan to cut 3d icons. There were some ideas of various equipment. For their implementation, we needed the most versatile mounting tool. Depending on the type of spindle, with the purchase you could choose one of two options.
1. The first option:

2. The second option:

I chose the 2nd. This is a universal mount with a hole diameter of 43mm. Such a choice made it possible to make several equipments for performing a wide range of operations, from the banal cutting of flat forms to turning.
Basic operations
In my amateurish understanding for a CNC router, the basic operations are:
- Drilling holes
- Cutting out patterns
- Slot cutting
- Any artistic things (well, where without them)
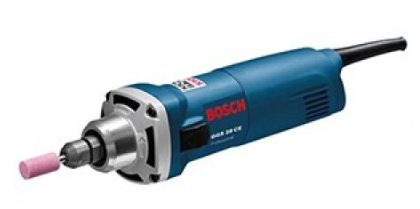
A straight grinding machine from a little-known Bosch company was bought as a spindle:
Everything is simple: we fix the spindle, insert the milling cutter, load the g-code and go! The main difficulty is to find the right spindle speed. If the speed is too high, the tree can burn, and if it is insufficient, the quality suffers. All modes are selected empirically.
Example of the result of the basic operation (vertical bars on the panels):

Additive
When creating cabinet furniture it is often the task to connect 2 panels of a furniture shield to the end. In order for the wood panel not to be bent from time, holes are drilled at regular intervals where the wooden dowels are clogged. The holes in the two panels to be joined must exactly match each other. Offset even a millimeter is not allowed. For drilling these holes, there are special filler mills. They cost sick money (50k +).
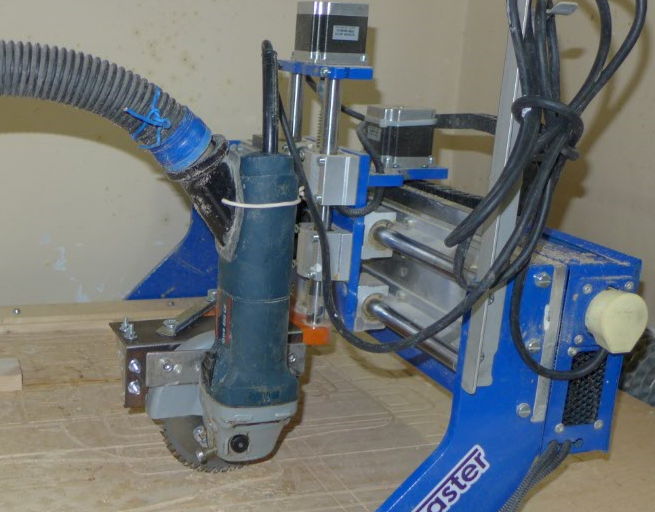
But I also have a unit with a positioning accuracy of 0.05mm (if the seller is not lying). All you need to do is deploy the cutting tool 90 degrees. To do this, replace the spindle on the grinder:
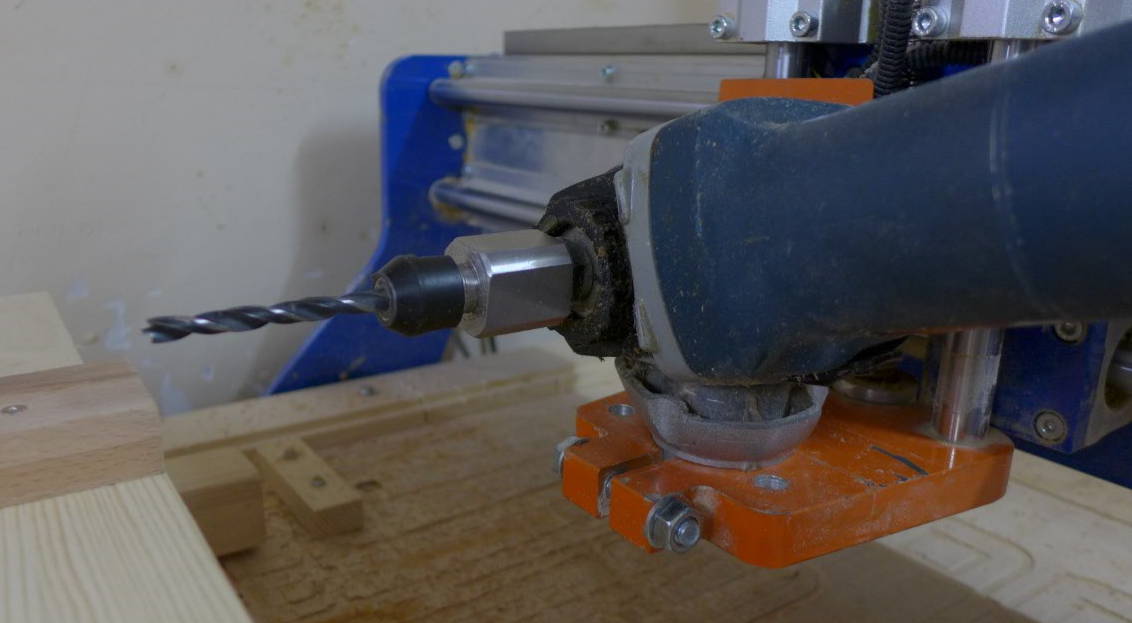
It looks simple, but in order to do this I had to pretty much break my head. I could not pick up a cartridge that could be screwed to the grinder. I had to order such an adapter at the factory:
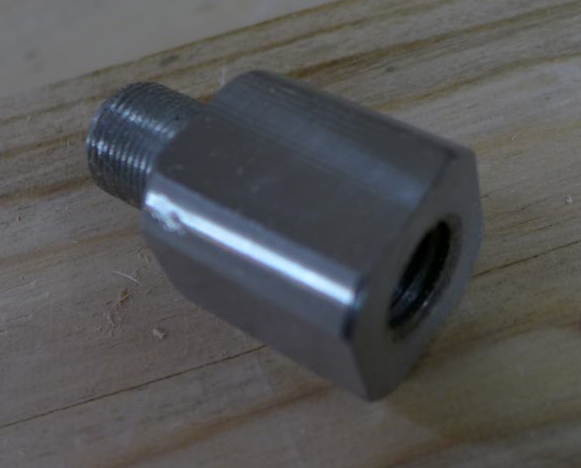
I didn’t do any drawings, I just brought a grinder and a cartridge from the router to the guys and asked them to be friends. The guys were literate, made a perfectly balanced adapter. No beating even at maximum speed, which is not particularly needed for drilling. The price of the question, if my memory serves me, was 4k.
It remained to figure out how to attach the grinder to the CNC. The decision came up with this: from the old broken drill sawed off a piece of gear, to which he bolted the grinder. When assembled, this equipment looks like this:

A small lyrical digression. In the old Soviet-Russian drills, the gearbox housing was often made from a magnesium alloy (as in my case). When working with magnesium, as it turned out, you need to take precautions. I got a spark of magnesium dust from the spark from the grinder, which remained on the workbench after sawing the drill gearbox. Fortunately, the slide was small and always keep a fire extinguisher on hand ...
I tried to adapt the same equipment as a tenoning knife. I wrote a simple program that generates g-code for the entered spike sizes. And she even worked, the spikes turned out quite decent. But the idea had to be abandoned. There was a risk of damaging the tool, so I had to remove small layers of wood per pass. Because of this time, it took a lot to cut one spike.
Cutting sheet materials
In the manufacture of cabinets, it is also important to clearly observe the dimensions of the individual panels and right angles. Before I adapted the CNC for this purpose, this operation, with seeming simplicity, took a lot of time and often the result was far from ideal.
The correct joiners for these purposes use a format-cutting machine (in common parlance “formatnik”). But he theoretically did not even fit into my 9 squares, I don’t even speak about the price. For some time I used all sorts of guide tires. But the quality cut did not work. Having understood the question, I understood what the problem was. It turns out that in professional formatters there are 2 disks - one small undercut (cuts not to the full depth of the workpiece) and the second main one.
I had to think again. As a result, the brainstorm was born here such a thing:

The long bolt at the bottom is designed to accurately position the right angle between the saw blade and the table. The thin disc and high revolutions of the grinder make it possible to get the perfect cut even when sawing soft pine. To emulate a professional formatter, I make each cut in 2 passes: the first pass at 1/4 of the depth (simulation of the cutting disc) and the second pass at full depth.
Here, just, and need a high speed of movement, about which I wrote in the comments to the previous post. Otherwise, one cut will take several minutes.
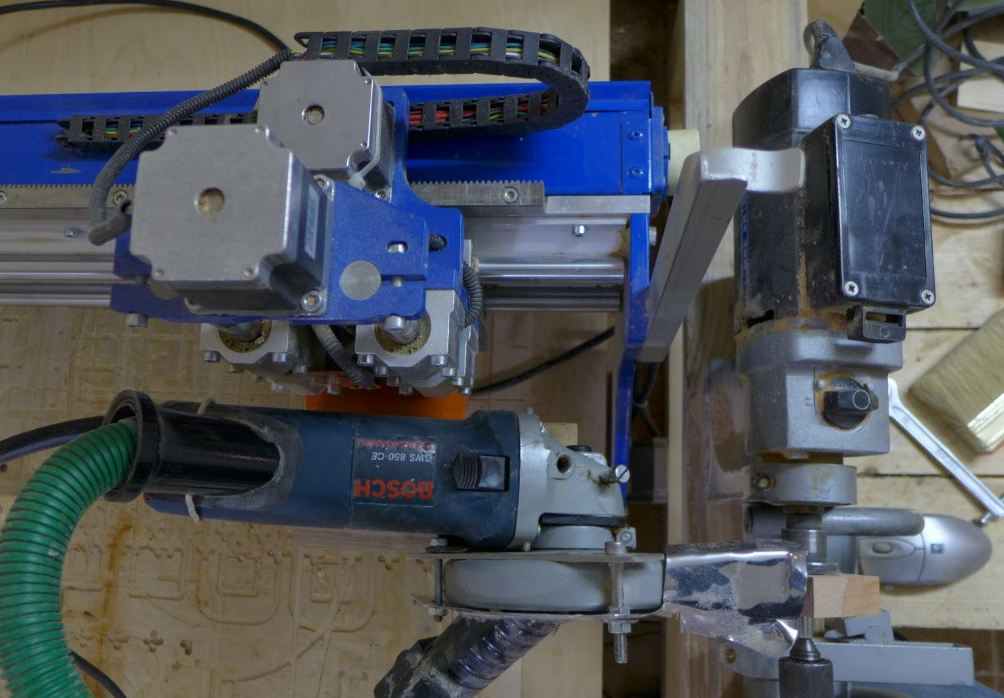
The same equipment is turned 90 degrees for cutting along:
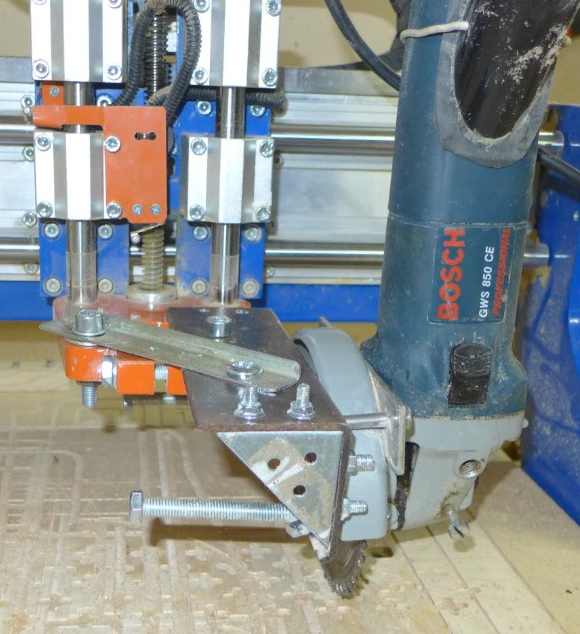
And from another angle: The
pipe that comes out of the grinder is not for dust removal, as it may seem, but to
cool the motor.
Turning
I always admire the products of professional turners. I still do not understand how, working only with chisels and chisels, they manage to carve 2 identical objects (copiers do not count). Honestly, I tried, nifiga failed.
All the same CNC-unit and Bulgarian came to the rescue. In addition to them, for a pleasant 2.5k on Avito, I bought a Soviet amateur lathe from 1983. The result was such an intricate design:

Top view: The
green pipe is the cooling of the grinder, the black one is a suction of sawdust.
Video of how it all works (sound quieter):
With the seeming simplicity of the lathe, it allows machining meter blanks, which corresponds to the length of the X axis of my CNC. Thus, this design is suitable for the manufacture of, for example, precast billiard cue.
I knew about rotary axes to the CNC, but I immediately refused. First, a little expensive (+ 30k). Secondly, it needs a higher portal. This immediately cut off all budget options that are found. And, thirdly, speed. For turning a large number of balusters for a gazebo in the country, this option is clearly not suitable (the Bulgarian version sharpens the baluster in one pass in a couple of minutes).
In the comments to the previous post there was a whole thread with a discussion about my choice of a rack gear instead of a helical one. I did not want to reveal the intrigue ahead of time, therefore, now I will explain for what reasons I chose what I chose. Even before the purchase, I had the idea of the lathe console described above. I didn’t know exactly how to do it, but the overall picture in my head was already there.
At the last stage, the choice was reduced to 2m variants. The first is the one that I eventually bought and the second one:
The price difference was around 30k. But in the version with ballscrew there were 2 significant drawbacks:
- Movement speed (1500 mm / min versus 7500 mm / min at the slats).
- One drive in the middle.
Subconsciously, I understood that high speed could be useful, but at that time I didn’t think about the CNC formatter. But for the construction of turning Pribluda one drive in the middle was not very useful. In this case, the diagonal loads on the portal could turn out to be critical, and the whole portal design would spring when turning. There would be no question of any accuracy in this case. That's why I overpaid the thirty for a separate drive on each side.
Bulgarian
Separately, I want to say about the grinder. When I first conceived these constructions, there were serious doubts about how long LBM would live under such loads. Therefore, I bought a professional Bosch. Several strained plastic gearbox cap where the shaft bearing was pressed in (I'm not sure that I called this part correctly). But, surprisingly, the Bulgarian has been living for the second year.
When cutting and adding extreme loads on it is not. Therefore, when drilling holes, I do not connect the grinder to the vacuum cleaner for cooling. When cutting it all depends on the volume to be cut.
Serious load on the grinder, mainly during turning operations. There is no cooling in any way. While I did not attach the green hose, I had to take 20 minute breaks every 5 minutes of work. Now I also take breaks, but much less often. Well, I do not forget to update the lubricant in the gearbox after each major work.
Summary
The CNC machine has become indispensable in my joinery experiments. In some cases, only thanks to him, being an amateur in the carpentry business, can I come closer to the quality of professional craftsmen (for example, in turning products).
PS: When I was preparing materials for the article I did not think that this topic would be so interesting. Now I understand that it was necessary to make a video on each item. I will try to finish the weekend and attach to this post.
UPD In the comments, many wrote about safety. I just have to broadcast it here. When working with a piercing-cutting-sawing tool, it is necessary to observe safety precautions:
- glasses for eyes;
- headphones on the ears;
- mask or respirator on the nose;
- do not stand in the plane of rotation of the saw blade;
- we do not work with the saw blade;
- Gloves, gloves (except thin rubber) are prohibited;
- takes on the head, hair under the beret (if the baseball cap, then the visor back);
- a bathrobe on the body, the sleeves do not hang;
- handy fire extinguisher;
- sunscreen (ultraviolet is dangerous);
- common sense in the head.
UPD2 Promised Videos.
Layout:
Additive times:
Additive two: