Testing the EZ-Robots Kit
Half a year ago, reading Habr, I came across a note about the Canadian company EZ-Robots, which sells parts for building a home robot. The child’s dream of “building a robot” was easier than ever to implement, and a friend and I decided to purchase a kit.
For insurance, we ordered two The Complete Robot Kit, each of which cost $ 212. Each kit contains:
I did not want to wait for a long time, so I chose aero delivery, namely Small Packet International - Air, for $ 60. On the Canadian Post website, the delivery speed was indicated as "In as little as 6 days." In fact, the advantages of Canadian logistics were not so obvious. About two days after placing the order, a letter arrived stating that the parcel went to its destination. Then three weeks no news came. After several unsuccessful attempts to get a response from Canadian mail, I wrote ez-robots support. The next day, an answer came, in which it was reported that delivery may take 3-4 weeks. And indeed, after 4 weeks from placing the order, parts of the future robot finally landed at the Moscow post office.
Since the EZ robot is delivered without a case, exclusively as a set of electronic components, the question immediately arose of choosing a basis. Having considered two possibilities - the modification of some technical toy and assembly from scratch from the designer - we chose the second and purchased the missing parts in the "Children's World".
By the way, it turned out that most standard toys (cars, tanks) are not suitable for creating a robot - they have too little space for the circuit board and engines or the method of fixing parts is extremely inconvenient. The real find turned out to be a designer with the brutal name “Steel and Iron Compounds”. Perhaps someone remembers the old Soviet designer with rails, angles and screws - that was him. At a very low price, it was ideally suited for testing ideas. The size of the designer screws corresponded to the fasteners located on the servos, and its parts were well sized for the EZ components. But he still had one drawback - if you put the board down with the contacts on unpainted metal parts, the circuit will be short and it will start to work incorrectly. The problem is solved, for example,
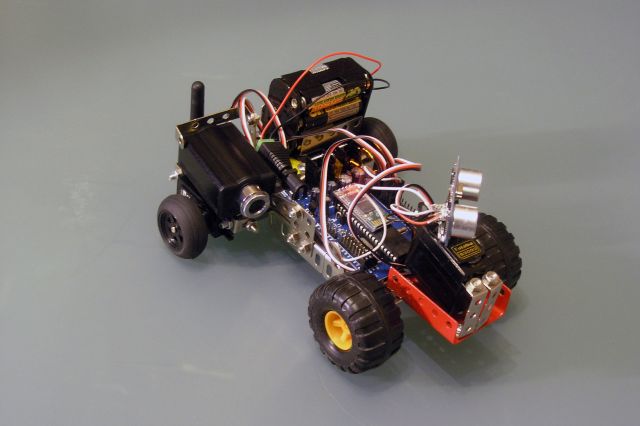
The following is a step-by-step assembly process for the first model. We used a simple design - a four-wheeled car with a rotating distance sensor and a camera, with which it should navigate and go around obstacles. On the basis of the first model, you can create more complex and interesting designs, only by adding additional modules to it.
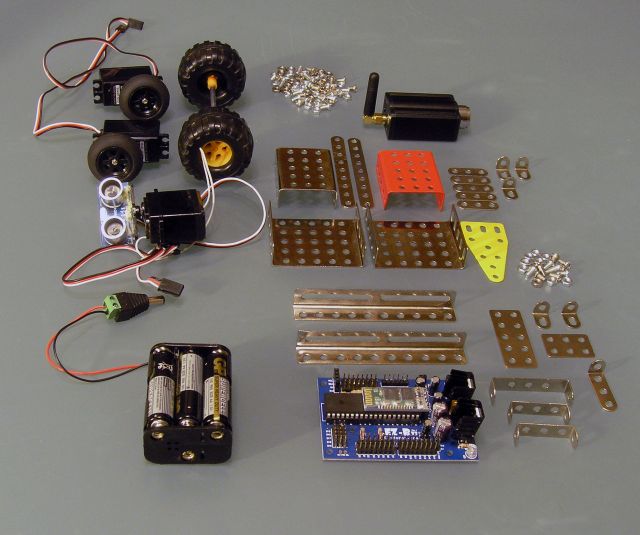
1. In the disassembled state
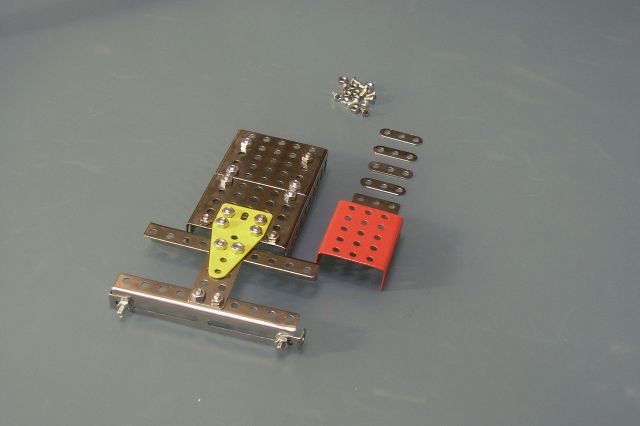
2. We assemble the case and the frame for mounting the wheels
3. Add auxiliary brackets and a stand for the ultrasonic sensor

4. Install the wheels and secondary brackets
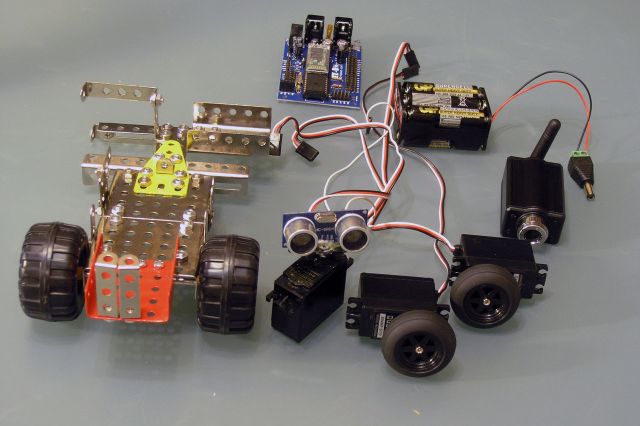
5. Connect the servomotors to the frame and fasten them to the rest of the electronics

6. Install the ultrasound and microcircuit
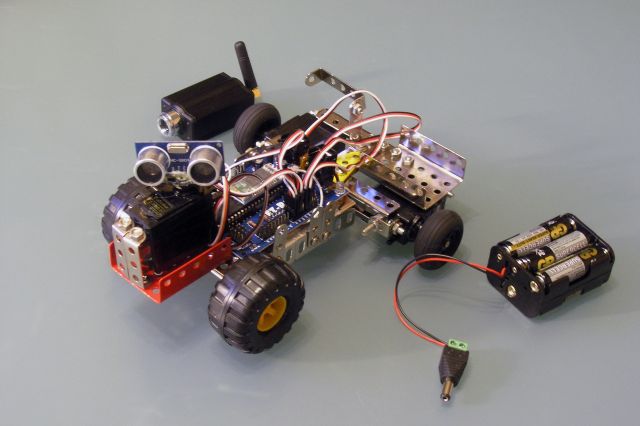
7. Connect the power source and install a wireless webcam on the side.
Here it is, here it is, the moment of my dream - it's time to connect the robot and breathe life into it. We turn on the power and start the search for available devices, and then turn on the EZ-Builder (it can be downloaded from ez-robots.com). And we get a connection error: it turns out we forgot to update the firmware. The problem is solved using the utility that comes with the ez-builder.
The builder itself turned out to be nice and understandable: after watching three videos from the site, I could freely manipulate the robot. To control using a distance sensor, you only need to configure the finished elements. It should be understood that although Ez-builder allows you to create your own scripts and algorithms, they are seriously limited. For example, in a condition you cannot compare arbitrary values, only a few specifically designed for this. However, from the same ez-robot.com you can download the EZ-SDK and implement anything you want with it.
Bottom line: the EZ-ROBOTS designer turned out to be easy to learn. The software is usable and allows you to create your first robot, even with minimal programming knowledge. The Soviet designer is an extremely convenient option for creating a wireframe. The time from receiving a package with details to the result that you see in the photographs is three evenings of three hours each.
Future plans:
1. Transfer from EZ to Friduino: the speed of delivery of parts from abroad is categorically not satisfied.
2. Go from the power supply from the kit to similar batteries.
3. Find servos the best application. Try the walking mechanism.
4. To teach the robot to navigate the picture from the webcam.
5. Teach the robot to remember the route and map the terrain.
And finally, a short video about the robot in action.
http://youtu.be/o95fQRay-dw
http://youtu.be/6mlr2F49kPw
For insurance, we ordered two The Complete Robot Kit, each of which cost $ 212. Each kit contains:
- EZ-B v3 Bluetooth Robot Controller
- Wireless webcam (charging for it takes the form of a plug for an American outlet, but you can charge from any USB)
- Ultrasonic distance sensor
- 3 limited-angle servos
- 2 continuous rotation servos
- 2 wheels
- A few extra wires
I did not want to wait for a long time, so I chose aero delivery, namely Small Packet International - Air, for $ 60. On the Canadian Post website, the delivery speed was indicated as "In as little as 6 days." In fact, the advantages of Canadian logistics were not so obvious. About two days after placing the order, a letter arrived stating that the parcel went to its destination. Then three weeks no news came. After several unsuccessful attempts to get a response from Canadian mail, I wrote ez-robots support. The next day, an answer came, in which it was reported that delivery may take 3-4 weeks. And indeed, after 4 weeks from placing the order, parts of the future robot finally landed at the Moscow post office.
Since the EZ robot is delivered without a case, exclusively as a set of electronic components, the question immediately arose of choosing a basis. Having considered two possibilities - the modification of some technical toy and assembly from scratch from the designer - we chose the second and purchased the missing parts in the "Children's World".
By the way, it turned out that most standard toys (cars, tanks) are not suitable for creating a robot - they have too little space for the circuit board and engines or the method of fixing parts is extremely inconvenient. The real find turned out to be a designer with the brutal name “Steel and Iron Compounds”. Perhaps someone remembers the old Soviet designer with rails, angles and screws - that was him. At a very low price, it was ideally suited for testing ideas. The size of the designer screws corresponded to the fasteners located on the servos, and its parts were well sized for the EZ components. But he still had one drawback - if you put the board down with the contacts on unpainted metal parts, the circuit will be short and it will start to work incorrectly. The problem is solved, for example,
The following is a step-by-step assembly process for the first model. We used a simple design - a four-wheeled car with a rotating distance sensor and a camera, with which it should navigate and go around obstacles. On the basis of the first model, you can create more complex and interesting designs, only by adding additional modules to it.
1. In the disassembled state
2. We assemble the case and the frame for mounting the wheels
3. Add auxiliary brackets and a stand for the ultrasonic sensor
4. Install the wheels and secondary brackets
5. Connect the servomotors to the frame and fasten them to the rest of the electronics
6. Install the ultrasound and microcircuit
7. Connect the power source and install a wireless webcam on the side.
Here it is, here it is, the moment of my dream - it's time to connect the robot and breathe life into it. We turn on the power and start the search for available devices, and then turn on the EZ-Builder (it can be downloaded from ez-robots.com). And we get a connection error: it turns out we forgot to update the firmware. The problem is solved using the utility that comes with the ez-builder.
The builder itself turned out to be nice and understandable: after watching three videos from the site, I could freely manipulate the robot. To control using a distance sensor, you only need to configure the finished elements. It should be understood that although Ez-builder allows you to create your own scripts and algorithms, they are seriously limited. For example, in a condition you cannot compare arbitrary values, only a few specifically designed for this. However, from the same ez-robot.com you can download the EZ-SDK and implement anything you want with it.
Bottom line: the EZ-ROBOTS designer turned out to be easy to learn. The software is usable and allows you to create your first robot, even with minimal programming knowledge. The Soviet designer is an extremely convenient option for creating a wireframe. The time from receiving a package with details to the result that you see in the photographs is three evenings of three hours each.
Future plans:
1. Transfer from EZ to Friduino: the speed of delivery of parts from abroad is categorically not satisfied.
2. Go from the power supply from the kit to similar batteries.
3. Find servos the best application. Try the walking mechanism.
4. To teach the robot to navigate the picture from the webcam.
5. Teach the robot to remember the route and map the terrain.
And finally, a short video about the robot in action.
http://youtu.be/o95fQRay-dw
http://youtu.be/6mlr2F49kPw