iOS 12: news in notifications
The WWDC conference was held, and there are still a lot of reports that are worth seeing. There were key topics that Apple paid special attention to. Core ML, Siri Shortcuts and, of course, changes in Notifications.
Since not everyone has enough free time to wade through the wilds of documentation, which, as is usually the case at the beta testing stage, leaves much to be desired, I prepared a review of the new features and supported the material with practical implementation. Read, be aware and embed in your applications.
Let's start with an overview of the features that Apple has added.
Notification grouping
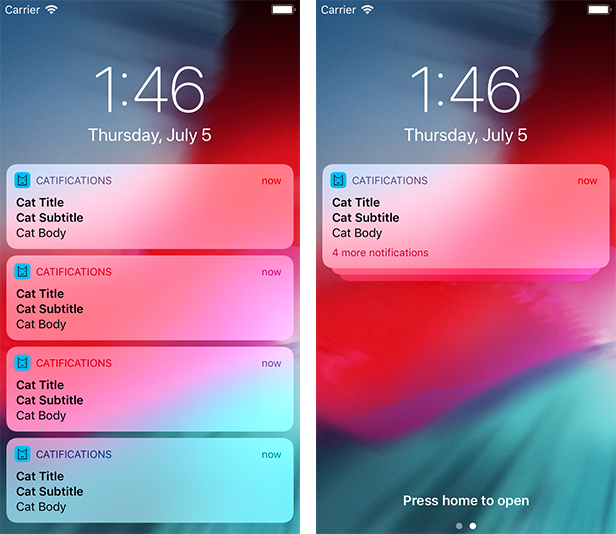
To implement anything you do not need. iOS 12 automatically groups messages for you. But there are nuances that relate to customization, localization and grouping, but not based on the application identifier, but, for example, depending on the name of the user who sent the notification.
In addition, if you will test the grouping of notifications, pay attention - they will start to pack up only if all the notifications cannot fit on the screen at a time. For example, on the screen of iPhone 8 for this you need to place 5 or more notifications.
In order not to overload this material, I brought the information into a separate article .
Changes to the NSExtensionContext API
The next item is new features for notifications and, in particular, the NSExtensionContext class . He is responsible for interacting with widgets, Siri, playing media content. We are more interested in notifications. Two methods and one variable were added:
var notificationActions: [UNNotificationAction] { getset }The variable allows you to interchange the set of available actions during the interaction with the notification:
funcdismissNotificationContentExtension()funcperformNotificationDefaultAction()Methods open the application or hide the notification.
To demonstrate the possibilities we will write a small application.
First, let's add local notifications to the application:
let actions = [
    UNNotificationAction(identifier: "like-action",  title: "Like", options: []),
    UNNotificationAction(identifier: "open-app",  title: "Open App", options: []),
    UNNotificationAction(identifier: "dismiss",  title: "Dismiss", options: []),
]
let simpleCategory = UNNotificationCategory(identifier: "category-simple", actions: actions, intentIdentifiers: [], options: [])
UNUserNotificationCenter.current().setNotificationCategories([simpleCategory])- We create several actions. A header is passed to the initializer, an identifier that allows you to distinguish between actions during processing and options. In the options it can be specified that user authentication is required to perform the action.
- We define a category with an identifier. The category ID allows you to process and display different types of notifications in different ways.
- The final step is to set a category for the center of notifications.
The second method will send a local notification after a specified period of time so that we can minimize the application or block the phone:
UNUserNotificationCenter.current().getNotificationSettings {
(settings) in
guard settings.authorizationStatus == .authorized else { return }
let content = UNMutableNotificationContent()
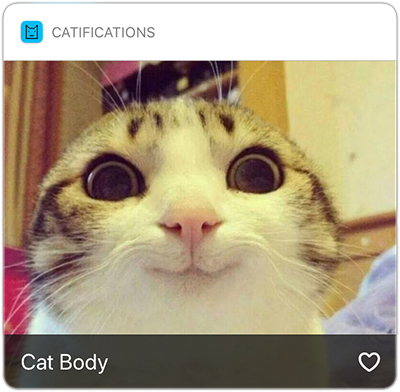
content.title = "Cat Title"
content.subtitle = "Cat Subtitle"
content.body = "Cat Body"
content.sound = .default
content.categoryIdentifier = "category-simple"
let trigger = UNTimeIntervalNotificationTrigger(timeInterval: 3, repeats: false)
let uuid = UUID().uuidString
let request = UNNotificationRequest(identifier: uuid, content: content, trigger: trigger)
UNUserNotificationCenter.current().add(request, withCompletionHandler: {
(error) in
})
}- Check if the user has allowed us to send notifications.
- Create a notification with a title and text and specify the category to which it will belong. In this case, "category-simple".
- Set trigger trigger after 3 seconds.
- Fill out the request to send a notification. In this case, we use the UUID as an identifier . This identifier may be needed if we want to cancel the scheduled notification.
- We add our request to the notification center.
Next, you need to add to the application a new target Notification Content Extension . It allows you to customize the display options for notifications and processing actions.
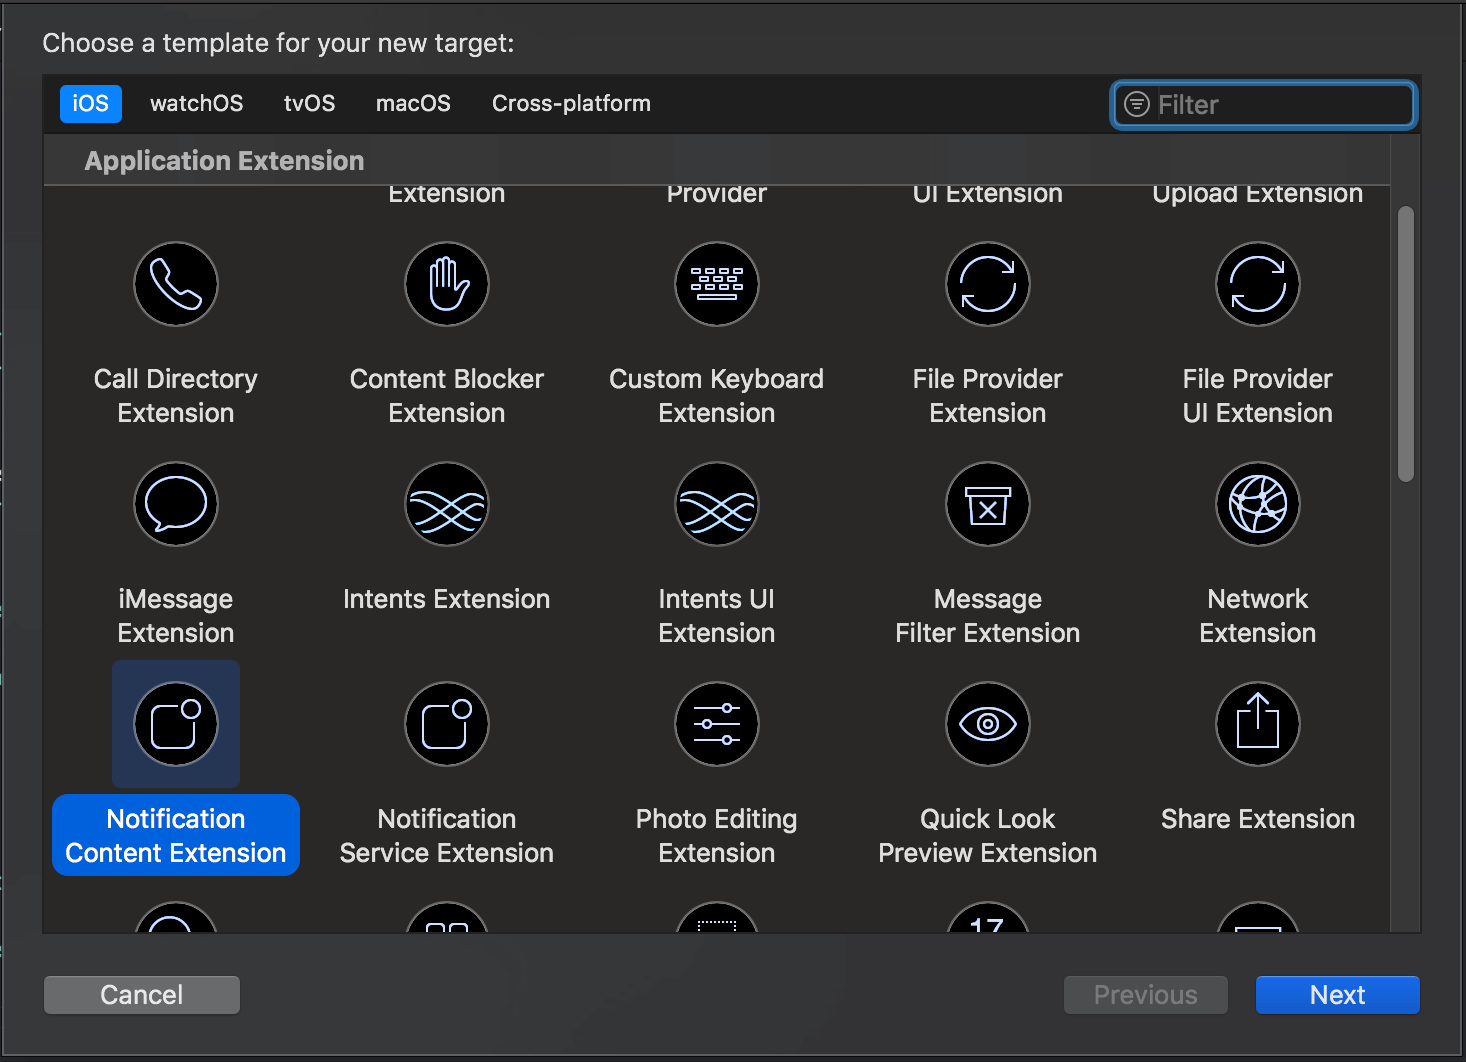
A plist file, ViewController and Storyboard will be created:
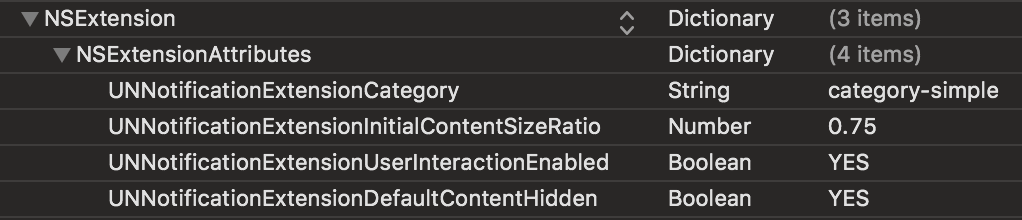
In the plist-file we are interested in the following keys:
- UNNotificationExtensionCategory - the name of the category to be processed. As before, we specify "category-simple".
- UNNotificationExtensionInitialContentSizeRatio - the ratio of the height of the notification to its width. Will affect the size of the notification after displaying in full.
- UNNotificationExtensionUserInteractionEnabled - enable or disable interaction with custom controls. In our case, it will be a button with a heart.
- UNNotificationExtensionDefaultContentHidden - hides the contents of the notification, which is generated by default.
In the storyboard we create a UIImageView, a UILabel to display the notification header, and a UIButton to interact with the application.

In the View Controller, we create methods to open the application and hide the notification:
funcopenApp() {
    extensionContext?.performNotificationDefaultAction()
}
funcdismissNotification() {
    extensionContext?.dismissNotificationContentExtension()
}
Implement the methods of the protocol UNNotificationContentExtension .
The first will allow you to display the required text:
funcdidReceive(_ notification: UNNotification) {
    self.notificationTitleLabel.text = notification.request.content.body
}
The second is needed to process actions from UNNotificationAction . In the same method, substitution of actions is performed using the assignment of extensionContext? .NotificationActions :
funcdidReceive(_ response: UNNotificationResponse, completionHandler completion: @escaping (UNNotificationContentExtensionResponseOption) -> Void) {
    switch response.actionIdentifier {
    case"like-action":
        let actions = [
            UNNotificationAction(identifier: "1-star",  title: "★", options: []),
            UNNotificationAction(identifier: "2-star",  title: "★ ★", options: []),
            UNNotificationAction(identifier: "3-star",  title: "★ ★ ★", options: []),
            ]
        extensionContext?.notificationActions = actions
    case"open-app":
        openApp()
    default:
        dismissNotification()
    }
}
Processing heart presses is performed as usual, through IBAction :
@IBActionfuncdefaultButtonTapped(_ sender: UIButton) {
    openApp()
}
Run the application and see what we did:
- Pushes from UIButton are processed.
- Using UNNotificationAction allows you to replace the options available for interaction.
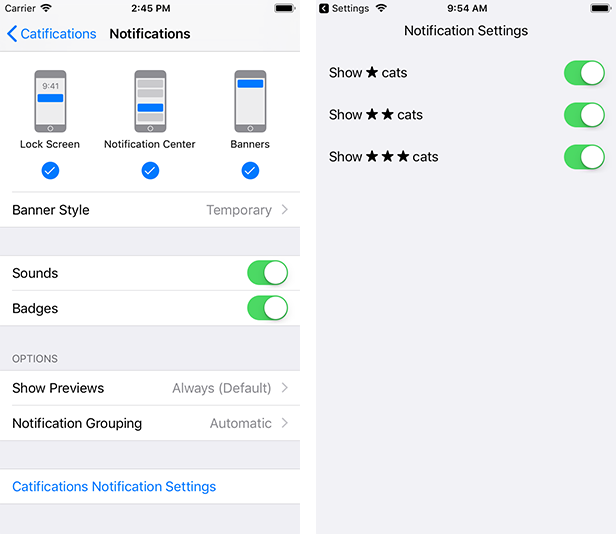
Interaction with notification settings
The following innovation allows you to add a new menu item to the notification settings. When you tap on it, a method call will be made that you can implement in the application. For example, a user can directly get into your application from the system settings and include only those notifications that he really wants to receive. What needs to be done to implement?
First, when authorizing notifications, we add one more parameter - providesAppNotificationSettings :
UNUserNotificationCenter.current().requestAuthorization(options: [.badge, .alert, .sound, .providesAppNotificationSettings])Secondly, we implement the userNotificationCenter method (_: openSettingsFor :) of the UNUserNotificationCenterDelegate protocol :
extensionAppDelegate: UNUserNotificationCenterDelegate{
    funcuserNotificationCenter(_ center: UNUserNotificationCenter, openSettingsFor notification: UNNotification?) {
        openSettings()
    }
    funcopenSettings() {
        let storyboard = UIStoryboard(name: "Settings", bundle: nil)
        let settings = storyboard.instantiateViewController(withIdentifier: "Settings")
        window?.rootViewController = settings
    }
}
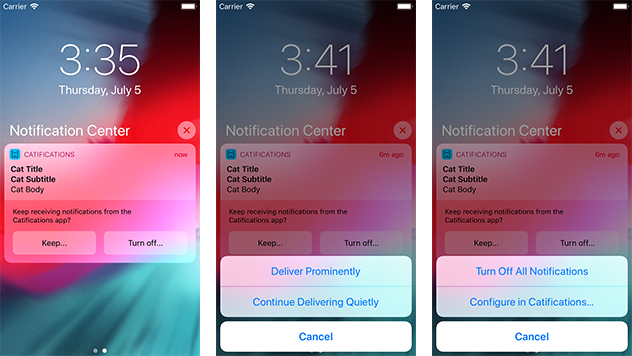
Provisional Notifications
The user does not always understand whether he wants to receive notifications from your application. Therefore, when you first start the application, it is difficult for him to make such a choice. With high probability he will refuse your offer. For these situations, Apple suggests using Provisional Authorization. When requesting authorization to send notifications, one more parameter is added - provisional . authorizationStatus for such notifications also comes in an application with the provisional status .
UNUserNotificationCenter.current().requestAuthorization(options: [.badge, .alert, .provisional])The user will not receive an authorization request when the application starts. However, in order not to disturb him, the application is placed in the so-called jail . For notifications, sounds, badges are disabled; they are displayed only in Notification Center. They will not appear on a locked screen or as banners.
When a user receives a notification, two additional buttons appear. One will completely block notifications or offer to switch to settings, and the second will translate your notifications into authorized status:
Critical alerts
The last change adds another type of notification - Critical Alerts . These notifications completely ignore the settings of your phone, the sound turned off or the "do not disturb" mode. Apple recommends using them in medical applications (for example, the user of the device sharply jumped sugar levels), as well as to ensure the safety of users at home or in public places.
The authorization request contains a special sign:

A new item is added in the settings, and an additional icon appears on the notification screen:
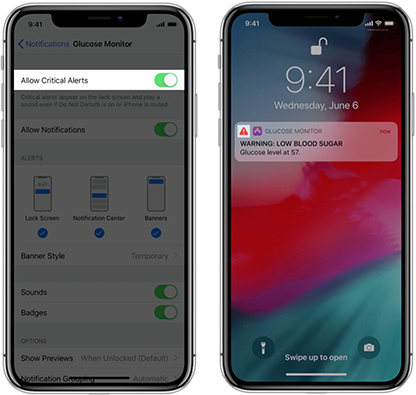
To send critical notifications, you will have to go through the validation process of your application on the Apple website .
To use notifications, use the criticalAlert parameter :
UNUserNotificationCenter.current().requestAuthorization(options: [.badge, .alert, .criticalAlert])And form the contents of the notification:
let content = UNMutableNotificationContent()
content.title = "WARNING"
content.body = "Storm alert"
content.categoryIdentifier = "storm-alert"
content.sound = UNNotificationSound.defaultCriticalSound(withAudioVolume: 1.0)
For Critical Alerts, you can specify the volume at which the notification will be triggered regardless of the user's settings.
I hope this material will simplify the process of introducing new notifications into your application. If it was not possible to sort out any implementation stages, I suggest reading the code on github or asking a question in the comments.
You can also see an article from e-Legion on notifications for iOS 10 or record a report from the WWDC - What's new in User Notifications. We can discuss innovations at MBLT DEV 2018 in Moscow on September 28.
Have a nice day and cats all ^ _ ^
UPD: The second part of the article about the grouping of notifications is already on Habré.