Effective use of WebAPI: self hosting REST services
With the release of ASP.NET WebAPI , developers have the opportunity to quickly create REST services in a convenient way, on the one hand fully implementing the principles of REST, and on the other using the full power of the ASP.NET platform.
Quite a lot of articles have already been written about the capabilities and application of WebAPI, for example, you can learn about the interesting function of self-documenting API services through ApiExplorer.
There is another great feature of WebAPI, about which not much has been written - this is the ability of WebAPI to provide independent hosting service (self hosting). This article illustrates how to create and run REST selfhosting services based on WebAPI using an example.
To provide access to the service API, it is not always advisable to deploy it on the basis of the IIS server. If the service is not part of any web application, it makes sense to run it on the basis of its own infrastructure.
Another option for using the self hosting mechanism may be to launch services on platforms that do not contain an IIS server or on which the launch of IIS is complicated or unnecessary.
One way or another, WebAPI allows you to create IIS-independent services that can be accessed without installing a web application on a web server.
Consider the function of self-hosting on the simplest example of a console application. Create a visual console-based console application in C # for Visual Studio 2012.
Using the NuGet package manager console, install the AspNetWebApi.Selfhost package. This can be done with the following command:
This command will install all the necessary components in a console application project. After that, add a link to the System.Web assembly in the project, if there is no such link.
The first step to creating a selfhosting service is to configure it. The configuration is the responsibility of the HttpSelfHostConfiguration class. Below is an example of configuring a service:
The first line creates an instance of the server class with the address set. The second line configures the server routing mechanism so that we can run our REST APIs on it.
The next step is to start the server, this is achieved using another class HttpSelfHostServer. Below is the code that starts the server for selfhosting services:
It's time to add a REST service to our application that will host on our server. To do this, add a new Web API Controller Class element to the project, for example, named ProductController. Add a new class to the project named Product:
In the newly created ProductController, add the new GetAllProducts method:
In order to avoid conflicts, you will need to remove or comment out the Get () method generated in the template.
Due to the fact that our application will be a server listening to certain ports, the application must be run with elevated privileges. You can run the compiled executable file as administrator on your own or run the project for execution in VS2012 launched as administrator. Another possibility would be to use the Netsh.exe command to grant authority to reserve the URL to the current user.
Run the application for execution.
Now, while our application is running, we can access the selfhosting service, which is started without using IIS. Just go tohttp: // localhost: 5555 / api / product / . For testing, you can use the browser or use Fiddler (Figure 1).
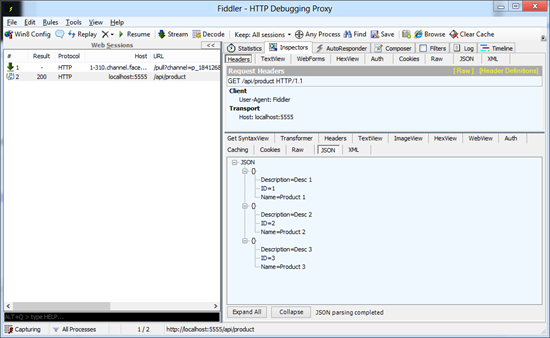
Fig. 1. Result of calling a selfhosting service
To start a selfhosting service, it might be a good idea to start a server application as a Windows service. This is easy enough to do.
A very convenient TopShelf tool can be used to quickly create system services. In the NuGet package manager console, run the package installation command:
After installing the package, you will get access to the API, which will allow you to easily create a Windows service from your application.
We will slightly change the code of our project. First, we put the server’s launch into a separate ProductService class:
Then we modify the code of the Main method to start the service using the TopShelf API:
Here, using the special methods that TopShelf offers, we register the service by setting the class necessary to start, its start and stop methods, the description of the service and its name.
After necessary modifications compile the project. Now you can run your application as a Windows service, this is done using the command:
The service will be installed (Figure 2).

Fig. 2. Installing the Windows service
Now, if you go to the list of Windows system services, you can easily find your application (Figure 3).
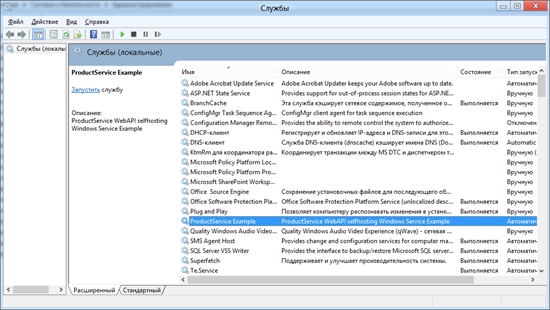
Fig. 3. A service in the list of system services
You may need to start your service if it is not running (Figure 4) Figure 4
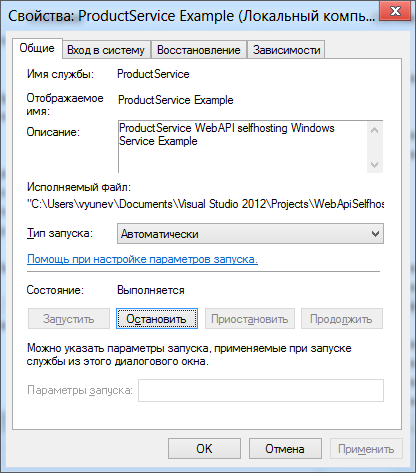
. Starting the service
Let's check the operation of the selfhosting service launched as a Windows service in Fiddler and make sure that everything works.
You can remove a service from the system using the command:
In this article, we examined one of the features of ASP.NET WebAPI. Using the self hosting mechanism, which is supported by WebAPI, you can create REST services that do not require an IIS server to run and can be run in the environment you want.
ASP.NET WebAPI is a new tool available to developers in Visual Studio 2012. You can download the new version of Visual Studio 2012 RC at the special short address: http://vs2012.ru/ .
The source codes of the final project (with all packages and binary components) are available at sdrv.ms/K9F7Hs
Quite a lot of articles have already been written about the capabilities and application of WebAPI, for example, you can learn about the interesting function of self-documenting API services through ApiExplorer.
There is another great feature of WebAPI, about which not much has been written - this is the ability of WebAPI to provide independent hosting service (self hosting). This article illustrates how to create and run REST selfhosting services based on WebAPI using an example.
Self hosting REST service
To provide access to the service API, it is not always advisable to deploy it on the basis of the IIS server. If the service is not part of any web application, it makes sense to run it on the basis of its own infrastructure.
Another option for using the self hosting mechanism may be to launch services on platforms that do not contain an IIS server or on which the launch of IIS is complicated or unnecessary.
One way or another, WebAPI allows you to create IIS-independent services that can be accessed without installing a web application on a web server.
Service inside the console application
Consider the function of self-hosting on the simplest example of a console application. Create a visual console-based console application in C # for Visual Studio 2012.
Using the NuGet package manager console, install the AspNetWebApi.Selfhost package. This can be done with the following command:
Install-package AspNetWebApi.Selfhost
This command will install all the necessary components in a console application project. After that, add a link to the System.Web assembly in the project, if there is no such link.
The first step to creating a selfhosting service is to configure it. The configuration is the responsibility of the HttpSelfHostConfiguration class. Below is an example of configuring a service:
var selfHostConfiguraiton = new HttpSelfHostConfiguration("http://localhost:5555");
selfHostConfiguraiton.Routes.MapHttpRoute(
    name: "DefaultApiRoute",
    routeTemplate: "api/{controller}",
    defaults: null
);
The first line creates an instance of the server class with the address set. The second line configures the server routing mechanism so that we can run our REST APIs on it.
The next step is to start the server, this is achieved using another class HttpSelfHostServer. Below is the code that starts the server for selfhosting services:
using (var server = new HttpSelfHostServer(selfHostConfiguraiton))
{
    server.OpenAsync().Wait();
    Console.ReadLine();
}
It's time to add a REST service to our application that will host on our server. To do this, add a new Web API Controller Class element to the project, for example, named ProductController. Add a new class to the project named Product:
publicclassProduct
{
    publicint ID { get; set; }
    publicstring Name { get; set; }
    publicstring Description { get; set; }
}
In the newly created ProductController, add the new GetAllProducts method:
public IList<Product> GetAllProducts()
{
    returnnew List<Product>(){
            new Product(){ID = 1, Name="Product 1", Description="Desc 1"},
            new Product(){ID = 2, Name="Product 2", Description="Desc 2"},
            new Product(){ID = 3, Name="Product 3", Description="Desc 3"},
    };
}
In order to avoid conflicts, you will need to remove or comment out the Get () method generated in the template.
Due to the fact that our application will be a server listening to certain ports, the application must be run with elevated privileges. You can run the compiled executable file as administrator on your own or run the project for execution in VS2012 launched as administrator. Another possibility would be to use the Netsh.exe command to grant authority to reserve the URL to the current user.
Run the application for execution.
Now, while our application is running, we can access the selfhosting service, which is started without using IIS. Just go tohttp: // localhost: 5555 / api / product / . For testing, you can use the browser or use Fiddler (Figure 1).
Fig. 1. Result of calling a selfhosting service
Running selfhosting services as a Windows service
To start a selfhosting service, it might be a good idea to start a server application as a Windows service. This is easy enough to do.
A very convenient TopShelf tool can be used to quickly create system services. In the NuGet package manager console, run the package installation command:
install-package topshelf
After installing the package, you will get access to the API, which will allow you to easily create a Windows service from your application.
We will slightly change the code of our project. First, we put the server’s launch into a separate ProductService class:
classProductService
{
    privatereadonly HttpSelfHostServer server;
    publicProductService()
    {
        var selfHostConfiguraiton = new HttpSelfHostConfiguration("http://127.0.0.1:5555");
        selfHostConfiguraiton.Routes.MapHttpRoute(
            name: "DefaultApiRoute",
            routeTemplate: "api/{controller}",
            defaults: null
            );
        server = new HttpSelfHostServer(selfHostConfiguraiton);
    }
    publicvoidStart()
    {
        server.OpenAsync();
    }
    publicvoidStop()
    {
        server.CloseAsync();
        server.Dispose();
    }
}
Then we modify the code of the Main method to start the service using the TopShelf API:
staticvoid Main(string[] args)
{
    HostFactory.Run(x =>
    {
        x.Service<ProductService>(s =>
        {
            s.SetServiceName("ProductService Example");
            s.ConstructUsing(name =>new ProductService());
            s.WhenStarted(svc => svc.Start());
            s.WhenStopped(svc => svc.Stop());
        });
        x.RunAsLocalSystem();
        x.SetDescription("ProductService WebAPI selfhosting Windows Service Example");
        x.SetDisplayName("ProductService Example");
        x.SetServiceName("ProductService");
    });
}
Here, using the special methods that TopShelf offers, we register the service by setting the class necessary to start, its start and stop methods, the description of the service and its name.
After necessary modifications compile the project. Now you can run your application as a Windows service, this is done using the command:
WebApiSelfhosting install
The service will be installed (Figure 2).
Fig. 2. Installing the Windows service
Now, if you go to the list of Windows system services, you can easily find your application (Figure 3).
Fig. 3. A service in the list of system services
You may need to start your service if it is not running (Figure 4) Figure 4
. Starting the service
Let's check the operation of the selfhosting service launched as a Windows service in Fiddler and make sure that everything works.
You can remove a service from the system using the command:
WebApiSelfhosting uninstall
Conclusion
In this article, we examined one of the features of ASP.NET WebAPI. Using the self hosting mechanism, which is supported by WebAPI, you can create REST services that do not require an IIS server to run and can be run in the environment you want.
ASP.NET WebAPI is a new tool available to developers in Visual Studio 2012. You can download the new version of Visual Studio 2012 RC at the special short address: http://vs2012.ru/ .
The source codes of the final project (with all packages and binary components) are available at sdrv.ms/K9F7Hs