Unity3D 3.x Introduction to Surface Shaders
- Tutorial
Sooner or later, the capabilities of standard shaders will be missed, and then Surface Shaders will come to your aid. In fact, this is an add-on over regular shaders, which allows you to write more understandable and compact code.
In Surface Shader you can control lighting, shadows, rendering paths using the same Cg / HLSL code.
Here is the full version of the shader, from where I will take the pieces for consideration.
The first line is the shader
On this way, he will be available at the inspector.
Next are Properties , these are the parameters that you can set in the inspector. Each parameter has a variable name, description, type and default value.
Data types:
name (“display name”, Range (min, max)) = number
Range of values of type float from min to max, the inspector will display as a slider
name (“display name”, Color) = (number, number, number, number)
The color type value, the default value should be RGBA float from 0 to 1. The inspector will display as color picker
name ("display name", 2D) = "def_col" {options}
Describes the texture. In the inspector it will be like texture
name ("display name", Rect) = "def_col" {options}
Describes a texture with a size not 2 n . The inspector will have a texture
name ("display name", Cube) = "def_col" {options}
Describes the Cubemap texture. The inspector will be like texture
name ("display name", Float) = number
Just a float, in the inspector it will be like an input field with the number
name ("display name", Vector) = (number, number, number, number)
Describes the vector
Default value (def_col) for types Rect, 2D and Cubemap it can be empty, either: “white”, “black”, “gray”, “bump”. It indicates what color the pixels will be by default inside the texture.
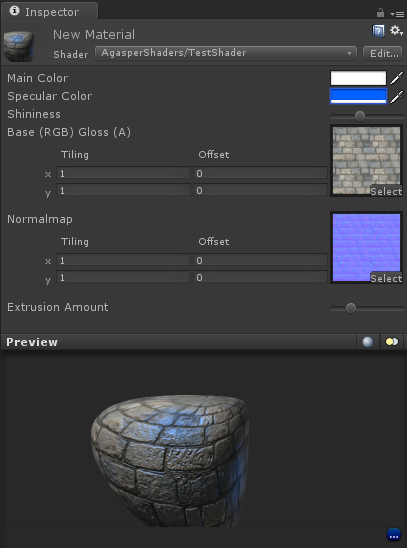
Here is what we will see in the inspector:
Next is SubShader. When a unit tries to draw an object, it searches for the first suitable SubShader in the list of this shader. If no SubShader is found, an error will occur. For example, it may be necessary in a situation when you want to realize the capabilities of Shader Model 3.0, but leave the opportunity to play people with an old video card.
Inside Surface SubShader are SubShader tags and the actual code itself.
The tag RenderType = "Opaque" means that we are going to draw an opaque object. You can read more about tags here and here.
In SurfaceShader code, you can describe three functions (in principle, more can be done, but rarely needed):
For example, let's write a Diffuse Bumped Specular shader with morphing. I will not describe the lighting calculation function in this article, we will accept the standard BlinnPhong.
CGPROGRAM is a directive declaring what we write in Cg (ends with the ENDCG directive ).
The second line we declare that:
Now we declare the variables that will be used in the code:
Unity will make sure that the data from the shader parameters declared at the top falls into these variables. It is important to name them in the same way as in the shader parameters.
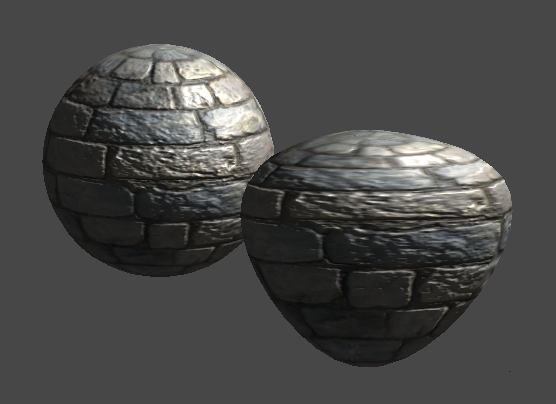
And here is the procedure for the vertex part of our shader. For example, take the coordinates of the current vertex and add to them the normal multiplied by the current coordinates and the coefficient from the shader parameters. Of course, some crap will turn out, but for an example it’s quite enough. With the Amount slider, you can adjust the degree of distortion of the object.
Example:
In official documentation there is an example of a swollen soldier . They just lifted all the vertices along the normal:

What else is inside:
Here you can read the full article on vertex shaders.
In the Input structure, you can ask the shader for additional variables that you will need for calculations in the surface procedure. We asked for the UV coordinates of both textures. The variable should be called uv_ NazvanieTekstury for the first UV coordinates and uv2_ NazvanieTekstury respectively for the second.
You can find a complete list of what you can specify here .
Here is the surface rendering procedure itself:
The Input structure is passed to it , and inside you need to fill out the SurfaceOutput structure , which has the following form:
We finish the shader with a line
This means that if for some reason the shader does not work on the client machine, then you need to roll back to the Specular shader.
Full version of the shader from the example
Materials used to write the article:
http://unity3d.com/support/documentation/Components/SL-SurfaceShaders
http://unity3d.com/support/documentation/Components/SL-SurfaceShaderExamples.html
http: / /unity3d.com/support/documentation/Components/SL-SubShader
http://unity3d.com/support/documentation/Components/SL-SubshaderTags
http://unity3d.com/support/documentation/Components/SL-ShaderReplacement.html
In Surface Shader you can control lighting, shadows, rendering paths using the same Cg / HLSL code.
Creating a shader from scratch
Here is the full version of the shader, from where I will take the pieces for consideration.
The first line is the shader
Shader "AgasperShaders/TestShader" {
On this way, he will be available at the inspector.
Properties
Next are Properties , these are the parameters that you can set in the inspector. Each parameter has a variable name, description, type and default value.
Properties {
	_Color ("Main Color", Color) = (1,1,1,1)
	_SpecColor ("Specular Color", Color) = (0.5, 0.5, 0.5, 1)
	_Shininess ("Shininess", Range (0.03, 1)) = 0.078125
	_MainTex ("Base (RGB) Gloss (A)", 2D) = "white" {}
	_BumpMap ("Normalmap", 2D) = "bump" {}
	_Amount ("Extrusion Amount", Range(-1,1)) = 0.5
}
Data types:
name (“display name”, Range (min, max)) = number
Range of values of type float from min to max, the inspector will display as a slider
name (“display name”, Color) = (number, number, number, number)
The color type value, the default value should be RGBA float from 0 to 1. The inspector will display as color picker
name ("display name", 2D) = "def_col" {options}
Describes the texture. In the inspector it will be like texture
name ("display name", Rect) = "def_col" {options}
Describes a texture with a size not 2 n . The inspector will have a texture
name ("display name", Cube) = "def_col" {options}
Describes the Cubemap texture. The inspector will be like texture
name ("display name", Float) = number
Just a float, in the inspector it will be like an input field with the number
name ("display name", Vector) = (number, number, number, number)
Describes the vector
Default value (def_col) for types Rect, 2D and Cubemap it can be empty, either: “white”, “black”, “gray”, “bump”. It indicates what color the pixels will be by default inside the texture.
Here is what we will see in the inspector:
Subshaders
Next is SubShader. When a unit tries to draw an object, it searches for the first suitable SubShader in the list of this shader. If no SubShader is found, an error will occur. For example, it may be necessary in a situation when you want to realize the capabilities of Shader Model 3.0, but leave the opportunity to play people with an old video card.
Inside Surface SubShader are SubShader tags and the actual code itself.
The tag RenderType = "Opaque" means that we are going to draw an opaque object. You can read more about tags here and here.
SubShader {
Tags {
		"RenderType" = "Opaque"
	}
//code
}
Actually the code itself
In SurfaceShader code, you can describe three functions (in principle, more can be done, but rarely needed):
- Vertex calculation function
- Surface rendering function
- Lighting calculation function
For example, let's write a Diffuse Bumped Specular shader with morphing. I will not describe the lighting calculation function in this article, we will accept the standard BlinnPhong.
CGPROGRAM
#pragma surface surf BlinnPhong vertex:vert
CGPROGRAM is a directive declaring what we write in Cg (ends with the ENDCG directive ).
The second line we declare that:
- surface rendering procedure called surf
- the shader will use light like BlinnPhong (there is also Lambert, Unlit, or its own procedure)
- the procedure for changing vertices is called vert
Now we declare the variables that will be used in the code:
sampler2D _MainTex;
sampler2D _BumpMap;
fixed4 _Color;
half _Shininess;
float _Amount;
Unity will make sure that the data from the shader parameters declared at the top falls into these variables. It is important to name them in the same way as in the shader parameters.
void vert (inout appdata_full v) {
  v.vertex.xyz += v.normal * v.vertex.xyz * _Amount ;
}
And here is the procedure for the vertex part of our shader. For example, take the coordinates of the current vertex and add to them the normal multiplied by the current coordinates and the coefficient from the shader parameters. Of course, some crap will turn out, but for an example it’s quite enough. With the Amount slider, you can adjust the degree of distortion of the object.
Example:
In official documentation there is an example of a swollen soldier . They just lifted all the vertices along the normal:
v.vertex.xyz += v.normal * _Amount ;
What else is inside:
- float4 vertex - coordinates of the current vertex
- float3 normal - normal to the surface at the current point
- float4 texcoord - UV coordinates of the first texture
- float4 texcoord1 - UV coordinates of the second texture
- float4 tangent - tangent vector
- float4 color - vertex color
Here you can read the full article on vertex shaders.
struct Input {
	float2 uv_MainTex;
	float2 uv_BumpMap;
};
In the Input structure, you can ask the shader for additional variables that you will need for calculations in the surface procedure. We asked for the UV coordinates of both textures. The variable should be called uv_ NazvanieTekstury for the first UV coordinates and uv2_ NazvanieTekstury respectively for the second.
You can find a complete list of what you can specify here .
Here is the surface rendering procedure itself:
void surf (Input IN, inout SurfaceOutput o) {
//Получаем цвет точки по текущим UV координатам.
	fixed4 tex = tex2D(_MainTex, IN.uv_MainTex);
//Смешиваем с оттенком из параметров
	o.Albedo = tex.rgb * _Color.rgb;
//Степень отражения будет зависеть от яркости точки
	o.Gloss = tex.rgb;
//Размытие будет зависеть от параметров шейдера
	o.Specular = _Shininess;
//Распаковываем нормаль из соответствующей текстуры
	o.Normal = UnpackNormal(tex2D(_BumpMap, IN.uv_BumpMap));
}
The Input structure is passed to it , and inside you need to fill out the SurfaceOutput structure , which has the following form:
struct SurfaceOutput {
    half3 Albedo; //Альбедо поверхности (Цвет)
    half3 Normal; //Нормаль поверхности
    half3 Emission; //Эмиссия (используется для расчета отражения)
    half Specular; //"Размытие" отблеска в данной точке (зависит от направления камеры (dot(viewDir, Normal))
    half Gloss; //Сила отблеска в данной точке
    half Alpha; //Прозрачность в данной точке (не будет использоваться в "RenderType" = "Opaque")
};
We finish the shader with a line
FallBack "Specular"
This means that if for some reason the shader does not work on the client machine, then you need to roll back to the Specular shader.
Full version of the shader from the example
Materials used to write the article:
http://unity3d.com/support/documentation/Components/SL-SurfaceShaders
http://unity3d.com/support/documentation/Components/SL-SurfaceShaderExamples.html
http: / /unity3d.com/support/documentation/Components/SL-SubShader
http://unity3d.com/support/documentation/Components/SL-SubshaderTags
http://unity3d.com/support/documentation/Components/SL-ShaderReplacement.html