Networking on DHCP Option82 - It's Easy
This article will focus on building a network using the technology of connecting users, known as IPoE using dynamic allocation of addresses via DHCP using option 82.
So, our task is to build a network in which the user requires a minimum of steps to authorize and work on the network. You can even call it like: "stuck a cable in a computer, and it worked."
As a billing system, we will use a free (up to 200 subscribers) certified ACP Felix2. As the DHCP server we will use the ISC DHCP server.
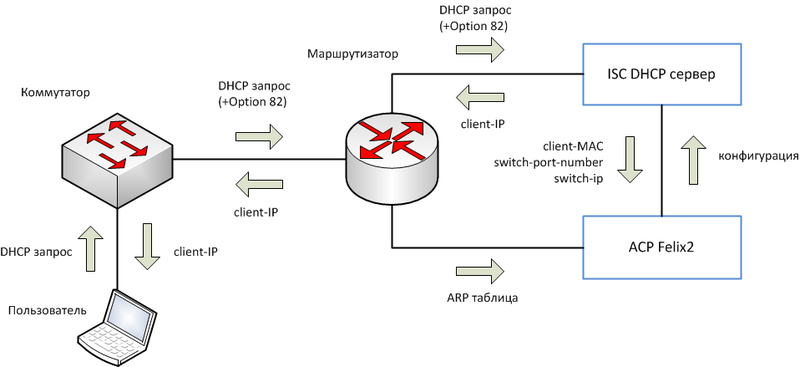
When the user turns on the computer, the operating system sends a DHCP request to obtain an IP address on the network. On the switch, DHCP request redirection (DHCP Relay) is enabled and DHCP option 82 is enabled, so it intercepts a DHCP request from the user, adds Option82 data (Agent Circuit ID and Agent Remote ID) to the DHCP packet and redirects the request to the DHCP server.
When a DHCP request arrives at a DHCP server, it issues an IP address based on the current configuration data. In the configuration, the correspondence of the IP address issued to the user, the IP address and port of the switch to which the user is connected is set. The DHCP server configuration is formed by ACP Felix2 based on the information available in the database.
ACP Felix2 periodically collects data from the DHCP server on the MAC addresses of users (to which IP addresses were issued) on the switch ports. By the IP address and port number of the switch, the system finds the user in the database and notes that the MAC address belongs to this user.
Also, ACP Felix2 periodically picks up the ARP table from the router (IP-MAC correspondence table) and, if the IP-MAC pair corresponds to the user in the database, this user is considered authorized. As soon as the IP-MAC pair disappears (the user turns off the computer), the system transfers the user to the list of unauthorized users (by doing this check that the subscriber’s equipment is really turned off).
First, we need a computer with two network cards and any switch that supports DHCP Relay (option 82). We will build the first (test) network according to the following scheme:

In this scheme, the Felix2 ACP system will additionally perform the function of a router.
Download ( felix2.ru/download ) and install using any of the described methods on the ACP server Felix2.
In this article, we will use the “ACP Felix2 Installation Disc”. Detailed installation instructions for ACP Felix2 can be found here: felix2.ru/documentation
After installation, we log into the system using the root username and password specified during installation.
After installation, the eth0 network interface is configured to work with the internal network: the eth1 interface must be configured to work with a higher-level Internet provider:
Here 1.1.1.2 is the IP address given to us by a superior Internet provider, 1.1.1.1 is the IP address of the provider's gateway.
So that the network configuration does not reset after a reboot, it must be described in the / etc / network / interfaces file.
Install ISC-DHCP server:
Immediately after installing the DHCP server will not start, so it has not yet been configured:
The ISC DHCP server configuration template file (dhcp_opt82_ip-port.conf) and all other necessary configuration files can be downloaded from here:
ftp://download.felix2.ru/config.examples/felix2_dhcp_opt82.tar.gz
Download, unpack, replace configuration files:
Restart ACP Felix2:
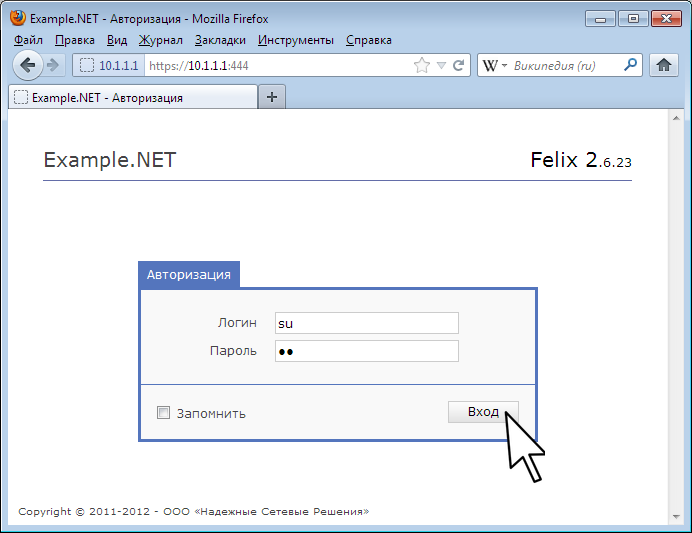
Let's go to the web admin interface. You can use a test machine for this by temporarily putting a static IP address on it (for example 10.1.1.10/24). The web-based admin interface is available on port 444 via HTTPS. The default username / password is su / su.
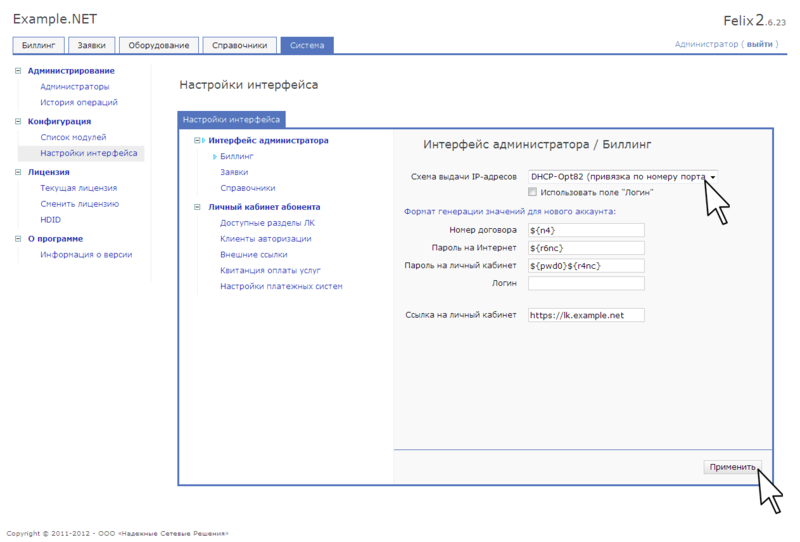
In order for additional fields to appear in the interface, we indicate in the interface settings (Configuration -> Interface settings) that the DHCP-Opt82 address issuing scheme is used:
Now we will add our switch to the equipment database (Equipment -> New equipment):
Status: Installed, IP address: 10.1.1.253, Model: DES-3200-28, and click "Add."

Create a new user (Users -> New User). We select the connection address. The system will automatically suggest the subnet used in this house and select the first free IP address.
We select the equipment to which the user will be connected. The system will prompt you to select equipment from the list of equipment installed in this house.
We indicate that the user will be connected to the first port of the switch. We mark the flag “Connection completed” and click “Add”.
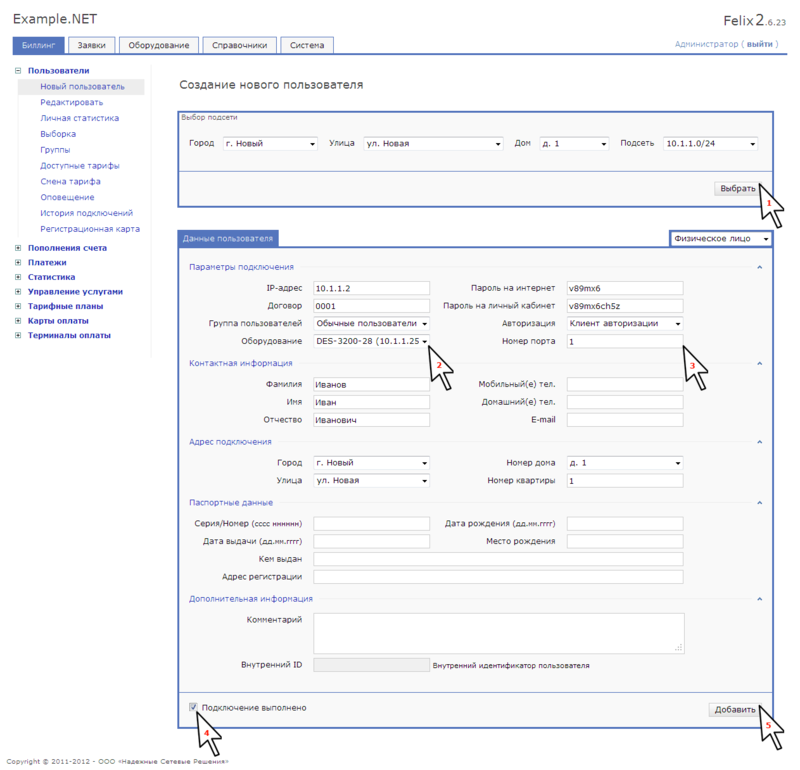
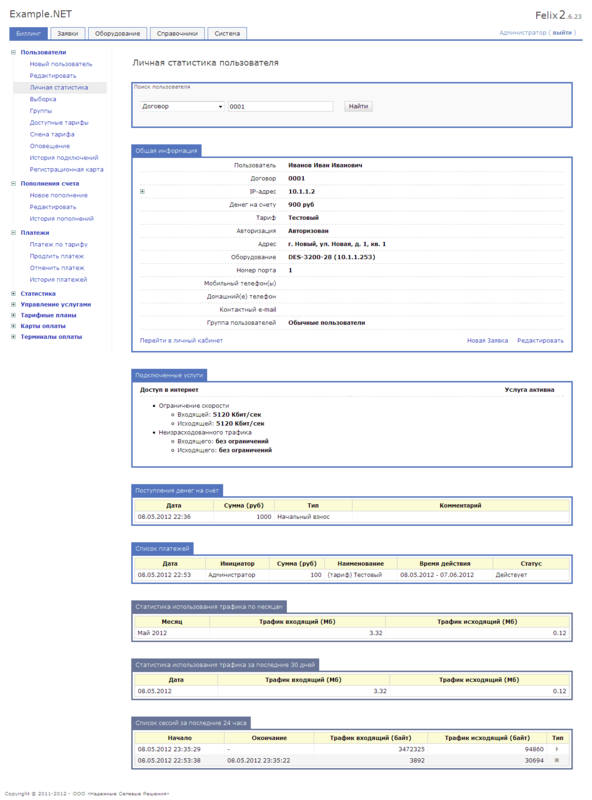
After that we replenish the account (Account replenishment -> New replenishment), activate the tariff plan (Payments -> Payment by tariff). You can view the current status of the user in (Users -> Personal statistics).
Check that the DHCP server configuration file has been updated:
Check that the DHCP server is working:
Now you need to configure the switch. If the switch is “out of the box”, the IP address must be specified in the manual. If the equipment is “used” and you don’t know what IP-address / login / password it is, you need to reset the configuration through a console connection.
In this article, we will use the DES-3200-28 out of the box switch.
We put a static IP address on the test machine (for example, 10.90.90.1/8). Connect to the switch using the telnet protocol:
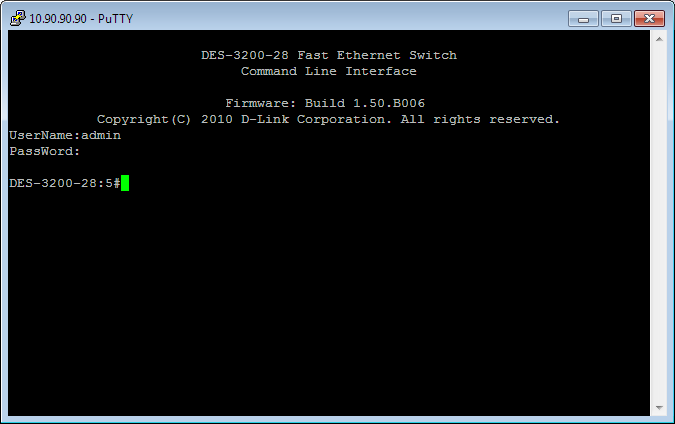
Turn it on, configure DHCP Relay:
Now the switch will intercept DHCP requests, add identification information (option 82) and send it to the DHCP server (10.1.1.1).
Set the default route and the new IP address of the switch:
After the last command (change of IP address), the connection will be disconnected. We put a static IP address on the test machine (for example, 10.1.1.10/24). We connect to the switch at the new address, save the configuration:
We turn on the test computer to obtain network settings via DHCP.
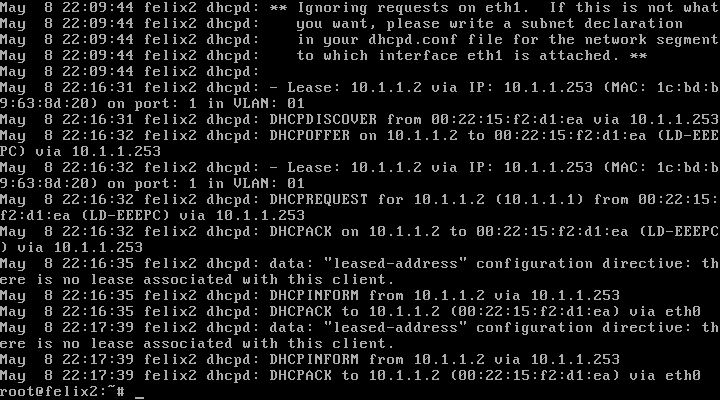
We connect the test computer to the first port of the switch. Check that DHCP-Relay packets from the switch reach the server and the client receives the IP address:
We verify that the user data is correctly displayed in the ACP Felix2 interface.
The network scheme discussed above was a test (you cannot connect many users to one switch). The following is an example of a real network diagram (no more than ~ 600 subscribers). The uplink from the backbone provider arrives at the optical port of the switch. This port must be combined in VLAN with the port where the eth1 network card is connected from the server with ACP Felix2.
For example, combine port 1 and port 24 in the 1000th VLAN:

When the network grows, it is also desirable to distribute the houses in separate VLANs.
With the growth of intranet (local) traffic, the connection between the switch and the server with ACP Felix2, which simultaneously acts as a router, will become a bottleneck. To avoid this, you need to install a dedicated router.
You also need to tell ACP Felix2 to receive the ARP table from an external router. Edit the file /etc/felix2/felix2.xml:
The arp_fetcher module can receive an ARP address table from CISCO equipment (interface = “CISCO”), D-Link (interface = “DLINK”), or from a Linux-based software router (interface = “Linux”).

At the request of the hawkers, an example of a system-generated configuration file for the ISC DHCP server was added.
In this example, users connected to ports 1-3 of the switch with the address 10.1.1.253 are given addresses 10.1.1.2-10.1.1.4, respectively.
So, our task is to build a network in which the user requires a minimum of steps to authorize and work on the network. You can even call it like: "stuck a cable in a computer, and it worked."
As a billing system, we will use a free (up to 200 subscribers) certified ACP Felix2. As the DHCP server we will use the ISC DHCP server.
General scheme of work
When the user turns on the computer, the operating system sends a DHCP request to obtain an IP address on the network. On the switch, DHCP request redirection (DHCP Relay) is enabled and DHCP option 82 is enabled, so it intercepts a DHCP request from the user, adds Option82 data (Agent Circuit ID and Agent Remote ID) to the DHCP packet and redirects the request to the DHCP server.
When a DHCP request arrives at a DHCP server, it issues an IP address based on the current configuration data. In the configuration, the correspondence of the IP address issued to the user, the IP address and port of the switch to which the user is connected is set. The DHCP server configuration is formed by ACP Felix2 based on the information available in the database.
ACP Felix2 periodically collects data from the DHCP server on the MAC addresses of users (to which IP addresses were issued) on the switch ports. By the IP address and port number of the switch, the system finds the user in the database and notes that the MAC address belongs to this user.
Also, ACP Felix2 periodically picks up the ARP table from the router (IP-MAC correspondence table) and, if the IP-MAC pair corresponds to the user in the database, this user is considered authorized. As soon as the IP-MAC pair disappears (the user turns off the computer), the system transfers the user to the list of unauthorized users (by doing this check that the subscriber’s equipment is really turned off).
Practical implementation
First, we need a computer with two network cards and any switch that supports DHCP Relay (option 82). We will build the first (test) network according to the following scheme:
In this scheme, the Felix2 ACP system will additionally perform the function of a router.
Installation
Download ( felix2.ru/download ) and install using any of the described methods on the ACP server Felix2.
In this article, we will use the “ACP Felix2 Installation Disc”. Detailed installation instructions for ACP Felix2 can be found here: felix2.ru/documentation
After installation, we log into the system using the root username and password specified during installation.
After installation, the eth0 network interface is configured to work with the internal network: the eth1 interface must be configured to work with a higher-level Internet provider:
IP-адрес: 10.1.1.1

Маска подсети: 255.255.255.0
ifconfig eth1 1.1.1.2 netmask 255.255.255.0
route add default gw 1.1.1.1
Here 1.1.1.2 is the IP address given to us by a superior Internet provider, 1.1.1.1 is the IP address of the provider's gateway.
So that the network configuration does not reset after a reboot, it must be described in the / etc / network / interfaces file.
Install ISC-DHCP server:
apt-get update
apt-get install isc-dhcp-server
Immediately after installing the DHCP server will not start, so it has not yet been configured:
root@felix2:~# cat /var/log/syslog | grep dhcp | tail -n 10
May 8 21:48:33 felix2 dhcpd:
May 8 21:48:33 felix2 dhcpd:
May 8 21:48:33 felix2 dhcpd: No subnet declaration for eth0 (10.1.1.1).
May 8 21:48:33 felix2 dhcpd: ** Ignoring requests on eth0.  If this is not what
May 8 21:48:33 felix2 dhcpd:    you want, please write a subnet declaration
May 8 21:48:33 felix2 dhcpd:    in your dhcpd.conf file for the network segment
May 8 21:48:33 felix2 dhcpd:    to which interface eth0 is attached. **
May 8 21:48:33 felix2 dhcpd:
May 8 21:48:33 felix2 dhcpd:
May 8 21:48:33 felix2 dhcpd: Not configured to listen on any interfaces!
Configuration
The ISC DHCP server configuration template file (dhcp_opt82_ip-port.conf) and all other necessary configuration files can be downloaded from here:
ftp://download.felix2.ru/config.examples/felix2_dhcp_opt82.tar.gz
Download, unpack, replace configuration files:
wget ftp://download.felix2.ru/config.examples/felix2_dhcp_opt82.tar.gz
tar -xf felix2_dhcp_opt82.tar.gz -C /etc/felix2/
Restart ACP Felix2:
/etc/init.d/felix2 restart
Creation of equipment and test user in ACP Felix2
Let's go to the web admin interface. You can use a test machine for this by temporarily putting a static IP address on it (for example 10.1.1.10/24). The web-based admin interface is available on port 444 via HTTPS. The default username / password is su / su.
In order for additional fields to appear in the interface, we indicate in the interface settings (Configuration -> Interface settings) that the DHCP-Opt82 address issuing scheme is used:
Now we will add our switch to the equipment database (Equipment -> New equipment):
Status: Installed, IP address: 10.1.1.253, Model: DES-3200-28, and click "Add."
Create a new user (Users -> New User). We select the connection address. The system will automatically suggest the subnet used in this house and select the first free IP address.
We select the equipment to which the user will be connected. The system will prompt you to select equipment from the list of equipment installed in this house.
We indicate that the user will be connected to the first port of the switch. We mark the flag “Connection completed” and click “Add”.
After that we replenish the account (Account replenishment -> New replenishment), activate the tariff plan (Payments -> Payment by tariff). You can view the current status of the user in (Users -> Personal statistics).
Check that the DHCP server configuration file has been updated:
cat /etc/dhcp/dhcpd.conf
Check that the DHCP server is working:
ps ax | grep dhcpd
Switch Configuration
Now you need to configure the switch. If the switch is “out of the box”, the IP address must be specified in the manual. If the equipment is “used” and you don’t know what IP-address / login / password it is, you need to reset the configuration through a console connection.
In this article, we will use the DES-3200-28 out of the box switch.
We put a static IP address on the test machine (for example, 10.90.90.1/8). Connect to the switch using the telnet protocol:
Turn it on, configure DHCP Relay:
enable dhcp_relay
config dhcp_relay hops 16 time 0
config dhcp_relay option_82 state enable
config dhcp_relay option_82 check disable
config dhcp_relay option_82 policy replace
config dhcp_relay option_82 remote_id default
config dhcp_relay add ipif System 10.1.1.1
Now the switch will intercept DHCP requests, add identification information (option 82) and send it to the DHCP server (10.1.1.1).
Set the default route and the new IP address of the switch:
create iproute default 10.1.1.1
config ipif System vlan default ipaddress 10.1.1.253/24 state enable
After the last command (change of IP address), the connection will be disconnected. We put a static IP address on the test machine (for example, 10.1.1.10/24). We connect to the switch at the new address, save the configuration:
save
We turn on the test computer to obtain network settings via DHCP.
We connect the test computer to the first port of the switch. Check that DHCP-Relay packets from the switch reach the server and the client receives the IP address:
tail –n 1000 /var/log/syslog | grep dhcpd
We verify that the user data is correctly displayed in the ACP Felix2 interface.
Real network diagram
The network scheme discussed above was a test (you cannot connect many users to one switch). The following is an example of a real network diagram (no more than ~ 600 subscribers). The uplink from the backbone provider arrives at the optical port of the switch. This port must be combined in VLAN with the port where the eth1 network card is connected from the server with ACP Felix2.
For example, combine port 1 and port 24 in the 1000th VLAN:
create vlan v1000 tag 1000
config vlan v1000 add untagged 1,24
When the network grows, it is also desirable to distribute the houses in separate VLANs.
Network Diagram with Dedicated Router
With the growth of intranet (local) traffic, the connection between the switch and the server with ACP Felix2, which simultaneously acts as a router, will become a bottleneck. To avoid this, you need to install a dedicated router.
You also need to tell ACP Felix2 to receive the ARP table from an external router. Edit the file /etc/felix2/felix2.xml:
The arp_fetcher module can receive an ARP address table from CISCO equipment (interface = “CISCO”), D-Link (interface = “DLINK”), or from a Linux-based software router (interface = “Linux”).
At the request of the hawkers, an example of a system-generated configuration file for the ISC DHCP server was added.
In this example, users connected to ports 1-3 of the switch with the address 10.1.1.253 are given addresses 10.1.1.2-10.1.1.4, respectively.
#
# Automatically generated configuration file
# Filename: dhcpd.conf (/etc/dhcp/dhcpd.conf)
# Generator: Felix2
# Creation Date: 15.05.2012 11:31:36
#
#
# option definitions common to all supported networks...
#
authoritative;
default-lease-time 86400;
max-lease-time 86400;
ddns-update-style none;
log-facility local7;
if exists agent.remote-id and exists agent.circuit-id
{
    if binary-to-ascii(16, 8, "", substring(option agent.remote-id, 2, 1)) = "0" {
        set switch-mac = concat("0", binary-to-ascii(16, 8, "", substring(option agent.remote-id, 2, 1)), ":", binary-to-ascii(16, 8, ":", substring(option agent.remote-id, 3, 6)));
    } else {
        set switch-mac = binary-to-ascii(16, 8, ":", substring(option agent.remote-id, 2, 6));
    }
    set switch-addr = binary-to-ascii(10, 8, ".", packet(24, 4));
    set switch-port = binary-to-ascii(10, 8, "", substring(option agent.circuit-id, 5, 1));
    set switch-port-vlan = binary-to-ascii(10, 8, "", substring(option agent.circuit-id, 2, 2));
    log(info, concat("- Lease: ", binary-to-ascii(10, 8, ".", leased-address), " via IP: ", switch-addr, " (MAC: ", switch-mac, ") on port: ", switch-port, " in VLAN: ", switch-port-vlan));
}
#
# subnets
#
subnet 10.1.1.0 netmask 255.255.255.0 {
	option routers 10.1.1.1;
	option domain-name-servers 10.1.1.1;
	class "1:1" {match if binary-to-ascii(10, 8, ".", packet(24, 4))="10.1.1.253" and binary-to-ascii(10, 8, "", suffix(option agent.circuit-id, 1)) = "1";}
	pool {range 10.1.1.2; allow members of "1:1";}
	class "1:2" {match if binary-to-ascii(10, 8, ".", packet(24, 4))="10.1.1.253" and binary-to-ascii(10, 8, "", suffix(option agent.circuit-id, 1)) = "2";}
	pool {range 10.1.1.3; allow members of "1:2";}
	class "1:3" {match if binary-to-ascii(10, 8, ".", packet(24, 4))="10.1.1.253" and binary-to-ascii(10, 8, "", suffix(option agent.circuit-id, 1)) = "3";}
	pool {range 10.1.1.4; allow members of "1:3";}
}









