 March 22, 2012 at 23:31
[Arch Linux] Configuring a bunch of Apache, Nginx, PHP and Percona DB
After moving from Ubuntu to Arch, there was a need to configure this bundle, however, unlike Ubuntu, there was no such all-in-one manual for Arch. Having collected ideas from different manuals, including those that were written under Ubuntu, I decided to write such an integral guide to Habr.
I want to say right away that this is a basic installation, without virtual hosts in the amount of n-pieces, just a setting for local development.
XAMPP did not suit me simply for ideological reasons.
It is assumed that you already have yaourt installed and you can use it at least a little, as well as the execution of root commands from your user (set the sudo package , then uncomment the line "% wheel ALL = (ALL) ALL" in the / etc / file sudoers and log in; when executing commands with sudo, we enter the password from our user, and not from root'a).
Also, before installing directly, make sure that you have extra and community repositories connected.
To do this:
And check that the sections of these repositories look the same.
And synchronize the list of packages.
Now we need to edit /etc/httpd/conf/httpd.conf: enable 2 modules for Apache - rpaf and php5, plus for rpaf add the configuration and more in detail.
Save the file (Ctrl + O) and exit (Ctrl + X).
Now we just have to slightly change the second Apache configuration file.
Change “Listen 80” to “Listen 81”.
Save the file (Ctrl + O) and exit (Ctrl + X).
Restart apache.
Next, to check, create the index.php file. (Here we enter the password not from our user, but from root.)
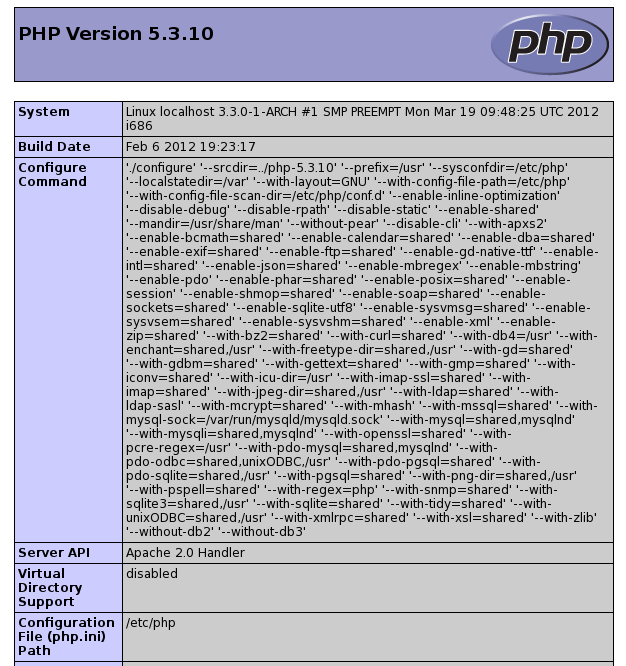
After that, if you go to the address http: // localhost: 81 / , you should see a page with full information about PHP and Apache. Something like that.
Install the latest (dev-branch) version. If you want a stable one, just write “sudo pacman -S nginx” instead of the command below.
And let's bring the view of the config to the following view.
We erase everything and copy everything from here - http://pastebin.com/2S8KnqkH .
And restart nginx.
Now, you can go to port 80 and you should also see information about php, as it was before ( http: // localhost ).
As you know, MySQL itself is far from being the fastest database, so I usually install fork - PerconaDB. You can read more about features on the official website , except for myself I can say that backward compatibility with MySQL is complete, so there will be no unexpected problems.
And set up the password for the PerconaDB administrative user.
ps if there are any suggestions for improving the material - write in the comments.
pps doesn’t leave me feeling that the “gzip_types” section in the nginx config is not quite optimal - so I will also hear suggestions.
And at the very bottom of the file we add to the array "DAEMONS":
I want to say right away that this is a basic installation, without virtual hosts in the amount of n-pieces, just a setting for local development.
XAMPP did not suit me simply for ideological reasons.
So let's get started.
It is assumed that you already have yaourt installed and you can use it at least a little, as well as the execution of root commands from your user (set the sudo package , then uncomment the line "% wheel ALL = (ALL) ALL" in the / etc / file sudoers and log in; when executing commands with sudo, we enter the password from our user, and not from root'a).
Also, before installing directly, make sure that you have extra and community repositories connected.
To do this:
sudo nano /etc/pacman.confAnd check that the sections of these repositories look the same.
[extra]#SigLevel = PackageOptionalInclude = /etc/pacman.d/mirrorlist[community]#SigLevel = PackageOptionalInclude = /etc/pacman.d/mirrorlistAnd synchronize the list of packages.
sudo pacman -SyFirst, we’ll install Apache and PHP and, accordingly, fix the configs a bit.
sudo pacman -S apache php-apacheyaourt mod-rpafNow we need to edit /etc/httpd/conf/httpd.conf: enable 2 modules for Apache - rpaf and php5, plus for rpaf add the configuration and more in detail.
sudo nano /etc/httpd/conf/httpd.conf- Change “Listen 80” to “Listen 81”, since port 80 will listen to nginx.
- Add 2 lines to the LoadModule section.
LoadModule rpaf_module modules/mod_rpaf-2.0.soLoadModule php5_module modules/libphp5.so - You can change the email in the “ServerAdmin” line, although this is an optional item. I usually change out of habit.
- A little lower is the commented line “ServerName” - uncomment and replace it with “ServerName 127.0.0.1:81”
- Check that in the "
"the line" TypesConfig conf / mime.types "was not commented out - Also uncomment the line “MIMEMagicFile conf / magic”
- In the "
"replace, we bring the line with the" DirectoryIndex "parameter to this form: DirectoryIndex index.php - And finally at the end of the file we append.
Include conf/extra/php5_module.confRPAFenable OnRPAFproxy_ips 127.0.0.1 10.0.0.1RPAFsethostname OnRPAFheader X-Forwarded-For
Save the file (Ctrl + O) and exit (Ctrl + X).
Now we just have to slightly change the second Apache configuration file.
sudo nano /etc/httpd/conf/ports.confChange “Listen 80” to “Listen 81”.
We are done with Apache setup. We pass to PHP.
sudo nano /etc/php/php.ini- Configure "post_max_size". Usually, 60M is quite enough, or even much less - look at the situation. Similarly, configure "upload_max_filesize" and "max_file_uploads".
- We include modules. There can be no single solution, however, my option for most needs should be enough ( http://pastebin.com/cZwepL0T ). If any additional modules are needed, which are not in the list, we are first looking in yaourt.
- I advise you to uncomment and configure “date.timezone” ( http://php.net/date.timezone ).
- Uncomment the line "session.save_path =" / tmp ".
Save the file (Ctrl + O) and exit (Ctrl + X).
Restart apache.
sudo rc.d restart httpdNext, to check, create the index.php file. (Here we enter the password not from our user, but from root.)
su -c "echo '' > /srv/http/index.php"After that, if you go to the address http: // localhost: 81 / , you should see a page with full information about PHP and Apache. Something like that.
We proceed to install and configure NGINX
Install the latest (dev-branch) version. If you want a stable one, just write “sudo pacman -S nginx” instead of the command below.
yaourt nginx-develAnd let's bring the view of the config to the following view.
sudo nano /etc/nginx/conf/nginx.confWe erase everything and copy everything from here - http://pastebin.com/2S8KnqkH .
And restart nginx.
sudo rc.d restart nginxNow, you can go to port 80 and you should also see information about php, as it was before ( http: // localhost ).
And the last step is installing PerconaDB
As you know, MySQL itself is far from being the fastest database, so I usually install fork - PerconaDB. You can read more about features on the official website , except for myself I can say that backward compatibility with MySQL is complete, so there will be no unexpected problems.
sudo pacman -S percona-serverAnd set up the password for the PerconaDB administrative user.
mysql_secure_installationThis is how we got a fairly quick local web server config. I hope this topic will be useful to someone.
ps if there are any suggestions for improving the material - write in the comments.
pps doesn’t leave me feeling that the “gzip_types” section in the nginx config is not quite optimal - so I will also hear suggestions.
Forgot to write about startup services at startup
sudo nano /etc/rc.confAnd at the very bottom of the file we add to the array "DAEMONS":
@nginx @httpd @mysqld








