VMware vSphere: Converting a Virtual IDE Disk to SCSI
Recently, I came across a situation where the vSphere virtual machine began to run out of space on a virtual disk, and a typical operation to expand disk space was impossible. In my case, it was connected to the disk connection interface - IDE.
Articles that can be found in this connection on the Internet, for example:
VMware Knowledge Base
Analogue, with pictures
, unfortunately are incomplete.
Following these articles leads to the inoperability of the virtual machine. After more detailed research, a working way was found to supplement the above articles. In order for the article to provide a complete solution to the problem, a revised and augmented conversion method will be outlined here.
1. In order not to clutter up the article, I will omit the word “virtual” everywhere, which will be applied to the disk and to the machine.
2. I will use specific terminology / names typical of vSphere.
3. The inability to expand the disk can be caused by several reasons: the presence of snapshots of this disk (while they may not be visible in the snapshot manager), the lack of space for expansion, the power of the machine, etc. It describes the situation when there are no snapshots, there is a place, the power is off, but the IDE drive.
4. There is a theoretical / (not tested) ability to convert a disk using VMware Converter. I didn’t use it for two reasons: it’s a rather “heavy” software and I met mention of the impossibility of loading the machine after conversion
5. Operations were performed on vSphere + ESXi v4.1U2. I do not guarantee that the method will work on other versions (but in principle it should work, nothing super-specific).
6. Inside the machine is installedneonka WinXP 32bit, and part of the action is designed for this, if you have another OS, keep this in mind.
7. The format of the disk is Thick
8. You have a fresh backup of this machine (in the process of experiments, I recovered about 5 times).
So, our machine is off, we have open vSphere Client.
We go into the properties of the machine, and add the SCSI Device. As a device tale, I had a cider, which is recommended to immediately change the Virtual Device Node from SCSI (0: 0) to SCSI (0: 1), because later on SCSI (0: 0) we will hang our converted disk.
Say the device is added along with the SCSI Controller, for which you need to change the type from BusLogic Parallel to LSI Logic Parallel.
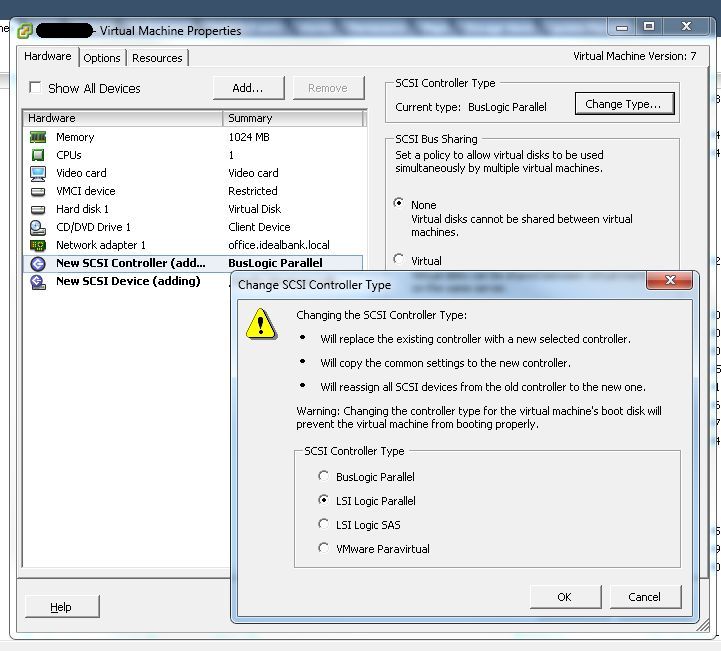
We save the settings and turn on the machine.
We install the driver for the controller, which can be found on the manufacturer's website: LSI Support .
We are looking for a driver for our OS, for LSI20320-R
After installing the driver, it would be nice to verify that the controller and the device appeared in the equipment of the machine and are installed correctly.
Turn off the virtual machine.
In the above links, it is recommended to replace one line in the file% vm-name% .vmdk (ddb.adapterType) so that in the future everything works. It didn’t work for me (the machine does not boot at all - even the MBR is not visible).
After some research, a problem was found - different geometry of IDE and SCSI disks.
Therefore, you need to figure out the geometry of a SCSI drive with exactly the same size as our IDE drive.
This can be done in different ways, I personally used VMware vSphere PowerCLI (see the basement).
So, we connect to the ESX (i) host and find out the disk size of the machine:
T.O. we got the size in kilobytes. Now we find out the name of the tale of the controller of our machine (this is needed to create the tale of the disk):
We create a tale disk of a similar size: Upon creation, a plate will be displayed in which, among other things, the path to the created disk will be written, as well as its name. A bit of theory: In VMware, a virtual disk in the simplest case consists of two files: % vm-name% .vmdk - disk description file % vm-name% -flat.vmdk - the disk itself (contents) By the way, Datastore Browser presents them in the form one file, but if you download this file, for example, to the local machine, we will actually get two files, as it should be (in theory, there may be more if split was used). At the moment, we are interested in the description files for the old IDE disk and the newly created SCSI disk. I used SSH and WinSCP to retrieve them.
For my disk size, we will see the following:
IDE
SCSI
First, pay attention to the second line, to the numbers after RW , this is the size of the disks (in my case in 512b blocks). The numbers must match, if they do not match, it makes no sense to read further.
Next, the difference between the cylinders and the heads is immediately evident. Well, the type of adapter.
Now we edit the description file of the old IDE disk, respectively changing the number of cylinders, heads and type of adapter. I do not recommend simply rewriting the description file, such as from the new tale of the disc, because There is more information in the old IDE disk in this file.
All we needed was from the test drive we received, so it can be removed (for example, using Remove-HardDisk).
Now we go into the properties of the virtual machine and remove the IDE disk from the machine.
Be extremely careful, the disk is removed only from the virtual machine (Remove from virtual machine), but we do not delete files from the disk!
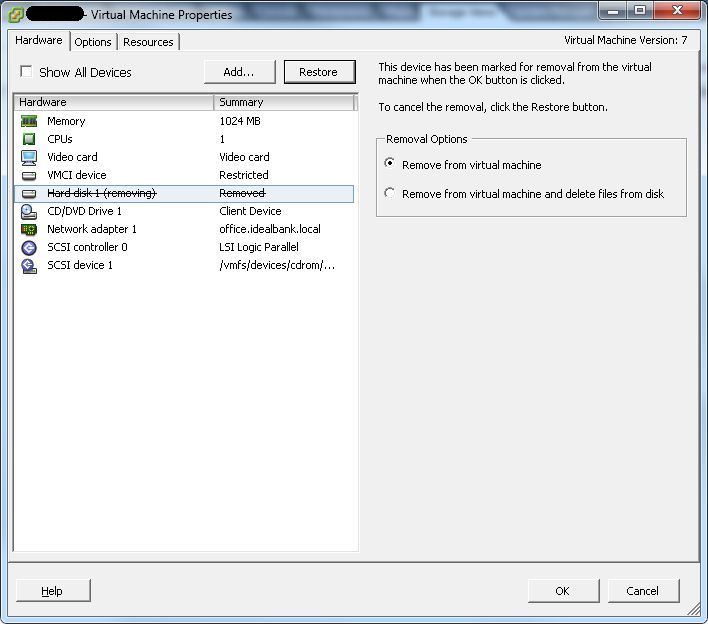
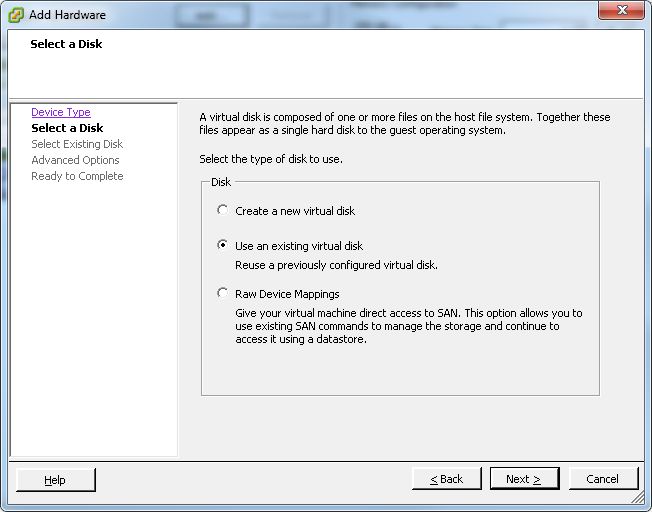
We save the changes, and again go to the properties of the virtual machine. Add a hard disk, select the “Reuse existing virtual disk” item and point to the file with our disk.
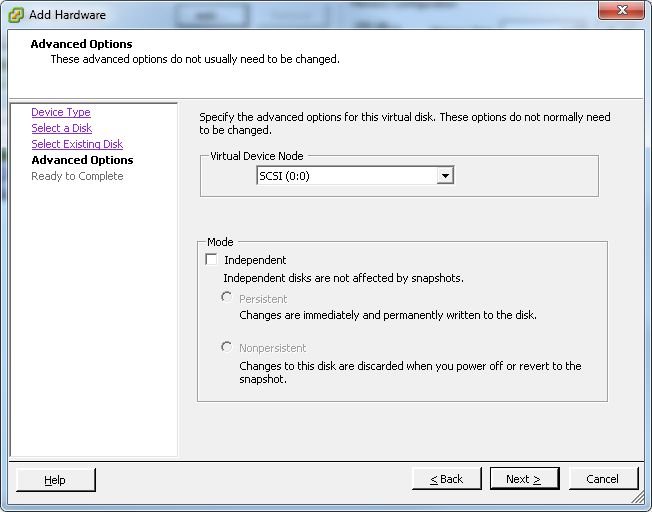
In the additional properties, we check that the disk is mounted on SCSI (0: 0).
At the moment, you can delete the tales by the sidir, if it is not needed, and check the IDE settings of the sidir (if there is one). An IDE cider must be installed on the channel IDE (0: 0) or IDE (1: 0) (master), otherwise the machine will refuse to start.
In general, that’s all. You can also go into the BIOS of the virtual machine, check the boot order.
The virtual machine can be started, at the first boot the driver will be installed on the disk.
By the way, now you can change the disk size.
VMware Knowledge Base: IDE to SCSI
LSI Support
VMware vSphere PowerCLI
Articles that can be found in this connection on the Internet, for example:
VMware Knowledge Base
Analogue, with pictures
, unfortunately are incomplete.
Following these articles leads to the inoperability of the virtual machine. After more detailed research, a working way was found to supplement the above articles. In order for the article to provide a complete solution to the problem, a revised and augmented conversion method will be outlined here.
Retreats
1. In order not to clutter up the article, I will omit the word “virtual” everywhere, which will be applied to the disk and to the machine.
2. I will use specific terminology / names typical of vSphere.
3. The inability to expand the disk can be caused by several reasons: the presence of snapshots of this disk (while they may not be visible in the snapshot manager), the lack of space for expansion, the power of the machine, etc. It describes the situation when there are no snapshots, there is a place, the power is off, but the IDE drive.
4. There is a theoretical / (not tested) ability to convert a disk using VMware Converter. I didn’t use it for two reasons: it’s a rather “heavy” software and I met mention of the impossibility of loading the machine after conversion
5. Operations were performed on vSphere + ESXi v4.1U2. I do not guarantee that the method will work on other versions (but in principle it should work, nothing super-specific).
6. Inside the machine is installed
7. The format of the disk is Thick
8. You have a fresh backup of this machine (in the process of experiments, I recovered about 5 times).
Started
So, our machine is off, we have open vSphere Client.
We go into the properties of the machine, and add the SCSI Device. As a device tale, I had a cider, which is recommended to immediately change the Virtual Device Node from SCSI (0: 0) to SCSI (0: 1), because later on SCSI (0: 0) we will hang our converted disk.
Say the device is added along with the SCSI Controller, for which you need to change the type from BusLogic Parallel to LSI Logic Parallel.
We save the settings and turn on the machine.
We install the driver for the controller, which can be found on the manufacturer's website: LSI Support .
We are looking for a driver for our OS, for LSI20320-R
After installing the driver, it would be nice to verify that the controller and the device appeared in the equipment of the machine and are installed correctly.
Turn off the virtual machine.
In the above links, it is recommended to replace one line in the file% vm-name% .vmdk (ddb.adapterType) so that in the future everything works. It didn’t work for me (the machine does not boot at all - even the MBR is not visible).
After some research, a problem was found - different geometry of IDE and SCSI disks.
Therefore, you need to figure out the geometry of a SCSI drive with exactly the same size as our IDE drive.
This can be done in different ways, I personally used VMware vSphere PowerCLI (see the basement).
So, we connect to the ESX (i) host and find out the disk size of the machine:
PowerCLI> (Get-HardDisk -VM% vm-name%). CapacityKB
10485760
T.O. we got the size in kilobytes. Now we find out the name of the tale of the controller of our machine (this is needed to create the tale of the disk):
PowerCLI> (Get-ScsiController -VM% vm-name%). Name
SCSI controller 0
We create a tale disk of a similar size: Upon creation, a plate will be displayed in which, among other things, the path to the created disk will be written, as well as its name. A bit of theory: In VMware, a virtual disk in the simplest case consists of two files: % vm-name% .vmdk - disk description file % vm-name% -flat.vmdk - the disk itself (contents) By the way, Datastore Browser presents them in the form one file, but if you download this file, for example, to the local machine, we will actually get two files, as it should be (in theory, there may be more if split was used). At the moment, we are interested in the description files for the old IDE disk and the newly created SCSI disk. I used SSH and WinSCP to retrieve them.
PowerCLI > New-HardDisk -Datastore datastoreXX -StorageFormat Thick -CapacityKB 10485760 -Controller "SCSI controller 0" %vm-name%
For my disk size, we will see the following:
IDE
# Extent description
RW 20971520 VMFS "% vm-name% -flat.vmdk"
# The Disk Data Base
#DDB
ddb.geometry.cylinders = "16383"
ddb.geometry.heads = "16"
ddb.geometry.sectors = "63"
ddb.adapterType = "ide"
SCSI
# Extent description
RW 20971520 VMFS "% vm-name% _1-flat.vmdk"
# The Disk Data Base
#DDB
ddb.geometry.cylinders = "1305"
ddb.geometry.heads = "255"
ddb.geometry.sectors = "63"
ddb.adapterType = "lsilogic"
First, pay attention to the second line, to the numbers after RW , this is the size of the disks (in my case in 512b blocks). The numbers must match, if they do not match, it makes no sense to read further.
Next, the difference between the cylinders and the heads is immediately evident. Well, the type of adapter.
Now we edit the description file of the old IDE disk, respectively changing the number of cylinders, heads and type of adapter. I do not recommend simply rewriting the description file, such as from the new tale of the disc, because There is more information in the old IDE disk in this file.
All we needed was from the test drive we received, so it can be removed (for example, using Remove-HardDisk).
Now we go into the properties of the virtual machine and remove the IDE disk from the machine.
Be extremely careful, the disk is removed only from the virtual machine (Remove from virtual machine), but we do not delete files from the disk!
We save the changes, and again go to the properties of the virtual machine. Add a hard disk, select the “Reuse existing virtual disk” item and point to the file with our disk.
In the additional properties, we check that the disk is mounted on SCSI (0: 0).
At the moment, you can delete the tales by the sidir, if it is not needed, and check the IDE settings of the sidir (if there is one). An IDE cider must be installed on the channel IDE (0: 0) or IDE (1: 0) (master), otherwise the machine will refuse to start.
In general, that’s all. You can also go into the BIOS of the virtual machine, check the boot order.
The virtual machine can be started, at the first boot the driver will be installed on the disk.
By the way, now you can change the disk size.
Basement
VMware Knowledge Base: IDE to SCSI
LSI Support
VMware vSphere PowerCLI









