VR game on blockchain using ERC-1155 token: React 360 or Unity?
VR games have always caused us admiration. This is a kind of digital shell magic, the full effect of immersion in another world. At all conferences, VR projects are given the most attention, large-scale stands, hundreds of spectators waiting to dive into the newly created universe. Since our company for the most part is not about entertainment, but rather about evolution and progressive approaches - we have discussed in detail how blockchain can be useful in such a young genre of game development as VR.
The answer came immediately - smart contracts and the newest network standard token Ethereum ERC1155, designed specifically to create gaming / digital assets. ERC1155 is a token that combines the best features of the popular ERC20 and ERC721 (technical details can be found in the readme github of the repository). Imagine a classic situation - you knocked out a rare and expensive item or skin. How to sell it so that you are not deceived by the buyer, or you yourself lacked the opportunity to freely pick up the money of others without giving away the item? The correct answer is smart contracts. And the ERC1155 token is exactly what is needed to implement this functionality. The subject can have its own characteristics - in the form of strength, damage, resilience, protection, additional damage (characteristic of ERC721 token) and its value (characteristic of ERC20 token) in one shell - doesn't that sound inspirational? All games can be safe and convenient to store, transfer and sell their digital assets. Let's try to solve this problem on the example of the toy we have conceived.
We came up with the concept rather quickly - an analogue of the popular board card game “Munchkin”, transferred to the VR universe, with smart contracts for trading any objects, armor and weapons knocked out during the game. The choice of implementation technology for our indie developers turned out to be difficult, but it is interesting that we want to tell you about this experience below.
React 360
Since most of the team had extensive development experience at React, there was a desire to try React-360 to solve the problem. The description of the tool seemed quite functional, so we made a choice in his direction.
Installation and Description
Installing React-360 starts with installing its CLI with npm, which helps to quickly and conveniently initialize, run, and build the project from the command line.
After initialization of the project, we received a ready-made project template in which two main files are client.js and index.js, as well as the static_assets folder, where all of the render object files, index.html and other configuration files are stored.
Rendering
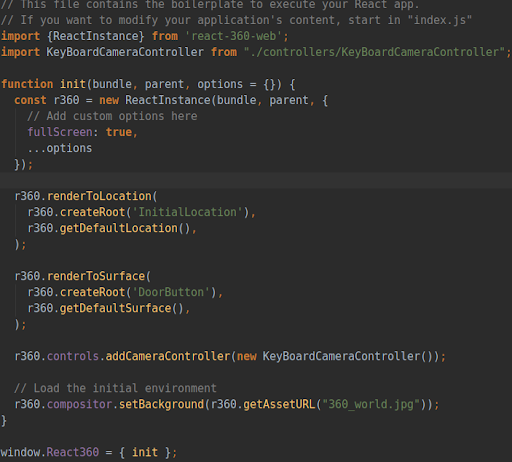
The first file (client.js) contains the rendering code and work with the main class React360. React360 has two types of rendering objects - it is renderToLocation, which is responsible for rendering a 3D object, and renderToSurface, which is responsible for rendering a 2D object. We also defined the Controller for the camera, which describes its behavior: in our case, the camera movement (as the main character) is described by pressing certain keyboard buttons. Then we set the default background for the whole project and in the last line we wrote React360 into the window object (which is a global object for browser applications).
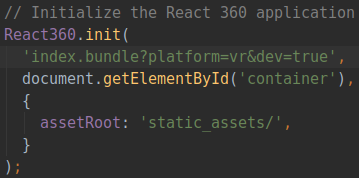
Subsequently, the init method from React360 is called in the index.html file as follows:
In the second file (index.js), the components are registered in the application, with a view to their further use for rendering in the client.js file.
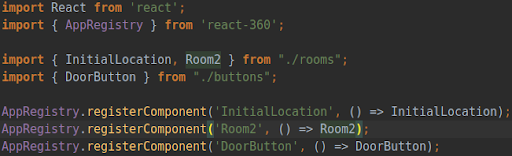
So the flow rendering of the component (object) is as follows:
a) Creation in a separate file;
b) Registration at index.js;
c) Rendering in client.js.
Positioning
The next moment is the positioning of the object in the 3D plane. In React-360, when positioning, as in rendering, there are differences between 3D and 2D objects. 3D objects can be positioned in two ways.
- Through Location when rendering.
- Through the Transform in the object itself.
We chose Transform at the default Location, as suggested by the official website React-360. Translate is responsible for positioning in the 3D plane.

2D objects are positioned using the flex system, as in React Native, which in our case turned out to be quite inconvenient:
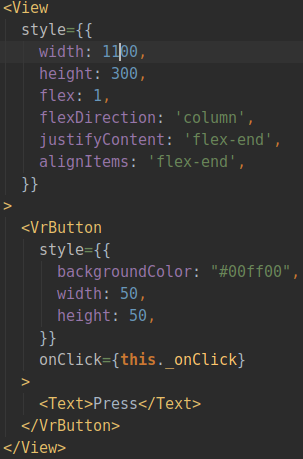
To position the button to the right of the camera, you had to create a View, as in React Native, and set its width corresponding to the distance from the leftmost point of the screen to the place where the object should be, and the height corresponding to the distance from the top point of the screen to the area where should be the object. It was also necessary to set certain styles so that the internal content was located in the lower right point of the View. In the end, it all looks cumbersome and inconvenient, it is easier to use the same translate to accommodate these types of objects, representing them as 3D objects with 0 depth.
Import of objects
The next item is the import of 3D objects into React-360. And here, at first glance, everything is simple and clear. There is a standard Model component, which has a props source, a JS object receiving the paths to the .obj files (the file of the object itself) and the .mtl (material file of this object):
But even here there were interesting pitfalls. The bottom line is that the .mtl file has a map texture by default in the .tga format and the specified path on the disk of the person who designed it. We not only had to change the path to the files manually, but also change them to .png, since the .tga files of the format were not rendered in the browser. The .png format allowed us to render textures correctly.
Lighting
Since the lighting system in the documentation is not described at all, I had to get into the react-360 source code and find something related to Lights, and then look at the examples of who does what and how to work with this zoo. By a trial and error method understood, applied to the AmbientLight, SpotLight and PointLight models. Their positioning is the same as for 3D objects, but there is also an angle:
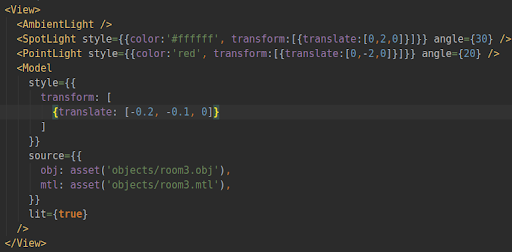
The light did not apply to the object, but we did not retreat, and, through long searches and walking on all sorts of issues in the react-360 repository, we came across what needs to be set props lit true, and only after that the light began to act on the object.
Motion
We have taken the main camera as the main player, by which we carry out movement and actions. To do this, they wrote the Controller for the camera, where they initialized the main function of the interface:

which transmits the current position of the camera and its rotation. You can work with them in the camera to change for some event, such an event was pressing the WASD buttons (as usual), later we wanted to replace them by pressing the key and moving to the coordinate that was pressed to then replace it with a VR Controller. For sweet, they set the speed of movement and the distance with which they worked. We had a movement with twitching and a complete lack of physics: walking through textures, flying out of limits, and so on. In the documentation, the physicist is not described from the word “in general” (and, in principle, this is not “game friendly” at this stage of the dive becomes habitual).
Conclusion
Although React-360 works with Three.js and WebGL, it is completely unsuitable for solving such tasks, moreover, it probably was not intended for game devs. React-360 will perfectly cope with three-dimensional presentations, virtual tours of objects, viewing panoramas, etc.
But even if you take on such things in this technological stack, you will encounter difficulty in the form of bad documentation, which will force you to spend hours on solving a small and seemingly simple task.
Разработчик должен быть знаком с JS, желательно с React, так как тут используется JSX, а также с тонкостями стилизации моделей (включая позиционирование), и, кроме того, с паттернами разработки на React, иметь опыт работы с React Native. Другими словами - порог входа достаточно высок.Unity
After all the torment, we decided to use the second tool within our competencies. This time, the choice fell on Unity, as there are C # developers in the team.
Installation and Description
Installation is easy enough - banal downloading and unpacking the distribution from the official site. There is one "but": Unity so far works only on Windows and Mac (from version 10). So we had to switch from Ubuntu to Mac.
Since Unity is a game engine that includes a good and convenient UI, the project is created by simply clicking on the button, after which you get the full template of the necessary files. Basically, everything is in the Assets folder.
Rendering
Since the engine itself is rendering, you don’t need to prescribe anything.
Positioning
Positioning is as easy as rendering. It is enough to drag the object into the field and work either with the sliders in the appropriate form, or in a convenient GUI. As with the rendering, the situation is such that it did not need to prescribe anything.
Import of objects
Simple Drag'n'Drop, initially inside the Asset into the appropriate folder, and then a similar operation on the GUI field. No code.
Lighting
Work with lighting is as easy as with the previous paragraphs. Creating a new lighting takes place in the corresponding project tab. The system is also described in sufficient detail in the documentation.
Motion
This is the first point where it took something to code. Namely, the behavior of the player and the camera during movement. For the motion system, we used the NavMesh system and its Agents. Plotted an area where you can go to the GUI, designated the camera and model as an Agent in the Navigation System. Then create a script, it is done very simply in the GUI:
- An object is selected;
- The button Add Components is pressed;
- New Script is selected;
- The name is written.
And voila - a standard script template in the root folder is created. We just had to transfer it to the Scripts folder and open it (by default it opens in VS, which is very convenient). The standard script template has a clear interface in the form of two functions:
- Start - used when configuring components;
- Update - called on each frame.
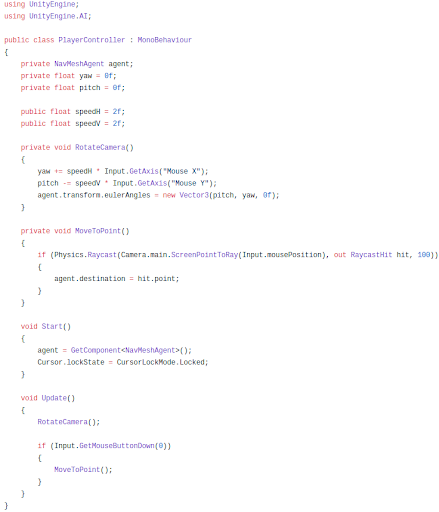
In the Start function, we locked the cursor in the center of the screen and wrote our component into the corresponding class property, and also declared the default parameters for the other properties.
In the Update function, we wrote the logic of rotating an object behind the cursor, as well as moving an object with a click:
Conclusion
In addition to the fairly obvious conclusion about the convenience of Unity, I would like to note that in order to work on Unity you can not be a programmer at all. Unity has a great many tutorials for beginners, very simple and clear, as well as high-quality, extensive documentation and a lively, active community.