How to use a USB camera with ROS on the Raspberry Pi or BeagleBone Blue - for streaming video to a large computer
- Tutorial
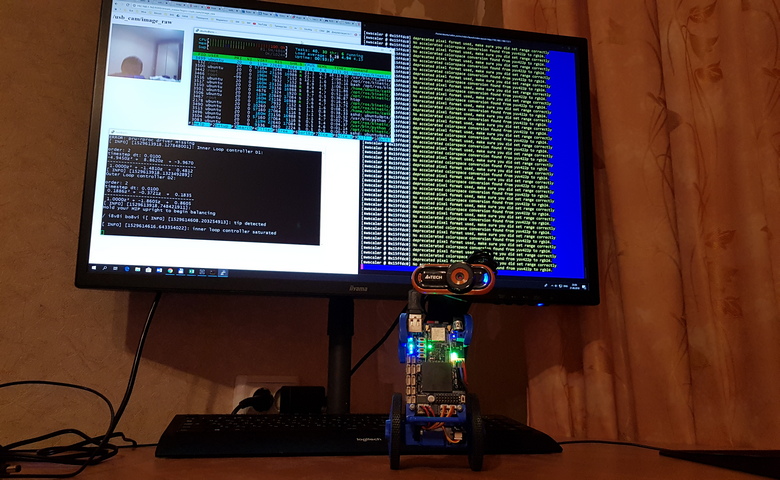
This tutorial is about how to connect a USB camera to the Raspberry Pi or BeagleBone Blue and use it with ROS (Robot Operating System) - to read data from the camera via ROS image_view and even stream the video to a web browser!
At the end of the video demonstration on the robot EduMip.
1) As a bonus, we will create a distributed ROS system.
2) The Roscore application and the image viewer will work on the PC (master) and the camera node on the Raspberry Pi (slave).
3) To set up master and slave, we need to update the environment variables on both devices.
4) On the wizard: find the IP address of the device. For ethernet, net_dev can be either enpXXs0 or ethX:
$ ifconfig {net_dev}
ifconfig enp61s0
или просто ifconfig
5) Use the IP address as the value for the ROS_IP variable:
$ export ROS_IP="10.42.0.1"6) And for ROS_MASTER_URI:
$ export ROS_MASTER_URI="http://10.42.0.1:11311"7) If you want to use these values for future sessions, you can save the values in a .bashrc file in your home directory:
$ echo'export ROS_IP="10.42.0.1"' >> ~/.bashrc
$ echo'export ROS_MASTER_URI="http://10.42.0.1:11311"' >> ~/.bashrc
8) Connect to the Raspberry Pi via ssh:
$ ssh {user}@{raspberry_ip} 9) For RPi as a slave device, add the main IP address for ROS_MASTER_URI
10) And the Raspberry Pi IP address for ROS_IP
$ export ROS_IP="10.42.0.65"
$ export ROS_MASTER_URI="http://10.42.0.1:11311"
или
$ echo'export ROS_IP="10.42.0.65"' >> ~/.bashrc
$ echo'export ROS_MASTER_URI="http://10.42.0.1:11311"' >> ~/.bashrc
11) Now it's time to connect a USB camera.
12) Check if the camera is recognized by the system ::
$ lsusb
$ ls /dev | grep video*
13) Install the node ROS usb_cam with the necessary dependencies:
$ sudo apt install ros-kinetic-usb-cam14) The usb_cam node already has a test startup file:
$ cat /opt/ros/kinetic/share/usb_cam/launch/usb_cam-test.launch15) Before launching this file, let's run the ROS kernel on master:
$ roscore16) And now run the usb_cam node on the slave:
$ roslaunch usb_cam usb_cam-test.launch17) Now we can see the topics created. We can check them either on the master or on the slave.
18) Put the current process in the background using CTRL + Z and execute the bg command to continue execution in the background. (on the Ubuntu version not full desktop and no screen, just run another terminal)
19) To see the themes in the terminal:
$ rostopic list20) ... or in the graphical interface:
$ rqt_graph21) Reading camera data using image_view:
$ rosrun image_view image_view image:=/usb_cam/image_raw
22) Or using rqt_image_view
23) Move the background task to the foreground:
$ fg24) The last experiment to date - streaming to the web
25) Installing the ROS node of the web video server:
$ sudo apt install ros-kinetic-web-video-server26) To do this correctly, create a catkin workspace for our custom startup file:
$ mkdir -p ~/rosvid_ws/src
$ cd ~/rosvid_ws
$ catkin_make
$ source devel/setup.bash
27) Then create the ROS package:
$ cd src
$ catkin_create_pkg vidsrv std_msgs rospy roscpp
28) Create a startup file using nano, vim, etc .:
$ mkdir -p vidsrv/launch
$ nano vidsrv/launch/vidsrv.launch
place the code there from here.
On Beaglebone Blue with an A4Tech usb camera, this code worked for me:
<launch><!-- This node description you can take from usb_cam-test.launch --><nodename="usb_cam"pkg="usb_cam"type="usb_cam_node"output="screen" ><paramname="video_device"value="/dev/video0" /><paramname="image_width"value="352" /><paramname="image_height"value="288" /><paramname="pixel_format"value="mjpeg" /><paramname="camera_frame_id"value="usb_cam" /><paramname="io_method"value="mmap"/></node><!-- This node will launch web video server --><nodename="web_video_server"pkg="web_video_server"type="web_video_server" \
/></launch>
29) Assemble the package:
$ cd ..
$ catkin_make
30) Run the ROS kernel on master again:
$ roscore31) And run the generated startup file:
$ roslaunch vidsrv vidsrv.launch32) Default web video server port is 8080
33) Open URL in web browser: {RPi_IP}: 8080
Documentation links:
→ Video server node
→ USB camera node
→ rqt image viewer
→ Raspberry Pi Camera Module node
USB cameras you can use almost anyone who has linux drivers, you can also use the Raspberry Pi Camera Module link above in the same way.
An example of how this works on BeagleBone Blue with an A4Tech camera:
Search for a three card for video from a USB camera BealeBone Blue (the recognition algorithm works on a laptop with master ROS).










