The recipe for a 1U server at home
The dish, which will be discussed in this article, is quite straightforward, but serious discussions flare up at many online conferences both about the correctness of its preparation and about the appropriateness of its use.
This dish can be prepared in an expensive restaurant with quality ingredients according to unique recipes by cooks from Dell, Fujitsu, HP, IBM and Sun. Yes, the price of such servers will be appropriate, because it will include not only the cooking fee, but also the warranty service fee, which, by the way, is at a fairly high level.
There is another option, which is not much inferior in quality, but puts less pressure on the pocket. Of course, we are talking about buying less branded servers from companies such as Intel, Tyan, Supermicro, and even ASUS. Here, unlike the previous version, the formulations are more or less standard, and when upgrading any ingredient, you can often replace it with a regular, non-branded one.
In principle, you can buy the same ingredients from which the servers are prepared in the second case as semi-finished products and make machines yourself from them, initially using cheaper (but no less reliable) analogues of individual components.
Well, of course, you can build the servers yourself, and prepare them from what is enough for imagination. But for many, the imagination dwells on larger-sized 2U cases (in Ukraine, CSV products are often used , less often InPC ). There may be several reasons for this.
First, assembling a system in such a package will be cheaper. Not only does the 2U case alone cost less, but the power supply can also be installed in it, as long as it is cooled by an 80-mm fan on the back wall. And to cool the processor, you can use the bundled “boxed” cooler or a similar inexpensive cooler.
Secondly, there are no problems with cooling components. On most desktop motherboards, memory slots are located along the board perpendicular to the expansion slots. That is, when such a board is installed in a server enclosure with a height of one unit, the entire air flow will be blocked by RAM modules, while in the two-unit enclosure there are another five centimeters in height for air circulation.
Thirdly, twice the height of the case will allow you to install multiple expansion cards (RAID controllers, network cards, etc.) at once. It is also worth noting that in 2U there will definitely not be problems with a high block of audio ports on the I / O panel, which may simply not fit in some single-unit cases (this depends on the model of the board and the model of the case).
Processor: Intel Core i7-2600 - $ 305
Cooler: 1U Active CoolJag DEN-7 - $ 35 (ordered in the USA)
Motherboard: Fujitsu D3062-B - $ 150
Memory: 4x 4096Mb Team Elite TED34096M1333C9 - $ 75
Hard drives: 2x 500Gb Western Digital WD5000AAKX - $ 190
Case: 1U Chenbro RM12700 - $ 140
Power supply: 250W Seasonic SS-250SU - $ 55 and a plate for it - $ 3
Optional: 2x SATA data cable, 2x 4pin-SATA power adapter, power cable - $ 5.
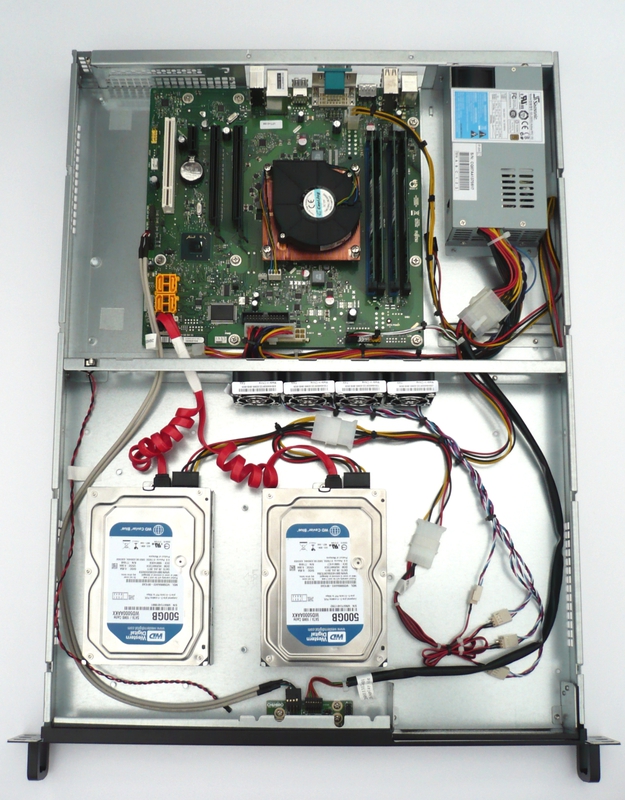
First of all, you need to install the processor in the socket of the motherboard and fix it. Then turn the board over and stick the cooler base plate (backplate) to it, then turn the board back and install the cooler itself (after removing the protective film from the thermal paste applied to its base), screwing its screws to the backplate nuts. Memory modules can be installed immediately, or after installing the "motherboard" in the case.
Next, you need to connect the power supply to the bracket with screws for fixing it, and then install this design into the housing. Also, before installing the motherboard, you need to fasten the missing bonks to the case. By the way, in my case, both the power supply with the plate and the bonks with the motherboard were already installed (this hardware was bought from one supplier), but the latter still had to be removed to install the processor cooling system.
Each hard drive is installed in the basket with four screws, and the basket itself is attached to the chassis with one. This mounting method allows you to quickly change hard drives, if there are additional baskets. Also, an additional basket may come in handy for installing a third hard drive, as shown on the manufacturer’s website .
After installing the hard drives, you can proceed to connect the cables. The power supply does not have SATA connectors, so I used an adapter from one 4-pin to 2 15-pin connectors. It is worth noting that the SATA Right Angle data cables in this case will not work, since when installing the side with the bend in the motherboard, the adjacent SATA port will be blocked, and it is almost impossible to insert a rotated connector into the already installed hard drive.
I connected the main connector of the motherboard power supply in a 20-pin version, since the additional 4 contacts do not play a role, and they definitely interfere with the air flow. It was originally planned to bypass these wires altogether, laying them on the other side with respect to the fans, but their length was not enough, and the corresponding extension cord was nowhere to be found on sale. Yes, and at this stage you need to remember to connect the 4-pin processor power connector.
The processor cooler fan must be connected to the nearest appropriate socket. I connected the case fans through an adapter that came with the case, since there were only two free fan connectors on the motherboard. The wiring diagram of the indicators and buttons on the front panel can be found in the instructions for the board. Front USB ports (if needed) are connected in the same way as on other boards.
All connected wires can be seasoned with ties to taste.
Before serving a meal, you need to make several settings in the BIOS. In order for the system to start despite the possible errors during POST, you need to transfer the Boot - POST Errors option to Disabled . Also, in Disabled, I would recommend installing the Advanced - System Monitoring - Fan Control option , which will allow the fan on the cooler to constantly rotate at maximum speed, but at the same time it will cause errors "SMCTRL: Sensor # ALERT". An important setting for server functioning is in Power - Power Failure Recovery. Setting the option to Always On will allow the machine to start automatically after an emergency shutdown (for example, when the data center is out of power or if the cleaner accidentally pulls the plug out of the socket for a while).
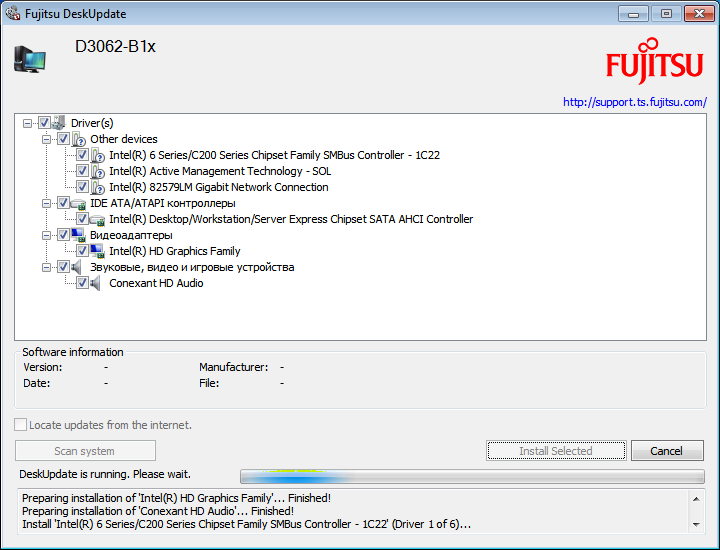
After building the server, the Windows 7 operating system was installed on it in order to determine the temperature of the processor under load. I recorded the disk image that came with the board on a USB flash drive and fed it to the server. The disk utility determined the model of the board and suggested installing the following drivers.
At the same time, the SysGuard proprietary program was installed, which allows monitoring the temperature at the sensors and controlling the fans connected to the board.
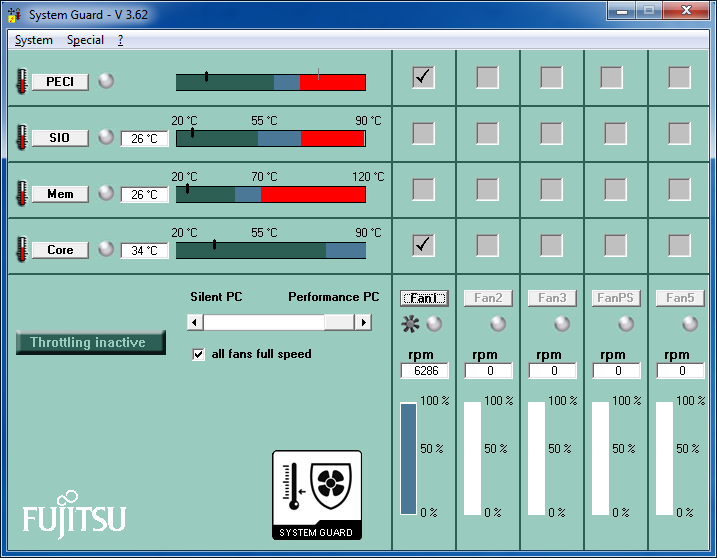
It is noteworthy that this software only works when the automatic fan control system is enabled in the BIOS.
Processor temperatures were measured at room temperature 22 ° C and using KPT-8 thermal paste (there would simply not be enough stock thermal interface for two processors; and KPT-8 is one degree more efficient). Under the temperature of the processor in each of the modes refers to the temperature of the hottest processor core, measured by RealTemp 3.60 for five minutes. It is also worth noting that in simple BCLK multiplier was reset to x16, and when loaded, it rose to x24 for Celeron and to x35 for Core i7.
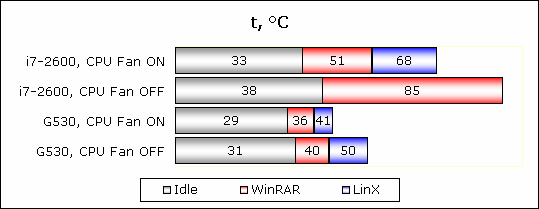
When the fan is on, the processor cooler keeps the temperature at an acceptable level, without rising above 68 ° C in a stress test. With the fan turned off, the temperature of the i7-2600 rises steadily, and even in the test of speed and reliability of the equipment WinRAR managed to rise to an obscene value (after six minutes the temperature was 88 ° C). And this despite the fact that this test barely loads this processor by 50%.
Celeron G530, taken for visual comparison, is much colder. When passing the test built into the archiver, which loads this processor by 90%, the temperature even with the fan turned off does not exceed 40 ° C. And five minutes of running LinX with a task volume of 10,000, squeezing all the juices from the processor, prevent it from heating up to more than 50 ° C. There is no need to talk about the operation mode with the fan turned on.
Since the topic of cheaper processors was touched upon, it is worth talking about motherboards with lower cost. If we talk about motherboards with a transverse arrangement of memory slots, then only motherboards from Biostar come to mind. But the motherboard power connector is even more unsuccessful there than on Fujitsu. So, on the H61ML board taken for teststhe Intel Core i7 processor heats several degrees more than on the D3062-B.
In addition to fewer features, the Biostar board is also less economical.
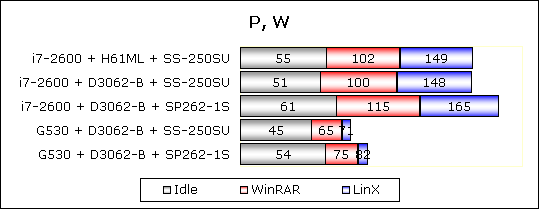
On the graph you can also see the results of testing the power supply Ablecom SP262-1S. This PSU was installed earlier in inexpensive Supermicro servers and enclosures. As you can see, it also does not shine with efficiency. Another stone in his garden is the use of Ltec capacitors at the outlet, which, to put it mildly, have more than a dubious reputation.
In this section, we will focus on the key chip used in building the motherboard server.
Fujitsu D3062-B is based on the Intel Q67 chipset. This logic set supports Intel Active Management and Intel vPro technologies, the interaction of which allows you to control the computer (in this case, the server) remotely. You can not only turn on, turn off or restart the server over the network, but also load it from disk or manage it through KVM access. The site THG.ru has a good article that describes the capabilities of these technologies.
To obtain such "buns" must use a processor that supports vPro. The list of processors can be found here . It is also worth noting that KVM will only work when using the integrated graphics adapter.
First you need to play a little shaman in the BIOS board. The Advanced - AMT Configuration - MEBx Mode setting must be set to Normal . The Power - Low Power Soft Off option is better transferred to Disabled , this will allow access to a turned off server.
After that, you need to restart the server and when passing POST, press Ctrl + P on the keyboard, this will allow you to get into the Management Engine BIOS menu. There you will need to enter the standard password admin and immediately set your own. Password must consist of at least eight characters, include at least one lowercase, one uppercase letter, number and special character (except ",:). Therefore, P @ ssw0rd is often used as a password .
In order for remote control to work, in the Intel AMT Configuration section of the MEBx menu, you need to configure the following items: Manageability Feature Selection - Enabled , in the SOL / IDER / KVM section set all items to Enabled , set the User Consent - User Opt-in menu to None , Be sure to set the machine name in Network setup - Intel ME Network Name Settings - Host Name (for example, server ). If DHCP is used, then in the TCP / IP Settings - Wired LAN IPv4 Configuration - DHCP Mode menu, enable Enabledotherwise, set the network settings manually. After all this, you need to click Activate Network Access and confirm your decision.
All the MEBx settings, oddly enough, are well-painted in Russian on the DELL website here and here .
You can use the iAMT and vPro functionality through a browser by going to the IP address: 16992, or through the Radmin program. You can manage the server using KVM through programs such as Real VNC.
In total, we have a self-assembled server with a good filling for less than a thousand dollars. The advantages include the use of components from well-known brands, performance, efficiency, prospects, KVM. The disadvantages, of course, include the fact that you can’t buy a motherboard and a cooler in an ordinary computer store.
On the other hand, motherboards like Biostar, which are commercially available, do not have sufficient functionality and will fit into cheaper servers. And this still does not cancel the purchase of an active single-unit cooler, except that the processor installed in this board will not be much more voracious than the Celeron G530. In any case, I have already made my choice.
This dish can be prepared in an expensive restaurant with quality ingredients according to unique recipes by cooks from Dell, Fujitsu, HP, IBM and Sun. Yes, the price of such servers will be appropriate, because it will include not only the cooking fee, but also the warranty service fee, which, by the way, is at a fairly high level.
There is another option, which is not much inferior in quality, but puts less pressure on the pocket. Of course, we are talking about buying less branded servers from companies such as Intel, Tyan, Supermicro, and even ASUS. Here, unlike the previous version, the formulations are more or less standard, and when upgrading any ingredient, you can often replace it with a regular, non-branded one.
In principle, you can buy the same ingredients from which the servers are prepared in the second case as semi-finished products and make machines yourself from them, initially using cheaper (but no less reliable) analogues of individual components.
Well, of course, you can build the servers yourself, and prepare them from what is enough for imagination. But for many, the imagination dwells on larger-sized 2U cases (in Ukraine, CSV products are often used , less often InPC ). There may be several reasons for this.
First, assembling a system in such a package will be cheaper. Not only does the 2U case alone cost less, but the power supply can also be installed in it, as long as it is cooled by an 80-mm fan on the back wall. And to cool the processor, you can use the bundled “boxed” cooler or a similar inexpensive cooler.
Secondly, there are no problems with cooling components. On most desktop motherboards, memory slots are located along the board perpendicular to the expansion slots. That is, when such a board is installed in a server enclosure with a height of one unit, the entire air flow will be blocked by RAM modules, while in the two-unit enclosure there are another five centimeters in height for air circulation.
Thirdly, twice the height of the case will allow you to install multiple expansion cards (RAID controllers, network cards, etc.) at once. It is also worth noting that in 2U there will definitely not be problems with a high block of audio ports on the I / O panel, which may simply not fit in some single-unit cases (this depends on the model of the board and the model of the case).
Ingredients
Processor: Intel Core i7-2600 - $ 305
Cooler: 1U Active CoolJag DEN-7 - $ 35 (ordered in the USA)
Motherboard: Fujitsu D3062-B - $ 150
Memory: 4x 4096Mb Team Elite TED34096M1333C9 - $ 75
Hard drives: 2x 500Gb Western Digital WD5000AAKX - $ 190
Case: 1U Chenbro RM12700 - $ 140
Power supply: 250W Seasonic SS-250SU - $ 55 and a plate for it - $ 3
Optional: 2x SATA data cable, 2x 4pin-SATA power adapter, power cable - $ 5.
Cooking
First of all, you need to install the processor in the socket of the motherboard and fix it. Then turn the board over and stick the cooler base plate (backplate) to it, then turn the board back and install the cooler itself (after removing the protective film from the thermal paste applied to its base), screwing its screws to the backplate nuts. Memory modules can be installed immediately, or after installing the "motherboard" in the case.
Next, you need to connect the power supply to the bracket with screws for fixing it, and then install this design into the housing. Also, before installing the motherboard, you need to fasten the missing bonks to the case. By the way, in my case, both the power supply with the plate and the bonks with the motherboard were already installed (this hardware was bought from one supplier), but the latter still had to be removed to install the processor cooling system.
Each hard drive is installed in the basket with four screws, and the basket itself is attached to the chassis with one. This mounting method allows you to quickly change hard drives, if there are additional baskets. Also, an additional basket may come in handy for installing a third hard drive, as shown on the manufacturer’s website .
After installing the hard drives, you can proceed to connect the cables. The power supply does not have SATA connectors, so I used an adapter from one 4-pin to 2 15-pin connectors. It is worth noting that the SATA Right Angle data cables in this case will not work, since when installing the side with the bend in the motherboard, the adjacent SATA port will be blocked, and it is almost impossible to insert a rotated connector into the already installed hard drive.
I connected the main connector of the motherboard power supply in a 20-pin version, since the additional 4 contacts do not play a role, and they definitely interfere with the air flow. It was originally planned to bypass these wires altogether, laying them on the other side with respect to the fans, but their length was not enough, and the corresponding extension cord was nowhere to be found on sale. Yes, and at this stage you need to remember to connect the 4-pin processor power connector.
The processor cooler fan must be connected to the nearest appropriate socket. I connected the case fans through an adapter that came with the case, since there were only two free fan connectors on the motherboard. The wiring diagram of the indicators and buttons on the front panel can be found in the instructions for the board. Front USB ports (if needed) are connected in the same way as on other boards.
All connected wires can be seasoned with ties to taste.
Before serving a meal, you need to make several settings in the BIOS. In order for the system to start despite the possible errors during POST, you need to transfer the Boot - POST Errors option to Disabled . Also, in Disabled, I would recommend installing the Advanced - System Monitoring - Fan Control option , which will allow the fan on the cooler to constantly rotate at maximum speed, but at the same time it will cause errors "SMCTRL: Sensor # ALERT". An important setting for server functioning is in Power - Power Failure Recovery. Setting the option to Always On will allow the machine to start automatically after an emergency shutdown (for example, when the data center is out of power or if the cleaner accidentally pulls the plug out of the socket for a while).
Energy value
After building the server, the Windows 7 operating system was installed on it in order to determine the temperature of the processor under load. I recorded the disk image that came with the board on a USB flash drive and fed it to the server. The disk utility determined the model of the board and suggested installing the following drivers.
At the same time, the SysGuard proprietary program was installed, which allows monitoring the temperature at the sensors and controlling the fans connected to the board.
It is noteworthy that this software only works when the automatic fan control system is enabled in the BIOS.
Processor temperatures were measured at room temperature 22 ° C and using KPT-8 thermal paste (there would simply not be enough stock thermal interface for two processors; and KPT-8 is one degree more efficient). Under the temperature of the processor in each of the modes refers to the temperature of the hottest processor core, measured by RealTemp 3.60 for five minutes. It is also worth noting that in simple BCLK multiplier was reset to x16, and when loaded, it rose to x24 for Celeron and to x35 for Core i7.
When the fan is on, the processor cooler keeps the temperature at an acceptable level, without rising above 68 ° C in a stress test. With the fan turned off, the temperature of the i7-2600 rises steadily, and even in the test of speed and reliability of the equipment WinRAR managed to rise to an obscene value (after six minutes the temperature was 88 ° C). And this despite the fact that this test barely loads this processor by 50%.
Celeron G530, taken for visual comparison, is much colder. When passing the test built into the archiver, which loads this processor by 90%, the temperature even with the fan turned off does not exceed 40 ° C. And five minutes of running LinX with a task volume of 10,000, squeezing all the juices from the processor, prevent it from heating up to more than 50 ° C. There is no need to talk about the operation mode with the fan turned on.
Since the topic of cheaper processors was touched upon, it is worth talking about motherboards with lower cost. If we talk about motherboards with a transverse arrangement of memory slots, then only motherboards from Biostar come to mind. But the motherboard power connector is even more unsuccessful there than on Fujitsu. So, on the H61ML board taken for teststhe Intel Core i7 processor heats several degrees more than on the D3062-B.
In addition to fewer features, the Biostar board is also less economical.
On the graph you can also see the results of testing the power supply Ablecom SP262-1S. This PSU was installed earlier in inexpensive Supermicro servers and enclosures. As you can see, it also does not shine with efficiency. Another stone in his garden is the use of Ltec capacitors at the outlet, which, to put it mildly, have more than a dubious reputation.
The nutritional value
In this section, we will focus on the key chip used in building the motherboard server.
Fujitsu D3062-B is based on the Intel Q67 chipset. This logic set supports Intel Active Management and Intel vPro technologies, the interaction of which allows you to control the computer (in this case, the server) remotely. You can not only turn on, turn off or restart the server over the network, but also load it from disk or manage it through KVM access. The site THG.ru has a good article that describes the capabilities of these technologies.
To obtain such "buns" must use a processor that supports vPro. The list of processors can be found here . It is also worth noting that KVM will only work when using the integrated graphics adapter.
First you need to play a little shaman in the BIOS board. The Advanced - AMT Configuration - MEBx Mode setting must be set to Normal . The Power - Low Power Soft Off option is better transferred to Disabled , this will allow access to a turned off server.
After that, you need to restart the server and when passing POST, press Ctrl + P on the keyboard, this will allow you to get into the Management Engine BIOS menu. There you will need to enter the standard password admin and immediately set your own. Password must consist of at least eight characters, include at least one lowercase, one uppercase letter, number and special character (except ",:). Therefore, P @ ssw0rd is often used as a password .
In order for remote control to work, in the Intel AMT Configuration section of the MEBx menu, you need to configure the following items: Manageability Feature Selection - Enabled , in the SOL / IDER / KVM section set all items to Enabled , set the User Consent - User Opt-in menu to None , Be sure to set the machine name in Network setup - Intel ME Network Name Settings - Host Name (for example, server ). If DHCP is used, then in the TCP / IP Settings - Wired LAN IPv4 Configuration - DHCP Mode menu, enable Enabledotherwise, set the network settings manually. After all this, you need to click Activate Network Access and confirm your decision.
All the MEBx settings, oddly enough, are well-painted in Russian on the DELL website here and here .
You can use the iAMT and vPro functionality through a browser by going to the IP address: 16992, or through the Radmin program. You can manage the server using KVM through programs such as Real VNC.
In total, we have a self-assembled server with a good filling for less than a thousand dollars. The advantages include the use of components from well-known brands, performance, efficiency, prospects, KVM. The disadvantages, of course, include the fact that you can’t buy a motherboard and a cooler in an ordinary computer store.
On the other hand, motherboards like Biostar, which are commercially available, do not have sufficient functionality and will fit into cheaper servers. And this still does not cancel the purchase of an active single-unit cooler, except that the processor installed in this board will not be much more voracious than the Celeron G530. In any case, I have already made my choice.