January 3, 2012 at 18:55
HowTo: continuous integration of a Django project with TeamCity
Introduction
In the development process, creating new functionality, increasingly began to touch the old code with wide strokes than destroyed the logic of its work. This forced me to write unit and integration tests for the old code and automate their launch, because chasing all the tests with my hands is somehow sad. Just recalled the recent CI Django tutorial in Jenkins and the pretty old Webtest tutorial in Django . As a result, an attempt was made to raise Jenkins, but somehow he didn’t take off on my ubunt and I recalled TeamCity as a sinful affair. “Since I'm writing in PyCharm and found an approach to it, then, probably, TeamCityI’ll master it, because there’s only one desk! ” - I thought ... In general, I was right, and while karma allows me, I decided to give you an ultra-useful (and mega-detailed) manual, unlike my previous one :)
Total: who needs guidance on raising the TeamCity integration server , and testing in it Django projects with tests nose and webtest in a virtual python environment with its automatic (environment) update - welcome to cat.
Caution! TeamCity requires (according to the documentation) the sun / oracle version of the JVM ...
Theory
Python virtual environment using virtualenv
The system on my development PC meets all the requirements of my project, but this is far from being the case on the server for testing (even python is 2.6 there, and I eventually needed 2.7), so I had to take care of the environment virtualization to calmly put what I needed, in addition, it eliminates the need to have the power of
roota or sudoer. To create a virtual environment, you need to install virtualenv or download and extract from the archive
virtualenv.py. We will use the second option, because this completely discourages us from using superuser power. Yes, python must still be installed on the system.python virtualenv.py -p python2.7 .env
Here it
-p python2.7sets the necessary version of python (the subtlety is that the necessary versions of python must be installed in the system itself, but not be a “default python”, the script will not be able to pull them out and install them) , and the .envdirectory in which the environment will be placed . Further, in order to use python and modules from the environment, you need to call them through .env/bin/python.source .env/bin/activate
which replaces the environment variable
PATH.Automation through fabric
In addition to the python installed on the target system, we also need the fabric module . That is, on the testing server you will have to execute a command
sudo pip install fabricor sudo easy_install fabric, during installation, it will pull pycryptowhich for assembly you need python sorts from python-dev, so first you need to put it. Fabric allows you to execute scripts in python that perform actions on a local or remote (via SSH) system. After installation, an application appears in the system fabthat looks for the file fabfile.pyin the call folder and executes the specified script. For instance:
fab test
will execute will execute a function
testfrom a file fabfile.py.Nose and webtest in django
Now a little about the tests themselves. Django has its own unit tests and functional tests (using the test client), but there are drawbacks to them that have been written about more than once. In general, I began to use nose for unit testing and webtest for functional. In the introduction, I gave a link to an article about webtest, it shows well how it works. We will need the following modules for testing (then we will add this list to the file with the list of modules for automatic installation via
pip -r):coverage>=3.0
nose
webtest
django-nose
django-webtest
In addition,
django_noseyou need to add to the INSTALLED_APPSfile of settings.pyyour django project, or specify in the same file TEST_RUNNER = 'django_nose.NoseTestSuiteRunner'. Attention! If used
south, then django_noseadd after it. Actually, if there are unit tests already written in the Jang test system - you can leave them alone, everything will work like that. How to write functional tests through webtest can be found in the above article .
Testing starts as usual:
python manage.py test
This command will perform both nose tests and webtest tests, if the names of files, classes and functions with tests have a word in the name
"test"- this is a bonus from nose. In addition, he nosecan use coverage to calculate the coverage of code with tests ( webtesthe does not understand the functional tests, because tests work with the code not directly, but through the generated pages). Django-noseallows us to use the options for running nose tests. To do this, they can be written in the settings.pyproject file . For instance:NOSE_ARGS = [
'--nocapture',
'--with-coverage',
'--cover-html',
'--cover-html-dir=%s' % os.path.join(PROJECT_PATH, 'cover', 'unit'),
'--cover-package=django_dir'
]
This spell will allow you to generate a test coverage report in HTML format and place it in a subdirectory of
cover/unityour project.Practice
Project structure
My project has the following folder structure:
.
..
project_dir
project_dir/django_dir
project_dir/build
project_dir/build/pipreq.txt
project_dir/fabfile.py
project_dir/virtualenv.py
Where it
project_dircontains all sorts of useful things such as a directory with a virtual environment, a factory file and other useful things, and already in the subdirectory django_dirthe project itself is located on django . The version control system (in my case it’s GIT ) gets everything starting with project_dira few exceptions like a directory with a virtual environment.Test execution
Actually, our goal is to teach TeamCity after detecting changes in the repository (that he knows how to) test our updated django project (which he does not know how to) and tell us about the results (here he needs to help a little too).
The fact is that for the purity of the experiment, it is desirable that, in addition to the tests themselves, the whole environment be checked / updated, for this we will write a small factory which, after receiving the changes, will launch TeamCity.
Code
project_dir/fabfile.py:# -*- coding: utf-8 -*-
from fabric.api import local
def test():
"""
Запуск тестов.
"""
local('python virtualenv.py -p python2.7 .env') # создаём виртуальное окружение
local('./.env/bin/pip install -q -E .env -r build/pipreq.txt') # ставим модули окружения
# перечисленные в build/pipreq.txt
local('./.env/bin/python django_dir/manage.py test --noinput') # запускаем тесты
Please note what
virtualenv.pylies at the root of the project so that it does not need to be installed on the system. Content Required
project_dir/build/pipreq.txt:django
coverage>=3.0
nose
teamcity-nose
webtest
django-nose
django-webtest
...много много ваших модулей которые постоянно добавляются/меняются...
Please note that the previously listed teamcity-nose is listed in the file , this module helps to convey the results of our testing to TeamCity. It does not require any configuration or connection - it starts automatically when it finds the environment variable
TEAMCITY_PROJECT_NAMEthat TeamCity creates during operation. Actually, everything is ready for automatic testing. To start it, just run the command:
fab test
at the root of the project.
Install and configure TeamCity
I did not bother much, which I recommend to you - I just downloaded the tar.gz option from the download page . All this happiness weighs indecent 333MB. But in addition to the integration server itself , it also includes Tomcat , which will save us from hemorrhoids with server settings and other crap.
TeamCity has a property (mentioned at the beginning) that someone might not like - it requires a dignity / Oracle version of the JVM to work .
How to get it on Ubuntu can be read for example here .
Actually, after downloading, unpack this stuff where it will work (by default, the data itself will be stored in a subdirectory
.BuildServeruser home directory under which the server is running). The server bin/runAll.dh startis started by the command , it is killed accordingly bin/runAll.dh stop(if we are in the folder with the unpacked archive). The server by default spins on the 8111port, but there is also one build agentthat starts on the 9090port. The first can be changed in the file conf/server.xml, the second in the file buildAgent/conf/buildAgent.dist.properties(sample) and buildAgent/conf/buildAgent.properties(specific agent). All other settings (which I’ll talk about) will be done through the web interface. In general, we start teamcity and go to the browser (http: // localhost: 8111 if it was launched locally). Depending on the capacity of the system, you will either see a license agreement or a message:
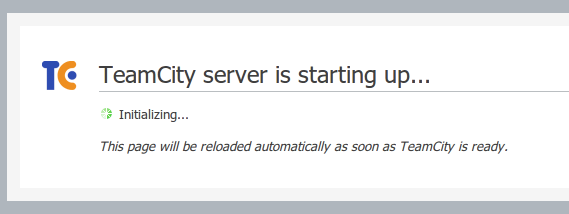
and you will need to wait until it is replaced by a license agreement.
Next, you will be prompted to create an administrator account. After which we will see the TeamCity system itself.
Here we are interested in creating a project. Everything is simple there - the name and description. After we get to the project settings page.
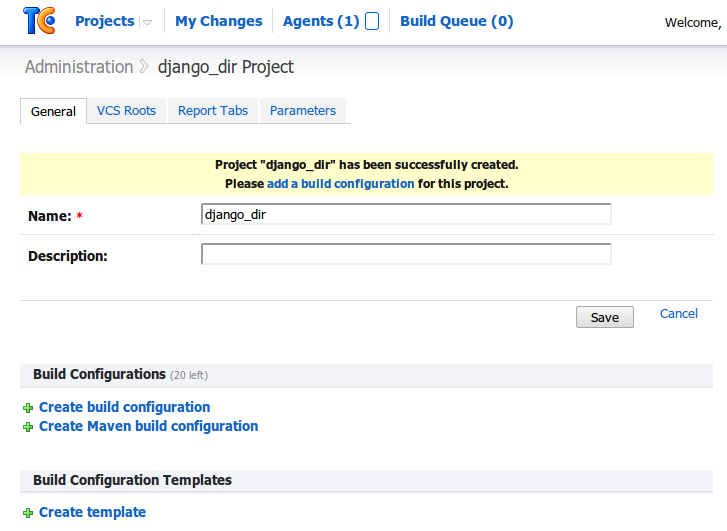
On the VCS Roots tab (VCS - version control system), you need to specify a new repository. More precisely indicate where the system will take the code for testing. There is a long footcloth that needs to be filled with your data. All fields are signed, there are links to help pages, so there is nothing superhuman there. You can immediately check the health of the connection.
Next, on the General tab, you need to create a new Buid Configuration - the cornerstone of our testing.
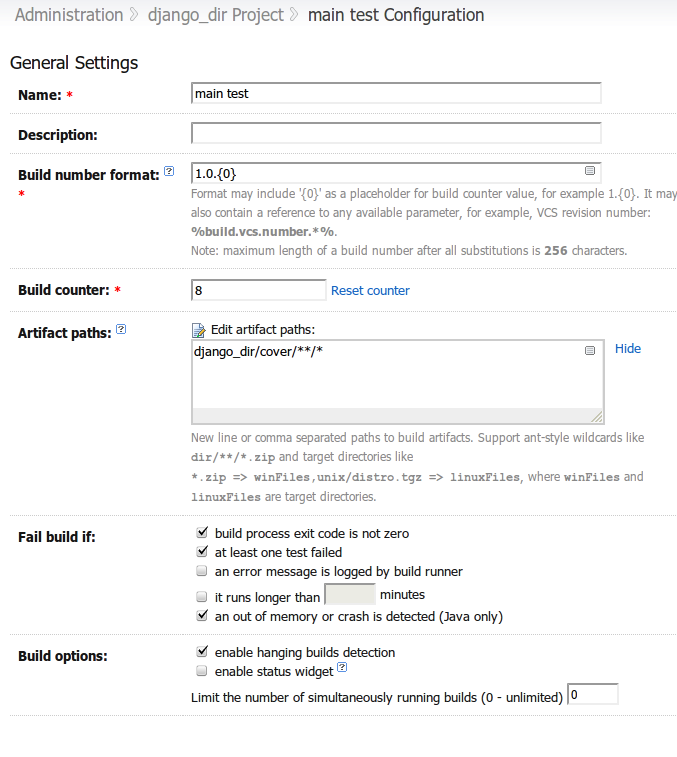
Build counter- the number from which the numbering of the builds will begin, or rather, the number of the build that will be assigned to the next assembly. You can safely put it
1, just a screenshot is not fresh :) Of the important fields on the first page, there are Artifact paths which tells the system how to find files resulting from assembly / testing. In our case, these are reports on test coverage. In my case, just enter here
django_dir/cover/**/*. On the second page, select our previously defined repository. By clicking on the Add Build Step, you will need to create the first (and, in our case, the only) build step (in our case, testing).

Actually the required set of settings you see on the screen. Save.
Next on the right in the vertical menu you need to selectBuild Triggering and add the launch of our assembly when changing the repository:
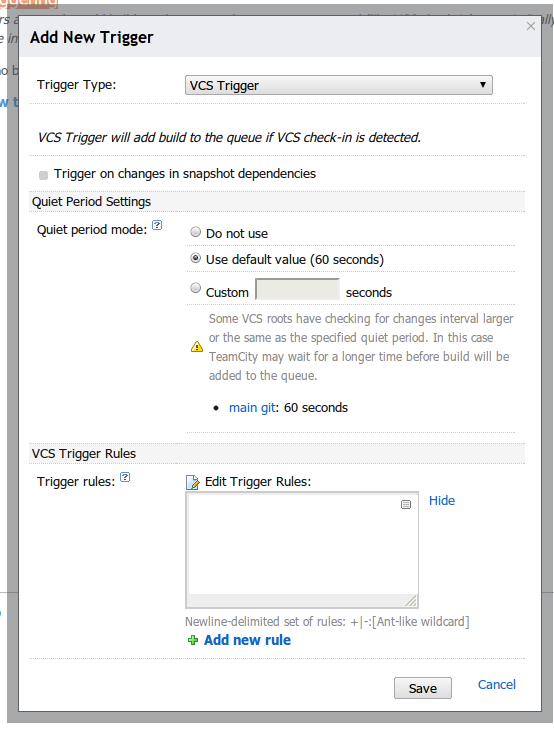
Well, finally, go back to the settings of the project itself, go to the Report Tabs tab and create a new tab:
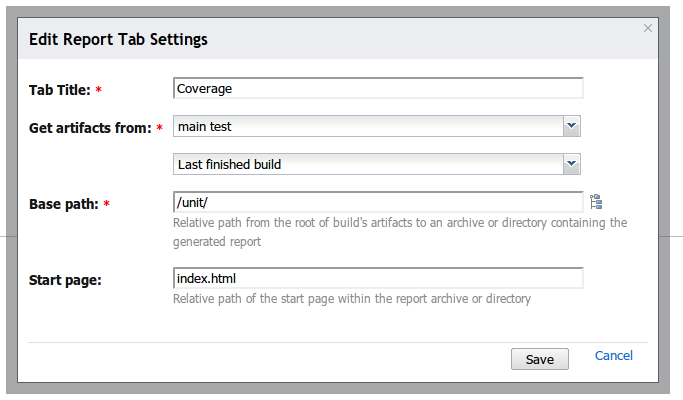
this will allow TemCity to display our reports in its interface.
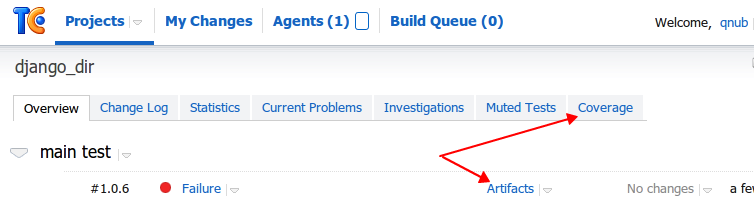
The tab will appear when the specified file is in the specified location, so if it is not there, check the settings and see if the reports are really where they should be.
That's all, it remains in the very top menu in Projects to go to our project and click Run on the build, for the first run.
Prettiness
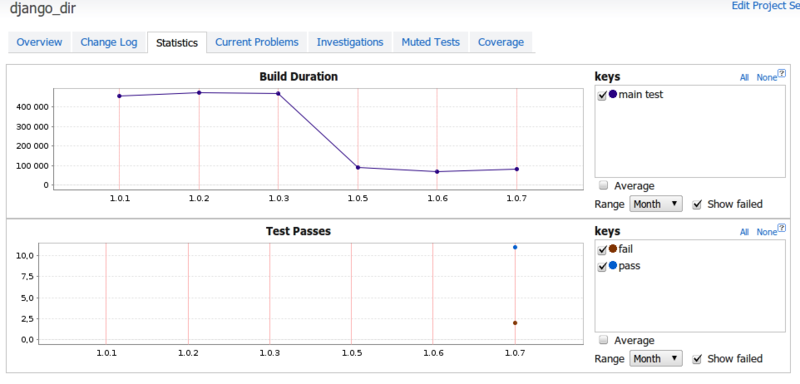
All managers love graphics, because in order to have something to show, you need to make several pictures. Alas, these pictures are added by the truly programmer-admin method - by making changes to the XML config. The manual can be found here . It is felt that in this place the developers pretty rested (they could make chesslovo forms) . Because
buildTypeIdI did not find an obvious way to find out one of the most important parameters . The simplest thing - to look in the address bar of your browser: .
I will give a config of two of my graphs:localhost:8111/viewType.html?tab=buildTypeStatusDiv&buildTypeId=bt2This is a file
~/.BuildServer/config/django_dir/plugin-settings.xml. Changes to the file are picked up on the fly. It looks something like this:
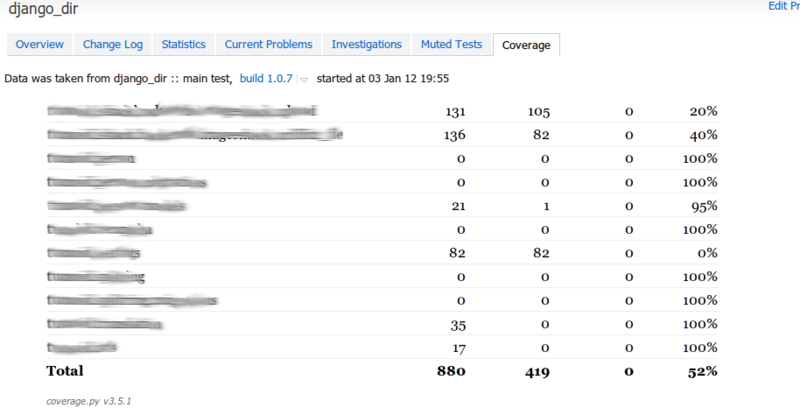
And here is the coverage report:
List of assemblies:

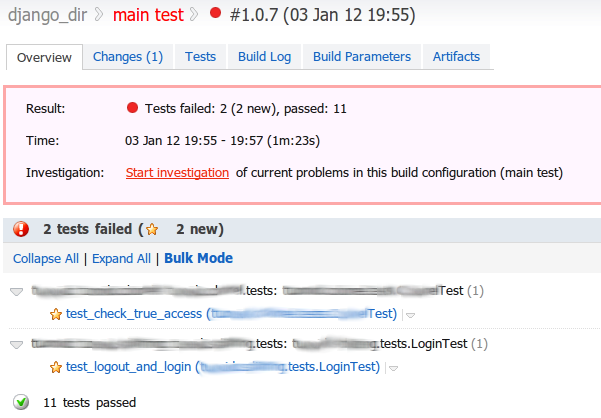
Details on the assembly:
Conclusion
I apologize for the "multi-book," but it just so happened. I wanted to describe it available. As a result, we have automated testing (modular and integration), in addition, the presence of the necessary modules and the “liftability” of the project are also checked. Disassemblies with the reaction of TemaCity to various assembly results I leave on your conscience. In this part, there is something to rejoice - both standard soap notification, and notification via jabber , and the creation of a release push.
Have a good development!