Implementing Path Finder for AI Agents with NavMesh
- Transfer
Follow the path and traffic control
Sometimes we need the AI characters to roam around the game world, following a roughly delineated or precisely defined path. For example, in a racing game, AI opponents must drive along the road, and in RTS, units must be able to move to the desired point, moving along the relief and taking into account each other's position.
In order to appear smart, AI agents must be able to determine what they are doing, and if they cannot reach the desired point, they must be able to work out the most efficient route and change their way when obstacles appear on the way.
Obstacle avoidance is simple behavior that allows AI entities to reach target points. It is important to note that the behavior implemented in this post is intended for such behaviors as crowd simulation, in which the main goal of each agent is to avoid other agents and achieve the goal. They do not determine the most efficient and shortest path.
Technical requirements
A version of Unity 2017 installed on a system with Windows 7 SP1 +, 8, 10 or Mac OS X 10.9+ is required. The code in this article will not work on Windows XP and Vista, and the server versions of Windows and OS X have not been tested.
The code files for this post can be found on GitHub .
To learn the code in action, watch this video .
Navigation mesh
Let's learn how to use Unity's built-in navigation mesh generator, which can greatly simplify the search for paths for AI agents. In the early stages of Unity 5.x, the NavMesh feature became available to all users, including those with personal edition licenses, although earlier it was a feature only for Unity Pro. Before the release of 2017.1, the system was updated to provide a component-based workflow, but since it requires an additional downloadable package, which at the time of this writing is only available in the preview version, we will follow the standard scene-based workflow. Don't worry, the concepts of both approaches are similar, and when the finished implementation finally gets to 2017.x, there should be no significant changes.
Learn more about the NavMesh component system in Unity at.GitHub .
Now we will explore all the possibilities that this system can offer us. To search for AI paths, the scene must be in a specific format; on a 2D map, a two-dimensional grid (array) is used to search for paths by the A * algorithm. AI agents need to know where the obstacles are, especially static ones. Dealing with collision avoidance between dynamically moving objects is another matter, commonly referred to as steering behavior. Unity has a built-in tool for generating NavMesh, representing the scene in a context convenient for the AI agents to find the best path to the target. To get started, open a demo project and go to the NavMesh scene.
Study card
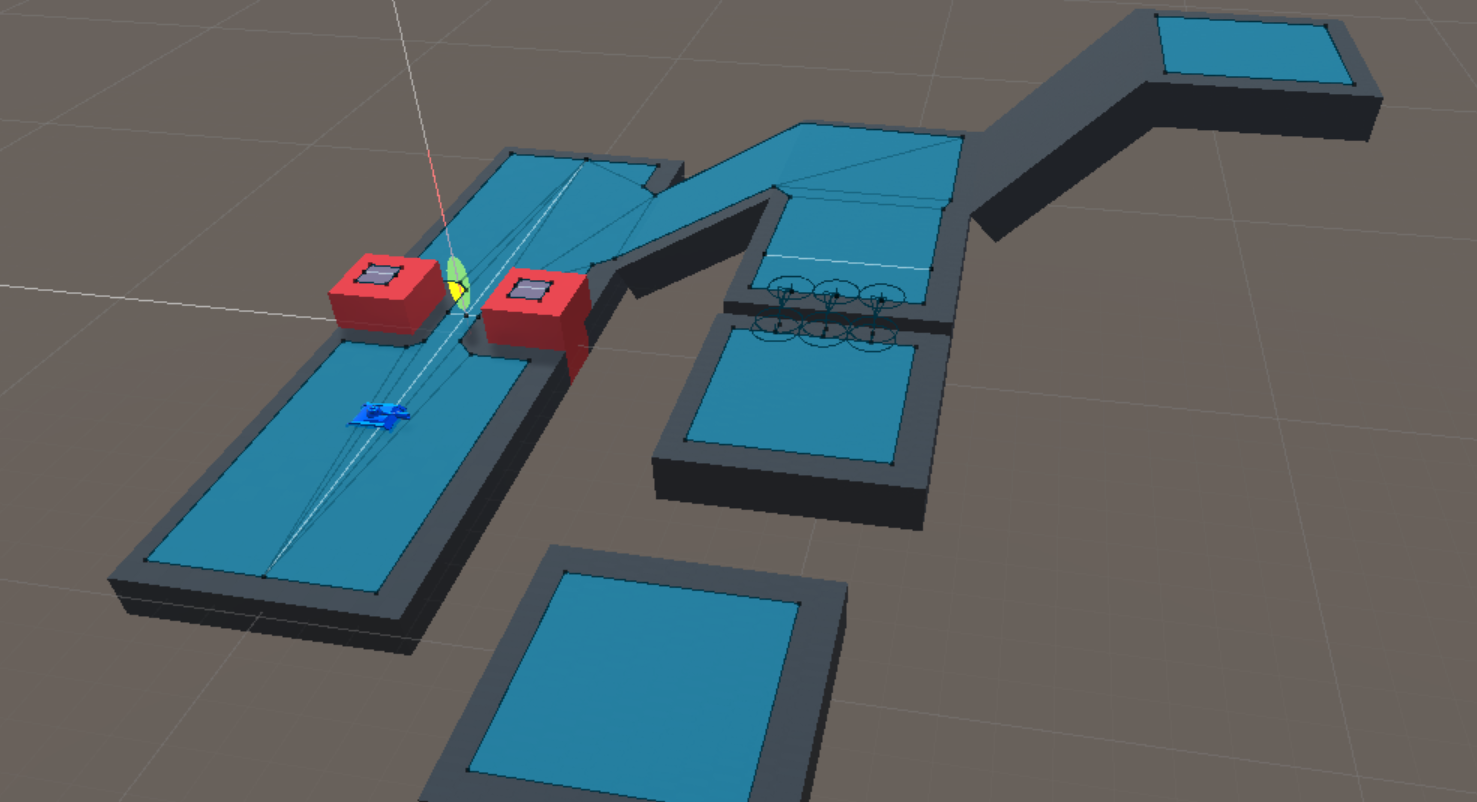
After opening the NavMesh demo it should look like in the screenshot:

Scene with obstacles and slopes
This will be our sandbox for explaining and testing the functionality of the NavMesh system. The general scheme is similar to the game in the genre of RTS (real-time strategy). We drive a blue tank. Click on different points so that the tank moves towards them. The yellow indicator is the current target of the tank.
Navigation Static
First, you need to say that you should mark all the geometry in the scene baked in NavMesh as Navigation Static . You might have met with this before, for example, in the Unity lighting map system. Making game objects static is very simple, just check the Static box for all their properties (navigation, lighting, culling, batching, and so on), or use the drop-down list for a specific indication of properties. The checkbox is located in the upper right corner of the inspector of selected objects.

Property Navigation Static
This can be done separately for different objects or, if you have a built-in hierarchy of game objects, apply the parameter to the parent object, after which Unity will offer to apply it to all children.
Baking navigation mesh
Navmesh navigation options are applied to the entire scene using the Navigation window . This window can be opened by going to the Window | Navigation . Like any other window, it can be detached for free movement or fixed. In our screenshots, it is shown as a fixed tab next to the hierarchy, but you can place this window at any convenient place.
When you open the window, you will see separate tabs. It will look something like this:

Navigation window
In our case, the previous screenshot shows the Bake tab , but in your editor any tab can be selected by default.
Let's look at each of the tabs, starting from the left and moving to the right. Let's start with the Agents tab , which looks like the one shown in the screenshot:

Agents Tab
If you are working on another project, you may find that some of the settings are different from those we set for the example project shown in the screenshot. At the top of the tab there is a list in which you can add new types of agents by clicking on the + button . You can remove additional agents by selecting them and clicking on the - button . The window shows in a visual form what the various settings do when they change. Let's see what each of the settings does:
- Name: The name of the agent type displayed in the Agent Types drop-down list.
- Radius: you can take it as an agent’s “personal space”. Agents will try to avoid too close contact with other agents based on this value, because it is used when avoiding.
- Height: as you might guess, this setting sets the height of the agent, which it uses for vertical avoidance (for example, when passing under objects).
- Step Height: This value determines the obstacles of which height the agent can climb.
- Max Slope: as we will see from the next section, this value determines the maximum angle an agent can climb. With this option you can make steep slopes of the map inaccessible to the agent.
Next we have the Areas tab , which looks like it is shown in this screenshot:

As seen in the screenshot, Unity provides several types of areas that cannot be changed: Walkable , Not Walkable, and Jump . In addition to naming and creating new areas, you can assign these areas the cost of moving around them.
Areas serve two purposes: make areas available or inaccessible to an agent, and also mark areas as less desirable in terms of moving costs. For example, you can develop RPGs in which demon enemies cannot enter areas marked as “sanctified land.” You can also mark some areas of the map as “quagmire” or “swamp”, which the agent will avoid due to the high cost of moving.
Third tab bake- probably the most important. It allows you to create NavMesh for the scene. You should already be familiar with some of the parameters. The Bake tab looks like this:

The Bake tab
The agent size parameters on this tab define how agents interact with the environment, while the parameters in the Agents tab control the interaction with other agents and moving objects. But they control the same parameters, so we will skip them. Drop Height and Jump Distance control how far an agent can “jump” to reach a part of NavMesh that is not directly related to the one in which the agent is currently located. We will discuss this in more detail below, so if you are not sure, then for now you can not study these parameters.
In addition, there are advanced options that are usually hidden by default. To expand these options, simply click on the drop-down triangle next to the Advanced heading . The parameter Manual Voxel Size can be perceived as the “quality” setting. The smaller the size, the more detail will be saved in the mesh. Min Region Area is used to skip baking platforms or surfaces below a selected threshold. Height Mesh gives us more vertically detailed data when baking the mesh. For example, this parameter allows you to maintain the correct location of the agent when climbing the stairs.
The Clear button deletes all the NavMesh data of the scene, and the Bake button.creates a mesh for the scene. The baking process is quite fast. While you have a window selected, you can observe the generation of NavMesh with the Bake button in the scene window. Let's click on the Bake button to view the results. In our sample scene, we end up with something that looks like this screenshot:
The blue areas shown are NavMesh. Below we will return to this. For now, let's move on to the last tab, Object , which looks like this:

The three buttons shown in the previous screenshot, All , Mesh Renderers and Terrains, are used as scene filters. They are useful when working in complex scenes with many objects in the hierarchy. Selecting an option filters the corresponding type from the hierarchy, which makes it easier for them to choose. You can use the buttons when examining your scene in search of objects that you want to mark as navigation static.
Using the Nav Mesh Agent
Now that we have set up the scene with NavMesh, we need a way that the agent can use this information. Fortunately for us, Unity has a Nav Mesh Agent component that can be dragged onto a character. In our example scene, there is a game object called Tank , to which the component is already attached. Look at the hierarchy and you will see something like this:

There are quite a few parameters, and we will not consider everything, because they are quite understandable, and the description can be found in the official Unity documentation. But we will mention the main things:
- Agent Type : Remember the Agents tab in the Navigation window ? Assignable agent types can be selected here.
- Auto Traverse Off Mesh Link : This parameter allows agents to automatically use the Off Mesh Links feature , which we will discuss below.
- Area Mask : here you can select the areas configured in the Areas tab of the Navigation window .
That's all. This component does 90% of the hard work for us: paving the way, avoiding obstacles, and so on. The only thing you need to do is pass the target point to the agent. Let's look at this task.
Setting the target point
After setting up an AI agent, we need a way to tell him where to go. In our example project, there is a script called Target.cs that performs exactly this task.
This is a simple class that performs three actions:
- "Shoots" the beam from the camera to the position of the mouse in the world
- Updates marker position
- Updates the destination point property for all NavMesh agents
The code is quite simple. The whole class looks like this:
using UnityEngine;
using UnityEngine.AI;
publicclassTarget : MonoBehaviour
{
    private NavMeshAgent[] navAgents;
    public Transform targetMarker;
    privatevoidStart ()
    {
      navAgents = FindObjectsOfType(typeof(NavMeshAgent)) as NavMeshAgent[];
    }
    privatevoidUpdateTargets ( Vector3 targetPosition )
    {
      foreach(NavMeshAgent agent in navAgents)
      {
        agent.destination = targetPosition;
      }
    }
    privatevoidUpdate ()
    {
        if(GetInput())
        {
            Ray ray = Camera.main.ScreenPointToRay(Input.mousePosition);
            RaycastHit hitInfo;
            if (Physics.Raycast(ray.origin, ray.direction, out hitInfo))
            {
                Vector3 targetPosition = hitInfo.point;
                UpdateTargets(targetPosition);
                targetMarker.position = targetPosition;
            }
        }
    }
    privateboolGetInput()
    {
        if (Input.GetMouseButtonDown(0))
        {
            returntrue;
        }
        returnfalse;
    }
    privatevoidOnDrawGizmos()
    {
        Debug.DrawLine(targetMarker.position, targetMarker.position + Vector3.up * 5, Color.red);
    }
}
Here the following actions take place: in the Start method, we initialize the navAgents array using the FindObjectsOfType () method .
The UpdateTargets () method traverses our navAgents array and sets the target point for them in the given Vector3 . This is the key to working the code. To obtain the target point, you can use any mechanism, and for the agent to move there, it suffices to specify the NavMeshAgent.destination field ; the agent will do the rest.
In our example, clicks are used to move, so when a player clicks the mouse, we release the beam from the camera into the world in the direction of the mouse cursor, and if it intersects with something, we set the collision point of the new targetPosition agent. We also customize the target marker accordingly for easy visualization of the destination point in the game.
To test the work, you need to bake NavMesh in accordance with the description from the previous section, then start the Play mode and select any area on the map. If you click a lot of times, you can see that the agent cannot reach certain areas - the tops of the red cubes, the uppermost platform and the platform at the bottom of the screen.
Red cubes are too high. The slope leading to the topmost platform is too sharp for our Max Slope settings , and the agent cannot climb it. The following screenshots show how Max Slope settings affect NavMesh:

NavMesh with max slope = 45
If you change the Max Slope value to something like 51 , and then press the Bake button again to bake NavMesh, the results will be as follows:

NavMesh with max slope = 51
As you can see, we can customize the level design, making entire areas inaccessible by changing a single parameter. This can be useful, for example, when you have a platform or ledge, which requires a rope, a ladder or an elevator to climb. Or maybe a special skill, for example, the ability to climb?
Application Off Mesh Links
You may notice that there are two breaks in our scene. Our agent can get to the first one, but the one at the bottom of the screen is too far away. These calculations are not completely arbitrary. Off Mesh Links essentially create a “bridge” across the gaps between unbound NavMesh segments. These links can be seen in the editor:

Blue circles with connecting lines are connections.
Unity can generate these links in two ways. The first we have already reviewed. Remember the Jump Distance value in the Bake tab of the Navigation window ? Unity automatically uses that value to generate these links when baking NavMesh. Try changing the value in our test scene to 5 and re-baking. See, are the platforms connected now? This is because the meshes are now within the new threshold.
Change the value to 2 again and bake. Now let's consider the second method. Create spheres to be used to connect the two platforms. Place them approximately as shown in the screenshot:

You can already see what is happening, but let's look at the process that allows them to be connected. In our case, I called the sphere on the right start , and the sphere on the left end . Soon you will understand why. Next, I added the Off Mesh Link component to the platform on the right (relative to the previous screenshot) . You will notice that the component has fields start and end . As you can guess, we will drag the previously created spheres into the corresponding slots - the start sphere in the start field , and the end sphere - in the end field . The inspector will look like this:

The Cost Override value is taken into account when it is given a positive value. It applies a cost multiplier when using this connection as opposed to a more cost effective route to the goal.
Bi Directional if true allows the agent to move in both directions. To create connections with one-way cross, you can disable this value. The value activated is used according to its name. If false, the agent ignores this association. You can enable and disable it to create game scenarios in which, for example, the player must activate a switch to activate a connection.
You do not need to re-bake to enable this connection. Look at your NavMesh and you will see that it looks exactly like in the screenshot:

As you can see, the smaller gap is still connected automatically, and now we have a new connection generated by the Off Mesh Link component between the two spheres. Start the Play mode and click on the far platform. As expected, the agent can now go to the disconnected platform:

At your game levels, you may need to change these settings to achieve the desired results, but a combination of these features provides you with a convenient off-the-shelf tool. You can quickly create a simple game using NavMesh functionality.
This tutorial is a fragment of the book Unity 2017 Game AI Programming - Third Edition , written by Ray Barrera, Aung Sithu Kyaw and Thet Naing Swe.