Proxy settings on Tomato firmware
Perhaps I’ll start with the main thing - for which, in fact, I personally need a proxy server. Our provider (I think like all others) has internal resources, access to which is possible only from a computer connected to this provider. Earlier, I used the scheme: a white IP on the computer, a proxy server (CCProxy) and did not turn off the computer. The idea that you can put a proxy server on the router has been around for a long time, since Linux is on the routers, the question was only in implementation. Squid is too heavy for this task, because I need a simple and practical solution, and just recently, I came across one program - srelay , which performs the "forward" traffic through HTTP and SOCKS proxies.
So, now let's get to setting up the router, in my case it is NETGEAR WNR-3500L-RUS and Tomato firmware (firmware modification does not matter). This article is intended for the advanced user and is considered. that a person already knows how to handle the command line, putty and knows what he is doing.
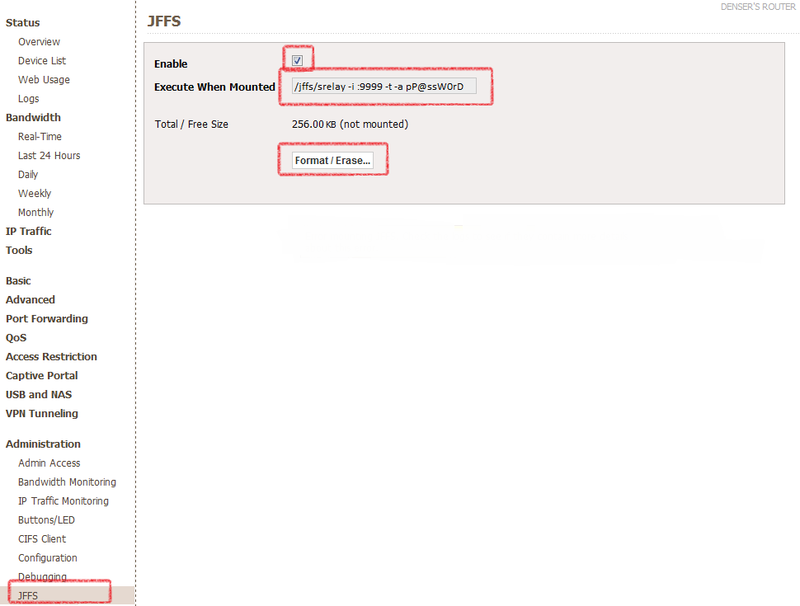
First, you need to make sure that the proxy always works and does not depend on flash drives or anything else, that is, we will place the program in the router’s memory, for this, in the Administration section, enable the JFFS option - this is a small section, in my case 320 kb , enough for the proxy program.
So, go to Administration / JFFS , enable the Enable checkbox and click Format / Erase, wait a while, and click Save .
When the JFFS partition is formatted and mounted, access to the / jffs folder will appear , here we will place the srelay program .
To download the program (the file is located on my Google site for convenience, already compiled from optware), we can run the following script in the Tools / System section : Now we have the srelay program in the jffs section, which is in the router’s memory, it remains to configure ports, startup of the program and its parameters. The parameters of the program can be seen by the command: We will need the following of them: Where 9999 is the port that will be used to connect, use whatever, except the standard ones. P @ ssW0rD
replace with the password that will be used for authorization (note the letter p in front of the password), the username for accessing the proxy is root. Add this line to the Execute When Mounted field so that the program starts when the JFFS partition is initialized with the specified parameters, namely:
It should look something like this in the end:
Now, add a rule in Firewall to open port 9999, for this we switch to the Administration / Scripts section , the Firewall tab , add the following via line
break : It will look something like this:

Now, reboot the router and check the operation programs by any available method, for example, a browser. I hope you find this instruction useful as I do.
It was noticed that after a long work, the program could close, for these purposes I install the monit program , but this is the topic of another article.
Materials used:
1. Sources of the program itself - socks-relay.sourceforge.net
2. Essay by one of the users - www.linksysinfo.org/index.php?threads/a-socks-proxy-server-for-tomato.23898
So, now let's get to setting up the router, in my case it is NETGEAR WNR-3500L-RUS and Tomato firmware (firmware modification does not matter). This article is intended for the advanced user and is considered. that a person already knows how to handle the command line, putty and knows what he is doing.
First, you need to make sure that the proxy always works and does not depend on flash drives or anything else, that is, we will place the program in the router’s memory, for this, in the Administration section, enable the JFFS option - this is a small section, in my case 320 kb , enough for the proxy program.
So, go to Administration / JFFS , enable the Enable checkbox and click Format / Erase, wait a while, and click Save .
When the JFFS partition is formatted and mounted, access to the / jffs folder will appear , here we will place the srelay program .
To download the program (the file is located on my Google site for convenience, already compiled from optware), we can run the following script in the Tools / System section : Now we have the srelay program in the jffs section, which is in the router’s memory, it remains to configure ports, startup of the program and its parameters. The parameters of the program can be seen by the command: We will need the following of them: Where 9999 is the port that will be used to connect, use whatever, except the standard ones. P @ ssW0rD
wget "http://sites.google.com/site/denserru/Home/srelay/srelay?attredirects=0&d=1" -O "/jffs/srelay"

chmod +x /jffs/srelay
root@denser-router:/tmp/home/root# /jffs/srelay -h
srelay 0.4.6 2003/04/13 (Tomo.M)
usage: srelay [options]
options:
-c file config file
-i i/f listen interface IP[:PORT]
-m num max child/thread
-o min idle timeout minutes
-p file pid file
-a np auth methods n: no, p:pass
-u file srelay password file
-f run into foreground
-r resolve client name in log
-s force logging to syslog
-t disable threading
-b avoid BIND port restriction
-v show version and exit
-h show this help and exit
/jffs/srelay -i :9999 -t -a pP@ssW0rDreplace with the password that will be used for authorization (note the letter p in front of the password), the username for accessing the proxy is root. Add this line to the Execute When Mounted field so that the program starts when the JFFS partition is initialized with the specified parameters, namely:
- work on HTTP, SOCKS4 and SOCKS5 protocols
- authorization on port 9999 user: root , password: P @ ssW0rD .
It should look something like this in the end:
Now, add a rule in Firewall to open port 9999, for this we switch to the Administration / Scripts section , the Firewall tab , add the following via line
iptables -I INPUT -p tcp --dport 9999 -j ACCEPTbreak : It will look something like this:
Now, reboot the router and check the operation programs by any available method, for example, a browser. I hope you find this instruction useful as I do.
It was noticed that after a long work, the program could close, for these purposes I install the monit program , but this is the topic of another article.
Materials used:
1. Sources of the program itself - socks-relay.sourceforge.net
2. Essay by one of the users - www.linksysinfo.org/index.php?threads/a-socks-proxy-server-for-tomato.23898