Qt Quick and Box2d: Simulate Physics
- Tutorial
This post participates in the competition “ Smart Phones for Smart Posts ”

Even though many programmers are in no hurry to transfer the development of their applications and games to the Qt Quick track, the infrastructure around the technology itself only grows and develops every day. .
So, the simulation of physics in two-dimensional space came down to it. Or rather, before the advent of the QML plugin. which allows with the inherent Qt Quick ease to integrate Box2D physics engine into its applications. We’ll talk about this today. More precisely, let’s analyze the implementation of a simple arkanoid, how quickly you can create a simple game, never before working with physical engines and almost unfamiliar terminology.
First of all, we need to get the source code of the plugin. To do this, click on the link gitorious.org/qml-box2d/qml-box2d/trees/master and on the right click on the button "Download master as tar.gz". Set aside the archive aside and go to Qt Creator.
Here, create a new project, such as “Qt Qucik Application”. In the wizard, enter the name, location in the file system, select the Qt profile, then continue to complete.
And now one of the most important parts begins. And usually one of the most difficult in OTHER languages and technologies. You must actually connect the plugin to a freshly created application. To do this, unpack the resulting archive into the root directory of the application and rename the resulting directory qml-box2d-qml-box2d to qml-box2d. B add one new line to the .pro file of the application:
And we will bring main.cpp to this form:
Here the line #include "box2dplugin.h" includes the plugin header, and the lines
we register in the application the types of Qt / Box2D that will be available and necessary for us in the future in QML.
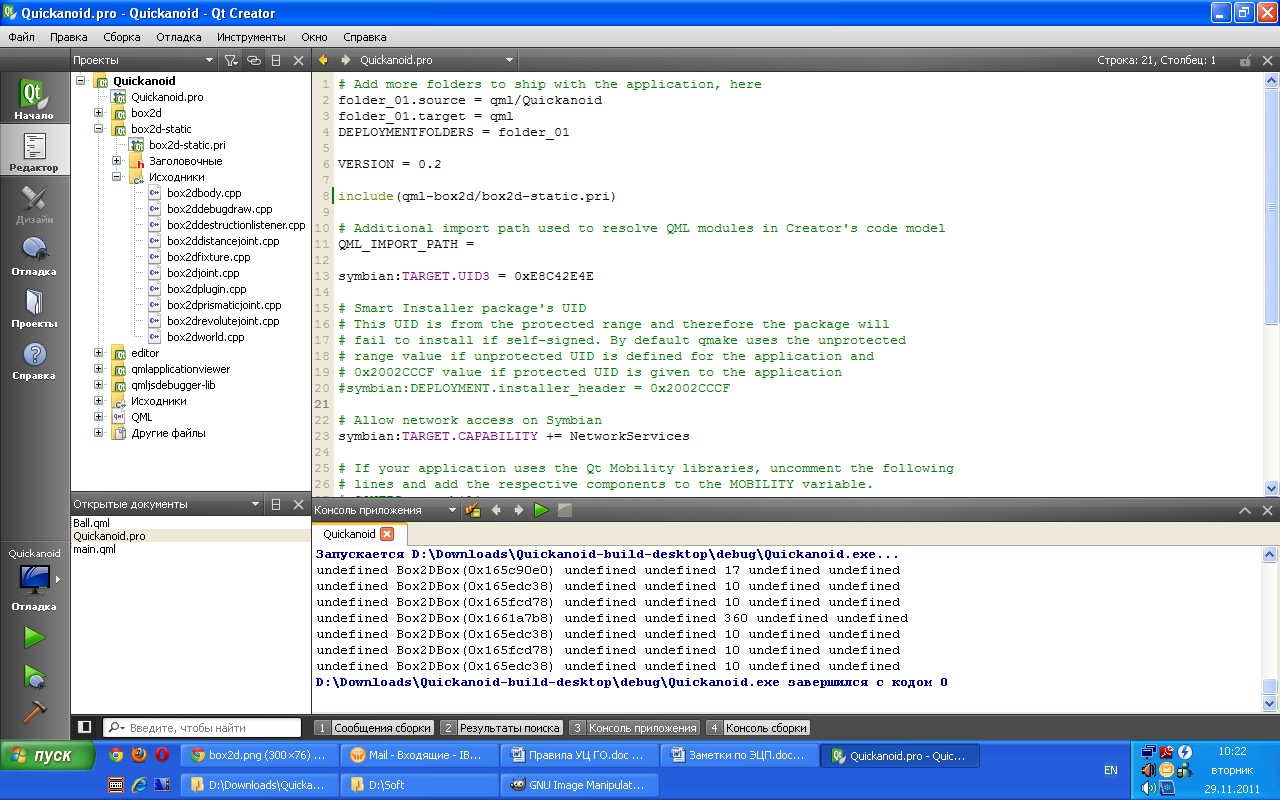
That's all. This is enough to connect the plugin as a statically linked library. Of course, the plugin can be assembled as an independent unit and put into a common directory of all QML plugins in the system. But the first option is also suitable for our purpose. The appearance of the resulting project is approximately as follows:
If we try to compile the application now, we will see the standard Hello World, which is the default template for the project in Qt Quick. But it is not interesting. We are interested in using physics.
So, we decided what we will do arkanoid. We list what we need in a toy of this plan:
Here on this simple TK and we will continue to work. As shown above, in main.cpp, we already told our application to start in landscape mode. It means more need to edit C ++ - we do not have code. Open the main.qml file and bring it to the form:
What have we done? We created a window with a size of 640x360, set its background and added one child of the World type, which in the future should be the ancestor of all physical objects. As you might guess, the World object describes the entire game world and sets its basic parameters, namely:
Their description can be found in the header file box2dworld.h The
empty physical world in three lines is cool. But let's dilute it with static. Or walls, whatever you like. Create a new QML file, call it Wall.qml. add next to the application and fill it with the following contents:
The wall, like all objects on the scene (and the Wold object is essentially a scene), are objects of type Body. Therefore, Body is the base class for all physical elements. It has the following properties:
The body, as such, cannot handle collisions with other objects. In order to teach the body this, you must set the fixtures property. Values for this property can be Circle, Box, and Polygon. All of them are descendants of the Fixture base class, which is responsible for interacting with other objects. On its own, it is of course inaccessible from QML, but only through its three descendants. For clarity, we list the available properties.
Fixture Class:
Each of the descendants extends this class a little with its own properties:
From theory it becomes clear that the wall is a physical body (Body) such as a rectangle (Box) and is graphically represented by a picture with a fill. And now, having one wall, we can create as many walls as we like, we need them 4. Open main.qml and inside the World object, after gravity.y: 0, add a description of our walls:
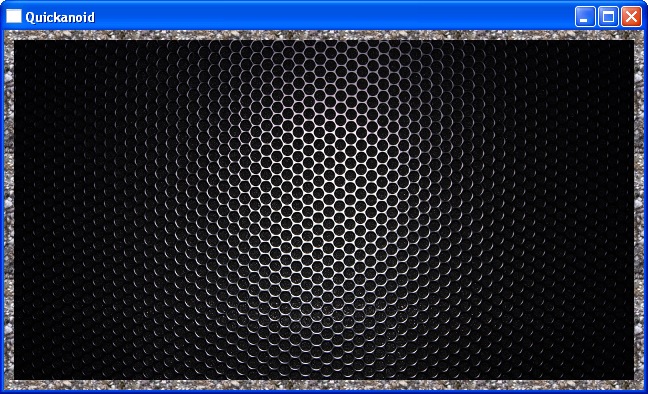
We save everything and run our application, on the screen we will see a background image and 4 walls framing the world around the edges.
Further, according to the plan, we have a ball that can fly within our world and hit walls. To describe the ball, create the Ball.qml file and fill it with the contents of the following nature:
The same as with the wall, only instead of Box we have Circle. Add our ball to the world we created, after describing the last wall in the World object, add the ball description:
We start, we see a ball in the center of the screen, which does not move anywhere for lack of gravity and linear acceleration. What a clever girl ...
The next step is a platform that represents the only player control that we will hit the ball with. According to the previous scheme, the new Platform.qml file, in it:
This physical object differs from others in that we allow the user to drive them across the screen using the mouse / finger cursor in the horizontal direction. In the main.qml, after the Ball description, add the platform description:
At the moment, I advise you to recall our walls. For the good, we know for sure that they work, but since we are limited by the size of the screen, we can hide our walls outside the screen. so as not to callus eyes and do not interfere. To do this, in turn, in each of the Wall objects inside World, add one of the properties: to the left leftMargin: -width, to the right rightMargin: -width, to the top topMargin: -height, and to the bottom bottomMargin: -height. After that, run again and look at what we get:
The next item on our plan. Bricks to be knocked down with a ball. But! We must not forget that we will not have enough space on the screen. Therefore, we will try to implement this part of the game differently. Namely, at the top of the screen there will be several green bricks, on which you constantly need to peel with a ball, not allowing them to turn red. If the brick turns red completely - to beat it is already useless. And in the game we introduce a timer that counts the amount of time until the moment when all the bricks turn red. The animation of the transition from green to red will be equal to, for example, 20 seconds. After the brick turns red completely, it disappears. If we manage to get on the brick, then the 20-second timer is reset and the brick begins to redden again. Let's start with the description of the brick in the Brick.qml file:
As you can see, there is also nothing complicated: a description of the body, a description of its display, two states with smooth animation of the transition between them, a timer counting down 20 seconds with a restart after each collision with the ball, and the auxiliary function show (). In the main.qml file, after the platform declaration, add the declarations of our bricks:
By the way, don’t ask me why I didn’t use the Row and Repeat elements - using them to automatically create elements of the Body type, the application crashes. At the very beginning of the file, add the declaration of a new variable, after determining the height and width:
According to it, we will consider the number of remaining bricks, when it equals two for example - we finish the game. That is, the logic of user interaction with the game will be simple - it is necessary that at least three bricks remain on the screen as much as possible. Let's describe the seconds counter at the very bottom of the World object:
What is left for us? It remains to add start and finish screens, well, and slightly correct the logic of the game. Actually, these are trifles that can be omitted in the article. I will give only finally a complete final listing of the main.qml file:
Here is a demo application. Now I propose to look at what happened in the end, and then read a couple of final lines and write your impressions of the work done by the developers of the plug-in. We look:
In my opinion, it turned out well. As a matter of fact, it took only two evenings (yesterday and today) to develop the application itself and write this article. Firstly, it speaks of simplicity and a very low threshold for entering development using QML, and secondly, of the quality of the code that developers can achieve over and over again both the Qt framework itself and third-party developers writing similar plugins for it.
A plus. Of course, I want to note that Box2D itself is not tied to any OS and is platform independent, therefore, the created application will work equally well on both desktop and mobile platforms. Well, even in this example, you can see screenshots from under Windows and video from under Linux.
Of course. in this article, not all Box2D functionality that was ported to QML was considered, at least Joints remained. On the other hand, I believe that this material is quite enough to understand the essence of things. And already having an idea of a bunch of QML / Box2D, you can easily rivet toys using physics. It can be labyrinths using the phone’s accelerometer and falling cubes, fun flying away from hitting each other and cars or motorbikes of the X-Moto type and much more. In this case, do not forget. that QML is just a wrapper on C ++ classes and the application itself will work as if it were originally written in C ++.
As usual, the source code can be collected on the project page: code.google.com/p/quickanoid/downloads/list
Thank you for your time.
Even though many programmers are in no hurry to transfer the development of their applications and games to the Qt Quick track, the infrastructure around the technology itself only grows and develops every day. .
So, the simulation of physics in two-dimensional space came down to it. Or rather, before the advent of the QML plugin. which allows with the inherent Qt Quick ease to integrate Box2D physics engine into its applications. We’ll talk about this today. More precisely, let’s analyze the implementation of a simple arkanoid, how quickly you can create a simple game, never before working with physical engines and almost unfamiliar terminology.
Bind QML and Box2d
First of all, we need to get the source code of the plugin. To do this, click on the link gitorious.org/qml-box2d/qml-box2d/trees/master and on the right click on the button "Download master as tar.gz". Set aside the archive aside and go to Qt Creator.
Here, create a new project, such as “Qt Qucik Application”. In the wizard, enter the name, location in the file system, select the Qt profile, then continue to complete.
And now one of the most important parts begins. And usually one of the most difficult in OTHER languages and technologies. You must actually connect the plugin to a freshly created application. To do this, unpack the resulting archive into the root directory of the application and rename the resulting directory qml-box2d-qml-box2d to qml-box2d. B add one new line to the .pro file of the application:
include(qml-box2d/box2d-static.pri)
And we will bring main.cpp to this form:
#include<QtGui/QApplication>#include"qmlapplicationviewer.h"#include"box2dplugin.h"Q_DECL_EXPORT intmain(int argc, char *argv[]){
    QScopedPointer<QApplication> app(createApplication(argc, argv));
    Box2DPlugin plugin;
    plugin.registerTypes("Box2D");
    QScopedPointer<QmlApplicationViewer> viewer(QmlApplicationViewer::create());
    viewer->setOrientation(QmlApplicationViewer::ScreenOrientationLockLandscape);
    viewer->setMainQmlFile(QLatin1String("qml/Quickanoid/main.qml"));
    viewer->showExpanded();
    return app->exec();
}
Here the line #include "box2dplugin.h" includes the plugin header, and the lines
    Box2DPlugin plugin;
    plugin.registerTypes("Box2D");
we register in the application the types of Qt / Box2D that will be available and necessary for us in the future in QML.
That's all. This is enough to connect the plugin as a statically linked library. Of course, the plugin can be assembled as an independent unit and put into a common directory of all QML plugins in the system. But the first option is also suitable for our purpose. The appearance of the resulting project is approximately as follows:
If we try to compile the application now, we will see the standard Hello World, which is the default template for the project in Qt Quick. But it is not interesting. We are interested in using physics.
We formalize the description of the game
So, we decided what we will do arkanoid. We list what we need in a toy of this plan:
- The default window is 360x640 - for easier porting in the future to mobile devices. And of course, fixing it in landscape mode.
- The background of the application is a simple picture, against which it will be convenient to play.
- 4 walls bordering our world at the edges of the window.
- A ball flying within the world.
- Platform at the bottom of the window, for beating the ball.
- A few bricks in the upper part of the window, which must be knocked down with our ball.
- Time counter on the screen.
- Start and finish screens of the game.
We realize the completed task
Here on this simple TK and we will continue to work. As shown above, in main.cpp, we already told our application to start in landscape mode. It means more need to edit C ++ - we do not have code. Open the main.qml file and bring it to the form:
importQtQuick 1.0importBox2D 1.0Image {
    id: screen;
    source: "images/bg.jpeg"
    width: 640
    height: 360
    World {
        id: world
        width: screen.width
        height: screen.height
        gravity.x: 0
        gravity.y: 0
    }
}
What have we done? We created a window with a size of 640x360, set its background and added one child of the World type, which in the future should be the ancestor of all physical objects. As you might guess, the World object describes the entire game world and sets its basic parameters, namely:
- gravity - X and Y gravity. For our application, gravity is not needed.
- And a few parameters, with the correct translation of which, unfortunately, I have problems: timeStep, velocityIterations, positionIterations, frameTime
Their description can be found in the header file box2dworld.h The
empty physical world in three lines is cool. But let's dilute it with static. Or walls, whatever you like. Create a new QML file, call it Wall.qml. add next to the application and fill it with the following contents:
import QtQuick 1.0
import Box2D 1.0
Body {
    property aliasimage: image.source
    bodyType: Body.Static
    fixtures: Box {
        anchors.fill: parent
        friction: 1.0
    }
    Rectangle {
        anchors.fill: parentcolor: "brown"
    }
    Image {
        id: image
        anchors.fill: parentsource: "images/wall.jpg"
        fillMode: Image.Tile
    }
}
Theory break
The wall, like all objects on the scene (and the Wold object is essentially a scene), are objects of type Body. Therefore, Body is the base class for all physical elements. It has the following properties:
- active - enable / disable physics on an element
- linearVelocity - linear acceleration
- fixtures - body boundaries by which collisions will be determined
- bodyType - body type, static, dynamic or kinematic
- fixedRotation - disable rotation
- sleepingAllowed - allow physics to automatically turn off to save resources
- linearDamping, angularDamping, bullet - not clear at first sight
The body, as such, cannot handle collisions with other objects. In order to teach the body this, you must set the fixtures property. Values for this property can be Circle, Box, and Polygon. All of them are descendants of the Fixture base class, which is responsible for interacting with other objects. On its own, it is of course inaccessible from QML, but only through its three descendants. For clarity, we list the available properties.
Fixture Class:
- density - specific gravity
- friction - friction force
- restitution - resilience / recoil
- groupIndex - the index in the group (presumably the group is one Body object)
- collidesWith - a list of objects. which the current object is in contact with at the moment
- sensor, categories - additional parameters
Each of the descendants extends this class a little with its own properties:
- The Box class does not add new properties, but uses the standard width and height to specify the borders of the rectangle.
- The Circle class introduces a radius property, which, oddly enough, is the radius of a circular object, such as a wheel.
- The Polygon class adds a verticles property that contains a list of the object's vertices for a more accurate physical simulation.
Back to practice
From theory it becomes clear that the wall is a physical body (Body) such as a rectangle (Box) and is graphically represented by a picture with a fill. And now, having one wall, we can create as many walls as we like, we need them 4. Open main.qml and inside the World object, after gravity.y: 0, add a description of our walls:
Wall {
    id: wallLeft
    width: 10
    anchors {
        bottom: parent.bottom
        left: parent.left
        top: parent.top
    }
}
Wall {
    id: wallRight
    width: 10
    anchors {
        bottom: parent.bottom
        right: parent.right
        top: parent.top
    }
}
Wall {
    id: wallTop
    height: 10
    anchors {
        left: parent.left
        right: parent.right
        top: parent.top
    }
}
Wall {
    id: wallBottom
    height: 10
    anchors {
        left: parent.left
        right: parent.right
        bottom: parent.bottom
    }
}
We save everything and run our application, on the screen we will see a background image and 4 walls framing the world around the edges.
Further, according to the plan, we have a ball that can fly within our world and hit walls. To describe the ball, create the Ball.qml file and fill it with the contents of the following nature:
importQtQuick 1.0importBox2D 1.0Body {
    id: ball
    fixedRotation: false
    sleepingAllowed: false
    fixtures: Circle {
        id: circle
        radius: 12
        anchors.fill: parent
        density: 0;
        friction: 10;
        restitution: 1.05;
    }
    Image {
        id: circleRect
        anchors.centerIn: parent
        width: circle.radius * 2
        height: width
        smooth: true
        source: "images/ball.png"
    }
}
The same as with the wall, only instead of Box we have Circle. Add our ball to the world we created, after describing the last wall in the World object, add the ball description:
Ball {
    id: ball
    x: parent.width/2
    y: parent.height/2
}
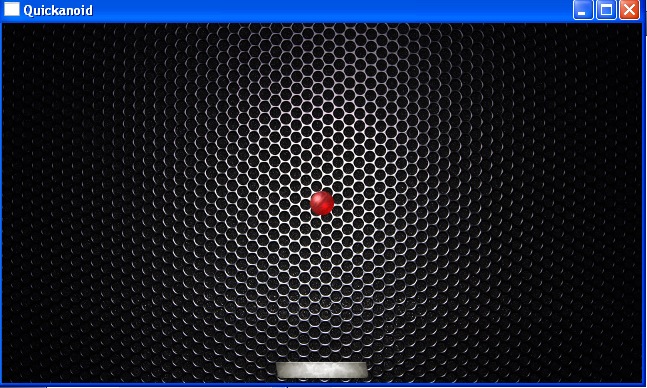
We start, we see a ball in the center of the screen, which does not move anywhere for lack of gravity and linear acceleration. What a clever girl ...
The next step is a platform that represents the only player control that we will hit the ball with. According to the previous scheme, the new Platform.qml file, in it:
importQtQuick 1.0importBox2D 1.0Body {
    id: platform
    width: platformBg.width
    height: platformBg.height
    x: parent.width/2 - width/2
    y: parent.height - platformBg.height - 5
    bodyType: Body.Static
    fixtures: Box {
        id: platformBox
        anchors.fill: parent
        friction: 10
        density: 300;
    }
    Image {
        id: platformBg
        smooth: true
        source: "images/platform.png"
    }
    MouseArea {
        anchors.fill: parent
        drag.target: platform
        drag.axis: Drag.XAxis
        drag.minimumX: 0
        drag.maximumX: screen.width - platform.width
    }
}
This physical object differs from others in that we allow the user to drive them across the screen using the mouse / finger cursor in the horizontal direction. In the main.qml, after the Ball description, add the platform description:
Platform {
   id: platform
}
At the moment, I advise you to recall our walls. For the good, we know for sure that they work, but since we are limited by the size of the screen, we can hide our walls outside the screen. so as not to callus eyes and do not interfere. To do this, in turn, in each of the Wall objects inside World, add one of the properties: to the left leftMargin: -width, to the right rightMargin: -width, to the top topMargin: -height, and to the bottom bottomMargin: -height. After that, run again and look at what we get:
The next item on our plan. Bricks to be knocked down with a ball. But! We must not forget that we will not have enough space on the screen. Therefore, we will try to implement this part of the game differently. Namely, at the top of the screen there will be several green bricks, on which you constantly need to peel with a ball, not allowing them to turn red. If the brick turns red completely - to beat it is already useless. And in the game we introduce a timer that counts the amount of time until the moment when all the bricks turn red. The animation of the transition from green to red will be equal to, for example, 20 seconds. After the brick turns red completely, it disappears. If we manage to get on the brick, then the 20-second timer is reset and the brick begins to redden again. Let's start with the description of the brick in the Brick.qml file:
import QtQuick 1.0
import Box2D 1.0
Body {
    id: brick
    width: parent.width/5 - 5
    height: 15
    anchors {
        top: parent.top
        topMargin: -height/2
    }
    signal disappear()
    property bool contacted : false
    bodyType: Body.Static
    fixtures: Box {
        anchors.fill: parent
        friction: 1.0
        onBeginContact: {
            contacted = true
        }
        onEndContact: {
            contacted = false
        }
    }
    Timer {
        id: timer
        interval: 20000; running: true; repeat: false
        onTriggered: { brick.visible = false; brick.active = false; disappear(); }
    }
    Rectangle {
        id: brickRect
        anchors.fill: parent
        radius: 6
        state: "green"
        states: [
            State {
                name: "green"
                when: brick.contacted
                PropertyChanges {
                    target: brickRect
                    color: "#7FFF00"
                }
                PropertyChanges {
                    target: timer
                    running: false
                }
            },
            State {
                name: "red"
                when: !brick.contacted
                PropertyChanges {
                    target: brickRect
                    color: "red"
                }
                PropertyChanges {
                    target: timer
                    running: true
                }
            }
        ]
        transitions: [
            Transition {
                from: "green"
                to: "red"
                ColorAnimation { from: "#7FFF00"; to: "red"; duration: 20000; }
            }
        ]
    }
    functionshow(){
        brick.visible = true;
        brick.active = true;
        state = "green"
    }
    functionhide(){
        brick.visible = false;
        brick.active = false;
    }
}
As you can see, there is also nothing complicated: a description of the body, a description of its display, two states with smooth animation of the transition between them, a timer counting down 20 seconds with a restart after each collision with the ball, and the auxiliary function show (). In the main.qml file, after the platform declaration, add the declarations of our bricks:
Brick {
    id: brick1
    x: 3;
    onDisappear: bricksCount--
}
Brick {
    id: brick2
    anchors {
        left:brick1.right
        leftMargin: 5
    }
    onDisappear: bricksCount--
}
Brick {
    id: brick3
    anchors {
        left:brick2.right
        leftMargin: 5
    }
    onDisappear: bricksCount--
}
Brick {
    id: brick4
    anchors {
        left:brick3.right
        leftMargin: 5
    }
    onDisappear: bricksCount--
}
Brick {
    id: brick5
    anchors {
        left:brick4.right
        leftMargin: 5
    }
    onDisappear: bricksCount--
}
By the way, don’t ask me why I didn’t use the Row and Repeat elements - using them to automatically create elements of the Body type, the application crashes. At the very beginning of the file, add the declaration of a new variable, after determining the height and width:
propertyint bricksCount: 5According to it, we will consider the number of remaining bricks, when it equals two for example - we finish the game. That is, the logic of user interaction with the game will be simple - it is necessary that at least three bricks remain on the screen as much as possible. Let's describe the seconds counter at the very bottom of the World object:
Text {
    id: secondsPerGame
    anchors {
        bottom: parent.bottom
        left: parent.left
    }
    color: "white"
    font.pixelSize: 36
    text: "0"
    Timer {
        interval: 1000; running: true; repeat: true
        onTriggered: secondsPerGame.text = parseInt(secondsPerGame.text) + 1
    }
}
What is left for us? It remains to add start and finish screens, well, and slightly correct the logic of the game. Actually, these are trifles that can be omitted in the article. I will give only finally a complete final listing of the main.qml file:
import QtQuick 1.0import Box2D 1.0
Image {
    id: screen;
    source: "images/bg.jpeg"
    width: 640
    height: 360
    property int bricksCount: 5
    World {
        id: world
        width: screen.width
        height: screen.height
        visible: false
        gravity.x: 0
        gravity.y: 0
        Wall {
            id: wallLeft
            width: 10
            anchors {
                bottom: parent.bottom
                left: parent.left
                leftMargin: -width
                top: parent.top
            }
        }
        Wall {
            id: wallRight
            width: 10
            anchors {
                bottom: parent.bottom
                right: parent.right
                rightMargin: -width
                top: parent.top
            }
        }
        Wall {
            id: wallTop
            height: 10
            anchors {
                left: parent.left
                right: parent.right
                topMargin: -height
                top: parent.top
            }
        }
        Wall {
            id: wallBottom
            height: 10
            anchors {
                left: parent.left
                right: parent.right
                bottom: parent.bottom
                bottomMargin: -height
            }
            onBeginContact: {
                console.log(other)
                finishGame()
            }
        }
        Ball {
            id: ball
            x: parent.width/2
            y: parent.height/2
        }
        Platform {
            id: platform
        }
        Brick {
            id: brick1
            x: 3;
            onDisappear: bricksCount--
        }
        Brick {
            id: brick2
            anchors {
                left:brick1.right
                leftMargin: 5
            }
            onDisappear: bricksCount--
        }
        Brick {
            id: brick3
            anchors {
                left:brick2.right
                leftMargin: 5
            }
            onDisappear: bricksCount--
        }
        Brick {
            id: brick4
            anchors {
                left:brick3.right
                leftMargin: 5
            }
            onDisappear: bricksCount--
        }
        Brick {
            id: brick5
            anchors {
                left:brick4.right
                leftMargin: 5
            }
            onDisappear: bricksCount--
        }
        Text {
            id: secondsPerGame
            anchors {
                bottom: parent.bottom
                left: parent.left
            }
            color: "white"
            font.pixelSize: 36text: "0"
            Timer {
                id: scoreTimer
                interval: 1000; running: true; repeat: true
                onTriggered: secondsPerGame.text = parseInt(secondsPerGame.text) + 1
            }
        }
    }
    Item {
        id:screenStart
        anchors.fill: parent
        visible: falseText {
            id: startGame
            anchors.centerIn: parent
            color: "white"
            font.pixelSize: 36text: "Start Game!"
            MouseArea {
                anchors.fill: parent
                onClicked: {
                    screen.startGame()
                }
            }
        }
    }
    Item {
        id:screenFinish
        anchors.fill: parent
        visible: falseText {
            id: score
            anchors.centerIn: parent
            color: "white"
            font.pixelSize: 36text: "Game over! Your score is: " + secondsPerGame.text
        }
        Text {
            id: restartGame
            anchors {
                top: score.bottom
                horizontalCenter: parent.horizontalCenter
            }
            color: "white"
            font.pixelSize: 36text: "Restart Game!"
            MouseArea {
                anchors.fill: parent
                onClicked: {
                    screen.startGame()
                }
            }
        }
    }
    function startGame() {
        screen.state = "InGame";
        bricksCount = 5
        brick1.show()
        brick2.show()
        brick3.show()
        brick4.show()
        brick5.show()
        secondsPerGame.text = "0"
        platform.x = screen.width/2 - platform.width/2
        ball.linearVelocity.x = 0
        ball.linearVelocity.y = 0
        ball.active = true;
        ball.x = platform.x + platform.width/2
        ball.y = platform.y - ball.height
        ball.x = screen.width/2
        ball.y = screen.height/2
        ball.applyLinearImpulse(Qt.point(50, 300), Qt.point(ball.x, ball.y))
        scoreTimer.running = true
    }
    function finishGame(){
        screen.state = "FinishScreen";
        brick1.hide()
        brick2.hide()
        brick3.hide()
        brick4.hide()
        brick5.hide()
        ball.active = false;
        ball.applyLinearImpulse(Qt.point(0,0), Qt.point(ball.x, ball.y))
        scoreTimer.running = false
    }
    onBricksCountChanged: {
        console.log(bricksCount)
        if (bricksCount <=2){
            finishGame()
        }
    }
    Component.onCompleted: {
        startGame()
    }
    states: [
        State {
            name: "StartScreen"
            PropertyChanges {
                target: screenStart
                visible: true
            }
        },
        State {
            name: "InGame"
            PropertyChanges {
                target: world
                visible: true
            }
        },
        State {
            name: "FinishScreen"
            PropertyChanges {
                target: screenFinish
                visible: true
            }
        }
    ]
    state: "StartScreen"
}
In total
Here is a demo application. Now I propose to look at what happened in the end, and then read a couple of final lines and write your impressions of the work done by the developers of the plug-in. We look:
In my opinion, it turned out well. As a matter of fact, it took only two evenings (yesterday and today) to develop the application itself and write this article. Firstly, it speaks of simplicity and a very low threshold for entering development using QML, and secondly, of the quality of the code that developers can achieve over and over again both the Qt framework itself and third-party developers writing similar plugins for it.
A plus. Of course, I want to note that Box2D itself is not tied to any OS and is platform independent, therefore, the created application will work equally well on both desktop and mobile platforms. Well, even in this example, you can see screenshots from under Windows and video from under Linux.
Of course. in this article, not all Box2D functionality that was ported to QML was considered, at least Joints remained. On the other hand, I believe that this material is quite enough to understand the essence of things. And already having an idea of a bunch of QML / Box2D, you can easily rivet toys using physics. It can be labyrinths using the phone’s accelerometer and falling cubes, fun flying away from hitting each other and cars or motorbikes of the X-Moto type and much more. In this case, do not forget. that QML is just a wrapper on C ++ classes and the application itself will work as if it were originally written in C ++.
As usual, the source code can be collected on the project page: code.google.com/p/quickanoid/downloads/list
Thank you for your time.