Raspberry Pi as Steam Idle Machine
Surely, many of the Raspberry Pi owners and owners have an account on Steam, whose library is filled with a considerable number of games purchased on sales on this Steam. But sometimes it happens that there is no time or desire to play these same games, but I would like to get from them at least some benefit other than the presence of a beautiful game icon in the list of games.

You can read more about Steam cards and badges here .
There are many ways to idle Steam cards. Each of the methods has its pros and cons. However, almost all of them need a regular Steam client, which gives us some inconvenience in the issue of uptime. Also, some of the idle methods require user intervention to switch games in which cards fall. Here we will consider a fully automated method that does not require large computing power and which would work 24/7 until all the cards fall out. For this, the Raspberry Pi is great for us! In addition, this is another reason to dust off your mini-computer and give it the opportunity to work for us.
A little about the advantages and possibilities of this method:
It is assumed that you have already installed and configured the OS in the Raspberry Pi, as well as everything you need to work with it. There are already enough articles on the hub that describe the detailed preparation for the Raspberry Pi, so here we will not analyze it.
Some of the articles that will help you configure your Raspberry Pi:
Our Steam Idle Machine requires node.js and some modules for it, such as node-steam , request , forever . But first things first.
First, we need to compile and install the latest version of node.js:
Compilation will take some time. At Raspberry Pi 2, without overclocking, compilation took about 4-5 hours.
Next, we check whether everything worked out well for us:

Next, install the node.js modules we need:
Hurrah! Node.js is now ready to go.
Create a folder for our project and place the symbolic link and the script itself there:
And insert there:
Pay attention to the last lines of code. We will need to enter the details of the Steam account here. First you need to enter only a username and password. Then save the file and run it:
The program will try to log in, but without success, because because of SteamGuard we need authCode. If you try to log in without authCode, Steam will send it to your inbox. Find a letter with a code in your mail and write the code in a script. Uncomment the comma and line below, save the file and run the script again.
If you did everything correctly, you will see approximately the same thing as in the image above. Congratulations! The Steam Idle Machine is functioning as it should. Now open the script file again and comment out how it was, the comma and the authCode line. We will no longer need them at the next start. Account data is stored in the folder with our project in the sentryfile file .
By the way, to run the script, it is best to use the forever module.
Unfortunately, there is a bug in the script and I could not fix it. After several hours, the script went on, it suddenly stops switching games. What caused this - I did not understand. I came up with a very barbaric solution to this problem. I set cron to restart the script every 2 hours.
Enter the line there:
In the end, I would like to say that this method is safe, like any other. Of course, it would be foolish to deny the possible risks, but, nevertheless, not a single case of account blocking was recorded due to a reason. I will be very happy with valuable additions to my article, as well as indications of my mistakes, if any.
Thank you for attention!
What is all this for?
- For sale. Each trading card costs money. The price tag for the card varies from 1 rub. up to 15 rubles for ordinary ones, and 10-50 rubles. for metal (rare) cards. Cards can be sold to other Steam users through the trading platform, thereby earning on other games, or content for games.
- To the collection. Many Steam users collect game badges from these cards, to increase the level of Steam, well, or for the aesthetic pleasure of the badges.
You can read more about Steam cards and badges here .
And where is the Raspberry Pi?
There are many ways to idle Steam cards. Each of the methods has its pros and cons. However, almost all of them need a regular Steam client, which gives us some inconvenience in the issue of uptime. Also, some of the idle methods require user intervention to switch games in which cards fall. Here we will consider a fully automated method that does not require large computing power and which would work 24/7 until all the cards fall out. For this, the Raspberry Pi is great for us! In addition, this is another reason to dust off your mini-computer and give it the opportunity to work for us.
A little about the advantages and possibilities of this method:
- Steam client not required
- Automatic game switching. If all the cards of a game have fallen, then the next game is turned on.
- Steam does not set the status "In the game." None of the friends on Steam will see the process
- Stable You can turn on and forget about the script until all the cards fall out.
Training
It is assumed that you have already installed and configured the OS in the Raspberry Pi, as well as everything you need to work with it. There are already enough articles on the hub that describe the detailed preparation for the Raspberry Pi, so here we will not analyze it.
Some of the articles that will help you configure your Raspberry Pi:
- Squeeze out all the juices or use the Raspberry pi to its fullest
- Raspberry Pi: detailed setup from scratch to TorrentBox
Install node.js and its components
Our Steam Idle Machine requires node.js and some modules for it, such as node-steam , request , forever . But first things first.
First, we need to compile and install the latest version of node.js:
wget http://nodejs.org/dist/v0.12.5/node-v0.12.5.tar.gz
tar xvf node-v0.12.5.tar.gz
cd node-v0.12.5
./configure
make
sudo make install
Compilation will take some time. At Raspberry Pi 2, without overclocking, compilation took about 4-5 hours.
Next, we check whether everything worked out well for us:
node -v
npm -v
Next, install the node.js modules we need:
sudo npm install steam@0.6.8 -g
sudo npm install request -g
sudo npm install forever -g
Hurrah! Node.js is now ready to go.
Install and run the script
Create a folder for our project and place the symbolic link and the script itself there:
cd ~
sudo mkdir steamidle
cd steamidle
sudo ln -s /usr/local/lib/node_modules ~/steamidle
sudo nano steamidle.js
And insert there:
var args = process.argv.slice(2);
var fs = require('fs');
var steam = require('steam');
var request = require('request');
var sentryFile = 'sentryfile';
var sentry = undefined;
if (fs.existsSync(sentryFile)) {
    sentry = fs.readFileSync(sentryFile);
}
function updateSentry (buffer) {
    console.log(buffer);
    fs.writeFile(sentryFile, buffer);
}
function createIdler(userinfo, timer){
    var bot = new steam.SteamClient();
    userinfo.bot = bot;
    bot.on('loggedOn', function() {
        canTrade = false;
        console.log('Logged in ' + userinfo.username);
    });
    bot.on('sentry', updateSentry);
    bot.on('error', function(e) {
        console.log(userinfo);
        console.log(e);
    });
    function startIdle(){
        var req = request.defaults({jar: userinfo.jar});
        req.get('http://steamcommunity.com/my/badges/', function (error, response, body) {
			if (body) {
				var b = body.match(//);
				if (b) {
					console.log(userinfo.username);
					console.log("Idling game " + b[1]);
					bot.gamesPlayed([b[1]]);
				}
			}
			var now = new Date();
			console.log(now.getHours()+':'+now.getMinutes()+':'+now.getSeconds());
		});
	}
    bot.on('webSessionID', function (sessionID) {
        userinfo.jar = request.jar(),
        userinfo.sessionID = sessionID;
        bot.webLogOn(function(cookies) {
            cookies.forEach(function(cookie) {
                userinfo.jar.setCookie(request.cookie(cookie), 'http://steamcommunity.com');
                userinfo.jar.setCookie(request.cookie(cookie), 'http://store.steampowered.com');
                userinfo.jar.setCookie(request.cookie(cookie), 'https://store.steampowered.com');
            });
            userinfo.jar.setCookie(request.cookie("Steam_Language=english"), 'http://steamcommunity.com');
            startIdle();
            setInterval(function(){startIdle();}, timer);
        });
    });
    bot.logOn({
        accountName: userinfo.username,
        password: userinfo.password,
        authCode: userinfo.authCode,
        shaSentryfile: sentry
    });
}
createIdler({
    username: ' ',           //логин
    password: ' '//,          //пароль
    //authCode: ' '           //код авторизации
}, (10*60*1000));
Pay attention to the last lines of code. We will need to enter the details of the Steam account here. First you need to enter only a username and password. Then save the file and run it:
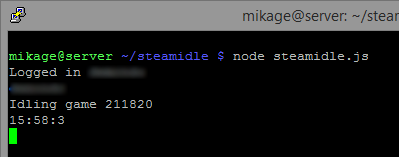
node steamidle.js
The program will try to log in, but without success, because because of SteamGuard we need authCode. If you try to log in without authCode, Steam will send it to your inbox. Find a letter with a code in your mail and write the code in a script. Uncomment the comma and line below, save the file and run the script again.
If you did everything correctly, you will see approximately the same thing as in the image above. Congratulations! The Steam Idle Machine is functioning as it should. Now open the script file again and comment out how it was, the comma and the authCode line. We will no longer need them at the next start. Account data is stored in the folder with our project in the sentryfile file .
By the way, to run the script, it is best to use the forever module.
forever start steamidle.js
There is something else...
Unfortunately, there is a bug in the script and I could not fix it. After several hours, the script went on, it suddenly stops switching games. What caused this - I did not understand. I came up with a very barbaric solution to this problem. I set cron to restart the script every 2 hours.
crontab -e
Enter the line there:
0 */2 * * * /usr/local/bin/node /usr/local/bin/forever restart ~/steamidle/steamidle.js
Conclusion
In the end, I would like to say that this method is safe, like any other. Of course, it would be foolish to deny the possible risks, but, nevertheless, not a single case of account blocking was recorded due to a reason. I will be very happy with valuable additions to my article, as well as indications of my mistakes, if any.
Thank you for attention!