 September 3, 2011 at 17:13
Learning to count in hex, or reverse engineering an alarm
Introduction
Recently, I had the idea to learn how to count in hexadecimal notation. Since I am a lazy person, such methods as learning the multiplication table did not suit me. With a little thought, I remembered that every morning I decide (sometimes several times) a simple example to turn off the alarm. It helps a little, over time I started to solve almost without waking up. So why not combine the useful with the useful?
It remains to choose a method of implementation. Since I don’t have the slightest idea of developing for Android (and I’m not very familiar with Java in general), and writing my application for such a trifle is shooting from a cannon at sparrows, it was decided to modify the existing alarm clock.
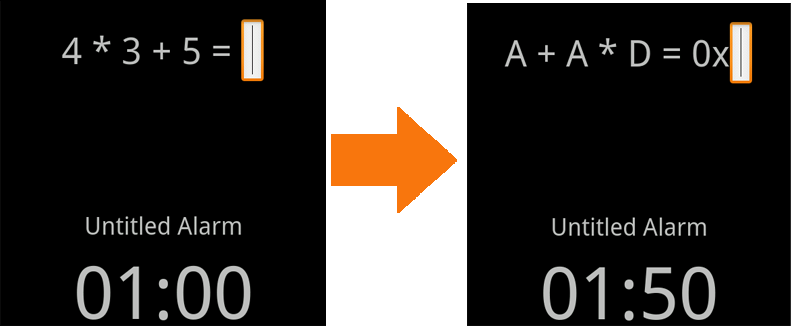
Under the cut you will find a description of the tools, the process and the result of translating the example into hex. As well as an explanation of the syntax for smali code (the opcode language for the dalvik virtual machine). There are almost no pictures, there are a lot of beeches.
A little bit about .apk structure
An .apk application is a zip-packed file. Inside, there are resource files, AndroidManifest.xml and classes.dex. The second is a file that contains basic information about the application, such as: information about the main Activity, a list of rights requested during installation, and other information that is not important for our purposes. classes.dex - bytecode compiled for the dalvik virtual machine. We can translate it into jar and get more or less readable Java code. What will we do now.
Getting readable code
So, we take the file of our application (in my case it is AlarmDroid ) and unzip it. There are many ways to do this. I used Apk Manager , which I will write about a little later. Next, you need to convert classes.dex to jar. There is dex2jar for this . Drag and drop the file to dex2jar.bat. Now you need to learn how to read the resulting jar file. We use the jd-gui program for this (by the way, there is a plug-in of the same name for Eclipse).
So we got an almost readable code, although in some places the decompiler clearly flattens.
Decompiling and reading .smali files
Since java code is read-only, you have to fix it in the opcodes of the virtual machine. There are only a little less than 256 pieces . For decompilation, you can use the above Apk Manager or the more console apktool . However, the first is only a beautiful wrapper of the second, with the addition of some additional functions (for example, unzipping and selecting the compression level). After decompilation, we get a folder with files with the extension .smali. These are the very opcodes. They can already be read by any text editor. But it would be nice to get some kind of backlight. I used the highlighting for Notepad ++ , but there is the same for vim .
Well, with the tools, finally figured out, it's time to analyze the code.
First blood
To begin with, it would be nice to make the generation of numbers not up to 10, but up to 15. We study the code, and we find a method for generating an example. You will have to look for it, there are many classes in the trees. But since the names of the methods have been preserved, it is not very difficult.
We find the desired method in the RingerActivity class.
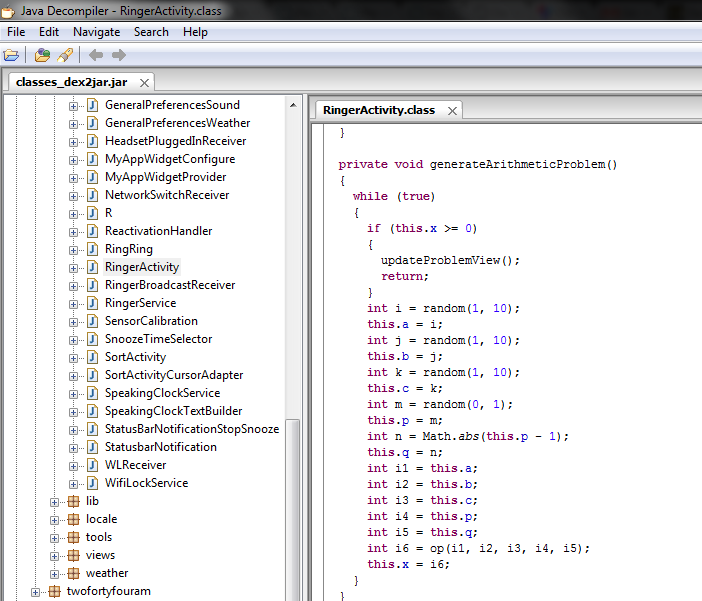
Well, everything seems to be simple: we generate 3 numbers and 2 characters, and put the result in this.x (this, by the way, is useful to us).
Now we find the same method in the smali code (unfortunately there are no smali code highlighters online, and writing your own is lazy, so the code will be screenshots).

(The method code continues further)
The code is incomprehensible, but it is clearly visible that the constants are set once at the beginning. Therefore, we change 0xa to 0xf and try to see the changes in order to know that we are on the right track. Using Apk Manager, we collect, sign, transfer to the phone (you can test on the emulator if the Android SDK is installed), install, set the alarm for a minute ahead, wait, watch. This procedure will have to be repeated a large number of times. The numbers on the screen have increased, no errors occur. Excellent! Now it's time to get a little understanding of the incomprehensible smali code.
Understanding smali code
In general, everything is pretty well described here , I will only briefly and in Russian retell.
Types, Methods, Fields
There are two types of types in dalvik opcodes: primitive and reference. Primitive types are denoted by a single letter (for example, I - int, V - void), the full list is here .
Reference types are objects and arrays, or, in other words, all but primitive types. In the code are designated as
Lpackage / name / ObjectName;where L at the beginning means that it is an object; - end of name. This entry will be equivalent
package.name.ObjectNamein java.
Arrays have the form [I is a one-dimensional array of ints (in Java there will be int []). For more measurements, just add square brackets at the beginning. [[[I == int [] [] [] (the maximum number of measurements is 255). Of course, you can create arrays of reference types, an array of strings, for example, will look like this:
[Ljava / lang / String;
Methods are specified in a long way, which includes an object containing a method, the name of the method, the types of all the parameters passed, and the type of the return value.
Lpackage / name / ObjectName; -> MethodName (III) ZIn this example, Lpackage / name / ObjectName; Is the object containing the method, MethodName is the name of the method, (III) are the types of parameters passed (in this case 3 ints), and Z is the type of the return value (in this case, bool).
Here is another more complex example.
method (I [[IILjava / lang / String; [Ljava / lang / Object;) Ljava / lang / String;
In Java, this code will look like this:
String method (int, int [] [], int, String, Object [])
Class fields are defined as follows:
Lpackage / name / ObjectName; -> FieldName: Ljava / lang / String;
Here, in general, everything is already clear.
Registers
In smali code, all registers are 32 bit and can contain any type of value. For 64 bit values, 2 registers are used.
Determining the number of registers in a method
There are two ways to determine the number of registers. The .registers directive defines the total number of registers, while .locals determines the number of registers that are not method parameters.
Passing parameters
When the method is called, the arguments fall into the last registers. Those. if the method is called with 2 arguments and 5 registers (v0-v4), the arguments fall into the registers v3 and v4.
The first parameter in non-static methods is always the object from which the method was called. Thus, if you call a non-static method
LMyObject; -> callMe (II) V
in addition to two ints, LMyObject is passed to it; before both ints, and it turns out that there are 3 parameters in the method. And if you set the total number of registers in method 5 (or local number 2), then v2 will get the object, v3 the first int, and v4 the second.
Register naming
There are 2 register naming schemes: a general v-scheme, and a p-scheme for parameter registers. In the above example, we will have 5 general registers v0-v4, and 3 parameter registers p0-p2, and as mentioned above p0 and v2 (as well as p1 and v3, p2 and v4) denote the same register.
In general, there are still some subtleties, but they are not important for us to change the alarm clock.
Translation of the example in hex
Now that everything has become clear with smali code, it would be nice to translate the example into hex. I really did not want to write my function, so I turned to Google. And found the Integer.toHexString () method.
So we find the right method
private void updateProblemView ()and him in smali code
{
TextView localTextView = this.problem;
String str1 = String.valueOf (this.a);
StringBuilder localStringBuilder1 = new StringBuilder (str1) .append ("");
int i = this.p;
String str2 = op2text (i);
StringBuilder localStringBuilder2 = localStringBuilder1.append (str2) .append ("");
int j = this.b;
StringBuilder localStringBuilder3 = localStringBuilder2.append (j) .append ("");
int k = this.q;
String str3 = op2text (k);
StringBuilder localStringBuilder4 = localStringBuilder3.append (str3) .append ("");
int m = this.c;
String str4 = m + "=";
localTextView.setText (str4);
}
.method private updateProblemView () V
.locals 3
.prologue
.line 520
iget-object v0, p0, Lcom / splunchy / android / alarmclock / RingerActivity; -> problem: Landroid / widget / TextView;
new-instance v1, Ljava / lang / StringBuilder;
iget v2, p0, Lcom / splunchy / android / alarmclock / RingerActivity; -> a: I
invoke-static {v2}, Ljava / lang / String; -> valueOf (I) Ljava / lang / String;
move-result-object v2
invoke-direct {v1, v2}, Ljava / lang / StringBuilder; ->(Ljava / lang / String;) V
const-string v2, ""
invoke-virtual {v1, v2}, Ljava / lang / StringBuilder; -> append (Ljava / lang / String;) Ljava / lang / StringBuilder;
move-result-object v1
iget v2, p0, Lcom / splunchy / android / alarmclock / RingerActivity; -> p: I
invoke-direct {p0, v2}, Lcom / splunchy / android / alarmclock / RingerActivity; -> op2text (I ) Ljava / lang / String;
move-result-object v2
invoke-virtual {v1, v2}, Ljava / lang / StringBuilder; -> append (Ljava / lang / String;) Ljava / lang / StringBuilder;
move-result-object v1
const-string v2, ""
invoke-virtual {v1, v2}, Ljava / lang / StringBuilder; -> append (Ljava / lang / String;) Ljava / lang / StringBuilder;
move-result-object v1
iget v2, p0, Lcom / splunchy / android / alarmclock / RingerActivity; -> b: I
invoke-virtual {v1, v2}, Ljava / lang / StringBuilder; -> append (I) Ljava / lang / StringBuilder;
move-result-object v1
const-string v2, ""
invoke-virtual {v1, v2}, Ljava / lang / StringBuilder; -> append (Ljava / lang / String;) Ljava / lang / StringBuilder;
move-result-object v1
iget v2, p0, Lcom / splunchy / android / alarmclock / RingerActivity; -> q: I
invoke-direct {p0, v2}, Lcom / splunchy / android / alarmclock / RingerActivity; -> op2text (I ) Ljava / lang / String;
move-result-object v2
invoke-virtual {v1, v2}, Ljava / lang / StringBuilder; -> append (Ljava / lang / String;) Ljava / lang / StringBuilder;
move-result-object v1
const-string v2, ""
invoke-virtual {v1, v2}, Ljava / lang / StringBuilder; -> append (Ljava / lang / String;) Ljava / lang / StringBuilder;
move-result-object v1
iget v2, p0, Lcom / splunchy / android / alarmclock / RingerActivity; -> c: I
invoke-virtual {v1, v2}, Ljava / lang / StringBuilder; -> append (I) Ljava / lang / StringBuilder;
move-result-object v1
const-string v2, "="
invoke-virtual {v1, v2}, Ljava / lang / StringBuilder; -> append (Ljava / lang / String;) Ljava / lang / StringBuilder;
move-result-object v1
invoke-virtual {v1}, Ljava / lang / StringBuilder; -> toString () Ljava / lang / String;
move-result-object v1
invoke-virtual {v0, v1}, Landroid / widget / TextView; -> setText (Ljava / lang / CharSequence;) V
.line 521
return-void
.end method
For the first number in the example, everything is simple. Replace
invoke-static {v2}, Ljava / lang / String; -> valueOf (I) Ljava / lang / String;on the
invoke-static {v2}, Ljava / lang / Integer; -> toHexString (I) Ljava / lang / String;and deal with the end. With the other two a little more complicated, they are not converted to String are added to the result. Therefore, we replace
iget v2, p0, Lcom / splunchy / android / alarmclock / RingerActivity; -> b: Ion the
invoke-virtual {v1, v2}, Ljava / lang / StringBuilder; -> append (I) Ljava / lang / StringBuilder;
move-result-object v1
iget v2, p0, Lcom / splunchy / android / alarmclock / RingerActivity; -> b: I(note that the type of value passed has changed). We do the same with the third number.
invoke-static {v2}, Ljava / lang / Integer; -> toHexString (I) Ljava / lang / String;
move-result-object v2
invoke-virtual {v1, v2}, Ljava / lang / StringBuilder; -> append (Ljava / lang / String;) Ljava / lang / StringBuilder;
move-result-object v1
We start - we see small letters. But I want something big! Not a problem, append before adding to the string
invoke-virtual {v2}, Ljava / lang / String; -> toUpperCase () Ljava / lang / String;for all three numbers.
move-result-object v2
Change input field
In general, this could be stopped, it became much more difficult to count. But now the translation from hex to dec is being trained, and we continue to count in decimal. This is not what I wanted. Therefore, you must convert the input field.
First of all, to finish with the update method, add “0x” in front of the input field. Well, it's very simple, we change
const-string v2, "="on the
const-string v2, "= 0x"Next, you need to change the type of the input field from numeric to text (numeric hex, unfortunately, does not provide). Similar properties are stored in xml files. Here I was helped by searching the files for the keywords "arithmetic", "math" and the like. In the file res / layout / ringer.xml we find the line
google, find the list of inputType values, change to "text".
Now it remains to learn how to transform the input so that it matches the result calculated during generation (RingerActivity.x, remember?). We search and find the following code
...It’s quite difficult to understand something, but we see some connection between solution and com / splunchy / android / alarmclock / RingerActivity $ 9. It turns out the last - this is a smali file, which, apparently, jd-gui could not adequately display. We go there and find the comparison method we need!
label1621: label1912: for (boolean bool15 = false;; bool15 = true)
{
boolean bool16 = bool15;
this.arithmeticProblemSolved = bool16;
RingerActivity localRingerActivity14 = this;
int i9 = 2131099787;
TextView localTextView4 = (TextView) localRingerActivity14.findViewById (i9);
this.problem = localTextView4;
RingerActivity localRingerActivity15 = this;
int i10 = 2131099788;
EditText localEditText1 = (EditText) localRingerActivity15.findViewById (i10);
this.solution = localEditText1;
RingerActivity localRingerActivity16 = this;
String str7 = "input_method";
InputMethodManager localInputMethodManager = (InputMethodManager) localRingerActivity16.getSystemService (str7);
this.imm = localInputMethodManager;
EditText localEditText2 = this.solution;
9 local91 = new com / splunchy / android / alarmclock / RingerActivity $ 9;
9 local92 = local91;
RingerActivity localRingerActivity17 = this;
ImageButton localImageButton5 = localImageButton3;
ImageButton localImageButton6 = localImageButton1;
local92.(localRingerActivity17, localImageButton5, localImageButton6);
localEditText2.setOnEditorActionListener (local91);
...
…Well, we add the translation in upper case to the line read from the input field, since we have already learned this. After that we replace
iget-object v1, p0, Lcom/splunchy/android/alarmclock/RingerActivity$9;->this$0:Lcom/splunchy/android/alarmclock/RingerActivity;
invoke-static {v1}, Lcom/splunchy/android/alarmclock/RingerActivity;->access$10(Lcom/splunchy/android/alarmclock/RingerActivity;)Landroid/widget/EditText;
move-result-object v1
invoke-virtual {v1}, Landroid/widget/EditText;->getText()Landroid/text/Editable;
move-result-object v1
invoke-interface {v1}, Landroid/text/Editable;->toString()Ljava/lang/String;
move-result-object v1
new-instance v2, Ljava/lang/Integer;
iget-object v3, p0, Lcom/splunchy/android/alarmclock/RingerActivity$9;->this$0:Lcom/splunchy/android/alarmclock/RingerActivity;
iget v3, v3, Lcom / splunchy / android / alarmclock / RingerActivity; -> x: I
invoke-direct {v2, v3}, Ljava / lang / Integer; ->(I) V
invoke-virtual {v2}, Ljava / lang / Integer; -> toString () Ljava / lang / String;
move-result-object v2
invoke-virtual {v1, v2}, Ljava / lang / String; -> equals (Ljava / lang / Object;) Z
move-result v1
...
iget v3, v3, Lcom / splunchy / android / alarmclock / RingerActivity; -> x: Ion the
invoke-direct {v2, v3}, Ljava / lang / Integer; ->(I) V
invoke-virtual {v2}, Ljava / lang / Integer; -> toString () Ljava / lang / String;
move-result-object v2
iget v2, v3, Lcom / splunchy / android / alarmclock / RingerActivity; -> x: Iand here we also add the translation to uppercase. We collect, we look. Hurrah! Everything works.
invoke-static {v2}, Ljava / lang / Integer; -> toHexString (I) Ljava / lang / String;
move-result-object v2
Conclusion
Soon the fairy tale affects, but not soon the thing is done. Due to the lack of a debugger, testing is very difficult, in order to run the application and check its performance, it takes a couple of minutes, and a lot of annoying actions.
I also really wanted to redo the digital layout of my favorite Swype keyboard for input in hex. But their encrypted layout files have become an insurmountable obstacle for me. = (
Here is the final version of the alarm clock . Unfortunately, it stopped updating after modification. Well, the current functionality is enough
for me. Thank you for your attention, I will be glad to any criticism!
PS Hexadecimal multiplication table









