Build Caffe at Google Collaboration: a free video card in the cloud
Google Collaboration is a cloud service that has appeared recently, aimed at simplifying research in the field of machine and in-depth training. Using Collaboration, you can get remote access to a machine with a connected video card, and absolutely free of charge, which greatly simplifies life when you have to train deep neural networks. We can say that it is some analogue of Google documents for Jupyter Notebook.
The laboratory pre-installed Tensorflow and almost all necessary for the work of the Python-library. If a package is missing, it is easily installed on the go through
All code is available in my Colaboratory Notebook .
Roughly speaking, Colaboratory allows you to run Jupyter Notebook on a remote machine. Collaboration files are ordinary .ipynb "laptops" and are stored in Google Drive. There is also a set of functions that allows you to upload files from a remote machine to Google-disk and back. These files can also be shared with others, you can write comments to them, as in Google documents.
In Colaboratory, you can use a GPU, namely the Tesla K80. To do this, you need to connect it in the settings: Runtime Change runtime typeHardware accelerator. It is worth noting that GPUs are not always available, and then Laboratory will offer to start the car without it.
It seems that nothing but the Jupyter Notebook itself can be started, but there is indirect access to the terminal: to do this, add an exclamation mark in front of the terminal team, for example
A few more comments about Colaboratory:
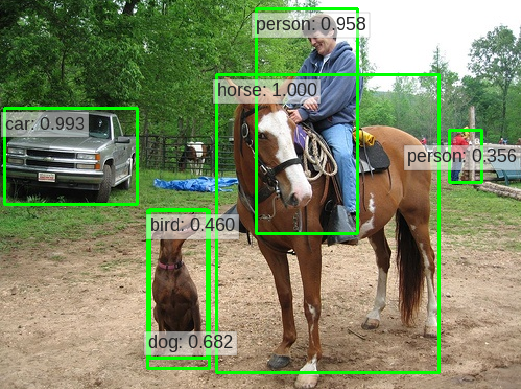
I wanted to try Single Shot Detector (SSD) , namely, its Caffe implementation at Google Laboratory, but for this project it was necessary to collect from the sources.
By the way, if any version of Caffe works for you , there is a much simpler way (it even works, although I have not tried to run anything):
Building SSD-Caffe from source is a rather long quest of several steps, which can only be completed with crutches.
Step 1: Install Addictions
Here we need to download all the dependencies for Caffe using
And it worked. It remains only to download the dependencies:
Step 2: need another compiler.
Here the problem is the following:
Step 3: you have to build a boost
If you try to build Caffe at this stage, problems will arise when you try to connect the boost, because it is compiled by another compiler, so you will need to download its source code and also build it
Step 4: Makefile Setup
Clone the Caffe from GitHub:
And we change the required fields in Makefile.config - I changed the path to CUDA, changed the BLAS option, changed the OpenCV version to the third, added the Python layer, and also added all the paths to the libraries that are installed, but for some reason were not found (all this is convenient done using python):
Also in the Makefile itself, I had to replace all the tags
Step 5: build The
last crutch is to fix the file
Now, in fact, you can assemble Caffe:
The last two lines add library paths, namely boost and caffe.
Now Caffe can be used (you only need to specify the path to it in PYTHONPATH):
To test the performance, I tested the Mobilenet-SSD project : the code is also in my Laboratory Notebook .
In particular, I measured the prediction time for one picture, and the acceleration on the GPU was about 3.8.
Google Collaboration has a great tutorial on Medium. Colaboratory itself has files with examples of almost everything that may be needed.
Mount the Google disk in the virtual machine file system:
This code will return the link and display the input window. It is necessary to follow the link, copy the code and enter it into the window. For some reason I have to do it twice. Farther:
After that, you can use your Google-disk as a normal directory. In addition, all changes in this directory are automatically synchronized with Google-disk.
Installing Keras :
Installing PyTorch :
Change working directory:
Erase all changes and restart the machine:
Upload file to local machine:
Get the dictionary from the files uploaded to Google-disk:
Mute terminal command output (redirect to variable):
In general, Google Lab offers a good opportunity to train neural networks in the cloud. True, this may not be enough for very large grids. Another plus is the ability to run code independently of the local operating system (which is good for reproducibility), and also work together on a single project. As a trick - the GPU may be unavailable, including for a long time.
The laboratory pre-installed Tensorflow and almost all necessary for the work of the Python-library. If a package is missing, it is easily installed on the go through
piporapt-get. But what if you need to build a project from source and connect to a GPU? It turns out that it may not be so simple that I found out during the assembly of the SSD-Caffe . In this publication I will give a brief description of Colaboratory, describe the difficulties encountered and how to solve them, and also provide several useful techniques. All code is available in my Colaboratory Notebook .
Collaboration in brief
Roughly speaking, Colaboratory allows you to run Jupyter Notebook on a remote machine. Collaboration files are ordinary .ipynb "laptops" and are stored in Google Drive. There is also a set of functions that allows you to upload files from a remote machine to Google-disk and back. These files can also be shared with others, you can write comments to them, as in Google documents.
In Colaboratory, you can use a GPU, namely the Tesla K80. To do this, you need to connect it in the settings: Runtime
Change runtime typeHardware accelerator. It is worth noting that GPUs are not always available, and then Laboratory will offer to start the car without it. It seems that nothing but the Jupyter Notebook itself can be started, but there is indirect access to the terminal: to do this, add an exclamation mark in front of the terminal team, for example
!mkdir images. In general, we can assume that we are dealing with a perfect ordinary machine, on which Ubuntu 17.10 is installed (at the time of writing), but connected remotely. It follows that on it you can do everything that can be done through the terminal (not interactively), including:- clone repositories with
git clone, - upload data using
wget(by the way, even large files are loaded almost instantly from a Google disk), - use
make(and most likelycmake) - install tools and libraries with
apt-getandpip
A few more comments about Colaboratory:
- It seems that the user has unlimited access to all files of the system (any commands need to be written without
sudo); - The state of the terminal is not transferred between the teams, even if they are in the same cell (for example,
cd dirif necessary, you have to write at the beginning of each command); - If you permanently disconnect from Colaboratory, all changes on the virtual machine will be erased, including all installed packages and downloaded files, therefore, they recommend installing the packages in Jupyter Notebook;
- After 12 hours of continuous use, the machine automatically shuts down, but then it can be restarted (in theory, in practice, the GPU may not be available).
SSD-Caffe assembly
I wanted to try Single Shot Detector (SSD) , namely, its Caffe implementation at Google Laboratory, but for this project it was necessary to collect from the sources.
By the way, if any version of Caffe works for you , there is a much simpler way (it even works, although I have not tried to run anything):
!apt install caffe-cudaBuilding SSD-Caffe from source is a rather long quest of several steps, which can only be completed with crutches.
Step 1: Install Addictions
Here we need to download all the dependencies for Caffe using
apt. However, before you do this, you must allow the aptsource code of the dependencies to be downloaded. The Caffe installation guide says that this requires a “deb-src line in the sources.list file”. Unfortunately, the details are not there, so I just uncommented all the deb-srclines in the file /etc/apt/sources.list:with open('/etc/apt/sources.list') as f:
txt = f.read()
with open('/etc/apt/sources.list', 'w') as f:
f.write(txt.replace('# deb-src','deb-src'))
And it worked. It remains only to download the dependencies:
!apt update
!apt build-dep caffe-cuda
Step 2: need another compiler.
Here the problem is the following:
g++-7which is the default by default, for some reason is incompatible with the CUDA compiler nvcc, so you have to use something else. I downloaded g++-5and made it the default compiler:
!apt install g++-5
!update-alternatives --install /usr/bin/gcc gcc /usr/bin/gcc-5 20
!update-alternatives --install /usr/bin/g++ g++ /usr/bin/g++-5 20
Step 3: you have to build a boost
If you try to build Caffe at this stage, problems will arise when you try to connect the boost, because it is compiled by another compiler, so you will need to download its source code and also build it
g++-5( for more details on the site boost ):
!wget https://dl.bintray.com/boostorg/release/1.67.0/source/boost_1_67_0.tar.bz2
!tar --bzip2 -xf boost_1_67_0.tar.bz2
!cd boost_1_67_0 && ./bootstrap.sh --exec-prefix=/usr/local --with-libraries=system,filesystem,regex,thread,python --with-python-version=2.7 --with-python-root=/usr
!cd boost_1_67_0 && ./b2 install
Step 4: Makefile Setup
Clone the Caffe from GitHub:
!git clone https://github.com/weiliu89/caffe.git && cd caffe && git checkout ssd
And we change the required fields in Makefile.config - I changed the path to CUDA, changed the BLAS option, changed the OpenCV version to the third, added the Python layer, and also added all the paths to the libraries that are installed, but for some reason were not found (all this is convenient done using python):
with open('caffe/Makefile.config.example') as f:
  config = f.read()
comment = ['CUDA_DIR := /usr/local/cuda',
           'BLAS := open']
uncomment = ['# CUDA_DIR := /usr',
             '# BLAS := atlas',
             '# OPENCV_VERSION := 3', '# WITH_PYTHON_LAYER := 1'] #
replace = [('INCLUDE_DIRS := $(PYTHON_INCLUDE) /usr/local/include',
            'INCLUDE_DIRS := $(PYTHON_INCLUDE) /usr/local/include /usr/include/hdf5/serial /usr/local/lib/python2.7/dist-packages/numpy/core/include/'),
           ('LIBRARY_DIRS := $(PYTHON_LIB) /usr/local/lib /usr/lib',
            'LIBRARY_DIRS := $(PYTHON_LIB) /usr/local/lib /usr/lib /usr/lib/x86_64-linux-gnu/hdf5/serial')]
for c in uncomment:
  config = config.replace(c, c[2:])
for c in comment:
  config = config.replace(c, '# '+c)
for c1,c2 in replace:
  config = config.replace(c1, c2)
with open('caffe/Makefile.config', 'w') as f:
  f.write(config)
Also in the Makefile itself, I had to replace all the tags
-isystemwith -I: both are responsible for searching for headers, but they are processed a little differently, and without this replacement, problems arose when stdlib was connected ( see more here ):with open('caffe/Makefile') as f:
mfile = f.read()
with open('caffe/Makefile', 'w') as f:
f.write(mfile.replace('-isystem','-I'))
Step 5: build The
last crutch is to fix the file
c++config.h, otherwise there are problems with nan-types ( more ):with open('/usr/include/x86_64-linux-gnu/c++/5/bits/c++config.h') as f:
txt = f.read()
with open('/usr/include/x86_64-linux-gnu/c++/5/bits/c++config.h', 'w') as f:
f.write(txt.replace('/* #undef _GLIBCXX_USE_C99_MATH */',
'/* #undef _GLIBCXX_USE_C99_MATH */\n#define _GLIBCXX_USE_C99_MATH 1'))
Now, in fact, you can assemble Caffe:
!cd caffe && make -j8 && make pycaffe && make test -j8 && make distribute
!echo /usr/local/lib >> /etc/ld.so.conf && ldconfig
!echo /content/caffe/distribute/lib >> /etc/ld.so.conf && ldconfig
The last two lines add library paths, namely boost and caffe.
Now Caffe can be used (you only need to specify the path to it in PYTHONPATH):
import sys
caffe_path = !cd caffe/python && pwd
sys.path.insert(0, caffe_path[0])
import caffe
To test the performance, I tested the Mobilenet-SSD project : the code is also in my Laboratory Notebook .
In particular, I measured the prediction time for one picture, and the acceleration on the GPU was about 3.8.
Bonus: some useful tricks
Google Collaboration has a great tutorial on Medium. Colaboratory itself has files with examples of almost everything that may be needed.
Mount the Google disk in the virtual machine file system:
!apt-get install -y -qq software-properties-common python-software-properties module-init-tools
!add-apt-repository -y ppa:alessandro-strada/ppa 2>&1 > /dev/null
!apt-get update -qq 2>&1 > /dev/null
!apt-get -y install -qq google-drive-ocamlfuse fuse
from google.colab import auth
auth.authenticate_user()
from oauth2client.client import GoogleCredentials
creds = GoogleCredentials.get_application_default()
import getpass
!google-drive-ocamlfuse -headless -id={creds.client_id} -secret={creds.client_secret} < /dev/null 2>&1 | grep URL
vcode = getpass.getpass()
!echo {vcode} | google-drive-ocamlfuse -headless -id={creds.client_id} -secret={creds.client_secret}
This code will return the link and display the input window. It is necessary to follow the link, copy the code and enter it into the window. For some reason I have to do it twice. Farther:
!mkdir -p drive
!google-drive-ocamlfuse drive
After that, you can use your Google-disk as a normal directory. In addition, all changes in this directory are automatically synchronized with Google-disk.
Installing Keras :
!pip install -q keras
import keras
Installing PyTorch :
from os import path
from wheel.pep425tags import get_abbr_impl, get_impl_ver, get_abi_tag
platform = '{}{}-{}'.format(get_abbr_impl(), get_impl_ver(), get_abi_tag())
accelerator = 'cu80'if path.exists('/opt/bin/nvidia-smi') else'cpu'
!pip install -q http://download.pytorch.org/whl/{accelerator}/torch-0.3.0.post4-{platform}-linux_x86_64.whl torchvision
import torch
Change working directory:
import os
os.chdir("/path/to/wdir")
Erase all changes and restart the machine:
!kill -9 -1Upload file to local machine:
from google.colab import files
files.download('file.ext')
Get the dictionary from the files uploaded to Google-disk:
from google.colab import files
uploaded = files.upload()
Mute terminal command output (redirect to variable):
lines_list = !pwd
In general, Google Lab offers a good opportunity to train neural networks in the cloud. True, this may not be enough for very large grids. Another plus is the ability to run code independently of the local operating system (which is good for reproducibility), and also work together on a single project. As a trick - the GPU may be unavailable, including for a long time.