 January 1, 2012 at 17:24
About creating a KolibriOS image
It all started with news about the possible introduction of KolibriOS at Chaos Constructions 2011. It was published on the KolibriOS Developer Forum four months before the event.
And so, in early August 2011, I had the idea to create an image for a virtual machine with this system (KolibriOS), various software and examples of files that you can work with. Actually, that's what I did.
The first question that arose for me is for which machine to create the image? At first I preferred the Bochs and QEMU emulators (with which I already dealt), but for this work I decided to choose a virtual machine from VMware. VMware Player seemed pretty advanced with a clear interface.
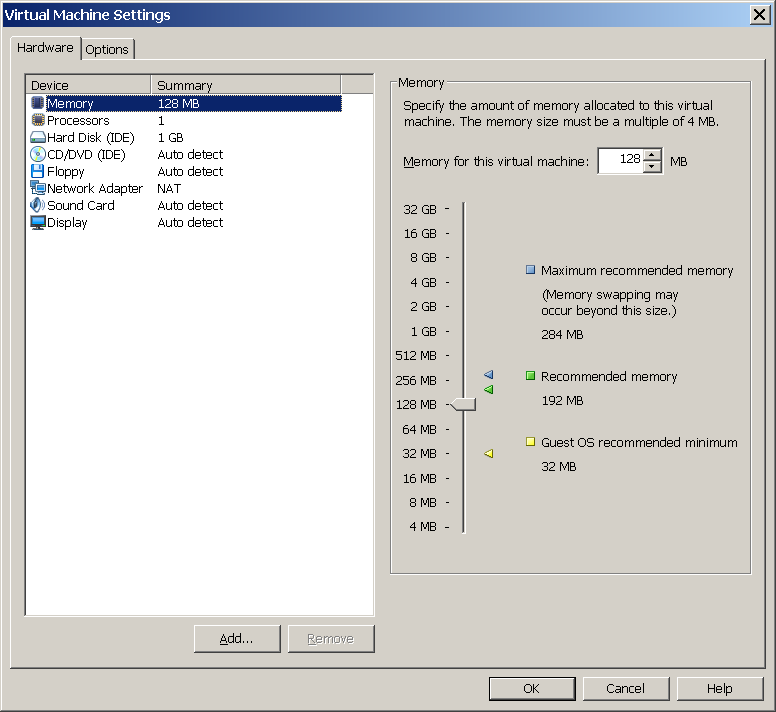
In order to create an image, you need VMware Player no lower than version 3.0. After creating the image of the virtual machine, a virtual disk of 1 GB was created and connected, which is quite enough. But then you had to create and format the partition. And here a problem arose. There are no utilities in Hummingbird yet to perform such actions. I applied the DOS boot disk image. And there - fdisk and format c: ... In principle, you can run Hummingbirds without a hard disk image - you only need a disk image, but I wanted something more serious.
The first installation of Hummingbirds on the virtual disk was done using the GRUB4DOS bootloader. Yes, unfortunately, I again had to resort to the help of a miracle floppy disk with DOS.
Later, the "native" mtldr was used as a secondary bootloader. To do this, the virtual disk was connected as a disk to the host system. The bootloader installer needs to be changed a bit - in the inst.asm source code uncomment two lines so that the bootloader can be installed not only on removable media (flash drives), but also on hard drives. After recompiling the program, it installed the bootloader.
All you need to download a Hummingbird is to install the bootloader (as you can see, there are at least two options) and copy the disk image to the root of the disk.
As the image of the diskette, I chose the last “night” build. The latest release of Hummingbird OS (0.7.7.0) took place in February 2010. And nightly builds are created automatically - after making changes to SVN.
Uninitiated in particular, Hummingbird OS may not understand what the floppy disk image has to do with it, because we are in the 21st century. I will explain.
From the user's point of view, this is just a container for system files. The disk image uses the FAT12 file system. You can work with the image both in * nix (mount) and in Windows (Winimage, plugins for Total Commander). Transferring a single file is easier. And from the developer's point of view, this is a legacy from the progenitor KolibriOS - the MenuetOS operating system. Without it, it is difficult (but possible) to create a ramdisk / rd / 1. A disk in RAM is one of the features of Hummingbird OS.
Let us return to the description of the process of creating an image for a virtual machine. I did not use the unmodified night assembly of Hummingbird OS. Firstly, the meaning of having a hard disk is lost. Yes, all the programs that exist for Hummingbirds cannot fit on the diskette image, but most of them are very possible. And secondly, since the purpose of the virtual machine image was to familiarize people with the operating system, I tried to make the location of the programs more visual. For this, the directory structure was changed and, if possible, the programs were transferred from the ramdisk to the hard disk. In addition, the links have been fixed for remote applications (for example, so that they can be called from the main menu).
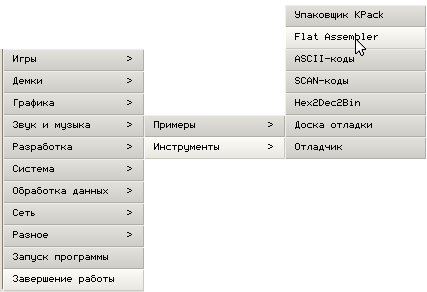
So, we left on the ramdisk: the kernel, drivers, fonts, dynamically loaded libraries and programs for which absolute paths are used to access.
The following directories were created on the hard drive: Demos, Develop, Docs, Education, Emulators, Games, Media, Network, Office, Other, Skins, System, Wallpapers. Applications and other files were sorted by these directories, for each application its own directory was created.
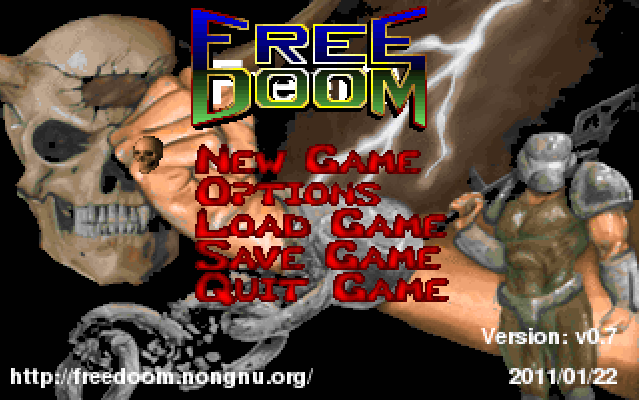
Most of the games turned out to be 51. These were simple toys (tag, tic-tac-toe, snakes, sapper, solitaire, tetris, lines, reversi, sea battle, checkers), and a ported Doom.
It should be noted that in addition to games with a graphical interface in CBS, there are several console games - tag, chess and an artificial intelligence simulator Eliza.
Other categories of applications are not so rich in representatives.
System programs include file managers KFAR, KFM and Eolite (analogs of FAR, Total Commander and Explorer, respectively), information utility CPUID (analogue of CPU-Z), utility for testing the Disptest monitor (analogue of Nokia monitor test), a utility for obtaining information about hard drives HDD-Info drives, an on-screen magnifier and virtual keyboard, as well as a simple Shell interpreter.
Development applications are located in the Develop directory. This is the Board debugging board, the Mtdbg debugger, the Heed hex editor, a utility for viewing the cObj functions exported by dynamic libraries, the FASM assembler, the main development tool in KolibriOS, as well as interpreters with examples of their use - Brainfuck, Lua, Tinypy.

In the same directory you can find examples of programs for the Hummingbird OS, mainly tests of dynamic libraries.

The Emulators catalog contains the DOSBox emulator, the NES FCEU emulator, the ZX Spectrum computer emulator, and the B3-34 programmable calculator simulator.

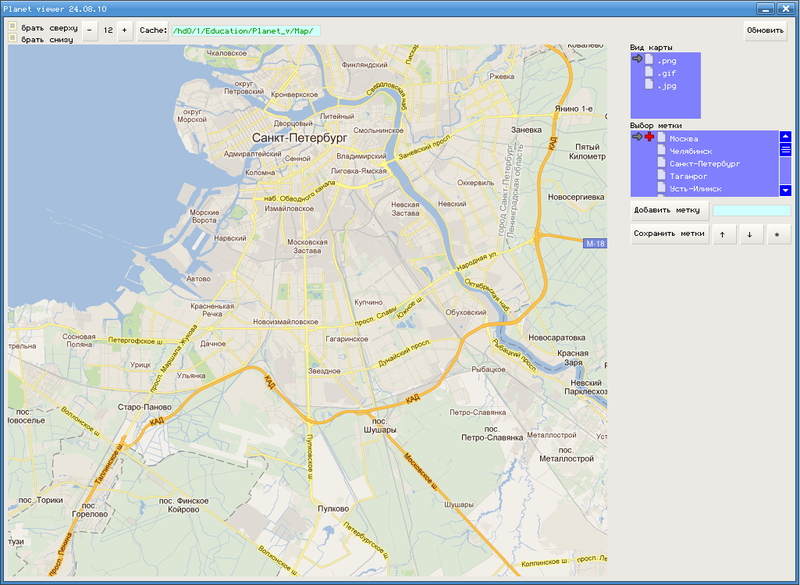
The training software is located in the Education folder. So far, there are only three programs here - the periodic table, an advanced keyboard simulator and a map viewer (uses the cache of the SASPlanet program). Regarding the latter, I want to note that since everything is not clear with the license of cards, there are only a few in the image of a virtual machine - just for reference.
The Media directory contains multimedia programs - audio and video players, viewers of graphic files and animations, fonts in various formats. A video player without a sound driver will work very poorly, but nevertheless, in order to try it, two video files are included in the image. I want to pay special attention to the zSea graphic file viewer. It has quite advanced features, but is not included in the official assembly of the system. Here I installed it by default as an image file viewer.
With other software, I propose to familiarize yourself.
What else is in the image? Skins and wallpapers, for example. The appearance of the system is quite easy to change. But, in the process of working on the image, I still had difficulties with the appearance. Although there are quite a lot of sets of icons, wallpapers and skins for windows, it turned out to be a difficult task to find a good combination with each other.
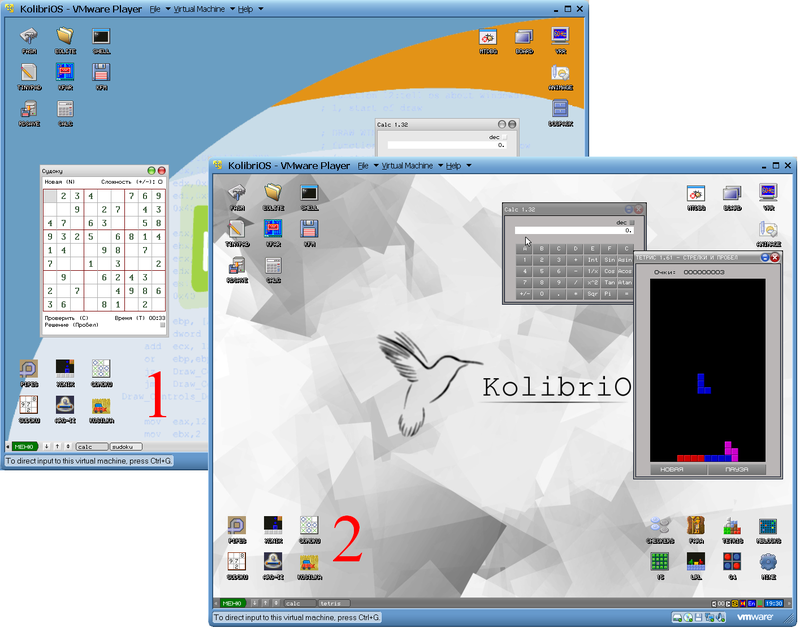
The participants did not like the first option due to the use of a skin that copies the MacOS X interface (there are buttons with buttons on both the left and right), the second option was generally terrible due to the wallpaper. The project participants offered dozens of options, but I didn’t like any of them. Therefore, the appearance of this assembly is not up to par.
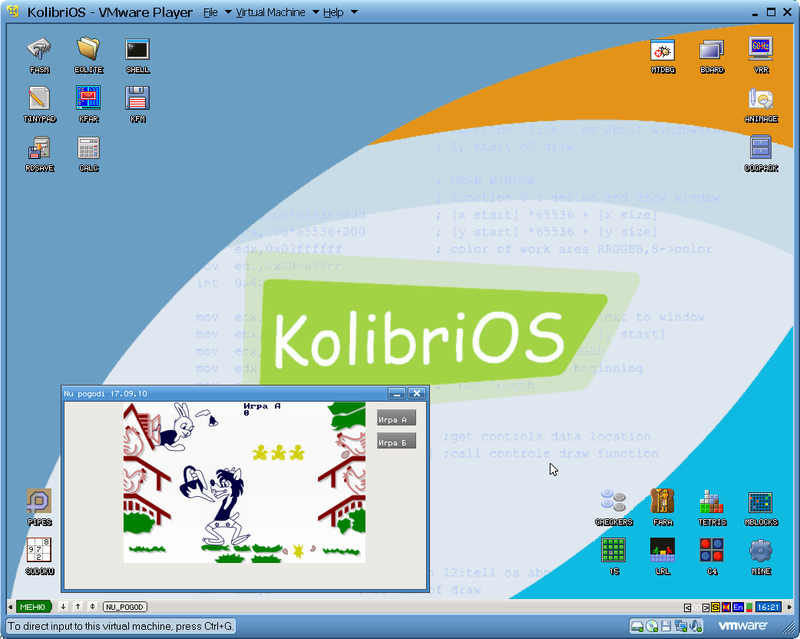
By the way, to change the appearance of the system, you need to make changes in the /rd/1/autorun.dat file, save the desired skin under the name /rd/1/dafault.skn and save the ramdisk image to / hd0 / 1. After any changes on the ramdisk (so that they are saved after a system reboot), you need to save it using the rdsave program.
The documentation for the system is located in the Docs directory and is presented by the Docpak application and assembly in the form of HTML files (which are viewed using the HTMLv program).
So, having examined the contents of the image, I want to say what are the results of the assembly of this image.
- The image of a virtual machine with KolibriOS has been assembled to familiarize everyone with this system.
- Got ideas about the number of programs for KolibriOS. I took them from SVN, the forum and other resources.
- Identified weaknesses in software (there are no programs for installing the system, partitioning and formatting disks) and design (all the same, there are few matching skins, wallpapers and icons).
- Gained valuable experience.
Instead of conclusions. Unfortunately, the image at Chaos Constructions-2011 was successfully forgotten, but this is not the main thing. Before the publication, the image was slightly updated, some errors were fixed (and, most likely, new ones were introduced). You can download it (98 Mb) from the "people": narod.ru/disk/36181467001/KolibriOS.zip.html
Related links:
KolibriOS website - kolibrios.org
Wiki - wiki.kolibrios.org/wiki/Main_Page Developer
forum - board .kolibrios.org
Theme about the image on the developer forum -board.kolibrios.org/viewtopic.php?f=4&t=1819
"Nightly" assemblies - builds.kolibrios.org
And so, in early August 2011, I had the idea to create an image for a virtual machine with this system (KolibriOS), various software and examples of files that you can work with. Actually, that's what I did.
The first question that arose for me is for which machine to create the image? At first I preferred the Bochs and QEMU emulators (with which I already dealt), but for this work I decided to choose a virtual machine from VMware. VMware Player seemed pretty advanced with a clear interface.
In order to create an image, you need VMware Player no lower than version 3.0. After creating the image of the virtual machine, a virtual disk of 1 GB was created and connected, which is quite enough. But then you had to create and format the partition. And here a problem arose. There are no utilities in Hummingbird yet to perform such actions. I applied the DOS boot disk image. And there - fdisk and format c: ... In principle, you can run Hummingbirds without a hard disk image - you only need a disk image, but I wanted something more serious.
The first installation of Hummingbirds on the virtual disk was done using the GRUB4DOS bootloader. Yes, unfortunately, I again had to resort to the help of a miracle floppy disk with DOS.
Later, the "native" mtldr was used as a secondary bootloader. To do this, the virtual disk was connected as a disk to the host system. The bootloader installer needs to be changed a bit - in the inst.asm source code uncomment two lines so that the bootloader can be installed not only on removable media (flash drives), but also on hard drives. After recompiling the program, it installed the bootloader.
; Uncomment following lines to allow hard drives
;	cmp	eax, 3	; DRIVE_FIXED
;	jz	@f
All you need to download a Hummingbird is to install the bootloader (as you can see, there are at least two options) and copy the disk image to the root of the disk.
As the image of the diskette, I chose the last “night” build. The latest release of Hummingbird OS (0.7.7.0) took place in February 2010. And nightly builds are created automatically - after making changes to SVN.
Uninitiated in particular, Hummingbird OS may not understand what the floppy disk image has to do with it, because we are in the 21st century. I will explain.
From the user's point of view, this is just a container for system files. The disk image uses the FAT12 file system. You can work with the image both in * nix (mount) and in Windows (Winimage, plugins for Total Commander). Transferring a single file is easier. And from the developer's point of view, this is a legacy from the progenitor KolibriOS - the MenuetOS operating system. Without it, it is difficult (but possible) to create a ramdisk / rd / 1. A disk in RAM is one of the features of Hummingbird OS.
Let us return to the description of the process of creating an image for a virtual machine. I did not use the unmodified night assembly of Hummingbird OS. Firstly, the meaning of having a hard disk is lost. Yes, all the programs that exist for Hummingbirds cannot fit on the diskette image, but most of them are very possible. And secondly, since the purpose of the virtual machine image was to familiarize people with the operating system, I tried to make the location of the programs more visual. For this, the directory structure was changed and, if possible, the programs were transferred from the ramdisk to the hard disk. In addition, the links have been fixed for remote applications (for example, so that they can be called from the main menu).
So, we left on the ramdisk: the kernel, drivers, fonts, dynamically loaded libraries and programs for which absolute paths are used to access.
The following directories were created on the hard drive: Demos, Develop, Docs, Education, Emulators, Games, Media, Network, Office, Other, Skins, System, Wallpapers. Applications and other files were sorted by these directories, for each application its own directory was created.
Most of the games turned out to be 51. These were simple toys (tag, tic-tac-toe, snakes, sapper, solitaire, tetris, lines, reversi, sea battle, checkers), and a ported Doom.
It should be noted that in addition to games with a graphical interface in CBS, there are several console games - tag, chess and an artificial intelligence simulator Eliza.
Other categories of applications are not so rich in representatives.
System programs include file managers KFAR, KFM and Eolite (analogs of FAR, Total Commander and Explorer, respectively), information utility CPUID (analogue of CPU-Z), utility for testing the Disptest monitor (analogue of Nokia monitor test), a utility for obtaining information about hard drives HDD-Info drives, an on-screen magnifier and virtual keyboard, as well as a simple Shell interpreter.
Development applications are located in the Develop directory. This is the Board debugging board, the Mtdbg debugger, the Heed hex editor, a utility for viewing the cObj functions exported by dynamic libraries, the FASM assembler, the main development tool in KolibriOS, as well as interpreters with examples of their use - Brainfuck, Lua, Tinypy.
In the same directory you can find examples of programs for the Hummingbird OS, mainly tests of dynamic libraries.
The Emulators catalog contains the DOSBox emulator, the NES FCEU emulator, the ZX Spectrum computer emulator, and the B3-34 programmable calculator simulator.
The training software is located in the Education folder. So far, there are only three programs here - the periodic table, an advanced keyboard simulator and a map viewer (uses the cache of the SASPlanet program). Regarding the latter, I want to note that since everything is not clear with the license of cards, there are only a few in the image of a virtual machine - just for reference.
The Media directory contains multimedia programs - audio and video players, viewers of graphic files and animations, fonts in various formats. A video player without a sound driver will work very poorly, but nevertheless, in order to try it, two video files are included in the image. I want to pay special attention to the zSea graphic file viewer. It has quite advanced features, but is not included in the official assembly of the system. Here I installed it by default as an image file viewer.
With other software, I propose to familiarize yourself.
What else is in the image? Skins and wallpapers, for example. The appearance of the system is quite easy to change. But, in the process of working on the image, I still had difficulties with the appearance. Although there are quite a lot of sets of icons, wallpapers and skins for windows, it turned out to be a difficult task to find a good combination with each other.
The participants did not like the first option due to the use of a skin that copies the MacOS X interface (there are buttons with buttons on both the left and right), the second option was generally terrible due to the wallpaper. The project participants offered dozens of options, but I didn’t like any of them. Therefore, the appearance of this assembly is not up to par.
By the way, to change the appearance of the system, you need to make changes in the /rd/1/autorun.dat file, save the desired skin under the name /rd/1/dafault.skn and save the ramdisk image to / hd0 / 1. After any changes on the ramdisk (so that they are saved after a system reboot), you need to save it using the rdsave program.
The documentation for the system is located in the Docs directory and is presented by the Docpak application and assembly in the form of HTML files (which are viewed using the HTMLv program).
So, having examined the contents of the image, I want to say what are the results of the assembly of this image.
- The image of a virtual machine with KolibriOS has been assembled to familiarize everyone with this system.
- Got ideas about the number of programs for KolibriOS. I took them from SVN, the forum and other resources.
- Identified weaknesses in software (there are no programs for installing the system, partitioning and formatting disks) and design (all the same, there are few matching skins, wallpapers and icons).
- Gained valuable experience.
Instead of conclusions. Unfortunately, the image at Chaos Constructions-2011 was successfully forgotten, but this is not the main thing. Before the publication, the image was slightly updated, some errors were fixed (and, most likely, new ones were introduced). You can download it (98 Mb) from the "people": narod.ru/disk/36181467001/KolibriOS.zip.html
Related links:
KolibriOS website - kolibrios.org
Wiki - wiki.kolibrios.org/wiki/Main_Page Developer
forum - board .kolibrios.org
Theme about the image on the developer forum -board.kolibrios.org/viewtopic.php?f=4&t=1819
"Nightly" assemblies - builds.kolibrios.org









