Real-time webcam sudoku solution
- Transfer
Foreword
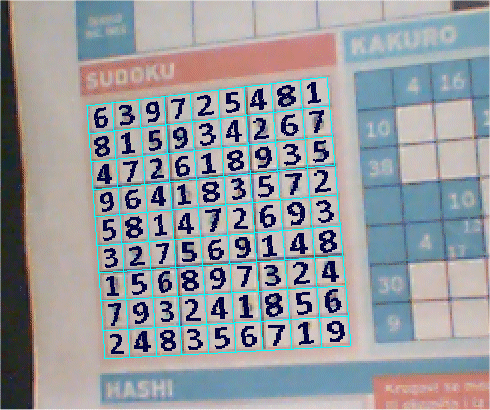
This application may not have practical value, but really gained a lot of experience. I would like to reflect a little on computer vision. This area is one of the most exciting in modern computer computing, and it is very complex. What is easy and simple for the human brain is very difficult for the computer. Many things still remain impossible with today's level of IT development.
The program is written using the low-level language C ++, because I really wanted to understand how it all works from the inside. If you also want to start studying computer vision, then the OpenCV library is useful for this. At CodeProject, you can find several lessons on it. The image from the webcam is obtained using the source code of Vadim Gorbatenko (AviCap CodeProject).
The image below explains how the program works.

The time intervals below are the delays in milliseconds on my 2.8 GHz PC with a 640x480 webcam resolution. We are seeing an interesting result. For example, the slowest step is to get a frame from the camera. It takes 100 ms, and this means that you will receive only 10 frames per second. It is not enough. Webcams are usually slow. You can speed them up by changing the resolution. By reducing it, you speed up the shooting, but sacrifice quality, and it can become completely unsuitable for analysis. Another surprise is that converting the image to binary (white or black only) also takes a long time, as much as 12 ms. On the other hand, I expected that OCR correction and the solution to sudoku itself would take a lot of time, and was pleasantly surprised when it turned out that these steps are performed together in 8 ms.
How conversion to monochrome works
Threshold selection
Each computer-vision application starts by converting a color (or black and white) image into monochrome. In the future, there may be some kind of algorithm that will use colors, but today computer vision applications work with monochrome images (they are color blind).
The simplest method for converting an image is a common threshold. Suppose you have a pixel with RGB color (200, 200, 200). Since the intensity of the components varies from 0 to 255, the pixel is very bright. Choosing a threshold as half the intensity: 256/2 = 128, we get that our pixel should turn white. But the common threshold is rarely used in real applications, since it is of little use. The local threshold algorithm is much more useful.
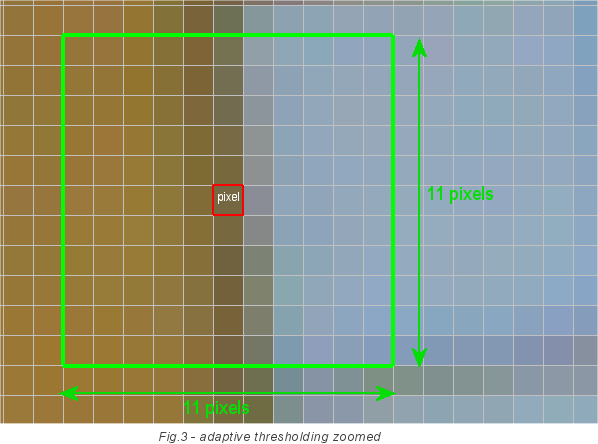
To correctly convert the image to monochrome, we will use adaptive threshold selection. It does not use a fixed threshold value of 128. Instead, it considers the threshold for each pixel separately. It takes a square with a side of 11 pixels and with a center in our pixel and summarizes the intensity of all points. The average value of the intensity will be the threshold for a given pixel. Intensity formula for the current pixel: threshold = sum / 121, where 121 = 11x11. If the intensity of our pixel is higher than the threshold value, then it is converted to white, if not, then to black. In the image below, the pixel for which the threshold is determined is marked in red. And these calculations are made for each pixel. Therefore, this step is so slow, because the algorithm requires a width * height * 121 readings of the image pixel.
Integer form
This step can be optimized using the "Integer Form". An integer form is an array of integers with image sizes. The meaning is brilliant and simple. Take the image. Suppose we have a 12x12 area where the intensity of the pixels is 1 (in the real world it doesn’t, because it’s never so simple), an integer image is the sum of all pixels from the top left to the current (bottom right).
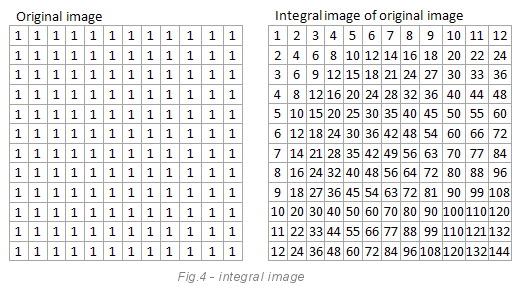
The following image shows how an integer image can be useful. The goal is to calculate the sum of the pixels in the gray rectangle.
Formula: Sum = DC-B + A. In our case: 110-44-40 + 16 = 42 (try to calculate manually).
Instead of reading all the pixels from the gray rectangle (which can be much larger than in the example), we need only one memory reading. This is a significant optimization of the algorithm. But even with her, converting an image to monochrome is very difficult.

How to determine the angle of rotation
The webcam is not a scanner. And the picture will never be perfectly smooth, which means in the order of things a little beveled and rotated image. To determine the angle of rotation, we will use the fact that the image from Sudoku always has horizontal and vertical lines. We will determine the most expressive and bold lines near the center of the image. The most expressive lines are not subject to noise. The algorithm for finding monochrome lines in an image is called the Hough transform.
How it works? You should remember the school formula y = (x * cos (theta) + rho) / sin (theta).

Where theta is the angle of the line, and rho is the distance from the line to the center of coordinates (0, 0).
It is important that the line can be described in just two variables: the angle of inclination and the distance to the center of coordinates.
The algorithm runs through all the pixels in a monochrome image, skipping white pixels. When he hit the black pixel, he is trying to "draw" all kinds of lines passing through this pixel in increments of 1 degree. This means that each pixel has 180 imaginary lines passing through it. Why not 360? Yes, because the angles 180-360 are copies of lines with angles 0-180 degrees.
This set of imaginary lines is called a drive, a two-dimensional array with theta and rho dimensions, which were in the formula above. Each imaginary line is represented by one value in the drive. By the way, the method is called conversion because it converts lines from (x, y) to an array (theta, tho). Each imaginary line adds value to the drive, increasing the likelihood that the imaginary line matches the real one. It is like a vote. These lines have the most “votes”.
After all the pixels and their 180 imaginary lines "voted", we must find the maximum value in the drive. (By the way, it is called a drive because it accumulates votes) The winner of the vote is the most expressive line. Its parameters theta and rho can be used with the formula above to draw it.
The following image shows a small example. On the left we have a line consisting of three pixels. You know for sure that this is a diagonal line from left to right, but for a computer this is not so obvious.
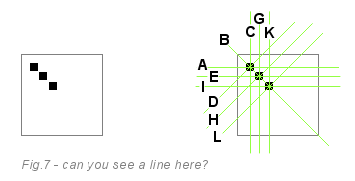
Looking at this image, you can understand how the line detection works. The Hough transform algorithm skips white pixels. On each black pixel, he draws four imaginary green lines (actually 180, but for simplicity we take four) passing through the current pixel. The first pixel votes for lines A, B, C and D. The second pixel votes for lines E, B, G, H. The third for I, B, K, L. All three pixels voted for line B, and the remaining lines received a total of one voice. Thus, line B won the vote.
The following image is a more complex example. On the left we see a sudoku grid, and on the right an array of the drive after passing through the image of the Hough transform algorithm. Bright bright areas are lines that have received many votes. Darkness means that we have no chance to find a line with such parameters in the image. We focus only on the bright points. Each line (AU) has a bright dot in the drive. You can see that all the lines are slightly rotated (about 6 degrees). Line A is less rotated than line K. Because the image is not only rotated, but also beveled. Also, if you look closely, you will see that lines A and B are closer to each other than B and C. This can be seen in both images.
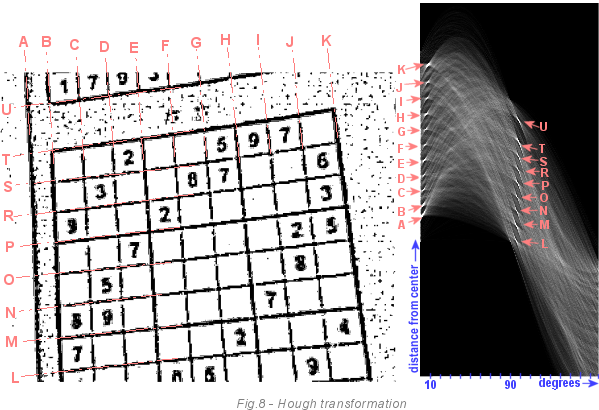
The Hough transform is important to understand if you want to engage in pattern recognition. The concept of virtual lines, which can be real through voting, can be extended to any geometric shape. The line is the simplest of them; therefore, it is the easiest to understand.
If you need to find a circle, then you need a drive with three dimensions: x, y and r. Where x and y are the coordinates of the center of our circle, and r is the radius.
The Hough transform can be optimized by limiting the area and possible angles of the original image. We do not need to analyze all the lines, only those that are close to the center. In our case, it is from them that we can build on.
How to define a grid
To get numbers from a sudoku grid, we need to determine where our grid starts and ends. This part is the simplest part for the human brain, but the most difficult for the computer. Why? Why not use the lines found using the Hough transform in the previous step? They have too much extra data. Very often newspapers and magazines print several sudoku side by side (hmm, they obviously do not count on computer recognition of the latter). There will be too many extra lines in the image. For example, look at the image below: It is
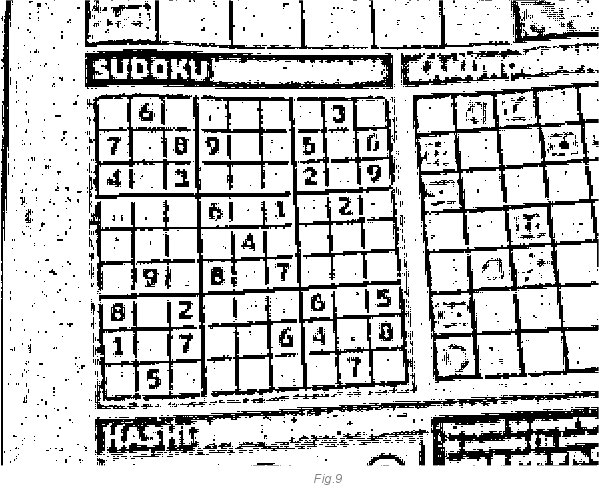
very difficult for a computer to determine which lines belong to what we need and which are just informational noise. Where is the end of our grid and the beginning of the next.
To solve this problem, we will not define black lines. Instead, we will define white areas around the grid. In the following image, you can see this. Green line 1 never intersects with black pixels while line 2 does this 10 times. This means that behind the grid line 1 is more likely than line 2. Just by calculating how many times the green line crosses the black pixels, we can conclude that it is outside the grid border. It is enough to simply calculate how many transitions from white to black pixels are under the line. By the way, you do not need to go over each line, it is enough to perform these actions every third line to increase the speed of execution.
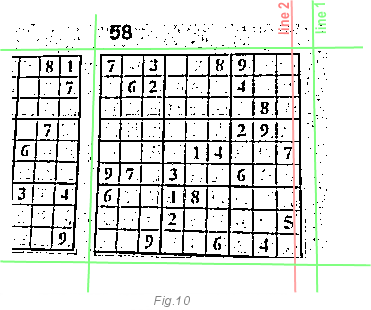
After we have determined the boundaries, we will run the Hough transform algorithm to accurately determine the grid lines. Until now, we did not care about distortions and other image defects. Only about the angle of rotation. This step will fix it. By starting the Hough transform, we get the exact positions of the grid lines. This will help determine the numbers in the grid.
TODO : This step may be more noise resistant. In the next version, I plan to combine the current method with Haar-like algorithms to determine the angles of the grid. I hope this will increase the quality. The problem may be that the Haar-like method works well with solid areas, not lines. The lines occupy a small area, so the difference between a light and a dark rectangle is not so great.
It is interesting what will happen when trying to detect a 10x10 grid ...
How does OCR work?
After we have determined where the numbers should be, we need to recognize them. It is relatively easy. The alphabet contains only numbers from 1 to 9.
Theory
Each recognition algorithm has three steps:
- Determination of the necessary characteristics
- Training
- Classification (recognition in runtime)
Identification of the necessary attributes is part of application development. For example, the number one is thin and high. This is what sets her apart from the rest. The number 8 has two circles, in the upper half and in the lower, etc.
Determining the necessary attributes can be difficult and not intuitive, depending on what needs to be recognized. For example, what is needed to recognize someone's face? Not just anyone, but a specific one.
Zones
In our application, the method of density of zones was used. The next step (this must be done in advance) is to train the application on the numbers 1 to 9. You can find these images in the ./res directory. They are reduced to size 5x5, normalized and stored in a static array OCRDigit :: m_zon [10] [5] [5], which looks something like this:

Reducing to 5x5 is called zoning or zoning. The array above is called function density.
Normalization means that the density varies from 0 to 1024. Without normalizing the zone, you cannot compare correctly.
What happens during program execution: when a digit is obtained from the original image, it is reduced to a size of 5x5. After that, each of its pixels is compared with each pixel of nine digits from the trained array. The goal is to find a figure with a minimal difference.

This method is invariant to image size, because in any case we use 5x5 zones. He is sensitive to turns, but we already took care of this before. The problem is that it is sensitive to position and bias, and also does not work with negatives (white on black) and numbers turned upside down.
Width / Height Ratio
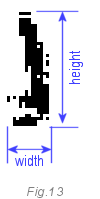
The number one is a special case. Since it is similar to 4 and 7, the determination method given above may be unreliable. A specific unit parameter: in our case, its width is 40% less than its height. There is no other such figure with the same ratio. We already have 25 zones (signs), so this is the 26th sign.
TODO : In the next version, OCR quality can be improved with the introduction of new features. For example, the numbers 5,6 and 9 are very similar when using zone breaks. In order to distinguish between them, we can use their profiles as attributes. A feature of the feature is the number of pixels (distance) between the edge of the frame of the digit and its border.
In the image below, you can see that the profiles of the numbers 5 and 6 are similar, but they are different from profile 9. The left profile 5 and 9 is similar, but different from profile 6.

You can add a few more improvements. Professional OCR engines use many features. Some of them are very exotic.
Adjust OCR Results
Once the OCR is completed, the results are adjusted according to Sudoku rules. One row, column and 3x3 block cannot contain the same digit. If the rule is violated, then it is necessary to introduce adjustments to the results. We will replace the wrong digit with the one that is possible from the remaining ones. For example, in image 12 above, the result is 5 because diff = 5210, which is the smallest difference value. The next possible result is 6, since diff = 5508 in this case. Thus, we will replace 5 with 6. In order to decide which of the two digits is incorrect, we will compare the values of their differences with their samples, and the one with a lower value will be considered correct. You can find the correction source code in the function SudSolver :: Fixit ();
How does the sudoku solution function work?
There are several ways to solve Sudoku. We use three simple methods that work together and complement each other: open numbers, hidden numbers, and overkill.
Brute force
This is the most widely used method by programmers that accurately gives a solution regardless of difficulty level. But the search can be very long, it depends on the depth of the recursion. You will never know how many iterations you need. During the search, the possible values from 1 to 9 are put into the cell in turn, and the solution to sudoku with the set number continues. If we are at a dead end (we get the same numbers in one row / column / block, then we change the number to the next). In fact, there may be more than one solution, but it will be cool if we find at least one. (The translator had the solution in the search and it worked surprisingly fast).
Firstly, it is necessary to prepare a table of candidates - possible values for each empty cell. The image below explains what exactly candidates are. They are painted blue. According to the rules of sudoku, the first cell can only contain the numbers 1, 4, 8. The three cannot be there, since it is already two cells lower.
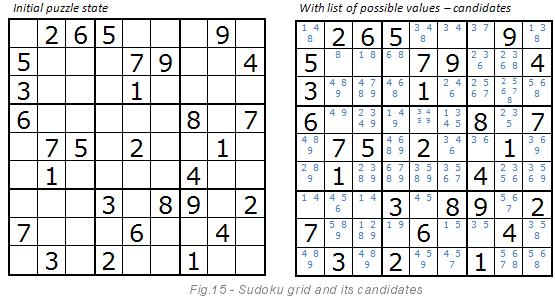
The brute force method tries to combine all the blue numbers until it finds a solution. Let's look at the first cell. The algorithm reads from one, in the fifth cell there will be a value of 3, etc. If some digit does not agree with other values, then the algorithm tries another. For example, the sixth cell on the left also has the number 3 as a candidate, but this is not consistent with the fifth cell, so the algorithm will try the next digit, i.e. 4, etc.
Enumeration can be very slow if the solution requires many iterations. For example, the following image is a very bad case for our algorithm. Starting from the upper left cell there will be too many searches, but there is good news: start with a cell where there are fewer options. This will speed up the solution.

There are several more optimizations to increase the performance of the algorithm, such as sorting a recursive sequence from cells with the least number of candidates to cells with the largest. But we do not use this algorithm, since this is only a partial optimization. All sudoku have bad cells, and are not processed as fast for real-time applications.
Open numbers
The image below explains this method. If a cell has a single candidate, then we can confidently say that this figure should be in this cell. After setting the value, the next step is to rebuild the list of candidates. The list of candidates is reduced while there are single candidates. This is an obvious and simple method for computers. But not as obvious to people as it seems to me. Live players cannot keep the list of candidates in their head and constantly rebuild and adjust it.
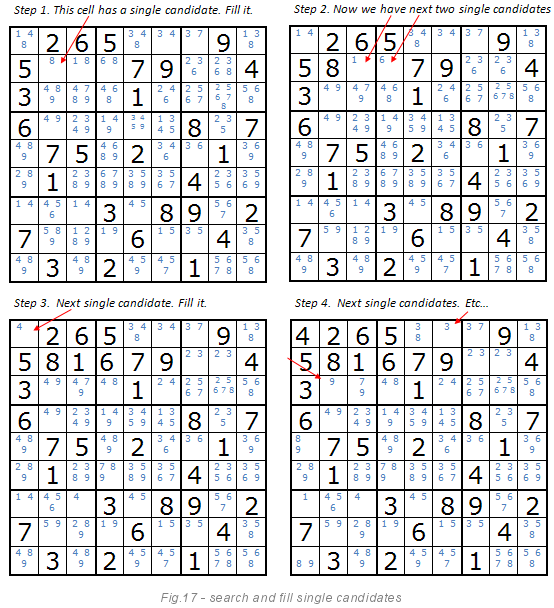
Hidden numbers
As before, the image below explains this method. Look at the number 7. If you are solving Sudoku, you will most likely say that the seven should be in the indicated cell.
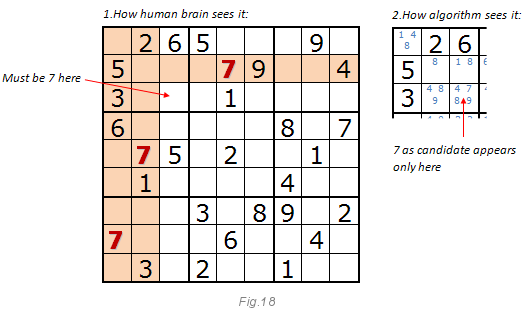
Even if this cell has four candidates: 4, 7, 8, 9 (see Fig. 15), the trick is that we are looking for unique numbers from the candidates in the 3x3 block, in the row and in the column. The method may be able to solve the entire puzzle, but it works better with method 2. When single candidates end in the open digit method, the hidden digit method enters the scene.
Combining all methods together
For this, processing speed and solutions are important. Enumeration is not a very fast method. Thus, we will use a combination of all three methods. Methods 2 and 3 are very fast, but can only solve fast puzzles. Since we ask the application to solve the puzzle for us, this means that it is really complex. Below is the algorithm of work. The fast methods 2 and 3 are located on the left side. And only if they fail to solve the puzzle, control passes to the right side with the search method, reducing the work for this algorithm.

Only if methods 2 and 3 cannot solve the puzzle, does the program begin to twist the values. And even then, the brute force algorithm is time limited to 600,000 iterations. There are also three attempts, after which the program gives up. Between each attempt, the recursive sequence is randomly rearranged with the hope that the new sequence will help solve the puzzle faster. If we could not solve Sudoku, then maybe we will be lucky in the next frame of the camera. The presented flowchart is described in the function SudSolver :: SolveMe ().
Buffering Solutions
When a solution is found, we store it in an array of type SudResultVoter. Buffering is necessary because OCR does not 100% guarantee the correctness of the result, and from time to time we get different solutions. To avoid an unstable solution, we will always show the strongest (for the accuracy of the last 12 solutions). From time to time, the array is reset to zero, forgetting old decisions and giving new ones a chance.
Video
TODO:
Some ideas for the future:
- Rewrite the program for Android. I wonder how it will work on smartphones
- Parallelize some functions on multiprocessor systems. Today, most PCs have at least two cores. Usually, parallelization gives a performance boost. But with a solver through a webcam, we need not so much speed as accuracy and quality. In principle, task parallelization should improve operations on similar frames, but with different settings. After all the tasks are completed, we just take the best result.
Download demo - 170 KB
Download sources - 307 KB
There is also a mirror of source codes on GitHub: github.com/NeonMercury/Realtime-Webcam-Sudoku-Solver
