Windows.Git.Cygwin.SSH.Gitolite and user guide
1. What is this article for?
The desire to get Git features on the Windows platform materialized the desire to tinker with different configuration schemes.
2. Awareness
You need to realize that you have to use the programs Cygwin, SSH, GitExtenstions, Git, Gitolite
Cygwin is a program that emulates the Linux environment. It has its own black window that looks and works like a Linux terminal window.
MsysGit is a program for emulating git environments, but without an ssh server, so we will not use repositories on the server. We use only for clients of the repository.
SSH is a program for using ssh connections from ssh clients, available for all operating systems.
SSH server is a program that accepts connections from ssh clients.
Git is a collection of programs, including git itself, for working with file repositories.
GitoliteIs a program that wraps git and implements repository management functions: managing users, their access, etc.
GitExtensions is a windows program that wraps the functionality of both git and the included set of programs in the GUI, which also integrates into the Visual Studio 05/08/10 development environment.
In the enterprise, you will have to allocate resources for hosting the SSH service, disk space for hosting repositories.
The person who will serve the SSH server, access to the repository.
Teach users to use function analogs to interact with their old version control system through GitExtensions.
Offer them some workflows that Git allows you to achieve.
UPD: 08/05/2011
UPD: 01/30/2012
3. We go to the result: Hosting for components
We will host Git, SSH server, Gitolite in Cygwin.
go to the address http://cygwin.com/setup.exe
Run the installer.
Add a mirror http://cygwin.vc.ukrtel.net/
matway.org - became not available. Updated 01.30.2012.
List of mirrors close to Russia: cygwin.com/mirrors.html
We mark the following components:
Net | openssh
devel | git
devel | git-completion
devel | git-gui
devel | gitk
editors | vim
Click Next and the installation will offer to add the necessary packages with what, we agree and click Next.
Check Start Menu / Cygwin / Cygwin Terminal:
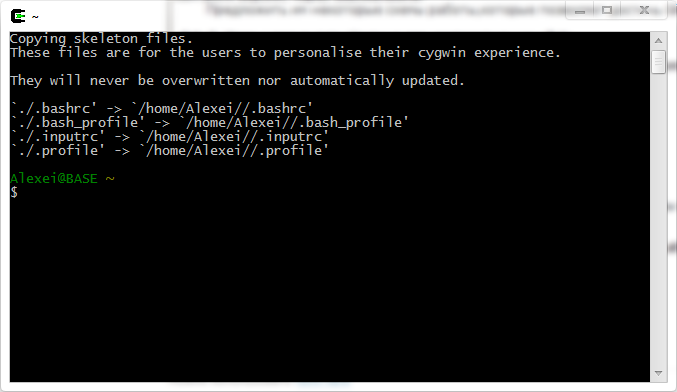
Login Alexei my windows login, base machine name. It all fits together.
4. We go to the result: Configure SSH server
Launch Cygwin Terminal.
We start the SSH server configuration with the ssh-host-config command.
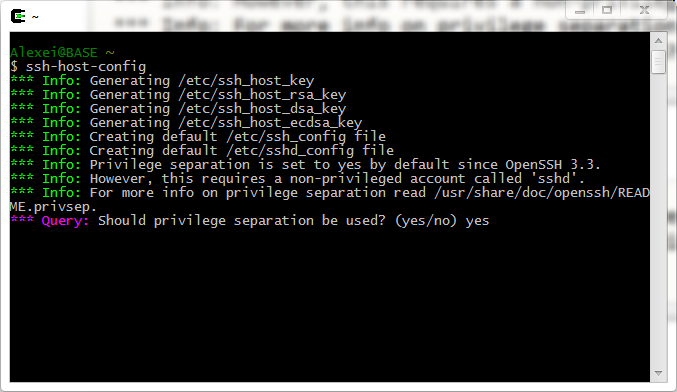


We go into / etc / sshd-config and
enable authorization without a password: Uncomment these lines:
PubkeyAuthentication yes
AuthorizedKeysFile .ssh / authorized_keys
For all users who will work with Git, you need to configure login to the SSH server through the user git (or another name) tv mode without password.
A bit of theory about the operation of the SSH server.
When connecting from the SSH client via the git @ localhost connection string, the first thing that happens is
searching for the private part of the key in the .ssh directory, if in CYGWIN then ~ / .ssh /, if windows - then c: /users/your name/.ssh
Next, in the authorized_keys file in the git profile on the localhost server, text is searched for that has a marker equal to your current username. If it is located, then you get the terminal into which the git user profile is loaded.
Clients are in cygwin, there are in gitbash, there are such as putty. We are interested in the ssh client, which is in cygwin.
It is called by the ssh command with arguments git @ localhost, where git is the name of the user whose profile we want to access through ssh and localhost (this is the address of the SSH server).
Actually, now we will make it work as described above.
- We introduce one more user under the name git. This name will be for official operations.
Open Computer managment -> Local User and Groups -> Users-> pcm -> New User ->
Git name, password 123456, leave the checkbox “Password never expires” -> OK
Open Cygwin Bash Shell, enter the command mkpasswd -l -u git >> / etc / passwd We
revive the user profile with the command: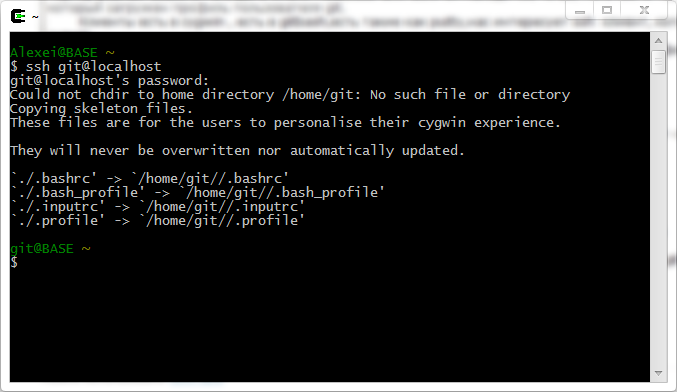
Exit the profile by pressing Ctrl + D or the exit command. - We generate a key for our login. In my case, for the login Alexei.
The ssh-keygen -t rsa command will create a key in a folder that will consist of two files
id_rsa (private part, stored by you) and id_rsa.pub (public part of the key).
Next, we add the public part of the key to the authorized_keys file in the git user profile
via the ssh-copy-id -i git @ localhost command.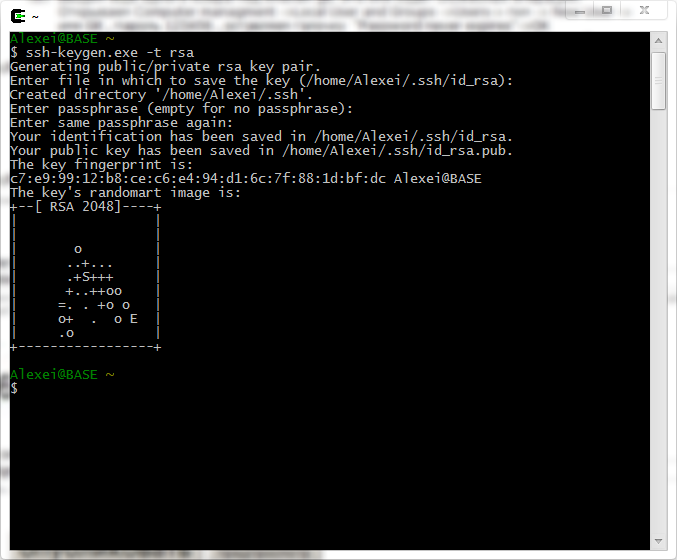
We start the SSH server command:
Copy the public part of the key to the git profile: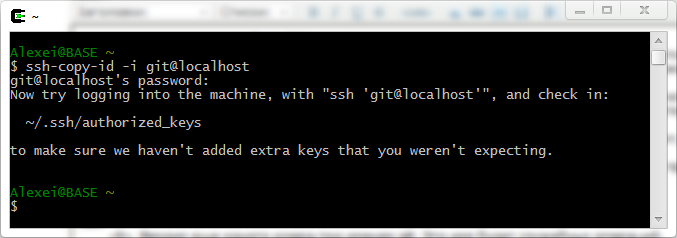
Check if we managed to configure as we need. Run the ssh git @ localhost command and wait for the terminal invitation
from the git user.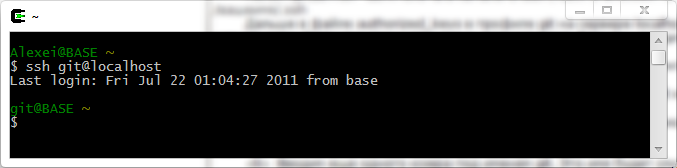
Everything turned out to be set up.
If it doesn’t work, go to step 10.
5. Going to the result: Gitolite setup
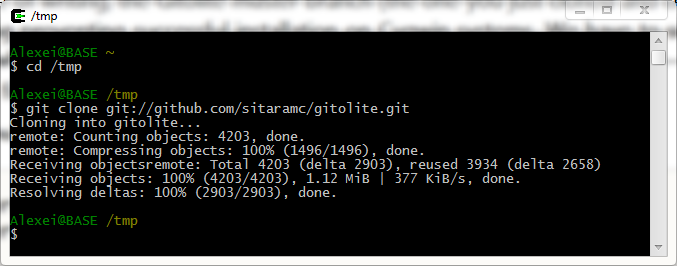
- Now you need to install gitolite, it will also install and configure repositories for storing files. Go to / tmp and download the gitolite program using git:
Next, go to / gitolite / src / and run ./gl-easy-install with the following
git keys localhost Alexei. git is the login where gitolite will be installed, localhost address of the SSH server, Alexei username at the same time as the name of the private and public part of the key.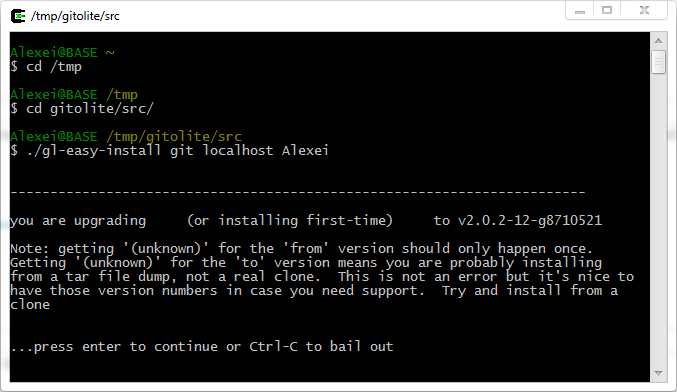
When asked to enter a password, then simply press Enter, since the password is not needed anywhere. - Next, go to the next installation screen.
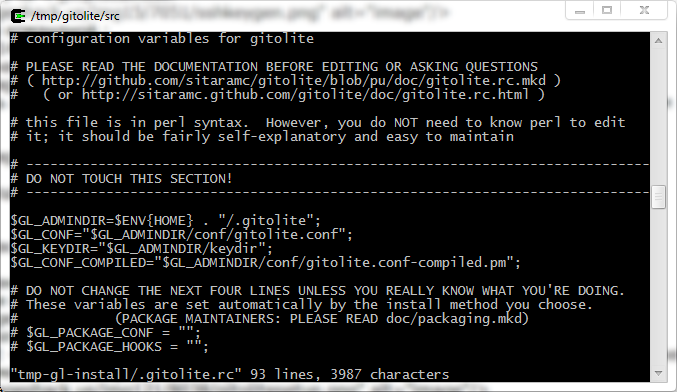
This window shows the open .gitolite.rc file in the vim editor.
You need to move the cursor to the place where the text was inserted, press I , enter the text
$ ENV {PATH} = "/ usr / local / bin: / usr / bin: / bin";
The text must be entered without errors, otherwise you will get confused in this editor.
For simplicity, you can copy the text, then move the cursor to the desired location, press I, then click on the
black window icon (terminal, command line, etc.), select edit-> paste and paste the line.
Press after entering ESC, press shift +:, type wq, press Enter.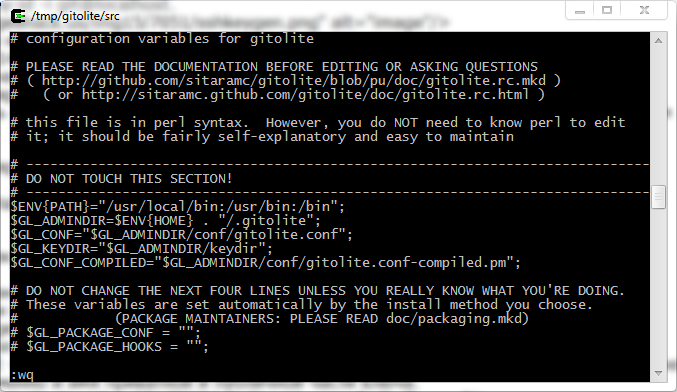
This line will allow gitolite to call programs from cygwin environments that have similar names to windows programs. For example, the find command is both there and there. And if you do not specify, gitolite will work with errors, and even the installer will work with errors, as find from windows will be used.
Press Enter a few more times and get the following picture: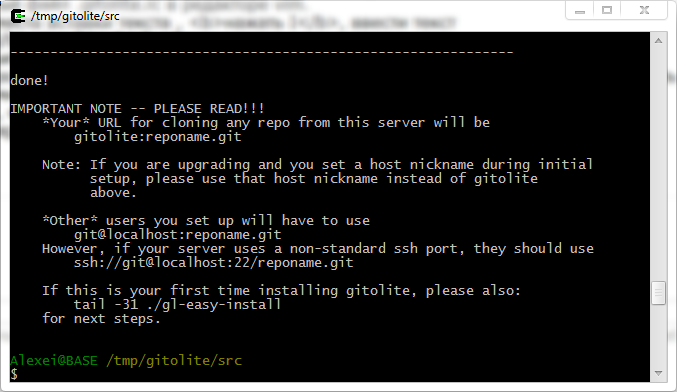
6. Going to the result: Setting up GitExtensions
- Now we proceed to install GitExtensions at http://code.google.com/p/gitextensions/ We install it
with msysgit, gitextensions will use it, after configuration.
We also note openssh in favor of putty.
I will not consider user and email settings for GitExtensions.
Everything goes smoothly there.
7. Going to the result: User setup
Now you need to configure the windows profile of the current user.
- Ensure that the Alexei file is in the .ssh folder / of the current profile c: /users/Alexei/.ssh/
- Ensure that the config file is in the same folder.
- in order to do this, you need to take them from c: \ cygwin \ home \ yourname \ .ssh \ config and yourname
and copy them to c: \ users \ yourname \ .ssh \ - This is an option, for the case when part of the work has already been done for us, in this case the gitolite program.
in the beginning she generated your name and your.pub key files for us. Sent the pub version to the git profile authrozied_keys file.
and added the settings to this key in authorized_keys.
Let's see this modified authorized_keys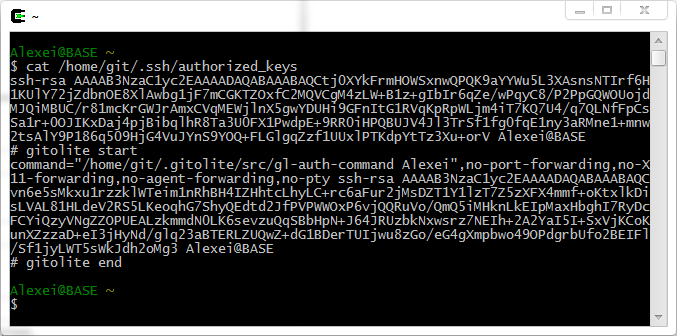
- Explanation of information.
The private parts of the keys are placed in blocks marked at the end: for which user and from which address.
The first private is from my first key id_rsa.pub.
The second private is from the key Alexei.pub, which gitolite itself already did; as you can see, gitolite adds advanced information to the key, which ensures all system interaction.
- To configure a new user, he needs to install for ease: gitextensions with msysgit and openssh enabled.
Next, you need to configure the user with a key to enter the git profile on localhost.
To do this, open the start menu-> git -> git bash and enter ssh-keygen -t rsa, we get two key files.
We give the pub file to the person who serves git.
8. Go to the result: Work algorithm for the admin repository
- This person should take the pub file, put it in the local repository folder gitolite-admin \ keydir.
This folder will already be created in the user profile from where the installation was started.
Register the file name in gitolite.conf and send via git push to the repository.
Then gitolite will create settings in its git user profile in its gitolite.conf.pm files, authorized_keys, etc.
We can assume that the user is set up in the system correctly and from under it you can work in windows.
To work from cygwin, you need to copy all the files relative to /home/user/.ssh/
9. We look at the result
- To see, you have to try.
Launch GitExtensions.
We configure it, on the Git tab, it should be as follows: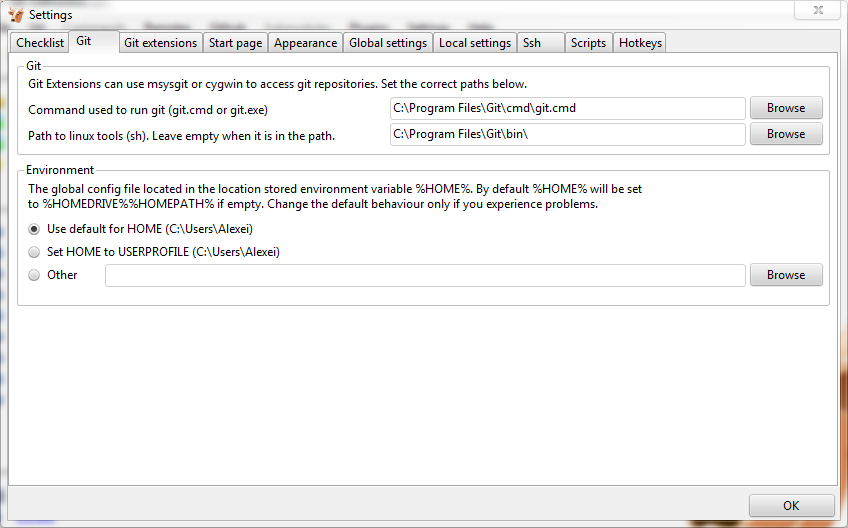
This folder appears if you install mSysGit together with GitExtensions (each client needs to install it).
We select clone repository, in the address we put git @ gitolite: testing.git, any destination folder.
click clone and get the empty testing repository.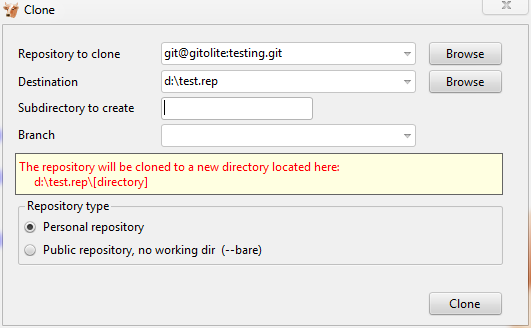
and you can get this window: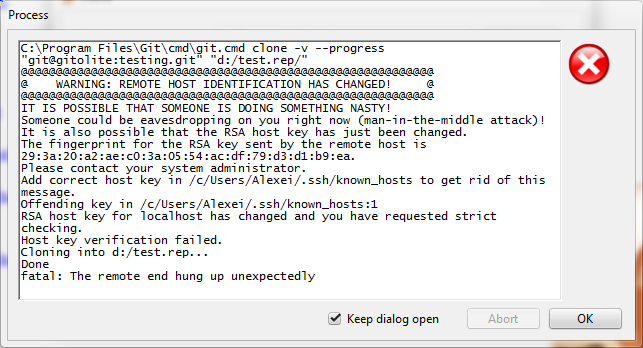
Which means a security violation in the ssh connection.
In this case, our SSH server is located on our computer, so to quickly solve this problem, delete the file c: \ users \ Alexei \ .ssh \ known_hosts, try again to make Clone.
The following window will appear:
Press yes and Enter.
The following window will appear: The
information in it means that the whole chain is working.
Opening the d: \ test.rep folder, we see, there is a hidden .git folder, which means success. - Why is the address git @ gitolite, gitolite, and not localhost? because there is a config file that contains the setting for the word gitolite. If the ssh client sees that we have indicated in the server address a word similar to what is in config, then it applies the settings from this file. In principle, you can not use config, then the private key will be called id_rsa and the localhost server address (or ip address) by default. And it will look like git @ localhost. But this cannot be done. Since gitolite will not understand who is who. Therefore, instead of id_rsa, everyone has a file with a private part, and his name is different from all others.
Let's look at the file: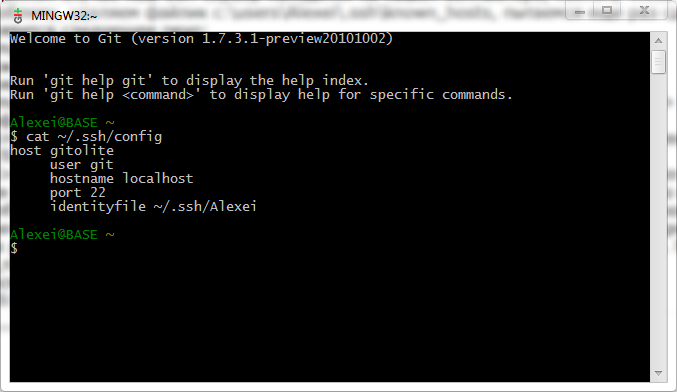
10. Смотрим на ошибки
- SSH и вход с паролем
Все из-за поломанного authorized_keys.
или настройки ssh сервера, которые включают использование authorized_keys файла.
если мы на этапе настройки git пользователя, то используем ssh-copy id, который копит pub версию ключа и редактирует authorized_keys. Если уже установили всю экосистему, то:
/home/git/.gitolite/src/gl-setup-authkeys -batch /home/git/.gitolite/keydir - Не принимается адрес вида git@gitolite:testing.git
/home/git/.gitolite/src/gl-setup-authkeys -batch /home/git/.gitolite/keydir
Все из-за поломанного authorized_keys. Генерим его с помощью этой команды заново. - Постоянно сбивается вход без пароля из cygwin bash shell
/home/git/.gitolite/src/gl-setup-authkeys -batch /home/git/.gitolite/keydir
Все из-за поломанного authorized_keys, генерим его с помощью этой команды заново.
А также вы, возможно, не установили в gitolite.rc запись:$ENV{PATH}="/usr/local/bin:/usr/bin:/bin";
Поставьте ее доступными вами средствами. - Синхронизировать пользователей между Windows и Cygwin
mkpasswd -l >/etc/passwd
Нужно, если вы хотите переназначить логины для ssh сервера и служебного логина для gitolite системы. - Удалить SSH сервер
cygrunsrv -R sshd
Это удалит только службу cygserver ssh из windows, но логин останется.
Для этого еще надо зачистить /etc/ssh* от файлов.
Удалить логин cygserver из windows и синхронизировать /etc/passwd командойmkpasswd -l >/etc/passwd
Маленькая заметка о большом ньансе
- Команда mkpasswd записывает в файл /etc/passwd путь рабочего каталога логина.
Если не подходит папка по-умолчанию cygwin\home, можно задать папку c:\users\ применительно к Windows7 или другую с помощью такого ключа -p "$(cygpath -H)", когда будете создавать пользователя git.mkpasswd -l -p "$(cygpath -H)" > /etc/passwd - Also in this article, we used the installation scheme when the ssh server and user are on the same computer. This leads to another nyance. By default, your login in Cygwin looks in the folder cygwin \ home \% username%, in the article it is bypassed with msysgit, in which your login looks in the folder c: \ users \% username% (for win7), so your keys from cygwin \ home \% username% to c: \ users \% username% (section 7.3). If you transfer the home folder to Cygwin for your login on c: \ users \% username%, then the need for msysgit will disappear.
With nyansa completed.