What is Protected Mode and what does it eat
In order to write an OS, you need to understand many details. Now, let me enlighten you a little, (but let's agree that you will read mana yourself so that there is something to talk about).
Honestly, in the vastness of the network there is a cloud of fat materials on PM, and iley and pehat talked a little about this mode, but they asked me to describe it in the general framework anyway. Now I will briefly give out a theory (in general, Intel wrote mana specifically for this), then we will start writing code.
Introduction to protected mode.
So, PM is significantly different from all the usual since DOS'a real mode (RM). Now you have to get used to it: there are no static, 64 kilobyte segments, the interrupt table in the 1st kilobyte, the addresses of the segment bases in segment registers, in general, a completely new world.
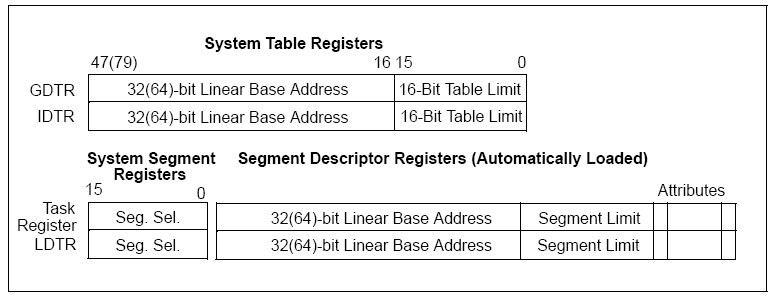
Segments are now described in the Global Descriptor Table (GDT) . This table can be in only one copy. She is a structure in mind. Not a segment! It can be located in memory anywhere, but its address and limit are recorded in the GDTR register. Here is its structure:
The table itself consists of entries of the following structure (by the way, the null entry is empty. This is important. When accessing the memory described by the null descriptor, get #GP - General Protection Fault):
Let's take a closer look at this structure.
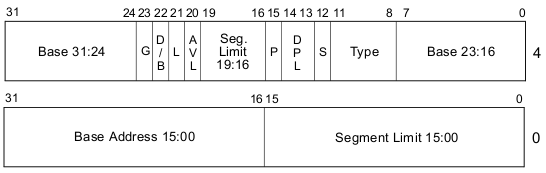
1. Segment Limit: The
purpose of this field is clear by name, but there is subtlety. The dog is buried in bit G (Granularity).
If it is not installed, then the memory is 'counted' in bytes. In this case, the segment size can vary from 1 byte to 1 megabyte per 1 byte size.
If we set it to 1, paging memory will be entered. Then we can address from 4 kilobytes to 4 gigabytes of RAM with resizing to 4 kilobytes (page size). In general, page addressing is preferable (compare (1MB + 64Kb-16byte) and 4GB). Let's talk only about segmented addressing in this post. Paging deserves a separate discussion.
2. Base Address:
Here we indicate the physical address of the base.
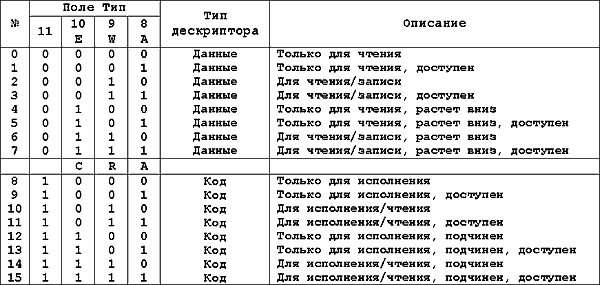
3. Type field:
Combinations of bits determine the type of segment:
4. S (descriptor type):
The Intel documentation says that if this bit is not set, then this descriptor is for the system segment, otherwise, code or data. By system is meant LDT, TSS, Interrupt Gates and others like them (more about them later).
5. DPL (Descriptor Privilege Level): The
privileges of the described segment. Everyone knows Rings.
6. P (segment present):
If this bit is set, then the processor 'knows' that the segment is already in memory (although it is better to say valid). If you load a descriptor selector with an undefined P bit into the segment register, an #NP (not present) exception will occur. In general, the meaning of this ornate phrase will explain a little later.
7. D / B:
For segments of different types, it is interpreted differently.
1. For code segments:
32 or 16 bit effective address length and operand size.
(1-32; 0-16);
2. For the stack:
The stack pointer is 32 or 16 bit. (1-32; 0-16);
8. G:
Affects in which units (bytes, pages) the segment limit is measured. In general, Paging can be enabled when switching to PM by setting 31 bits of the CR0 register.
A little more information: We
guess that the word Global was not put in vain. So there is still some kind of sign. True, there is also a Local Descriptor Table . There may be a great many. For example, they can be used in the implementation of tasks, etc. And here is the LDTalready represents a segment! So get used to phrases like 'segment descriptor of local descriptor plate'.
After we have described the table, it needs to be loaded into the GDTR register . This is far from being mov. GDTR is populated with the lgdt fword command (value) . That is, it is necessary to independently form this structure and load it into the aforementioned register. There are still teams working with this register, but we gallop across Europe.
Another point. In PM, the segment registers store not the base addresses of the segments (as in RM), but specially trained pieces called selectors . Their structure is as follows:

Here Index is the serial number of the descriptor in the table.
TI shows where to look for the descriptor (in GDT or LDT ).
Now that it’s already clear how to build the table, we’ll talk about how to switch to PM (note that this can only be done from RM). In general ... you just need to set bit 0 of the CR0 control register. Although I'm lying. First you need to prohibit all interrupts ( NMI ( including Non Maskable Interrupts ) including), open the A20 address line (so that 32-bit addressing is available), load GDTR , and jump to the start mark.
Let's use the bootloader (you can take KOLIBRI'sky), which will load our code at the address 1000h: 0 (RM'ovsky, I note the address).
It will not be as smooth as in those mans when they switch to PM directly from the bootloader. Everything is a little more complicated. But first, let's analyze the code that the bootloader will load (we write everything on FASM). This is a kind of helloworld. We boot, go to PM and print a greeting. All. What have we done? The bootloader successfully loaded us at 1000h: 0, from where we continued execution. First, we turned on the A20 , prohibited all interrupts, loaded the appropriate value into the GDTR , jumped to the input label. I note that we jumped on T.e. 08h - the code descriptor selector. Get used to it.
Now how to launch this miracle. Personally, I use WinImage and VirtualBox. We push the bootloader into the boot sector of the diskette and put the .bin file into the root. We save it in .vfd, prescribe the path to the disk image in the properties of the virtual machine, start it and see the result.
In the next issue we will consider interrupts, faults, traps, aborts and how they work, are caught and debugged. Let's start talking about architecture.
Sources of information.
1) I want to express my gratitude to Phantom_84 aka egos for pointing out the true path and helping me at the very beginning. Without it, it would be much harder for me to figure it out.
2) BrokenSword'a Articles BrokenSword'a Articles. They are worth paying attention to.
3) Intel System Programming Guides
Honestly, in the vastness of the network there is a cloud of fat materials on PM, and iley and pehat talked a little about this mode, but they asked me to describe it in the general framework anyway. Now I will briefly give out a theory (in general, Intel wrote mana specifically for this), then we will start writing code.
Introduction to protected mode.
So, PM is significantly different from all the usual since DOS'a real mode (RM). Now you have to get used to it: there are no static, 64 kilobyte segments, the interrupt table in the 1st kilobyte, the addresses of the segment bases in segment registers, in general, a completely new world.
Segments are now described in the Global Descriptor Table (GDT) . This table can be in only one copy. She is a structure in mind. Not a segment! It can be located in memory anywhere, but its address and limit are recorded in the GDTR register. Here is its structure:
The table itself consists of entries of the following structure (by the way, the null entry is empty. This is important. When accessing the memory described by the null descriptor, get #GP - General Protection Fault):
Let's take a closer look at this structure.
1. Segment Limit: The
purpose of this field is clear by name, but there is subtlety. The dog is buried in bit G (Granularity).
If it is not installed, then the memory is 'counted' in bytes. In this case, the segment size can vary from 1 byte to 1 megabyte per 1 byte size.
If we set it to 1, paging memory will be entered. Then we can address from 4 kilobytes to 4 gigabytes of RAM with resizing to 4 kilobytes (page size). In general, page addressing is preferable (compare (1MB + 64Kb-16byte) and 4GB). Let's talk only about segmented addressing in this post. Paging deserves a separate discussion.
2. Base Address:
Here we indicate the physical address of the base.
3. Type field:
Combinations of bits determine the type of segment:
4. S (descriptor type):
The Intel documentation says that if this bit is not set, then this descriptor is for the system segment, otherwise, code or data. By system is meant LDT, TSS, Interrupt Gates and others like them (more about them later).
5. DPL (Descriptor Privilege Level): The
privileges of the described segment. Everyone knows Rings.
6. P (segment present):
If this bit is set, then the processor 'knows' that the segment is already in memory (although it is better to say valid). If you load a descriptor selector with an undefined P bit into the segment register, an #NP (not present) exception will occur. In general, the meaning of this ornate phrase will explain a little later.
7. D / B:
For segments of different types, it is interpreted differently.
1. For code segments:
32 or 16 bit effective address length and operand size.
(1-32; 0-16);
2. For the stack:
The stack pointer is 32 or 16 bit. (1-32; 0-16);
8. G:
Affects in which units (bytes, pages) the segment limit is measured. In general, Paging can be enabled when switching to PM by setting 31 bits of the CR0 register.
A little more information: We
guess that the word Global was not put in vain. So there is still some kind of sign. True, there is also a Local Descriptor Table . There may be a great many. For example, they can be used in the implementation of tasks, etc. And here is the LDTalready represents a segment! So get used to phrases like 'segment descriptor of local descriptor plate'.
After we have described the table, it needs to be loaded into the GDTR register . This is far from being mov. GDTR is populated with the lgdt fword command (value) . That is, it is necessary to independently form this structure and load it into the aforementioned register. There are still teams working with this register, but we gallop across Europe.
Another point. In PM, the segment registers store not the base addresses of the segments (as in RM), but specially trained pieces called selectors . Their structure is as follows:
Here Index is the serial number of the descriptor in the table.
TI shows where to look for the descriptor (in GDT or LDT ).
Now that it’s already clear how to build the table, we’ll talk about how to switch to PM (note that this can only be done from RM). In general ... you just need to set bit 0 of the CR0 control register. Although I'm lying. First you need to prohibit all interrupts ( NMI ( including Non Maskable Interrupts ) including), open the A20 address line (so that 32-bit addressing is available), load GDTR , and jump to the start mark.
Let's use the bootloader (you can take KOLIBRI'sky), which will load our code at the address 1000h: 0 (RM'ovsky, I note the address).
It will not be as smooth as in those mans when they switch to PM directly from the bootloader. Everything is a little more complicated. But first, let's analyze the code that the bootloader will load (we write everything on FASM). This is a kind of helloworld. We boot, go to PM and print a greeting. All. What have we done? The bootloader successfully loaded us at 1000h: 0, from where we continued execution. First, we turned on the A20 , prohibited all interrupts, loaded the appropriate value into the GDTR , jumped to the input label. I note that we jumped on T.e. 08h - the code descriptor selector. Get used to it.
format binary

 xor ax,ax

 cli ;реинициализируем сегментные регистры

 mov ss,ax

 xor sp,sp

 sti

 mov ax,3

 int 10h


jmp 1000h:r_start


r_start:


mov ax,1000h;перенастраиваем регистры

 mov ds,ax

 mov es,ax


in al, 0x92;включаем A20

 or al, 2

 out 0x92, al


cli ;запрещаем прерывания

 mov al,8Fh;запрещаем NMI

 out 70h,al

 in al,71h


lgdt fword [GDTR];загружаем регистр GDTR

 mov eax,cr0

 or al,1;устанавливаем 0-вой бит

 mov cr0,eax;включаем PM


jmp fword 08h:Startup32; прыгаем в PM


align 8 ;процессор быстрее обращается с выравненной табличкой

GDT:

 dq 0 ;пустой

 db 0FFh,0FFh,0,0,0,9Ah,0CFh,0 ;код

 db 0FFh,0FFh,0,0,0,92h,0CFh,0;данные

 db 0FFh,0FFh,0,80h,0Bh,92h,40h,0 ;видеосегмент

 label GDT_SIZE at $-GDT

GDTR:

 dw GDT_SIZE-1

 dd GDT+10000h

; нужно записать 32-битный адрес. Сейчас мы находимся в сегменте 1000h, база которого 1000h*10h (по ;физическому адресу) => физический адрес GDTR (метки!) = 10000h (физический адрес базы сегмента)+offset


virtual ;теперь, фактически, забиваем пространство до конца сегмента

 rb 10000h-$;

 end virtual

;;;;;;;;;;;;;;;;;;;;;;;;;;;;;;;;;PM32 Entry;;;;;;;;;;;;;;;;;;;

 use32

 org $+10000h;вот для чего: в PM мы работаем с Flat-сегментами, и если мы оставим код ;для PM перед org’ом, то ;внутрисегментный адрес не будет совпадать с Flat адресом. Так вот.


Startup32: ;точка входа в PM

 mov ax,10h ;здесь пихаем селекторы. Зачастую (! не забываем про порядковый номер в

 mov es,ax ;таблице) селектор сегмент кода - 08h. данных - 10h, видеосегмент - 18h

 mov ds,ax

 mov fs,ax

 mov ss,ax

 mov esp,10000h;стек

 mov ax,18h

 mov gs,ax


mov esi,hi_string ;покажем, что мы удачно перешли

 call print

 jmp $


;ESI - адрес строки

print:

 pushad

 xor ebx,ebx

 mov ah,07h;атрибут

 puts:

 mov al,[esi+ebx]

 mov [gs:(ebx*2)],ax

 inc ebx

 test al,al

 jnz puts

 popad

 ret

hi_string db ‘Welcome to PM, dude’,0
jmp fword 08h:Startup32Now how to launch this miracle. Personally, I use WinImage and VirtualBox. We push the bootloader into the boot sector of the diskette and put the .bin file into the root. We save it in .vfd, prescribe the path to the disk image in the properties of the virtual machine, start it and see the result.
In the next issue we will consider interrupts, faults, traps, aborts and how they work, are caught and debugged. Let's start talking about architecture.
Sources of information.
1) I want to express my gratitude to Phantom_84 aka egos for pointing out the true path and helping me at the very beginning. Without it, it would be much harder for me to figure it out.
2) BrokenSword'a Articles BrokenSword'a Articles. They are worth paying attention to.
3) Intel System Programming Guides