Electronic forms via Microsoft InfoPath
Hi, habravchane!

Business processes and workflow in any organization require the completion of many forms and forms. The task of automating these processes involves, among other things, replacing antediluvian paper forms with electronic counterparts. At the same time, a lot of very different tools and technologies are used: forms based on Excel documents, forms based on Access, web forms of asp.net applications, corporate desktop applications.
As part of the MS Office package, there is a program specifically designed for creating electronic forms - this is Microsoft Office InfoPath.
I will talk about the basics of developing InfoPath forms. The main focus will be on basic things, but in the end, some deeper aspects will be mentioned, such as data connections, programming in InfoPath forms, and integration with Sharepoint.
The fundamental principle of InfoPath forms is the separation of the form template and its data.
In accordance with this division, InfoPath acts in two ways - a designer for developing templates and a client for opening and filling out forms based on templates. Up to InfoPath 2007, this functionality was combined in one application. In Office 2010, the application is divided into two independent components: InfoPath Designer (Form Designer), designed for developing templates, and InfoPath Filler, with which you fill out specific forms based on templates. The examples in this article will be for InfoPath 2007.
Typically, a form template is published in some well-known place from where it can be accessed by users. Users open the template and fill out the form. Further actions may be different: saving the completed form as an .xml file, sending information somewhere.
A form saved as an .xml file can be opened and modified. It is clear that the .xml file must “know” where the corresponding form template is located, because the structure and design of the form are defined in the template. If the template is not available, InfoPath will take it from the cache; if it has changed, it will be possible to download the updated template. To provide the links between a form template and its data, InfoPath has a sophisticated architecture for publishing form templates.
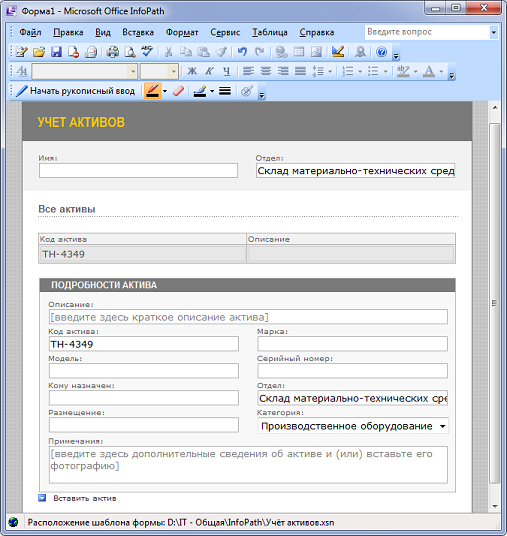
The best way to figure it out is to touch it with your hands. To begin with, you can experiment with ready-made samples of forms that come with the program. Open Microsoft Office InfoPath 2007. If the “Getting Started” window appears, select “Set up a sample” on the left, if it does not appear, then go to the “File” menu, select “Form Template Designer ...” and in the window that opens, again left click “Customize the sample ...”. Take, for example, the sample “Asset Accounting”.

After double-clicking on the sample, InfoPath will open it in design mode. You can edit the form template, delete unnecessary fields, add new ones, etc. The panel with available components (input fields, checkboxes, drop-down lists) is opened by the "Controls" link on the taskbar in the right part of the window.

We will save our template in a convenient place as the file “Asset Accounting.xsn”. Perhaps with this InfoPath will remind you that it would be nice to publish it - but for now we will not do it.

Now you can open the template and fill out the form.
After filling, you can save it. This will already be a file with the extension .xml - a data file based on our template. This way you can fill out many forms based on one template.
As already mentioned, InfoPath has a complex architecture for publishing form templates. The template for the asset accounting form that we saved somewhere on our computer is currently available only to us. I would like to make it available to a wider circle of users.
First, open the form template in design mode (“Designer” item from the file’s context menu).
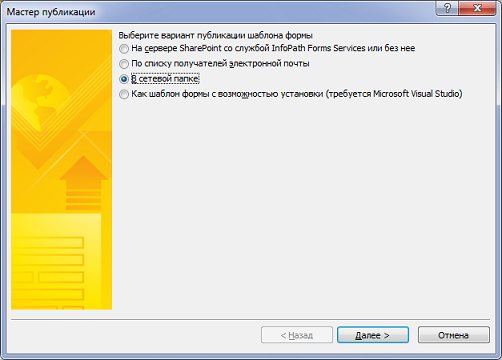
The publishing wizard is launched by the “Publish ...” command from the “File” menu.
InfoPath provides several options for publishing a form. In this case, let's put the template in a shared folder.
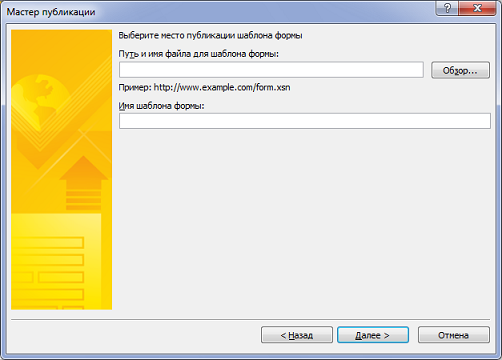
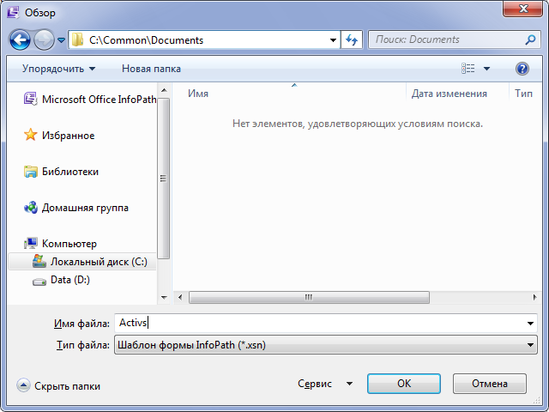
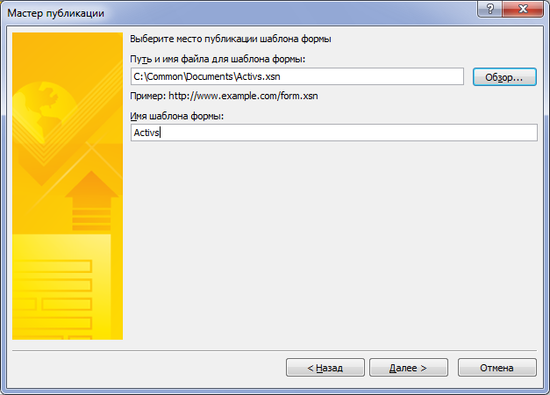
In the next wizard window, you need to specify the publication location. At one time, I tormented myself at this step. Not quite understanding the meaning of the actions taken, I clicked on the “Browse” button and selected the saved template file there. This is not necessary. The "Path and file name for the form template" field must contain the path to the file that does not exist in the place where we want to publish it. Therefore, click "Browse", we reach the shared folder, and in the "File name" field we drive in the name of the future published template, and then click "OK".
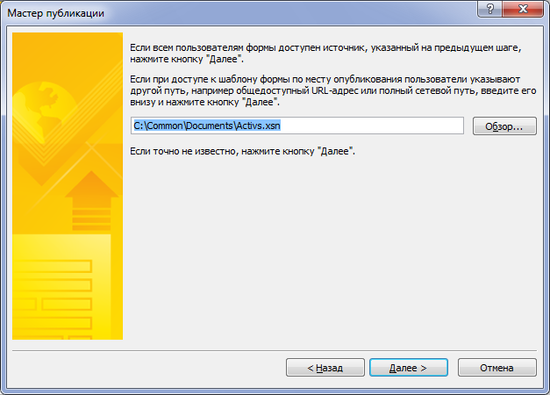
In the next step, you need to enter an alternative way for users to access the published template. After all, the mapping of network resources may differ between the developer and the end user. The network resource visible to end users may be different. And InfoPath requires that access to the published template is done in the same way. Therefore, when publishing, two paths are set: one for the administrator (we have already set it), the other for end users. If the path from the user’s side does not differ, just copy the path that we specified in the previous step into the input field.
After clicking on the “Next” button, we verify the entered data and click “Publish”.
In the final window of the wizard, you can enjoy the message about the successful publication and ask to immediately open the form based on the published template in order to make sure that everything is in order.
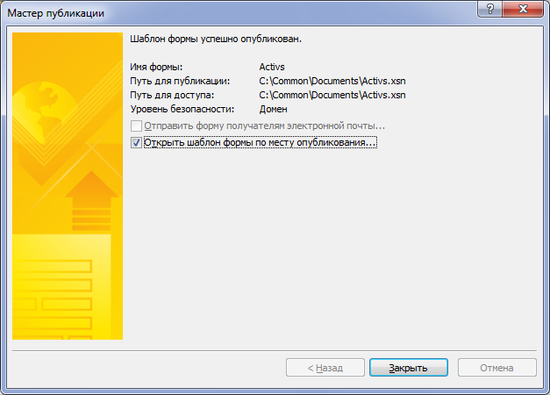
In the final windows of the publication wizard, you will notice the line “Security level: Domain”.
The security level of the form determines what the form is allowed to do, what is the level of trust in it.
This is set when developing a form template on the "Security and Trust" tab of the "Form Settings" dialog box, which is opened by the command of the same name from the "Tools" menu. There are three possible levels of trust: limited, domain level, and full trust.
By default, the “Automatically detect security level” checkbox is selected on the “Security and Trust” tab. From experience, I can say that it is automatically not always correctly determined correctly: a significant part of errors when opening a form based on some template was caused precisely by the fact that the template had a low level of security.
As already mentioned, an InfoPath form can access external data sources. It can be a database (MS Sql or Access), Sharepoint list, web service, .xml file. The most obvious use is filling out drop-down lists based on various directories.
Let me remind you that a form template that accesses external data sources must have a security level - a domain.
In fact, the very structure of an InfoPath form is determined by the data source. Even if you create a form template from scratch, there will still be one in the data sources - the “main” data source. When adding elements to the form, the corresponding nodes will be added to the data source. Any data source in InfoPath is represented by an xml tree, so the structure of the form is essentially some kind of xml tree.
It is possible to create InfoPath forms based on some available data sources - web services, databases, predefined xml schemes. In this case, we will no longer be able to change the data source, which is the basis of the form structure, and we will not be able to add new fields that are not in the data source.
A form can have several representations. A view is a certain “slice” that includes a certain group of fields. It is not necessary to simultaneously display all the fields of its data source on the form. If there are many fields, you can group them according to their meaning and divide them into several representations. In addition, you can create different views for different groups of users who will work with the form as part of a business process. Finally, you can create a separate presentation for printing forms that will have a particularly beautiful design that focuses on this particular task. You can switch between views using the Info menu in the InfoPath client where the form is open, or, for example, programmatically, for example, by clicking on the buttons in the form (in this case, vice versa,
Complex forms may contain program code (the most interesting is managed code in C # or in Visual Basic .Net). Let me remind you that the level of security of such forms should be “Full Confidence”. In the code, for example, you can perform the necessary event processing, complex control of input data (in addition to a simpler validation, which can be configured through the InfoPath constructor interface). It is possible to dynamically change the interface and form elements, add and hide certain input fields, switch between views. You can programmatically connect to data sources that are not provided for in the InfoPath constructor (say, to an Oracle database).
The combination of InfoPath forms and Sharepoint is probably one of the most promising and common applications of InfoPath forms to date. Say, my acquaintance with InfoPath happened recently in the process of studying the development of work processes (Workflows) for Sharepoint. For many years before, InfoPath quietly lived on my computer as part of the MS Office suite, without attracting attention to it.
So what about the integration of InfoPath with Sharepoint?
In this article I tried to review the development of electronic forms using InfoPath, focusing mainly on the Microsoft Office InfoPath 2007 version. Many questions were mentioned only in passing, other aspects remained completely unaffected - primarily because I myself encountered InfoPath- forms relatively recently and the process of studying them is still far from complete. This process could have been much more time-consuming without one book, which served me as the main source of information on the topic - this is the book by Philo Janus “InfoPath 2007 for Professionals”.
Business processes and workflow in any organization require the completion of many forms and forms. The task of automating these processes involves, among other things, replacing antediluvian paper forms with electronic counterparts. At the same time, a lot of very different tools and technologies are used: forms based on Excel documents, forms based on Access, web forms of asp.net applications, corporate desktop applications.
As part of the MS Office package, there is a program specifically designed for creating electronic forms - this is Microsoft Office InfoPath.
I will talk about the basics of developing InfoPath forms. The main focus will be on basic things, but in the end, some deeper aspects will be mentioned, such as data connections, programming in InfoPath forms, and integration with Sharepoint.
Concept
The fundamental principle of InfoPath forms is the separation of the form template and its data.
- A form template is a file with the extension .xsn containing a description of the structure of the form and its design. With a stretch, you can perceive it as an empty form without data.
- Form data is an xml file containing specific information. This is a useful “filling” of the form.
In accordance with this division, InfoPath acts in two ways - a designer for developing templates and a client for opening and filling out forms based on templates. Up to InfoPath 2007, this functionality was combined in one application. In Office 2010, the application is divided into two independent components: InfoPath Designer (Form Designer), designed for developing templates, and InfoPath Filler, with which you fill out specific forms based on templates. The examples in this article will be for InfoPath 2007.
Typically, a form template is published in some well-known place from where it can be accessed by users. Users open the template and fill out the form. Further actions may be different: saving the completed form as an .xml file, sending information somewhere.
A form saved as an .xml file can be opened and modified. It is clear that the .xml file must “know” where the corresponding form template is located, because the structure and design of the form are defined in the template. If the template is not available, InfoPath will take it from the cache; if it has changed, it will be possible to download the updated template. To provide the links between a form template and its data, InfoPath has a sophisticated architecture for publishing form templates.
Simple example
The best way to figure it out is to touch it with your hands. To begin with, you can experiment with ready-made samples of forms that come with the program. Open Microsoft Office InfoPath 2007. If the “Getting Started” window appears, select “Set up a sample” on the left, if it does not appear, then go to the “File” menu, select “Form Template Designer ...” and in the window that opens, again left click “Customize the sample ...”. Take, for example, the sample “Asset Accounting”.
After double-clicking on the sample, InfoPath will open it in design mode. You can edit the form template, delete unnecessary fields, add new ones, etc. The panel with available components (input fields, checkboxes, drop-down lists) is opened by the "Controls" link on the taskbar in the right part of the window.
We will save our template in a convenient place as the file “Asset Accounting.xsn”. Perhaps with this InfoPath will remind you that it would be nice to publish it - but for now we will not do it.
Now you can open the template and fill out the form.
After filling, you can save it. This will already be a file with the extension .xml - a data file based on our template. This way you can fill out many forms based on one template.
Publication
As already mentioned, InfoPath has a complex architecture for publishing form templates. The template for the asset accounting form that we saved somewhere on our computer is currently available only to us. I would like to make it available to a wider circle of users.
First, open the form template in design mode (“Designer” item from the file’s context menu).
The publishing wizard is launched by the “Publish ...” command from the “File” menu.
InfoPath provides several options for publishing a form. In this case, let's put the template in a shared folder.
In the next wizard window, you need to specify the publication location. At one time, I tormented myself at this step. Not quite understanding the meaning of the actions taken, I clicked on the “Browse” button and selected the saved template file there. This is not necessary. The "Path and file name for the form template" field must contain the path to the file that does not exist in the place where we want to publish it. Therefore, click "Browse", we reach the shared folder, and in the "File name" field we drive in the name of the future published template, and then click "OK".
In the next step, you need to enter an alternative way for users to access the published template. After all, the mapping of network resources may differ between the developer and the end user. The network resource visible to end users may be different. And InfoPath requires that access to the published template is done in the same way. Therefore, when publishing, two paths are set: one for the administrator (we have already set it), the other for end users. If the path from the user’s side does not differ, just copy the path that we specified in the previous step into the input field.
After clicking on the “Next” button, we verify the entered data and click “Publish”.
In the final window of the wizard, you can enjoy the message about the successful publication and ask to immediately open the form based on the published template in order to make sure that everything is in order.
Security
In the final windows of the publication wizard, you will notice the line “Security level: Domain”.
The security level of the form determines what the form is allowed to do, what is the level of trust in it.
This is set when developing a form template on the "Security and Trust" tab of the "Form Settings" dialog box, which is opened by the command of the same name from the "Tools" menu. There are three possible levels of trust: limited, domain level, and full trust.
- Forms with limited trust are not very useful, they cannot access external data sources, they cannot even be published in the shared folder, which we did with the template for the asset accounting form. However, limited trust templates can be emailed and recipients will be able to fill out forms based on them. By the way, when sending an InfoPath 2007 form by email, there are two ways to do this. The first is to send the form as an attachment. This can be done regardless of which email clients are used by the recipient and ours. The second option is to send a form in the body of the message. This is possible if both our recipient and the mail client are Microsoft Office Outlook 2007.
- Forms with a domain level of security can access content within the domain, for example, fill out drop-down lists from directories stored in the MS SQL Server database, or from Sharepoint lists.
- Full trust implies that a form can do anything. In particular, if the form has program code (event handlers, etc.), it must have a full level of trust. Templates with a full level of trust must be signed - you can do it here (checkbox “Sign this form template”, buttons for creating and selecting electronic digital signature certificates).
By default, the “Automatically detect security level” checkbox is selected on the “Security and Trust” tab. From experience, I can say that it is automatically not always correctly determined correctly: a significant part of errors when opening a form based on some template was caused precisely by the fact that the template had a low level of security.
A bit about different things
Data sources
As already mentioned, an InfoPath form can access external data sources. It can be a database (MS Sql or Access), Sharepoint list, web service, .xml file. The most obvious use is filling out drop-down lists based on various directories.
Let me remind you that a form template that accesses external data sources must have a security level - a domain.
In fact, the very structure of an InfoPath form is determined by the data source. Even if you create a form template from scratch, there will still be one in the data sources - the “main” data source. When adding elements to the form, the corresponding nodes will be added to the data source. Any data source in InfoPath is represented by an xml tree, so the structure of the form is essentially some kind of xml tree.
It is possible to create InfoPath forms based on some available data sources - web services, databases, predefined xml schemes. In this case, we will no longer be able to change the data source, which is the basis of the form structure, and we will not be able to add new fields that are not in the data source.
Representation
A form can have several representations. A view is a certain “slice” that includes a certain group of fields. It is not necessary to simultaneously display all the fields of its data source on the form. If there are many fields, you can group them according to their meaning and divide them into several representations. In addition, you can create different views for different groups of users who will work with the form as part of a business process. Finally, you can create a separate presentation for printing forms that will have a particularly beautiful design that focuses on this particular task. You can switch between views using the Info menu in the InfoPath client where the form is open, or, for example, programmatically, for example, by clicking on the buttons in the form (in this case, vice versa,
Programming
Complex forms may contain program code (the most interesting is managed code in C # or in Visual Basic .Net). Let me remind you that the level of security of such forms should be “Full Confidence”. In the code, for example, you can perform the necessary event processing, complex control of input data (in addition to a simpler validation, which can be configured through the InfoPath constructor interface). It is possible to dynamically change the interface and form elements, add and hide certain input fields, switch between views. You can programmatically connect to data sources that are not provided for in the InfoPath constructor (say, to an Oracle database).
Sharepoint Integration
The combination of InfoPath forms and Sharepoint is probably one of the most promising and common applications of InfoPath forms to date. Say, my acquaintance with InfoPath happened recently in the process of studying the development of work processes (Workflows) for Sharepoint. For many years before, InfoPath quietly lived on my computer as part of the MS Office suite, without attracting attention to it.
So what about the integration of InfoPath with Sharepoint?
- A form template can be published as a Sharepoint form library. In this case, when publishing on the Sharepoint website, a library of InfoPath forms is created based on this template. Users will be able to fill out forms and add them to the library.
- To continue the previous paragraph, InfoPath Forms Services, available in MOSS 2007 (Microsoft Office Sharepoint Server 2007), allows you to fill out InfoPath forms directly in a browser window. In this case, users do not have to install the InfoPath application - they will be able to fill out and add forms to the form library using only a browser. Unfortunately, InfoPath Forms Services is available only in MOSS, this service is not available in WSS (Windows Sharepoint Services). Another limitation is that by no means all the features of full-fledged InfoPath forms can be used in forms compatible with InfoPath Services: in order for the form to be displayed directly in the browser, some controls (pictures, ActiveX controls, block “Main / Details”, bulleted and numbered lists and others),
- Publishing a template as a form library has one drawback - the inability to reuse it. If we need another library, we will have to publish again. Fortunately, you can publish a form template as a Sharepoint content type and create as many form libraries as you like on it.
- InfoPath forms can be used as Sharepoint workflow forms. On the Windows Workflow Foundation (WF) workflow and Habré has already been written. The Sharepoint platform (both WSS and MOSS) offers a WF-based workflow infrastructure for lists, libraries, and content types. For example, you can create a document approval workflow (yes, the same InfoPath forms!) That will be launched when a document is added to the library. The workflow involves the formation of tasks for users or user groups (in this case, these are tasks that approve the added document for consideration). When developing a workflow, it is necessary to create various forms that need to be filled out at different stages of the workflow life cycle: when associating a workflow with a list, when starting a workflow, when performing assigned tasks. And these forms of the Sharepoint workflow can be either classic asp.net pages or InfoPath forms.
- Finally, it is through InfoPath forms that metadata is entered when downloading and editing documents in document libraries on the Sharepoint website. The figure below shows a Word document that has a dashboard for entering metadata - Author, Title, Subject, and others. This panel is nothing more than an embedded form of InfoPath. If desired, you can customize this form, replace it with your own designed, if something does not suit the one that was automatically generated for this document library.

Afterword
In this article I tried to review the development of electronic forms using InfoPath, focusing mainly on the Microsoft Office InfoPath 2007 version. Many questions were mentioned only in passing, other aspects remained completely unaffected - primarily because I myself encountered InfoPath- forms relatively recently and the process of studying them is still far from complete. This process could have been much more time-consuming without one book, which served me as the main source of information on the topic - this is the book by Philo Janus “InfoPath 2007 for Professionals”.
- Janus, Filo. InfoPath 2007 for professionals: Per. from English - M .: LLC “I. D. Williams ", 2009. - 272 p.: Ill. - Paral. tit. English ISBN 978-5-8459-1484-2 (Russian)